This tutorial teaches you how to integrate Sendbird UIKit for React Native in your mobile application.
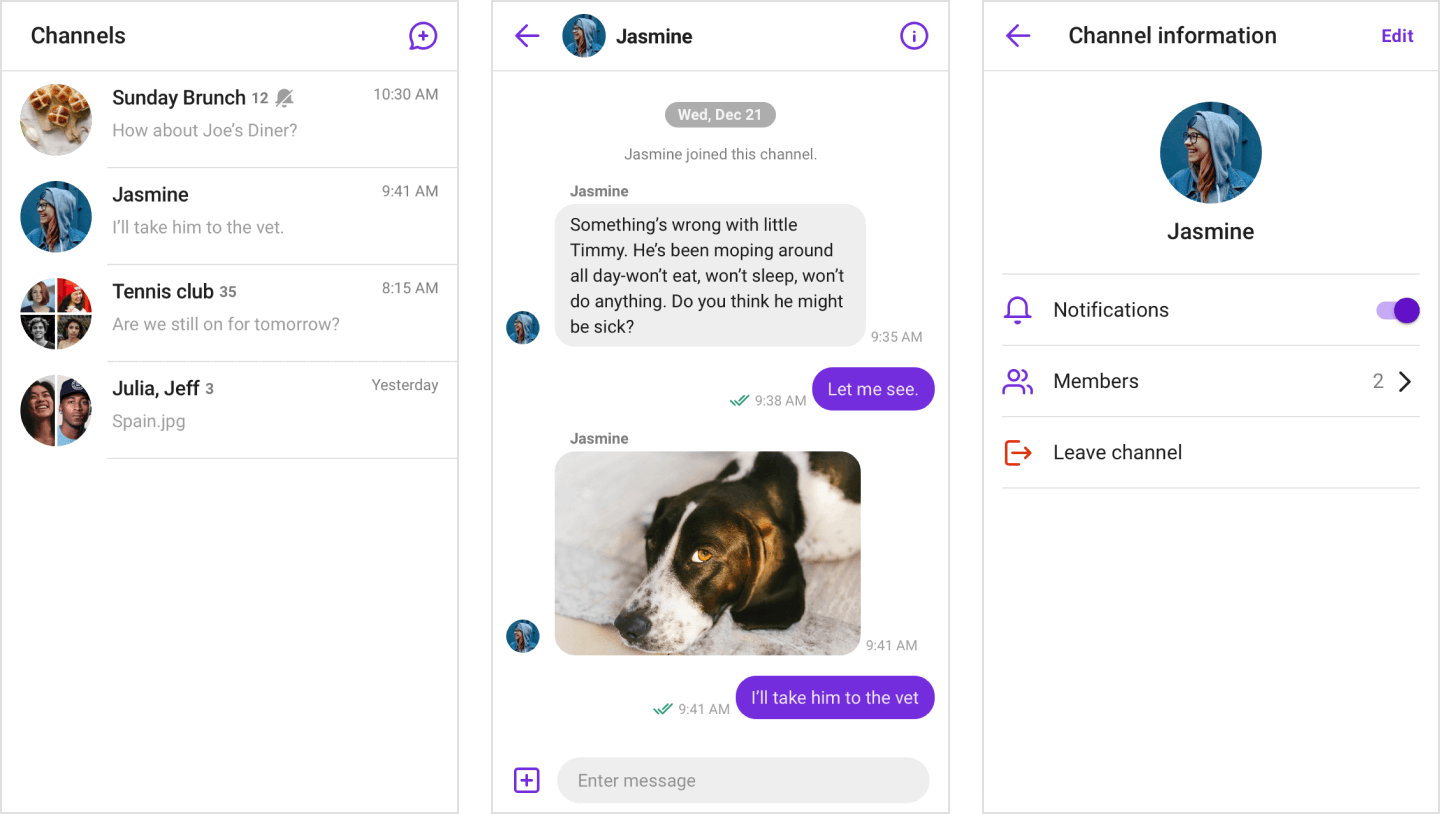
This is what your app will look like when you've finished this tutorial:

What you'll learn
- How to set up a new React Native project
- How to install and configure Sendbird UIKit
- How to implement native modules
- How to create chat screens
- How to send your first message
What you'll need
- A fully configured environment for React Native development. Refer to the React Native environment setup guide to ensure your development environment is properly configured.
- React 17.0.2 or higher
- React-Native 0.65.0 or higher
- Sendbird Chat SDK for Javascript 4.13.3 or higher
Note: As of July 18, 2025, Sendbird UIKit for React Native has been tested and confirmed to be compatible with React Native 0.80.
Before you start, you need the following:
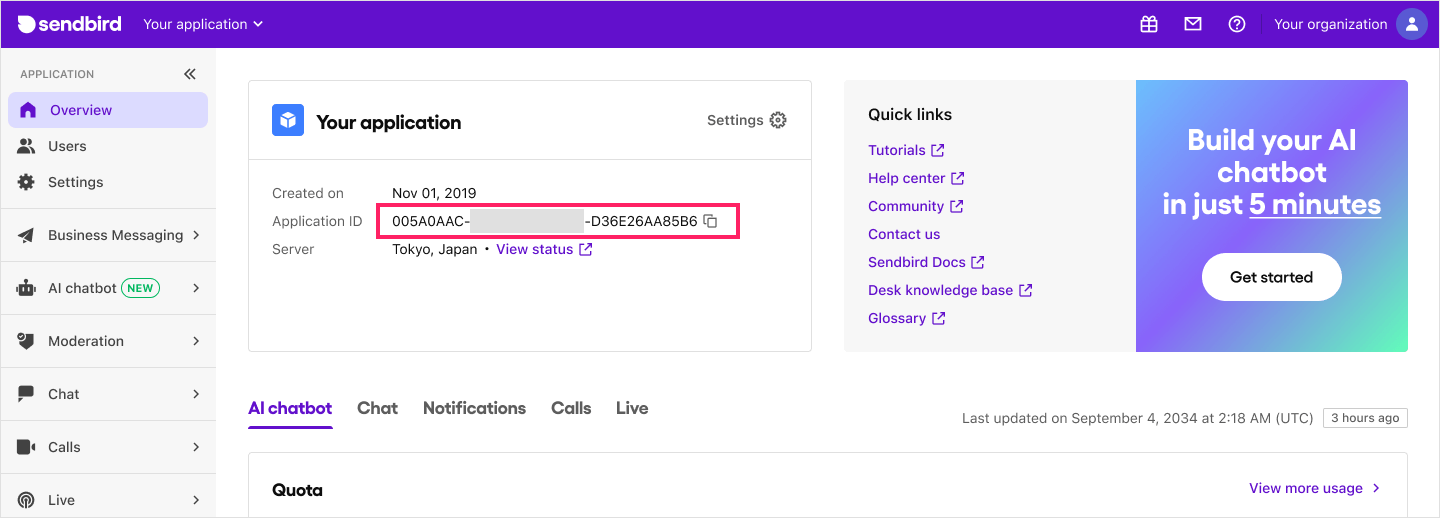
Application ID
- Go to Sendbird Dashboard and create an account or sign in.
- Click Create + to create a new application.
- Enter a name, choose a Product Type and Region, then click Confirm.
- Note down the Application ID - you'll need this later.

User ID
Next, create a user in your Sendbird application:
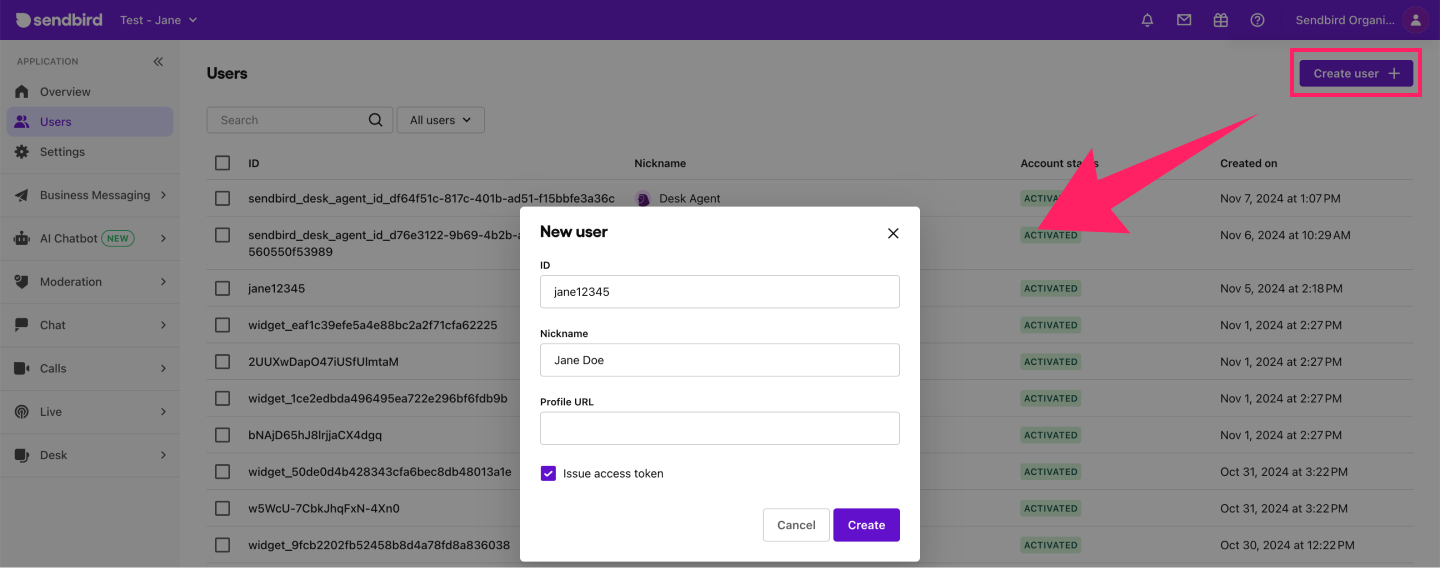
- Go to the Users menu and click Create user+.
- Enter a User ID and Nickname. Check Issue access token for authentication.
- Click Create and copy the user ID for later use.

Let's start by creating a new React Native project. You can use either Expo or React Native CLI to do so.
Expo
npx create-expo-app@latest ChatApp --template blank-typescript
CLI
npx @react-native-community/cli@latest init ChatApp
Install the required packages using your preferred package manager.
Step 1: Install core dependencies
Expo
npx expo install @sendbird/uikit-react-native \
                 @sendbird/chat \
                 date-fns \
                 react-native-safe-area-context \
                 @react-native-community/netinfo \
                 react-native-mmkv
CLI
yarn add @sendbird/uikit-react-native \
         @sendbird/chat \
         date-fns \
         react-native-safe-area-context \
         @react-native-community/netinfo \
         react-native-mmkv
Step 2: Install native modules
Choose the appropriate installation based on your environment:
Expo
npx expo install expo-image-picker \
                 expo-document-picker \
                 expo-media-library \
                 expo-file-system \
                 expo-clipboard \
                 expo-notifications \
                 expo-av \
                 expo-video-thumbnails \
                 expo-image-manipulator

npx expo prebuild
CLI
yarn add react-native-video \
         react-native-permissions \
         react-native-file-access \
         react-native-image-picker \
         react-native-create-thumbnail \
         react-native-audio-recorder-player \
         @react-native-clipboard/clipboard \
         @react-native-camera-roll/camera-roll \
         @react-native-documents/picker \
         @react-native-firebase/app \
         @react-native-firebase/messaging \
         @bam.tech/react-native-image-resizer

npx pod-install
Implement the platform service interfaces that we provide to handle native features like file upload, notifications, and media playback.
Expo
import {
  createExpoClipboardService,
  createExpoFileService,
  createExpoMediaService,
  createExpoNotificationService,
  createExpoPlayerService,
  createExpoRecorderService,
  SendbirdUIKitContainerProps
} from "@sendbird/uikit-react-native";

import * as ExpoClipboard from 'expo-clipboard';
import * as ExpoDocumentPicker from 'expo-document-picker';
import * as ExpoFS from 'expo-file-system';
import * as ExpoImagePicker from 'expo-image-picker';
import * as ExpoMediaLibrary from 'expo-media-library';
import * as ExpoNotifications from 'expo-notifications';
import * as ExpoAV from 'expo-av';
import * as ExpoVideoThumbnail from 'expo-video-thumbnails';
import * as ExpoImageManipulator from 'expo-image-manipulator';

const platformServices: SendbirdUIKitContainerProps['platformServices'] = {
  clipboard: createExpoClipboardService(ExpoClipboard),
  notification: createExpoNotificationService(ExpoNotifications),
  file: createExpoFileService({
    fsModule: ExpoFS,
    imagePickerModule: ExpoImagePicker,
    mediaLibraryModule: ExpoMediaLibrary,
    documentPickerModule: ExpoDocumentPicker,
  }),
  media: createExpoMediaService({
    avModule: ExpoAV,
    thumbnailModule: ExpoVideoThumbnail,
    imageManipulator: ExpoImageManipulator,
    fsModule: ExpoFS,
  }),
  player: createExpoPlayerService({
    avModule: ExpoAV,
  }),
  recorder: createExpoRecorderService({
    avModule: ExpoAV,
  }),
};
CLI
import {
  createNativeClipboardService,
  createNativeFileService,
  createNativeMediaService,
  createNativeNotificationService,
  createNativePlayerService,
  createNativeRecorderService,
  SendbirdUIKitContainerProps
} from "@sendbird/uikit-react-native";

import Clipboard from '@react-native-clipboard/clipboard';
import { CameraRoll } from '@react-native-camera-roll/camera-roll';
import RNFBMessaging from '@react-native-firebase/messaging';
import Video from 'react-native-video';
import * as DocumentPicker from '@react-native-documents/picker';
import * as FileAccess from 'react-native-file-access';
import * as ImagePicker from 'react-native-image-picker';
import * as Permissions from 'react-native-permissions';
import * as CreateThumbnail from 'react-native-create-thumbnail';
import * as ImageResizer from '@bam.tech/react-native-image-resizer';
import * as AudioRecorderPlayer from 'react-native-audio-recorder-player';

export const platformServices: SendbirdUIKitContainerProps['platformServices'] = {
  clipboard: createNativeClipboardService(Clipboard),
  notification: createNativeNotificationService({
    messagingModule: RNFBMessaging,
    permissionModule: Permissions,
  }),
  file: createNativeFileService({
    imagePickerModule: ImagePicker,
    documentPickerModule: DocumentPicker,
    permissionModule: Permissions,
    fsModule: FileAccess,
    mediaLibraryModule: CameraRoll,
  }),
  media: createNativeMediaService({
    VideoComponent: Video,
    thumbnailModule: CreateThumbnail,
    imageResizerModule: ImageResizer,
  }),
  player: createNativePlayerService({
    audioRecorderModule: AudioRecorderPlayer,
    permissionModule: Permissions,
  }),
  recorder: createNativeRecorderService({
    audioRecorderModule: AudioRecorderPlayer,
    permissionModule: Permissions,
  }),
};
Note: Each interface comes with a set of methods and helper functions. Based on the interface, you can create a new class that includes the corresponding methods and implement them in UIKit. Then, you can use the helper functions to set the interface in the individual modules. To do so, pass the module as a parameter in the helper function.
Some of the features provided by Sendbird UIKit include attaching or saving media files and sending file messages. To learn more about using these features, refer to the get native module permission page.
Wrap your app in the SendbirdUIKitContainer component to provide the necessary context for UIKit components.
Note: Make sure to place the SendbirdUIKitContainer component at the top and wrap your app with it, just as shown in the example below.
//App.tsx
import { SendbirdUIKitContainer } from '@sendbird/uikit-react-native';
import { MMKV } from 'react-native-mmkv';

const mmkv = new MMKV();

export default function App() {
  return (
    <SendbirdUIKitContainer
      appId={'APP_ID'}  // Replace with your Sendbird application ID
      chatOptions={{ localCacheStorage: mmkv }}
      platformServices={platformServices}
    >
      {/* Rest of your app */}
    </SendbirdUIKitContainer>
  );
};
Install and configure React Navigation to handle screen transitions.
Expo
npx expo install @react-navigation/native @react-navigation/native-stack react-native-screens react-native-safe-area-context
CLI
yarn add @react-navigation/native @react-navigation/native-stack react-native-screens react-native-safe-area-context

npx pod-install
Implement the core chat screens:
- Channel list screen (
GroupChannelListFragmentis the starting point when the app opens) - Channel creation screen (
GroupChannelCreateFragmentis used to create a new channel) - Chat screen (
GroupChannelFragmentis used to display messages and send new messages)
// App.tsx
import { useNavigation, useRoute } from '@react-navigation/native';
import {
  useSendbirdChat,
  createGroupChannelListFragment,
  createGroupChannelCreateFragment,
  createGroupChannelFragment,
} from '@sendbird/uikit-react-native';
import { useGroupChannel } from '@sendbird/uikit-chat-hooks';

const GroupChannelListFragment = createGroupChannelListFragment();
const GroupChannelCreateFragment = createGroupChannelCreateFragment();
const GroupChannelFragment = createGroupChannelFragment();

const GroupChannelListScreen = () => {
  const navigation = useNavigation<any>();
  return (
    <GroupChannelListFragment
      onPressCreateChannel={(channelType) => {
        // Navigate to GroupChannelCreate function.
        navigation.navigate('GroupChannelCreate', { channelType });
      }}
      onPressChannel={(channel) => {
        // Navigate to GroupChannel function.
        navigation.navigate('GroupChannel', { channelUrl: channel.url });
      }}
    />
  );
};

const GroupChannelCreateScreen = () => {
  const navigation = useNavigation<any>();

  return (
    <GroupChannelCreateFragment
      onCreateChannel={async (channel) => {
        // Navigate to GroupChannel function.
        navigation.replace('GroupChannel', { channelUrl: channel.url });
      }}
      onPressHeaderLeft={() => {
        // Go back to the previous screen.
        navigation.goBack();
      }}
    />
  );
};

const GroupChannelScreen = () => {
  const navigation = useNavigation<any>();
  const { params } = useRoute<any>();

  const { sdk } = useSendbirdChat();
  const { channel } = useGroupChannel(sdk, params.channelUrl);
  if (!channel) return null;

  return (
    <GroupChannelFragment
      channel={channel}
      onChannelDeleted={() => {
        // Navigate to GroupChannelList function.
        navigation.navigate('GroupChannelList');
      }}
      onPressHeaderLeft={() => {
        // Go back to the previous screen.
        navigation.goBack();
      }}
      onPressHeaderRight={() => {
        // Navigate to GroupChannelSettings function.
        navigation.navigate('GroupChannelSettings', { channelUrl: params.channelUrl });
      }}
    />
  );
};
- Create a sign-in screen
- Connect users to Sendbird using the
useConnectionhook.
//App.tsx
import { Pressable, Text, View } from 'react-native';
import { useConnection } from '@sendbird/uikit-react-native';

const SignInScreen = () => {
  const { connect } = useConnection();

  return (
    <View style={{ flex: 1, alignItems: 'center', justifyContent: 'center' }}>
      <Pressable
        style={{
          width: 120,
          height: 30,
          backgroundColor: '#742DDD',
          alignItems: 'center',
          justifyContent: 'center',
        }}
        // TODO: Use the ID of a user you've created on the dashboard.
        // If there isn't one, specify a unique ID so that a new user can be created with the value.
        onPress={() => connect('USER_ID', {accessToken: 'ACCESS_TOKEN'})}
      >
        <Text>{'Sign in'}</Text>
      </Pressable>
    </View>
  );
};
Note: You can find the user's Access token in the Sendbird Dashboard under your Application > Users > your user > Access token. For this tutorial, you are using the user access token as a way of authentication. For actual implementation, itt is highly recommended to refer to this authentication guide to implement a more secure way of authentication.
Now that you've created the screens, you need to register them. Think of it like creating a menu - we're listing all the screens users can visit and how to get there.
The code below:
- Creates a list of all our screens
- Shows the sign-in screen when users aren't logged in
- Shows the chat screens when users are logged in
//App.tsx
import { NavigationContainer } from '@react-navigation/native';
import { createNativeStackNavigator } from '@react-navigation/native-stack';

const RootStack = createNativeStackNavigator();
const Navigation = () => {
  const { currentUser } = useSendbirdChat();

  return (
    <NavigationContainer>
      <RootStack.Navigator screenOptions={{ headerShown: false }}>
        {!currentUser ? (
          <RootStack.Screen name={'SignIn'} component={SignInScreen} />
        ) : (
          <>
            <RootStack.Screen name={'GroupChannelList'} component={GroupChannelListScreen} />
            <RootStack.Screen name={'GroupChannelCreate'} component={GroupChannelCreateScreen} />
            <RootStack.Screen name={'GroupChannel'} component={GroupChannelScreen} />
          </>
        )}
      </RootStack.Navigator>
    </NavigationContainer>
  );
};

export default function App() {
  return (
    <SendbirdUIKitContainer
      appId={'APP_ID'}
      chatOptions={{ localCacheStorage: mmkv }}
      platformServices={platformServices}
    >
      <Navigation />
    </SendbirdUIKitContainer>
  );
};
Now let's test the chat interface by sending a message:
- Run your application:
React Native CLI
npx react-native run-ios # or run-android
Expo
npx expo run:ios # or run:android
- Sign in using your user credentials
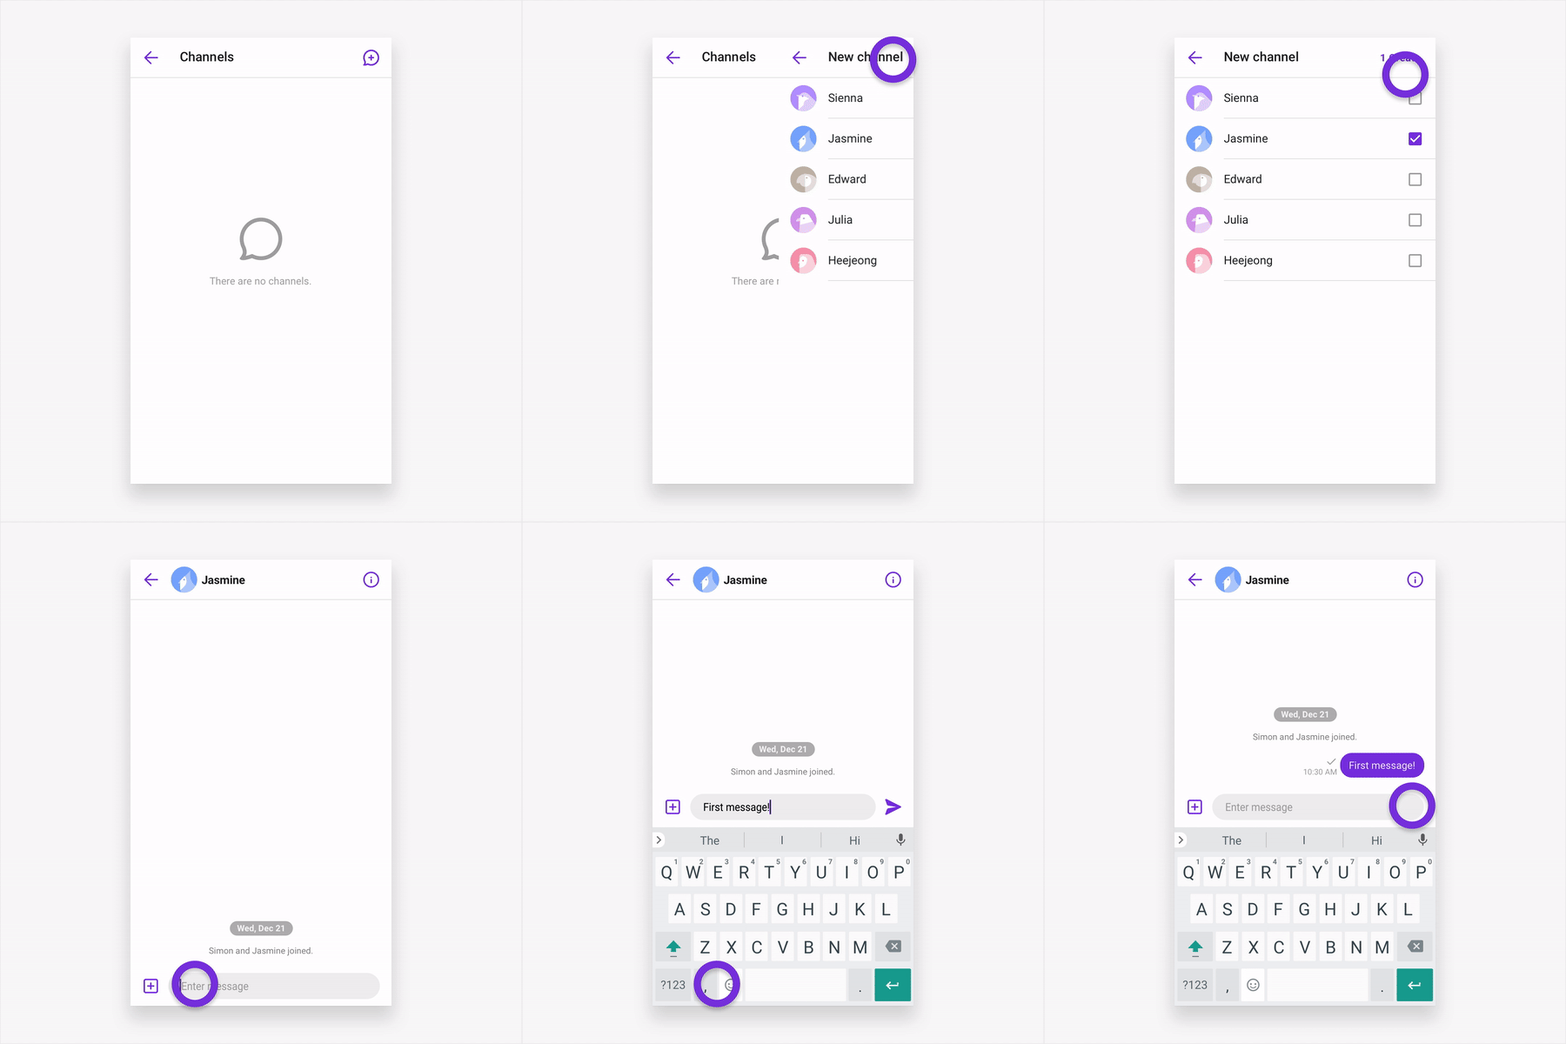
- Create a group channel:
- Tap the create channel icon
- Select users to invite
- Tap create
- Send a message:
- Type your message
- Tap send

You've successfully:
- Created a React Native project with Sendbird UIKit
- Implemented a complete chat interface
- Sent your first message
- Explore the list of provided group channel screens and open channel screens with Sendbird UIKit.
- Learn about customizing Sendbird UIKit components
- For a variety of additional code samples, check out our sample app.