On This Page

How to customize in-app chat on iOS with the Sendbird UIKit

Jason Allshorn 1
Jason Allshorn
Solutions Engineer
  • Tutorial Type: Advanced
  • Reading Time: 15 mins
  • Building Time: N/A
U Ikit developer sidebar offer
No-code feature configuration for chat apps built with UIKit
On This Page

Introduction

This tutorial will show you how to customize the iOS Sendbird UIKit for chat. We will customize two components:

  • The channel list view
  • The message list view

Before we start, you will need to install the Sendbird UIKit. To do so, follow the instructions in the Sendbird docs.

Now that you are ready, let’s dive right into it.

How to customize the Chat Channel List

To change the aspect of the Channel List, we need to update the SBUChannelListViewController. The gist below contains the code to customize:

First, let’s:

  • Initialize the UIKit Channel List View Controller
  • And override its functions and properties

This is the same process to customize any component of the Sendbird Chat UIKit for iOS.

Below is a basic pattern to initialize a custom UIKit Channel List View Class. The IBAction openChat is a button in the view controller that displays the UIKit channel list.

1 import UIKit
2 import SendBirdUIKit
3
4 class ChannelListVC: SBUChannelListViewController {}
5
6 class ViewController: UIViewController {
7
8 @IBAction func openChat(_ sender: UIButton) {
9
10 let channelListVC = ChannelListVC()
11 let naviVC = UINavigationController(rootViewController: channelListVC)
12 naviVC.modalPresentationStyle = .fullScreen
13 present(naviVC, animated: true)
14 }
15 }

Now, let’s change the look of the:

  1. leftBarButton
  2. titleView
  3. rightBarButton
  4. channelCell
  5. Custom channel list query
A before and after comparison of the chat channel list customization
Figure 1: A before and after comparison of the chat channel list customization

Customizing the leftBarButton

To customize the leftBarButton use this code:

import UIKit
import SendBirdUIKit
class ChannelListVC: SBUChannelListViewController {
override init() {
super.init()
self.leftBarButton = self.createHighlightedBackButton()
}
func createHighlightedBackButton() -> UIBarButtonItem {
return UIBarButtonItem(title: "back", style: .plain, target: self, action:
#selector(onClickBack))
}
@objc func onClickBack() {
self.navigationController?.popViewController(animated: true)
self.dismiss(animated: true, completion: nil)
}
}

Customizing the titleView

To customize the titleView, use this code:

import UIKit
import SendBirdUIKit
class ChannelListVC: SBUChannelListViewController {
override init() {
super.init()
self.titleView = self.createCustomTitleLabel()
}
func createCustomTitleLabel() -> UILabel {
let titleLabel = UILabel()
titleLabel.text = "Your Chat List"
return titleLabel
}
}

Customizing the channelListVC.rightBarButton

To customize the channelListVC.rightBarButton use this code:

override init() {
super.init()
self.rightBarButton?.isEnabled = false
}
view raw Init.swift hosted with ❤ by GitHub

Customizing the channelListVC.register(channelCell: CustomChannelListCell())

To customize the channelListVC.register(channelCell: CustomChannelListCell()), use this code:

override init() {
#if swift(>=5.2)
self.register(channelCell: CustomChannelListCell())
#else
self.register(channelCell: CustomChannelListCell( style: .default,
reuseIdentifier: CustomChannelListCell.sbu_className)
)
#endif
}
view raw init.swift hosted with ❤ by GitHub

For the CustomChannelListCell class, the code focuses on the programmatic rendering of cell views. Here is a working example of the code:

//
// CustomChannelListCell.swift
// SendBirdUIKit-Sample
//
// Copyright © 2020 SendBird, Inc. All rights reserved.
//
import UIKit
import SendBirdUIKit
class CustomChannelListCell: SBUBaseChannelCell {
// MARK: - Properties
@SBUAutoLayout var coverImage = UIImageView()
@SBUAutoLayout var separatorLine = UIView()
@SBUAutoLayout var titleLabel = UILabel()
@SBUAutoLayout var memberLabel = UILabel()
@SBUAutoLayout var titleStackView: UIStackView = {
let titleStackView = UIStackView()
titleStackView.alignment = .center
titleStackView.spacing = 4.0
titleStackView.axis = .horizontal
return titleStackView
}()
let kCoverImageSize: CGFloat = 40
// MARK: -
override func setupViews() {
super.setupViews()
self.coverImage.clipsToBounds = true
self.coverImage.frame = CGRect(x: 0, y: 0, width: kCoverImageSize, height: kCoverImageSize)
self.contentView.addSubview(self.coverImage)
self.titleStackView.addArrangedSubview(self.titleLabel)
// Not yet available
self.titleStackView.addArrangedSubview(self.memberLabel)
self.contentView.addSubview(self.titleStackView)
self.contentView.addSubview(self.separatorLine)
self.titleLabel.font = SBUTheme.channelCellTheme.titleFont
self.titleLabel.textColor = SBUTheme.channelCellTheme.titleTextColor
self.separatorLine.backgroundColor = SBUTheme.channelCellTheme.separatorLineColor
self.memberLabel.textColor = .gray
}
override func setupAutolayout() {
super.setupAutolayout()
NSLayoutConstraint.activate([
self.coverImage.topAnchor.constraint(
equalTo: self.contentView.topAnchor,
constant: 10
),
self.coverImage.bottomAnchor.constraint(
equalTo: self.contentView.bottomAnchor,
constant: -10
),
self.coverImage.leadingAnchor.constraint(
equalTo: self.contentView.leadingAnchor,
constant: 16
),
self.coverImage.widthAnchor.constraint(equalToConstant: kCoverImageSize),
self.coverImage.heightAnchor.constraint(equalToConstant: kCoverImageSize),
])
NSLayoutConstraint.activate([
self.titleStackView.topAnchor.constraint(
equalTo: self.contentView.topAnchor,
constant: 10
),
self.titleStackView.bottomAnchor.constraint(
equalTo: self.contentView.bottomAnchor,
constant: -10
),
self.titleStackView.leadingAnchor.constraint(
equalTo: self.coverImage.trailingAnchor,
constant: 16
),
self.titleStackView.rightAnchor.constraint(
equalTo: self.contentView.rightAnchor,
constant: -16),
])
self.titleLabel.setContentCompressionResistancePriority(.defaultLow, for: .horizontal)
self.memberLabel.setContentCompressionResistancePriority(.defaultLow, for: .horizontal)
NSLayoutConstraint.activate([
// From bottom of cell
self.separatorLine.topAnchor.constraint(
equalTo: self.coverImage.bottomAnchor,
constant: -0.5
),
// From left side
self.separatorLine.leadingAnchor.constraint(
equalTo: self.titleStackView.leadingAnchor,
constant: 0
),
// From right side
self.separatorLine.trailingAnchor.constraint(
equalTo: self.contentView.trailingAnchor,
constant: -16
),
//Line Width
self.separatorLine.heightAnchor.constraint(equalToConstant: 10.0)
])
}
override func configure(channel: SBDBaseChannel) {
super.configure(channel: channel)
self.titleLabel.text = channel.name.count > 0 ? channel.name : "Empty channel"
let ch = channel as! SBDGroupChannel
if let message = ch.lastMessage?.message {
self.memberLabel.text = "'\(message)'"
}
self.coverImage.image = UIImage(named: "kitten")
self.coverImage.layer.cornerRadius = kCoverImageSize/2
self.coverImage.layer.masksToBounds = true
}
}

Customizing the channel list query

  • When creating the channel list view, include your custom query during initialization, and pass it into the super.init() method.
  • The custom channel list query leverages the Sendbird core SDK’s channel list query. The Sendbird core SDK is part of the Sendbird UIKit library.

class ChannelListVC: SBUChannelListViewController {
override init(channelListQuery: SBDGroupChannelListQuery? = nil) {
super.init(channelListQuery: channelListQuery)
}
}
class ViewController: UIViewController {
@IBAction func openChat(_ sender: UIButton) {
let listQuery = SBDGroupChannel.createMyGroupChannelListQuery()
listQuery?.includeEmptyChannel = true
listQuery?.includeFrozenChannel = true
// ... You can set more query options
let channelListVC = ChannelListVC(channelListQuery: listQuery)
let naviVC = UINavigationController(rootViewController: channelListVC)
naviVC.modalPresentationStyle = .fullScreen
present(naviVC, animated: true)
}
}

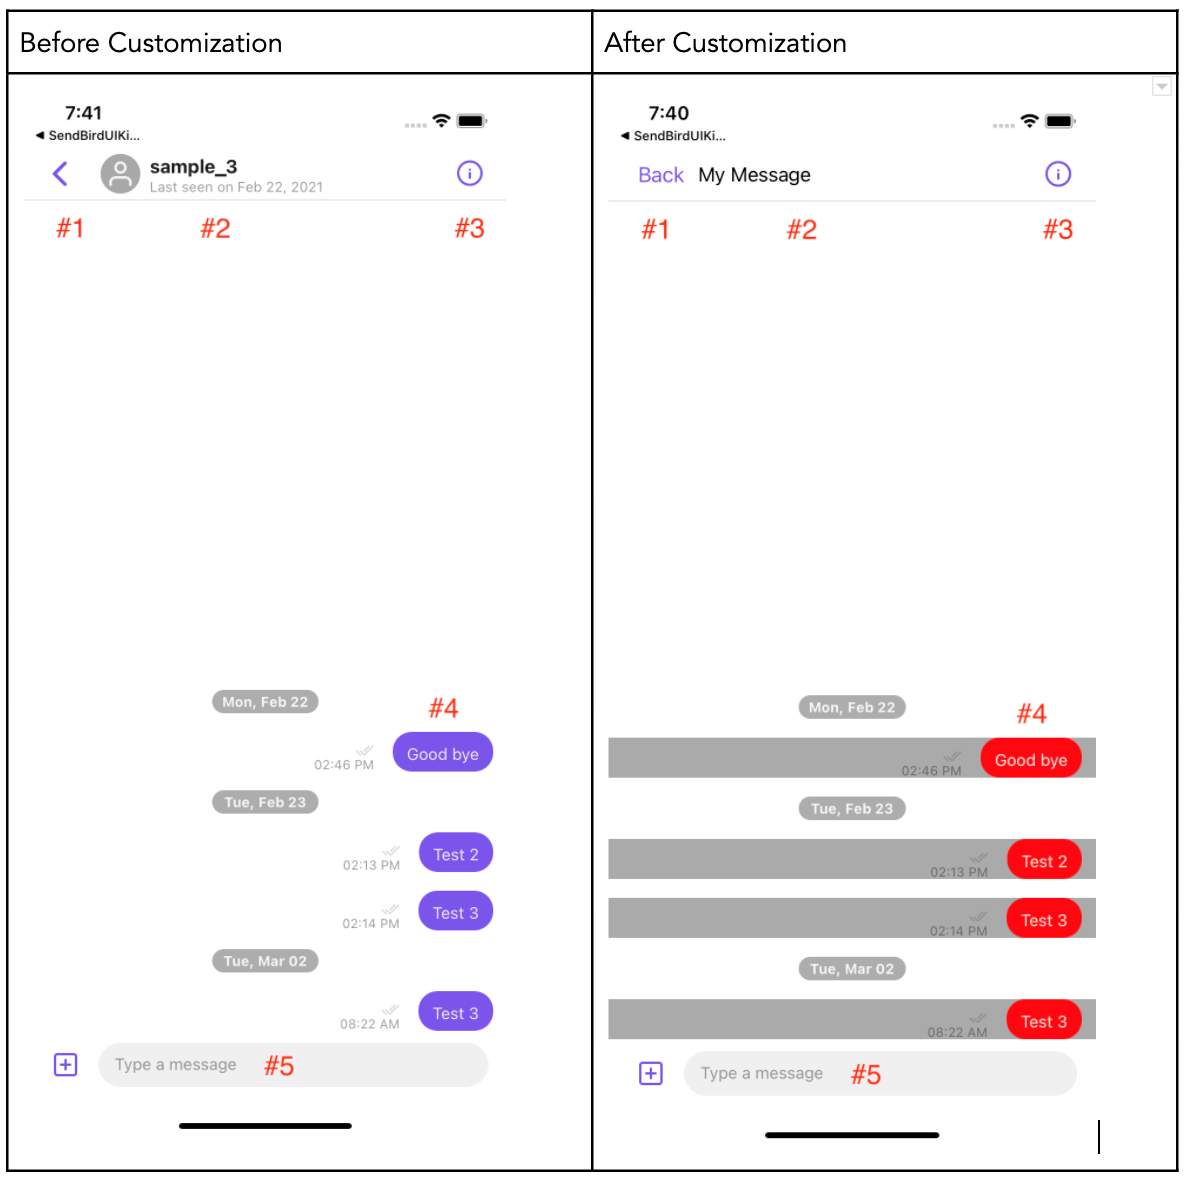
How to customize the channel message list

This viewController shows all the messages in a particular channel. In this example, we will change the:

  1. leftBarButton
  2. titleView
  3. rightBarButton
  4. register(channelCell: CustomUserMessageCell())
  5. Customize message send
Before and after comparison of channel message list customization
Figure 2. A before and after comparison of channel message list customization

You will need to initialize your channelViewController with either a channel URL or a channel object to customize a single channel. The code below demonstrates overriding the SBUChannelListViewController’s didSelectRowAt delegate. The override allows you to listen to the channel selected within the channelListViewController then display the channelViewController.

import UIKit
import SendBirdUIKit
class MessageList: SBUChannelViewController {
init(channelUrl: String){
super.init(channelUrl: channelUrl)
}
}
class ChannelListVC: SBUChannelListViewController {
override func tableView(_ tableView: UITableView, didSelectRowAt indexPath: IndexPath) {
let channel = self.channelList[indexPath.row].channelUrl
let channelVC = MessageList(channelUrl: channel)
let naviVC = UINavigationController(rootViewController: channelVC)
naviVC.modalPresentationStyle = .fullScreen
self.present(naviVC, animated: true)
}
}
class ViewController: UIViewController, UITableViewDelegate {
@IBAction func openChannelList(_ sender: UIButton) {
let channelListVC = ChannelListVC()
let naviVC = UINavigationController(rootViewController: channelListVC)
naviVC.modalPresentationStyle = .fullScreen
self.present(naviVC, animated: true)
}
}

Customizing the leftBarButton

To customize the leftBarButton use this code:

class MessageList: SBUChannelViewController {
init(channelUrl: String){
super.init(channelUrl: channelUrl)
self.leftBarButton = createHighlightedBackButton()
}
func createHighlightedBackButton() -> UIBarButtonItem {
let backButton = UIButton(type: .custom)
backButton.frame = .init(x: 0, y: 0, width: 50, height: 45)
backButton.setTitle("Back", for: .normal)
backButton.setTitleColor(SBUColorSet.primary300, for: .normal)
backButton.addTarget(self, action: #selector(clickedBack), for: .touchUpInside)
let backBarButton = UIBarButtonItem(customView: backButton)
return backBarButton
}
@objc func clickedBack() {
self.navigationController?.popViewController(animated: true)
self.dismiss(animated: true, completion: nil)
}
}

Customizing the titleView

To customize the titleView, use this code:

class MessageList: SBUChannelViewController {
init(channelUrl: String){
super.init(channelUrl: channelUrl)
let myView = UILabel()
myView.text = "My Message"
self.titleView = myView
}
}

Customizing the rightBarButton

To customize the rightBarButton use this code:

class MessageList: SBUChannelViewController {
init(channelUrl: String){
super.init(channelUrl: channelUrl)
self.rightBarButton? = UIBarButtonItem(title: "test", style: .done, target: self, action: #selector(addTapped))
}
@objc func addTapped () {
print("tapped")
}
}

Customizing the register(channelCell:CustomUserMessageCell())

To customize the register(channelCell:CustomUserMessageCell()) use this code:

class CustomUserMessageCell: SBUUserMessageCell {
override func setupStyles() {
super.setupStyles()
self.messageTextView.backgroundColor = .red
self.messageContentView.backgroundColor = .lightGray
}
}
class MessageList: SBUChannelViewController {
init(channelUrl: String){
super.init(channelUrl: channelUrl)
self.register(userMessageCell: CustomUserMessageCell())
}
}

Customizing message send

To customize message send, use this code:

override func messageInputView(_ messageInputView: SBUMessageInputView, didSelectSend text: String) {
guard text.count > 0 else { return }
guard let messageParams = SBDUserMessageParams(message: text) else {
return
}
messageParams.customType = "EXAMPLE 1"
self.sendUserMessage(messageParams: messageParams)
print("Working")
}

Color set

By default, Sendbird provides a beautiful user interface with light or dark themes. To further customize and specify the exact colors to be used with both light and dark themes, you can use our UIKit color set guide. This document will help you set harmonious colors and contrast levels between the backgrounds and chat UI components.

Conclusion

This tutorial walked you through the steps to customize two components of the iOS Sendbird UIKit for Chat. For additional UI modifications, check the docs for the complete list of customizable themes and how to change common resources such as Strings, Icons, and other Styles.

You are on your way to creating a beautiful and personalized chat experience! Keep it going and happy chat building! 🙂

U Ikit Mobile content offer background

Build in-app messaging with developer-friendly SDKs, APIs, and UIKits.

Need more resources?