How to build an AI chatbot (no code + video tutorial)


If you’ve been wondering how to create your own AI chatbot, but you’re not sure where to start, you’re in the right place! By the end of this blog, you will have learned how to make a chatbot in 6 easy steps. Read on to learn how to create a chatbot for free with Sendbird's user-friendly, no-code platform. Watch the video below if you prefer to see an AI chatbot video tutorial, or skip directly to building your AI chatbot!
How to build a chatbot in 6 easy steps
Step 1: Signup for a Sendbird account
Step 2: Fill out basic information
Step 5: Test your AI chatbot
Step 6: Publish your chatbot widget
If you want to start building your AI chatbot right away (you can get a custom AI chatbot up and running in 5 minutes!), please share a few quick details to help us set up your account.

8 major support hassles solved with AI agents
Why should you build an AI chatbot? Top 5 reasons

Cost savings: Automating routine tasks, such as low-level data collection, appointment booking, answering FAQs, and handling common customer service queries, reduces the need for manual labor. An AI chatbot can lower operational expenses across industries like healthcare, finance, and logistics.
Increased sales: In industries such as retail or ecommerce, an AI chatbot can guide customers every step of the way during their sales journey. An AI chatbot also offers personalized product recommendations and helps convert more browsers into buyers.
Lead qualification: In industries such as real estate, insurance, and education, an advanced AI chatbot can interact with potential customers, qualify leads based on pre-defined criteria, and guide users through decision-making processes, improving lead qualification rates.
Enhanced efficiency: An AI chatbot can streamline workflows such as appointment scheduling, order processing, and inventory management, helping businesses save time and operate more effectively.
Employee productivity: By taking over repetitive tasks, chatbots allow employees to focus on higher-value work, such as strategic planning, innovation, and customer engagement, boosting overall productivity across various business functions.
We have seen that chatbots are critical. Before you start building, however, ensure you have clarity on your AI chatbot’s purpose, scope, audience, and sample use cases. For example, if you are building a chatbot for customer service for customers of an ecommerce brand, the AI chatbot might handle common inquiries, provide order updates, or process straightforward refunds.
Also, think about limitations; which questions can the chatbot not answer? For example, ecommerce chatbot use cases typically include personalized product recommendations, real-time order tracking, and processing returns. Even the best ecommerce chatbots may struggle with interpreting complex legal concepts. It may be best to escalate complex issues to human agents and implement a chatbot to human handoff.
How to build your own chatbot in 6 easy steps
This step-by-step tutorial will walk you through building a custom AI tool using Sendbird's agent builder.

Reinvent CX with AI agents
Step 1: Sign up for a Sendbird account
First, contact our sales team to setup an account.
After you’ve created an account, follow the simple onboarding steps.
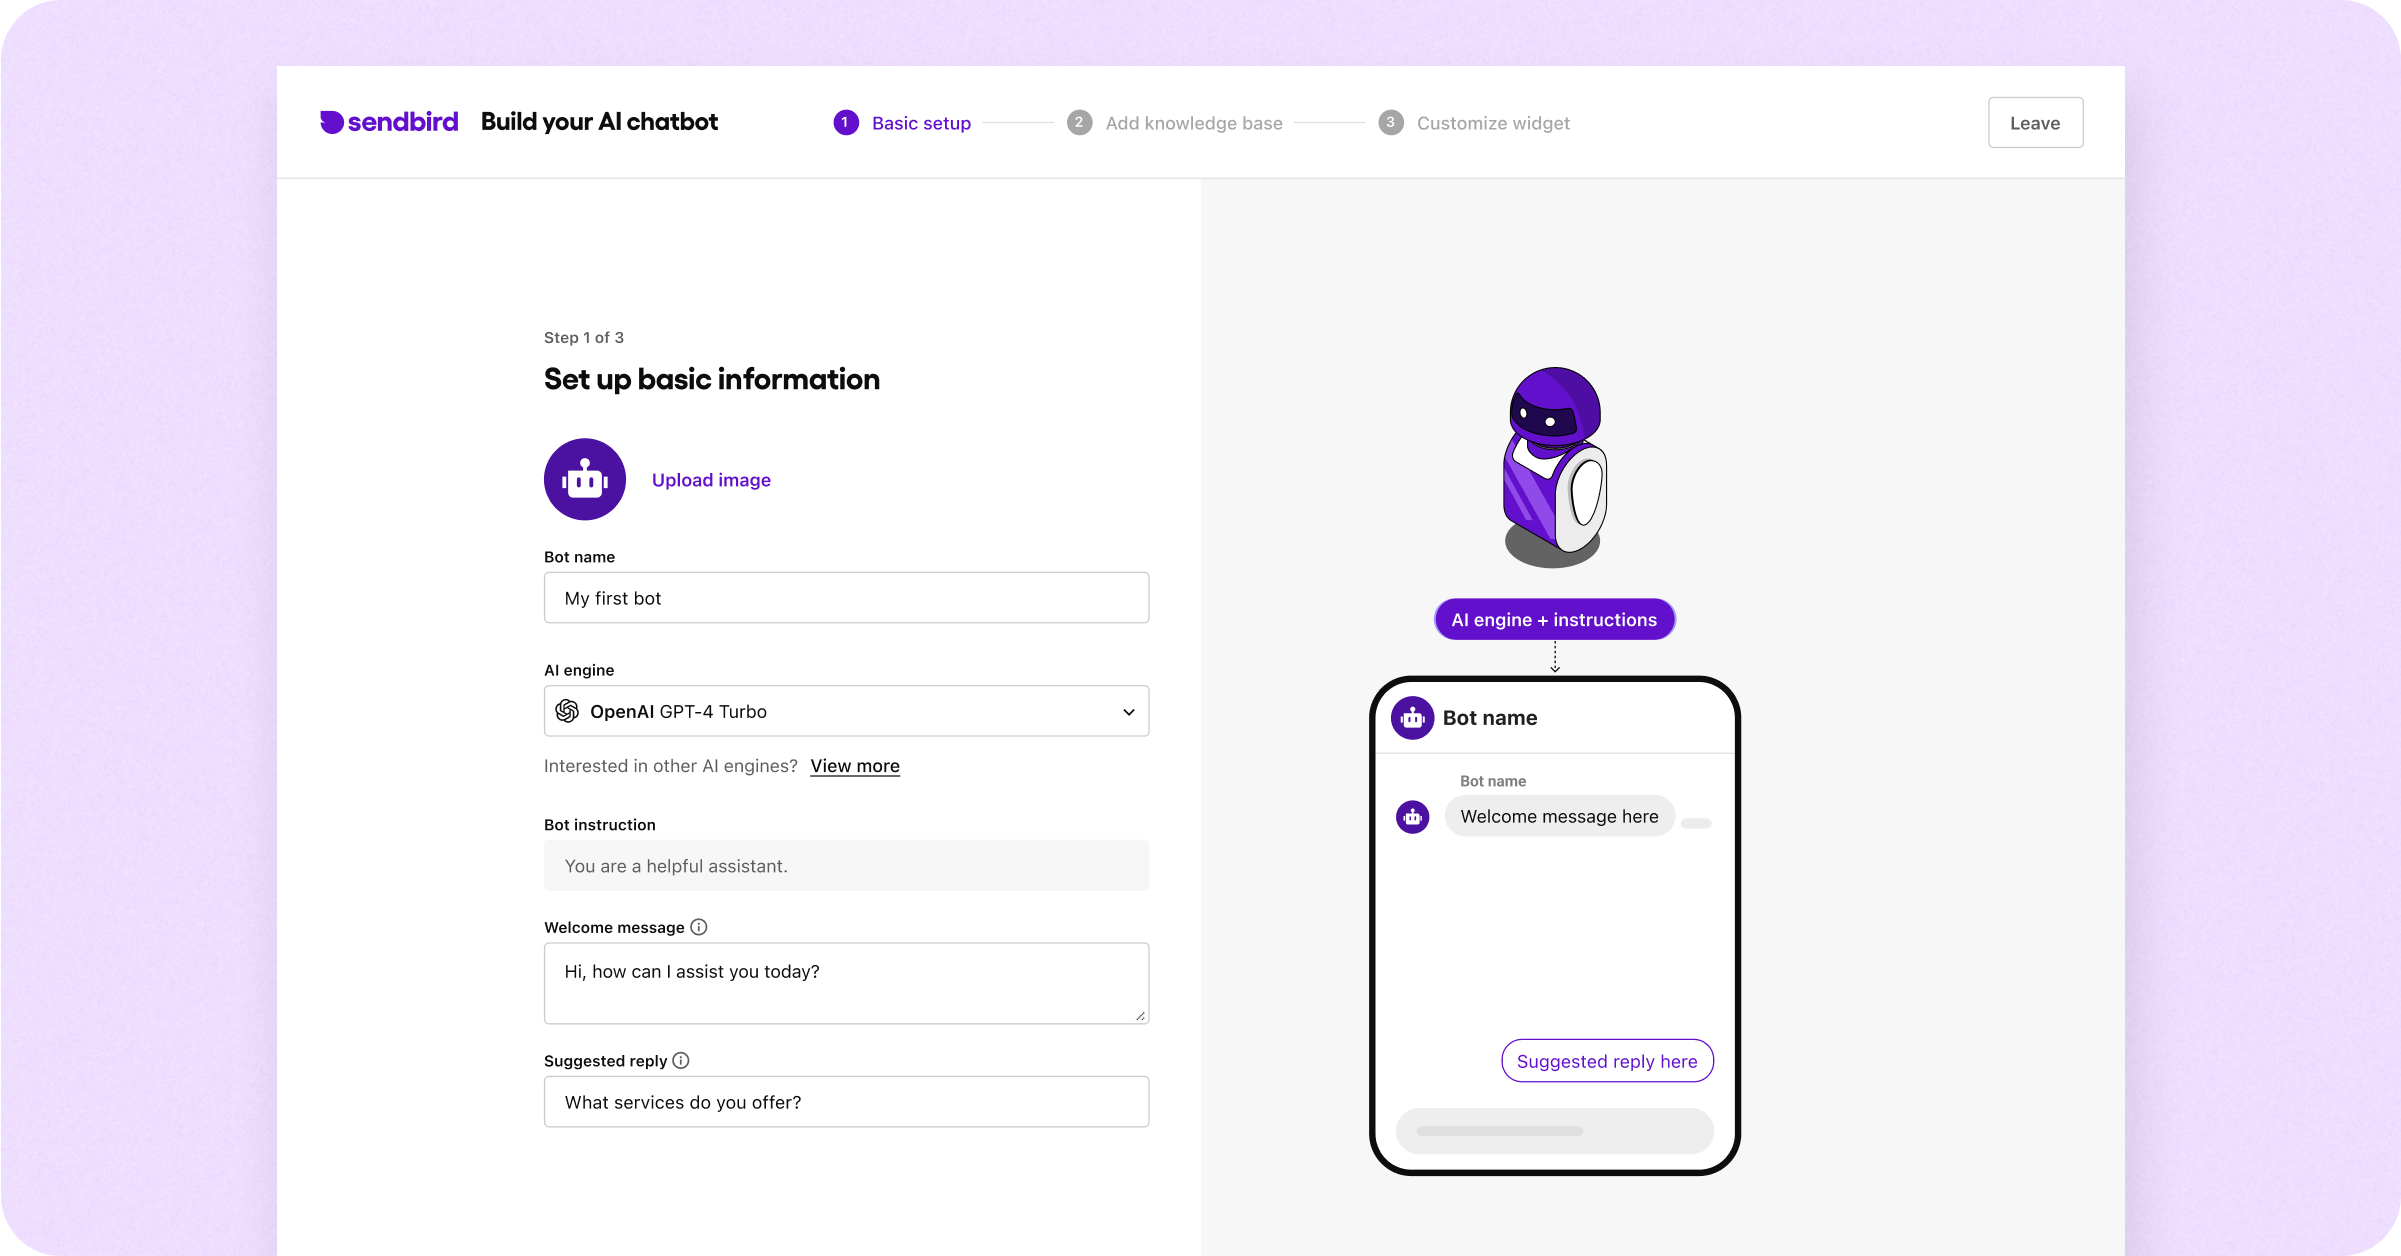
Step 2: Fill out basic information
Provide some essential, basic details about your chatbot. As your needs evolve, you can easily change these settings in the Bot Studio in the Sendbird Dashboard.
For the ‘AI engine’ field, choose OpenAI’s GPT-4o or Anthropic’s Claude 3.5 Sonnet. Consider upgrading to a subscription plan if you prefer a different engine, such as Llama-3 or Solar.
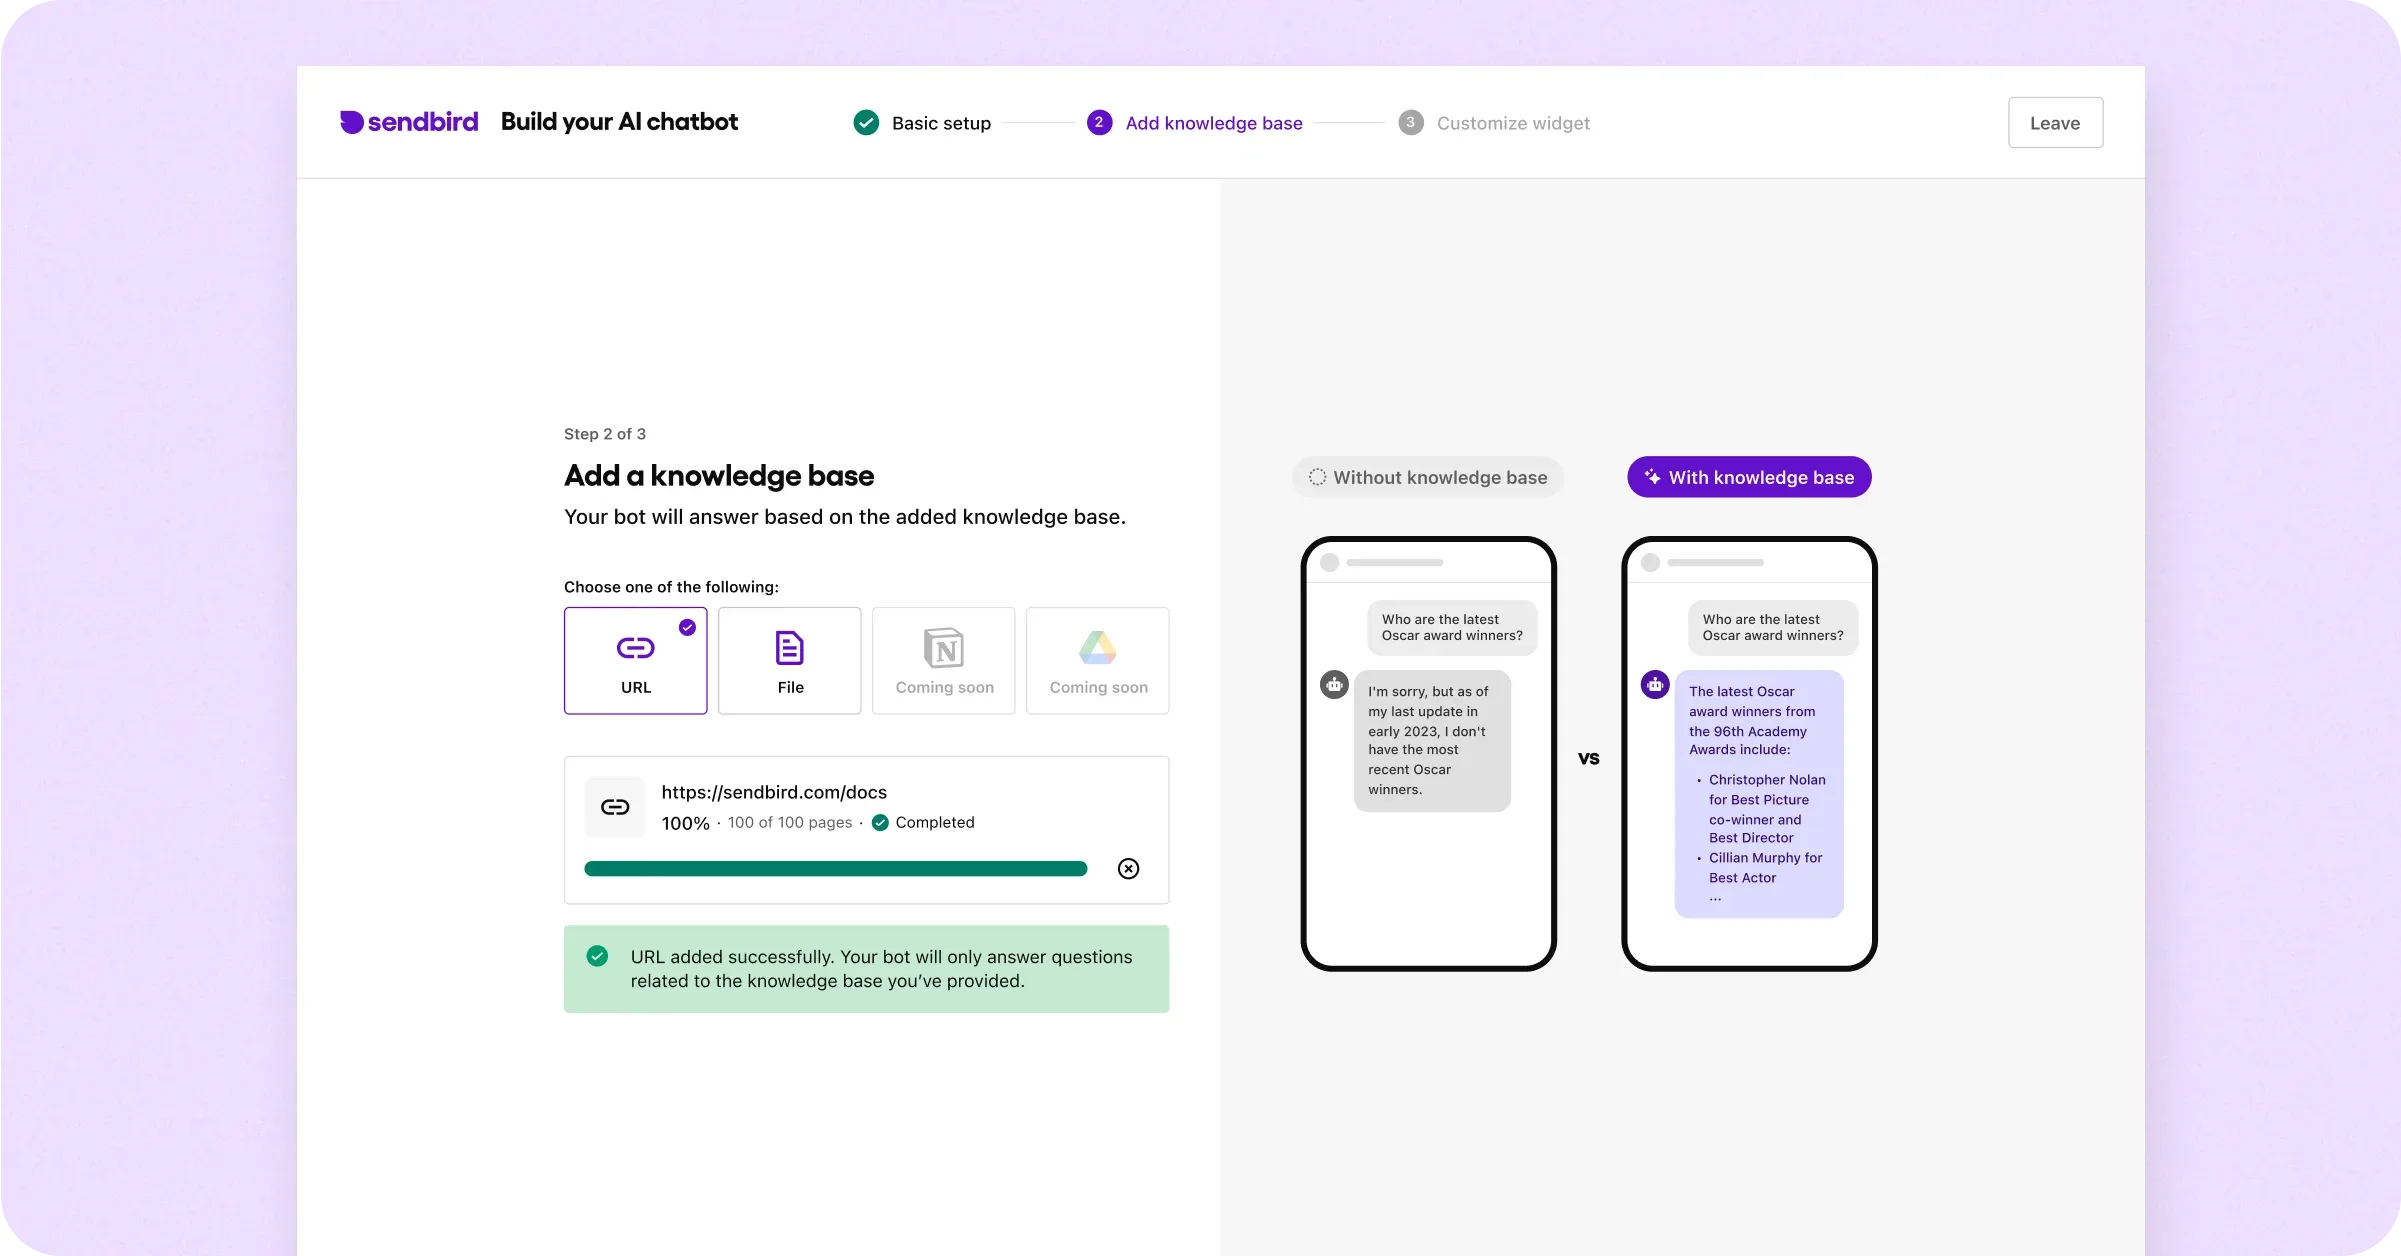
Step 3: Connect a knowledge base to your bot
A chatbot knowledge base is a centralized repository of information that a chatbot uses to provide accurate and relevant responses to user queries. It may contain your proprietary data, FAQs, guidelines, and other resources that the chatbot can reference during interactions. This database enables the chatbot to deliver consistent and reliable information efficiently.
For the purposes of building this sample chatbot, we’ve provided a sample Wikipedia page about the 96th Academy Awards. In this field, we highly recommend that you paste the URL of your own website if you have one. If you don’t have anything to add at the moment, go ahead and add the sample site to test and see how the bot responds with the knowledge base. Scanning the URL can take a few minutes to complete.
Remember that you can make adjustments to the bot’s knowledge base later!
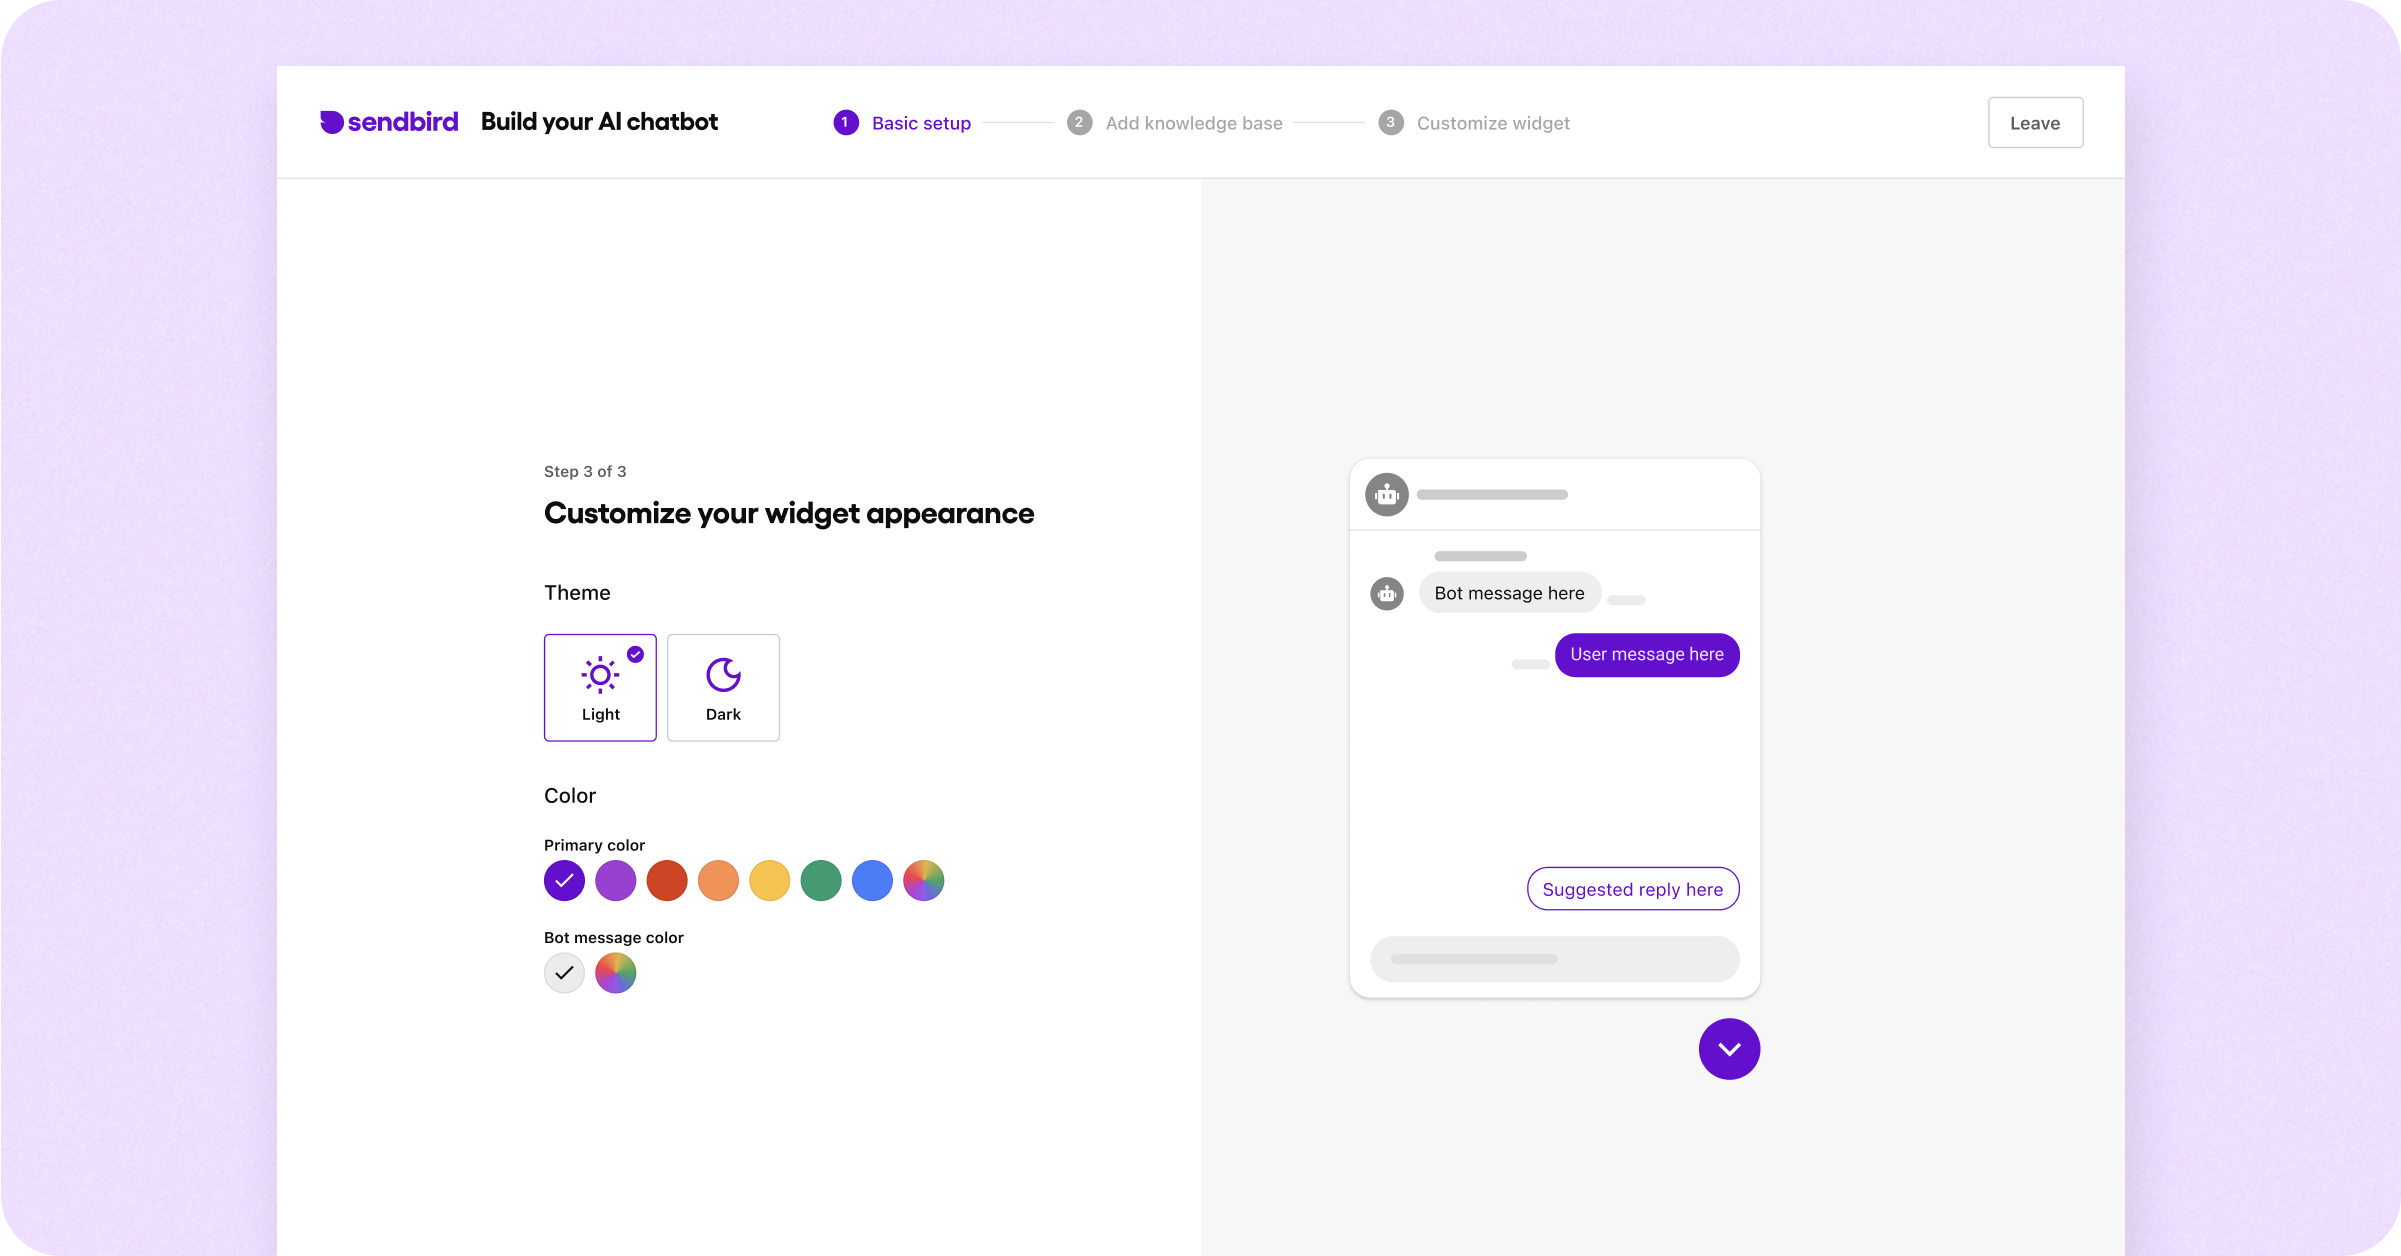
Step 4: Customize your chatbot’s appearance (Basic chatbot customization)
Sendbird provides chatbot customization options to help you build an AI chatbot that integrates with your customer touchpoints and complements your brand’s online presence. Customize themes, widget colors, and message bubble hues until they align with your company’s brand identity. Changes you make here will update instantly, allowing easy live previewing so you can get your adjustments just right. Remember that you can make adjustments to the bot’s appearance later.
Once you are satisfied with your chatbot’s appearance, click Complete & Preview. This will finalize the chatbot customization for use on your website or app.
Congratulations, you’ve created your first AI chatbot! 🥳 Now it’s time to test it.

Boost CSAT with proactive AI customer service
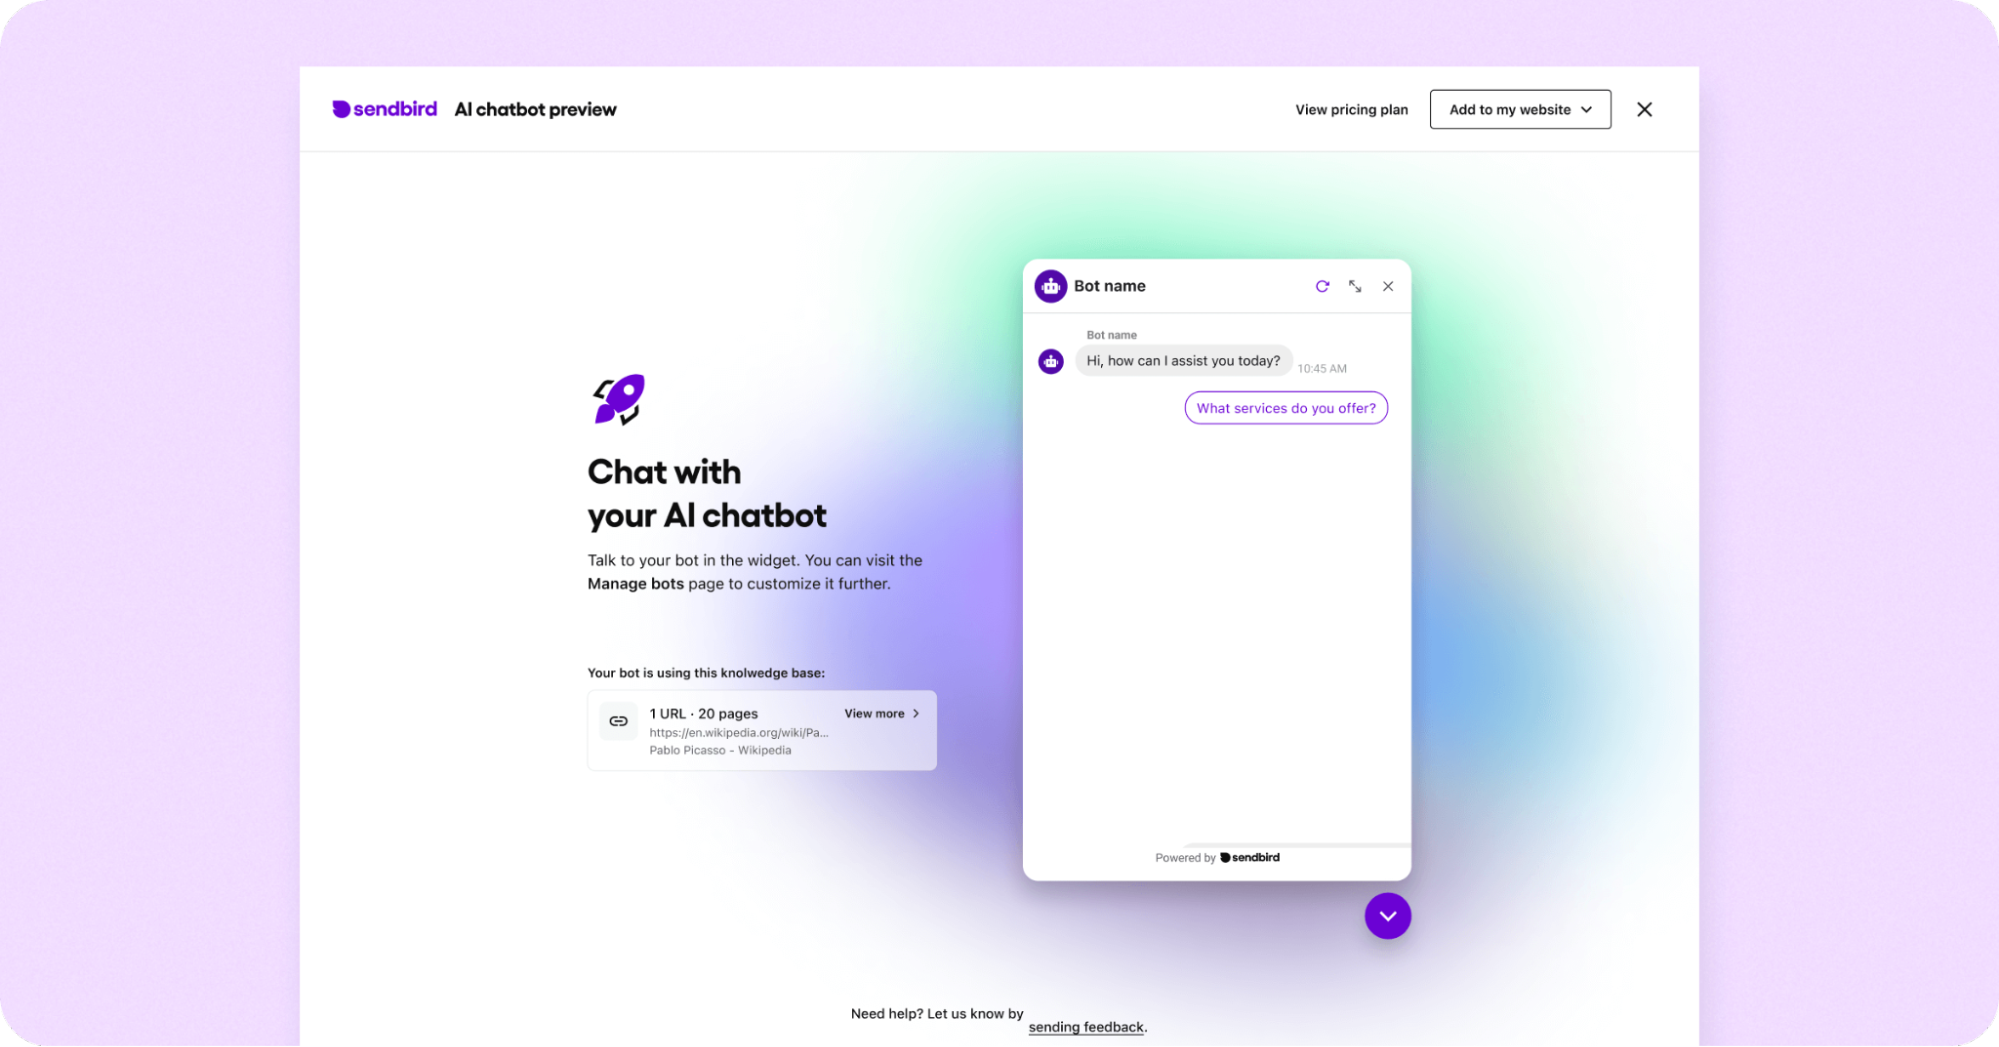
Step 5: Test your AI chatbot
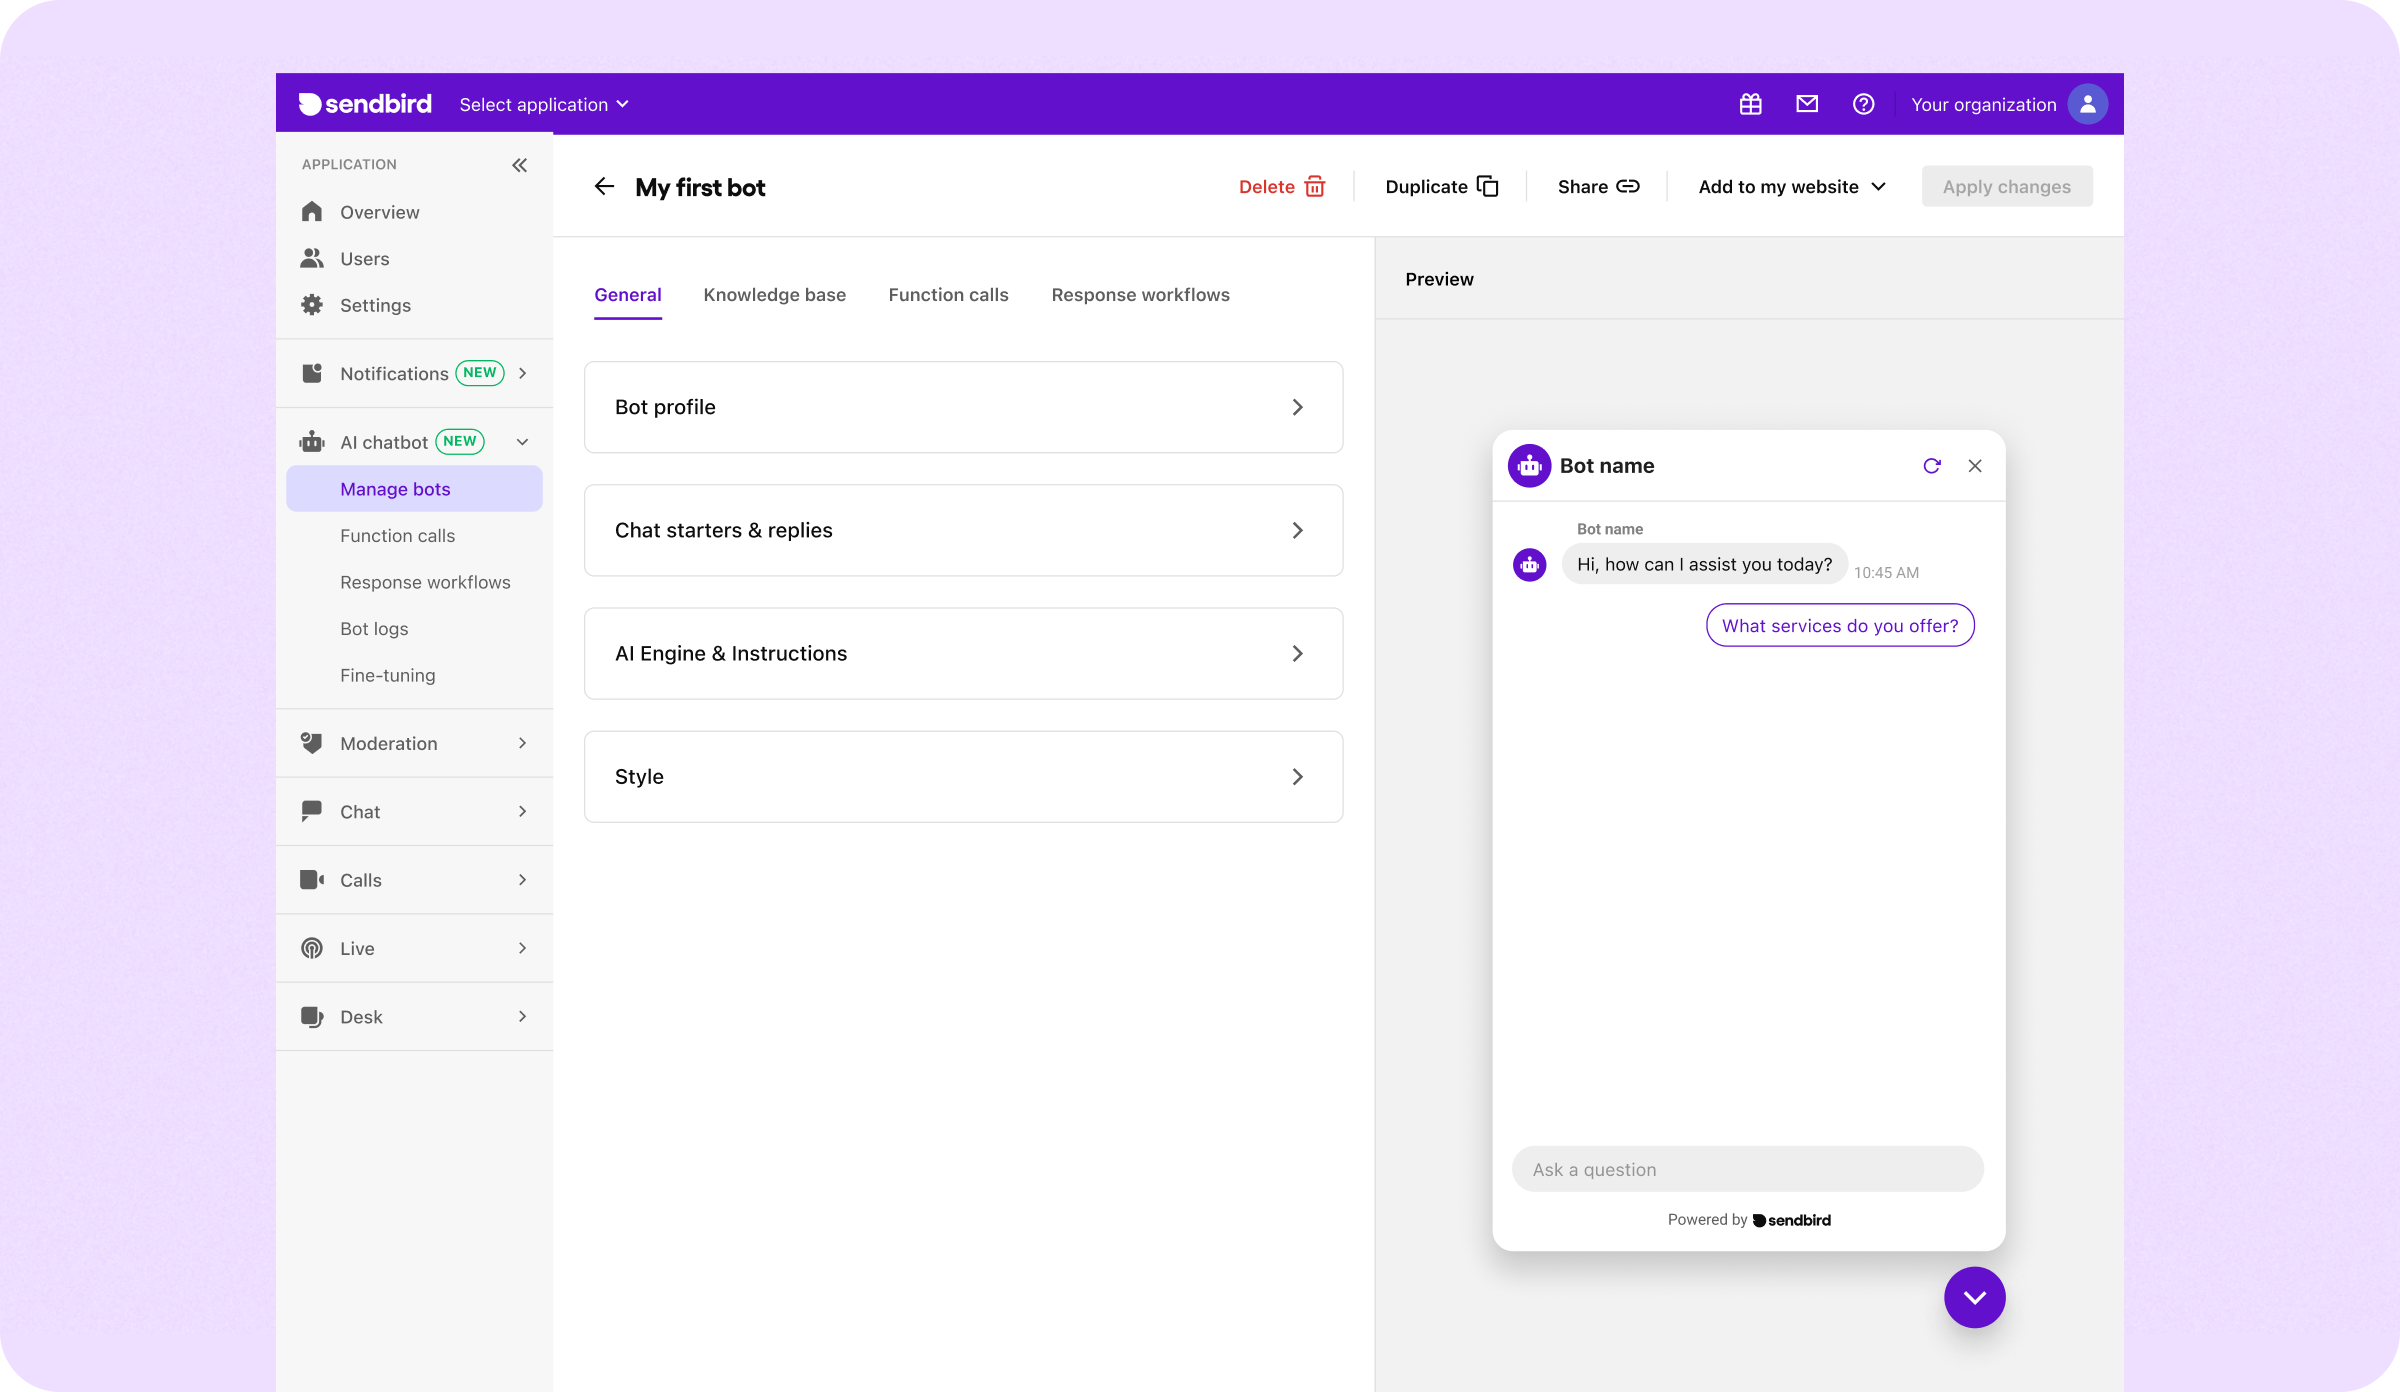
Congratulations on creating your chatbot! Now, it’s time to refine your AI chatbot to help it become truly intelligent. Testing, adjusting, and refining are essential in this phase. You can have a preliminary conversation with your chatbot in the AI chatbot preview (seen below), but we recommend that the bot studio become your testing ground.
Before we dive into the details, define your testing goals.
Key considerations of chatbot testing
Accurate intent interpretation: LLMs excel at understanding natural language; however, their performance can be further enhanced through some refinement. Define trigger keywords and relevant questions, then test thoroughly to ensure your chatbot handles even the most unexpected edge cases. This can be done by adding trigger keywords directly within the response workflow, by incorporating specific examples into the chatbot’s prompt instructions, or by a combination of these.
Relevant and accurate responses: Your chatbot should always provide valuable, contextually aware answers. Testing will help expose any gaps in its knowledge base or logic.
Graceful fallbacks: No chatbot is perfect. When it can’t interpret a request, the AI chatbot should gracefully transition to a predefined path, such as offering to connect to a human agent, or providing a list of helpful resources. This can be achieved through prompt instructions.
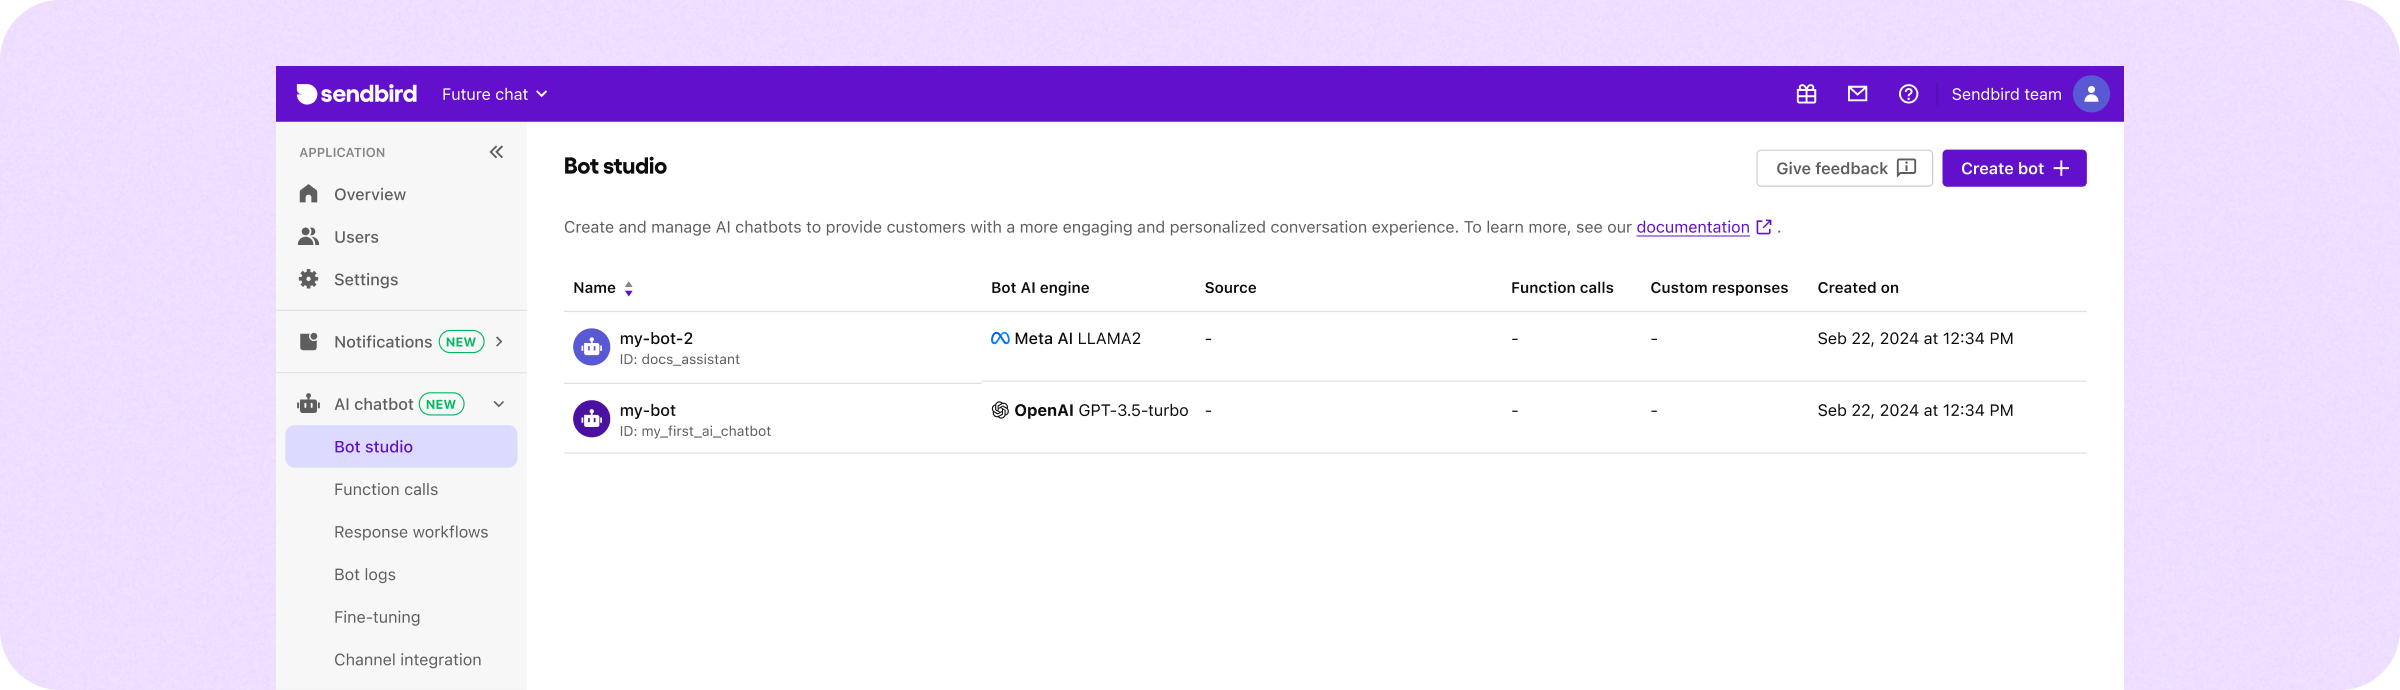
The bot studio provides a good playground for experimentation, which is why we recommend that this becomes your testing ground. In the bot studio, you can test your chatbot against real-world scenarios and immediately see the impact of any changes you make. So, head over to the bot studio (left sidebar in the dashboard -> AI Chatbot -> Bot studio) and select the chatbot you just created:
Now start refining your AI chatbot:
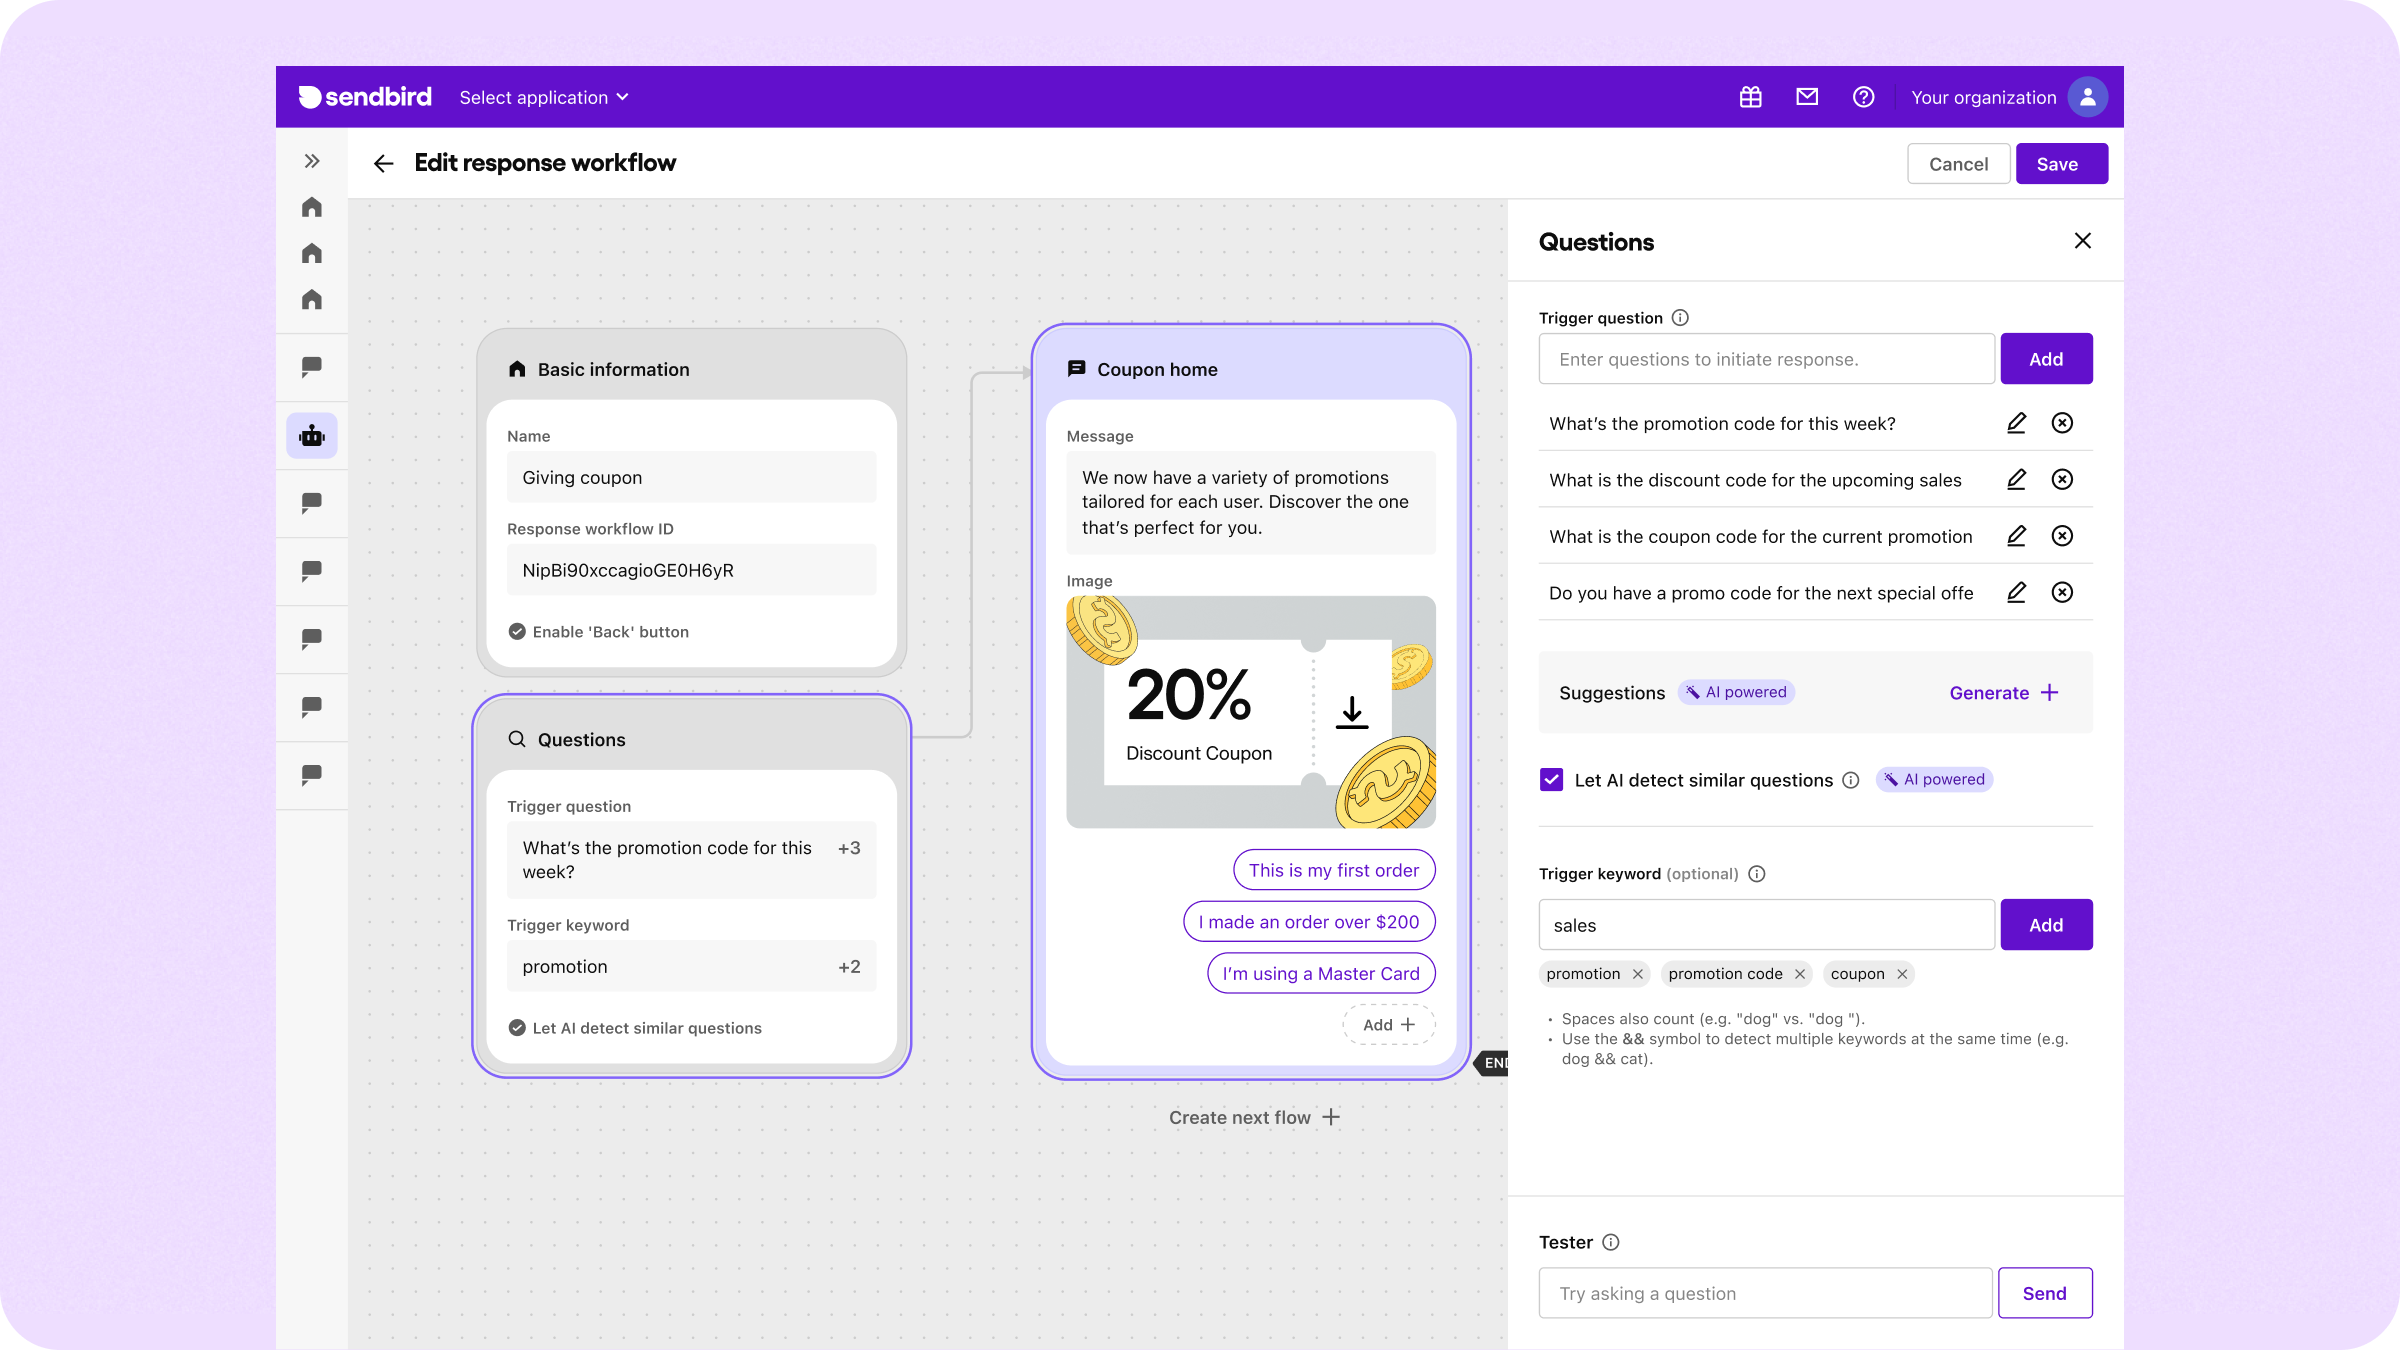
- Expand trigger keywords and questions: LLMs work with triggers. Therefore, the more variety you provide, the better the AI chatbot understands what users are asking. Let’s illustrate this with a “coupon offer” flow. If you add trigger keywords or questions such as “discount,” “promo code,” and “Is there a sale going on?”, this will allow AI to detect similar questions to trigger the chatbot to offer a coupon. To start doing this, go to the left sidebar and navigate to AI Chatbot -> Response workflows.
- Enrich your knowledge base: Your chatbot is only as good as the information to which it has access. The more comprehensive and accurate your knowledge base, the more precise and helpful your chatbot’s responses will be. For example, if you’re building a sales bot for your website, upload key documents like your shipping policy, inventory catalogs, and product FAQs.
- Test in bot studio: Now, go back to the bot studio and see if your AI chatbot can accurately identify user intent and deliver relevant responses. You can:
- Simulate conversations: Engage the chatbot in full conversations to see how it handles context and follow-up questions.
- Vary your phrasing: LLMs thrive on variety. The more diverse or varied the triggers, the better the chatbot will grasp user intent.
- Iterate and refine: Remember that testing and refining is an iterative process. The more you test and improve, the more intelligent your chatbot will become!
Step 6: Publish your chatbot widget using AI chatbot integrations
When you’re happy with the chatbot you’ve built, it’s time to publish! The easiest way to publish your AI chatbot is to use our WordPress plugin. These is simple, no-code integrations to publish your chatbot on your WordPress site.
WordPress users can effortlessly integrate their AI chatbot on their website with a plugin available on the WordPress marketplace and configure it in minutes.
If you have a working knowledge of websites, consider our Wix, Squarespace, and GoDaddy integration guides. These guides offer a step-by-step process for quickly integrating your AI chatbot and enabling users to start chatting with it!
The video below shows how to deploy the Sendbird AI Chatbot on WordPress, Wix, Squarespace, and to embed the code on your own website.
Advanced chatbot customization
Now that you've finished creating a chatbot, you can customize it further. Taking time to tweak these settings ensures the bot perfectly embodies your brand, follows chatbot best practices, and adapts to changing customer needs.
Navigate to the Bot Studio in the Sendbird Dashboard to start customizing your AI chatbot. This will show you a list of the chatbots you have created. Select the AI chatbot you wish to customize.
From here, you have multiple options to customize your AI chatbot to align with your brand and give it a personality. You can set a custom bot profile image, categorize your bot, select brand colors, and set a welcome message and suggested reply. You can also select the AI engine you wish to use (Sendbird offers GPT 3.5 - 4o, Llama 3, Solar, and Claude 3.5 Sonnet) and select advanced AI engine settings as well. Here’s a guide to selecting an LLM.
Consider adding specialized sources to train your AI chatbot in the 'Knowledge sources' tab. In the 'Function calls' tab, you can set up function calls for your bot. With function calls, you can trigger third-party API requests based on conversational cues. This can be very useful for a weather chatbot or a stock chatbot. Finally, consider setting up automated response workflows to streamline and lock in chatbot responses in advance to align with your business needs.
Please see the docs for more information, screenshots, and a step-by-step walkthrough!

Delight customers with AI customer service
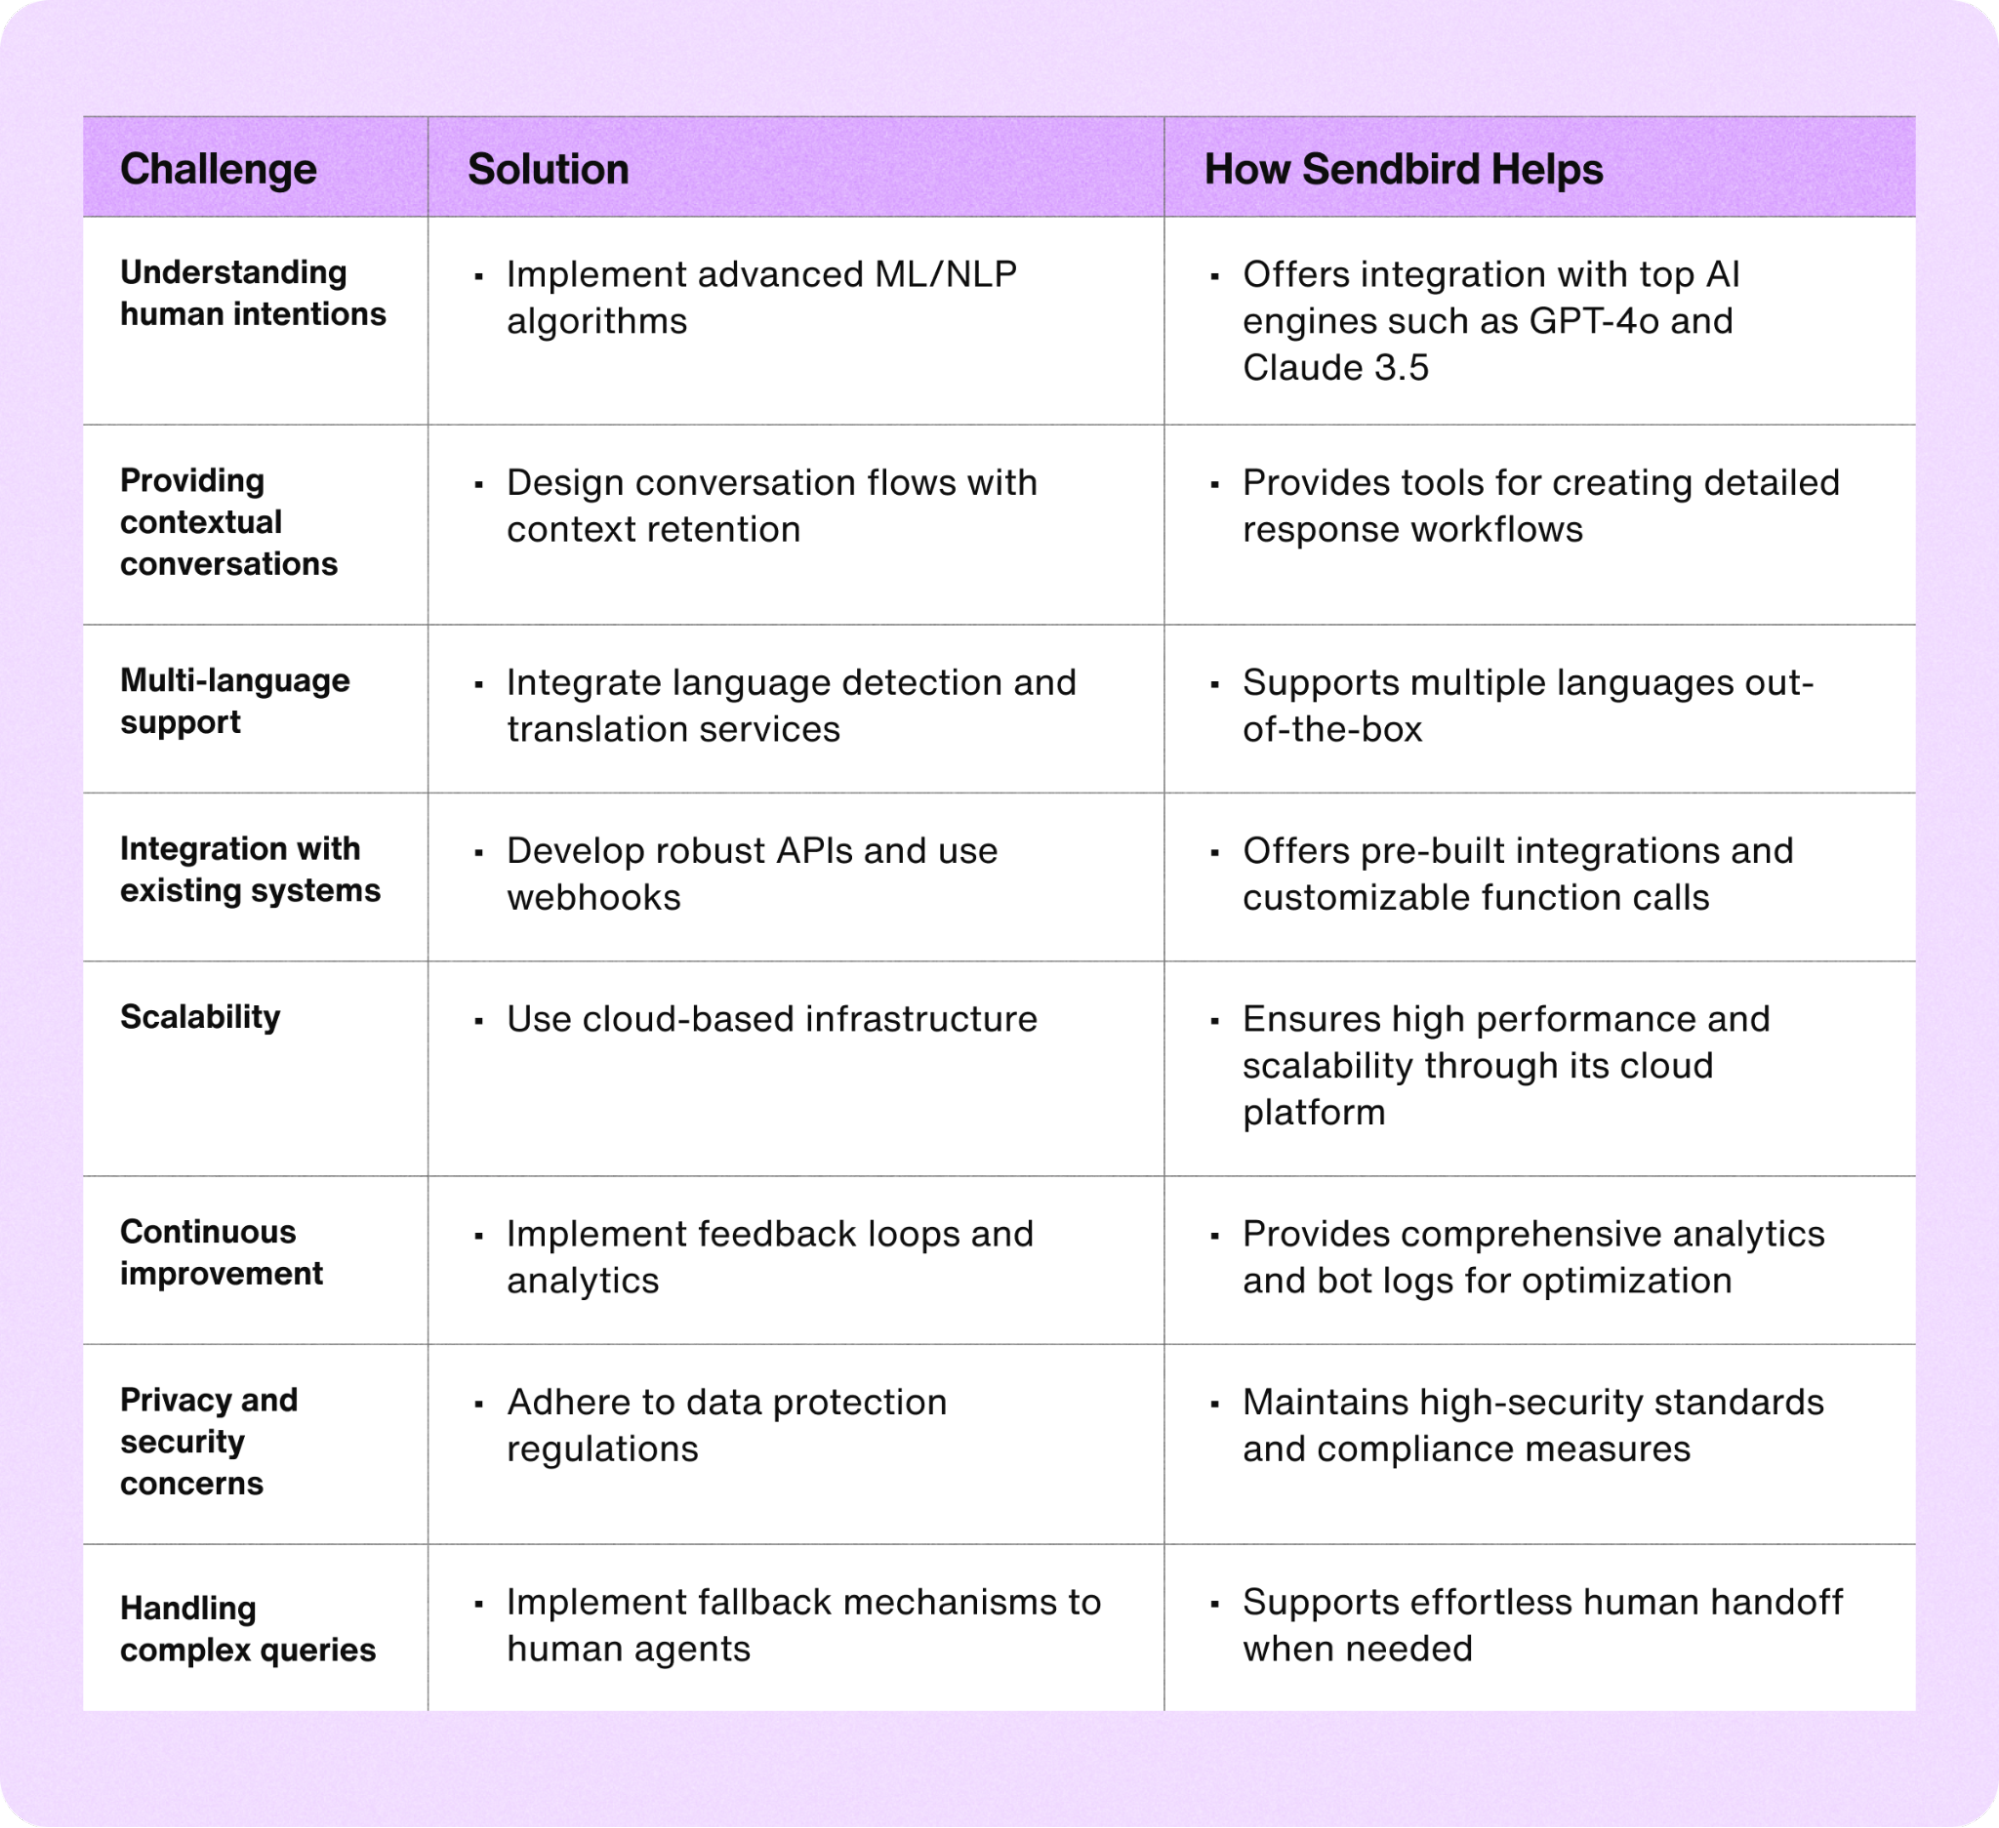
Challenges when you build a chatbot (+solutions)
Traditionally, building a chatbot involved overcoming various obstacles, from initial investment and complex training needs to providing ongoing maintenance. However, if you use Sendbird’s platform to build a chatbot as outlined above, you will find that Sendbird's chatbot platform eliminates these hurdles. Below is a table outlining some common chatbot challenges and how Sendbird’s solution helps you overcome them.
Chatbot dos and don’ts to consider when you make your own chatbot
Keeping these tips in mind will ensure that your chatbot more effectively meets your needs.
Top 3 dos
Focus on the user experience: Design intuitive and user-friendly interfaces that align with your brand. Ensure the chatbot’s responses are concise, relevant, and easy to understand. Give your chatbot a human touch with a voice, tone, and style that is representative of your brand.
Implement a chatbot to human handoff: Implement mechanisms, such as a seamless chatbot to human handoff, for users to escalate issues to a human agent if the chatbot cannot resolve them. You may need to contact your developers for help implementing this.
Test extensively: Conduct thorough testing, including unit, integration, and user testing. This helps identify and fix bugs, ensuring the chatbot performs reliably in real-world scenarios.
Top 3 don’ts
Don’t overcomplicate interactions: Avoid making the chatbot’s conversation flow too complex. Simple and straightforward interactions improve usability and user satisfaction.
Don’t neglect security and privacy: Ensure the chatbot complies with data protection regulations and securely handles user data. Neglecting these aspects can lead to breaches and loss of user trust.
Don’t make your chatbot too intrusive: Ensure that your chatbot does not disrupt the user experience by being overly proactive. Intrusive chatbots can frustrate and drive users away, so it's important to find a balance between being helpful and being bothersome.

Anywhere, anytime AI customer support
Elevate your customer experience with Sendbird today
Congratulations! You've learned how to create an AI chatbot. But why stop here?
As an AI customer experience platform, Sendbird is evolving beyond AI chatbots. Omnichannel, action-oriented, and continuously learning, AI agents can reduce your support team's workload while enhancing customer satisfaction.
Explore our AI agent platform and user-friendly AI agent builder to effortlessly create, train, test, and optimize AI agents. Plus, you can take advantage of AI agent integrations for streamlined business operations.
Ready to transform customer service with AI agents? Contact us today!


