
How to implement chat push notifications on a web application using Firebase

Introduction
Wouldn’t it be great if your web app could receive the same push notifications as your mobile applications? When you think of push notifications, you probably think only of your mobile device; fortunately, you can also use push notifications with your web app on both desktop and mobile. In fact, a lot of web applications are now PWAs (Progressive Web Applications), that allow functionality such as offline access and push notifications on both desktop and mobile. Our guide to mobile push notifications has everything you need to know about push notifications, their benefits, and how they can be used.
In this tutorial, we’ll talk about how to implement push notifications to increase mobile app engagement using Firebase for your web application. After laying the groundwork with some PWA concepts, we’ll explain how to set up Firebase, receive push notifications, and test your push notification implementation. By the end of this tutorial, you will know how to send web push notifications with Sendbird Chat and Firebase.
For this tutorial, we will use Mozilla’s:
To get the most out of this tutorial, you may want to download this very simple app.
Note that you will need to run “npm install” and “npm start”. You will also need to change the:
- Firebase configuration
- Vapid ID
- Sendbird credentials
Let’s dive in!
What is a PWA?
A progressive web application is a web application that looks and acts like a native application. For example, if your PWA is accessed on mobile, it could be installed and used while offline or it could receive push notifications while in the background.
Do I need a PWA?
To receive push notifications from the Sendbird server, your web app must be a PWA. Most web apps today are accessed on both desktop and mobile browsers; however, even if your app is only intended to be used in a desktop browser, there are still a number of benefits to a desktop PWA.
If you’re not sold on PWAs, you can still use the Notification API to display notifications to users when the application is open and a Sendbird event handler is called, but these aren’t true push notifications.
Now let’s talk through the implementation details of push notifications on a web application. The first thing we have to do is to set up a service worker.
Setting up your service worker
Regardless of whether your application is written in vanilla JavaScript or you are using a particular framework such as React, Angular, Vue, or something else, you should still be able to create a PWA. However, you may need to move some of this code to a slightly different location if using a framework. If you are using React Native, refer to our documentation.
Remember that the key to your PWA is the service worker. This worker runs in the background and allows you to receive push notifications, as well as other PWA functionality not covered in this tutorial.
First, create an empty file called firebase-messaging-sw.js in the project root.
In your index.js, register the firebase-messaging-sw.js file. This will make sure the browser supports service workers before registering. Omit the first line if you already have it.
Setting up Firebase
Now we will configure Firebase by creating a new Firebase app, then registering your web app with Firebase, adding the Firebase SDKs you will use, and initializing Firebase in your app.
After creating your Firebase app using the Firebase console, register your app with Firebase by clicking the web icon in the Firebase console. Enter the name of your application and click the register button.
There are a few options to add the Firebase SDKs to your application. For this guide, we will use npm to add the Firebase SDKs to your index.js file and service worker.
To import the SDKs for Firebase in our index.js file, install the Firebase package npm install –save firebase.
To initialize Firebase in your app, use the details provided when registering the app in the Firebase console. Make sure to use your own configuration details.
Add the following to your index.js file.
Next, add the following to your firebase-messaging-sw.js in your root folder to configure Firebase in the service worker. This will allow us to configure background notifications later. Be sure to use the messagingSenderId from your Firebase console.
Also, be sure to update the snippet below to use the latest Firebase JS versions.
Setting up Firebase messaging
Next, we will configure our app to work with Firebase cloud messaging.
If you don’t have one, create a manifest.json file in your root directory and add the following. Don’t change the gcm_sender_id.
{
 "gcm_sender_id": "103953800507"
}
Generate a VAPID keypair in your Firebase console. In your index.js file, add the following below your Firebase initialization. This can be found in your Firebase console:
Firebase__console → Project_overview → Project_settings → Cloud_messaging → Web_push_certificates
- Connect to Sendbird.
- Request permission to display notifications to the user.
- Get the device push token.
- Register the device push token with Sendbird.
- Check in the Sendbird Dashboard that the token has been registered for the current user.
- Sendbird Dashboard → Users → Find target user → Push token → Android
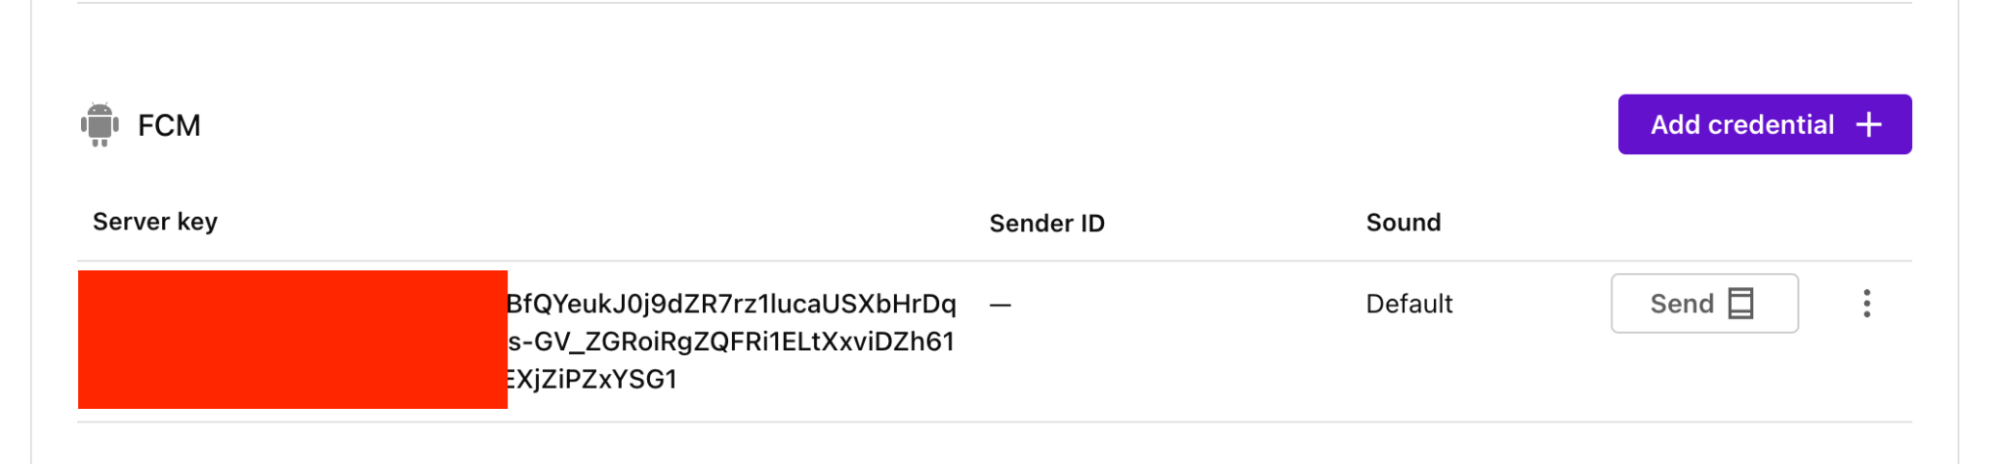
- Don’t forget to turn on push notifications in your Sendbird Dashboard and register your FCM credentials.
- Sendbird Dashboard → Settings → Notifications → FCM → Add credential
FCM recommends the following regarding checking for token changes:
“Whatever timing pattern you follow, make sure to update tokens periodically. An update frequency of once per month likely strikes a good balance between battery impact vs. detecting inactive registration tokens. By doing this refresh, you also ensure that any device which goes inactive will refresh its registration when it becomes active again. There is no benefit to doing the refresh more frequently than weekly.”
Receiving push notifications
By default, Sendbird will only send push notifications to users that are offline and receive a message in a group channel. The browser must be open to receive push notifications, but your application doesn’t have to be active or in the foreground.
There are two ways to receive notifications when a user is online. If you would like notifications to be sent when a user is connected, it’s best practice to use the channelEventListener’s onMessageReceived event.
The handler can be added right after instantiating the new Sendbird instance. From the onMessageReceived callback, consider that you could display an indication of the new message via the same notification method used by the browser’s push service.
Alternatively, in the Sendbird Dashboard:
Go to Settings → Notifications → Check “Send to device both offline and online”. “This means that a push notification will be sent for every message, regardless of a user’s online status.
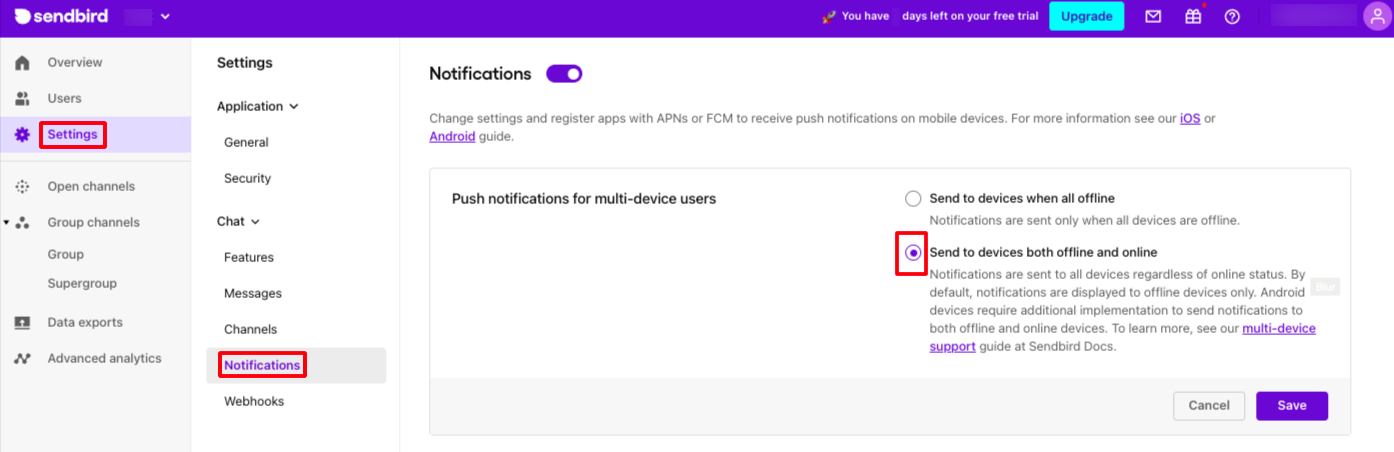
The tradeoff is that there will be two identical messages arriving at the device if the user happens to be online. That is to say, one push notification via FCM will arrive and one real time message via websocket will also arrive.
Sendbird Dashboard’s push notification tool
The push notification tool is built into the Sendbird Dashboard and will send messages to a dedicated channel.
1. Add your FCM server key if not already added.
2. Select your target user and send a push notification
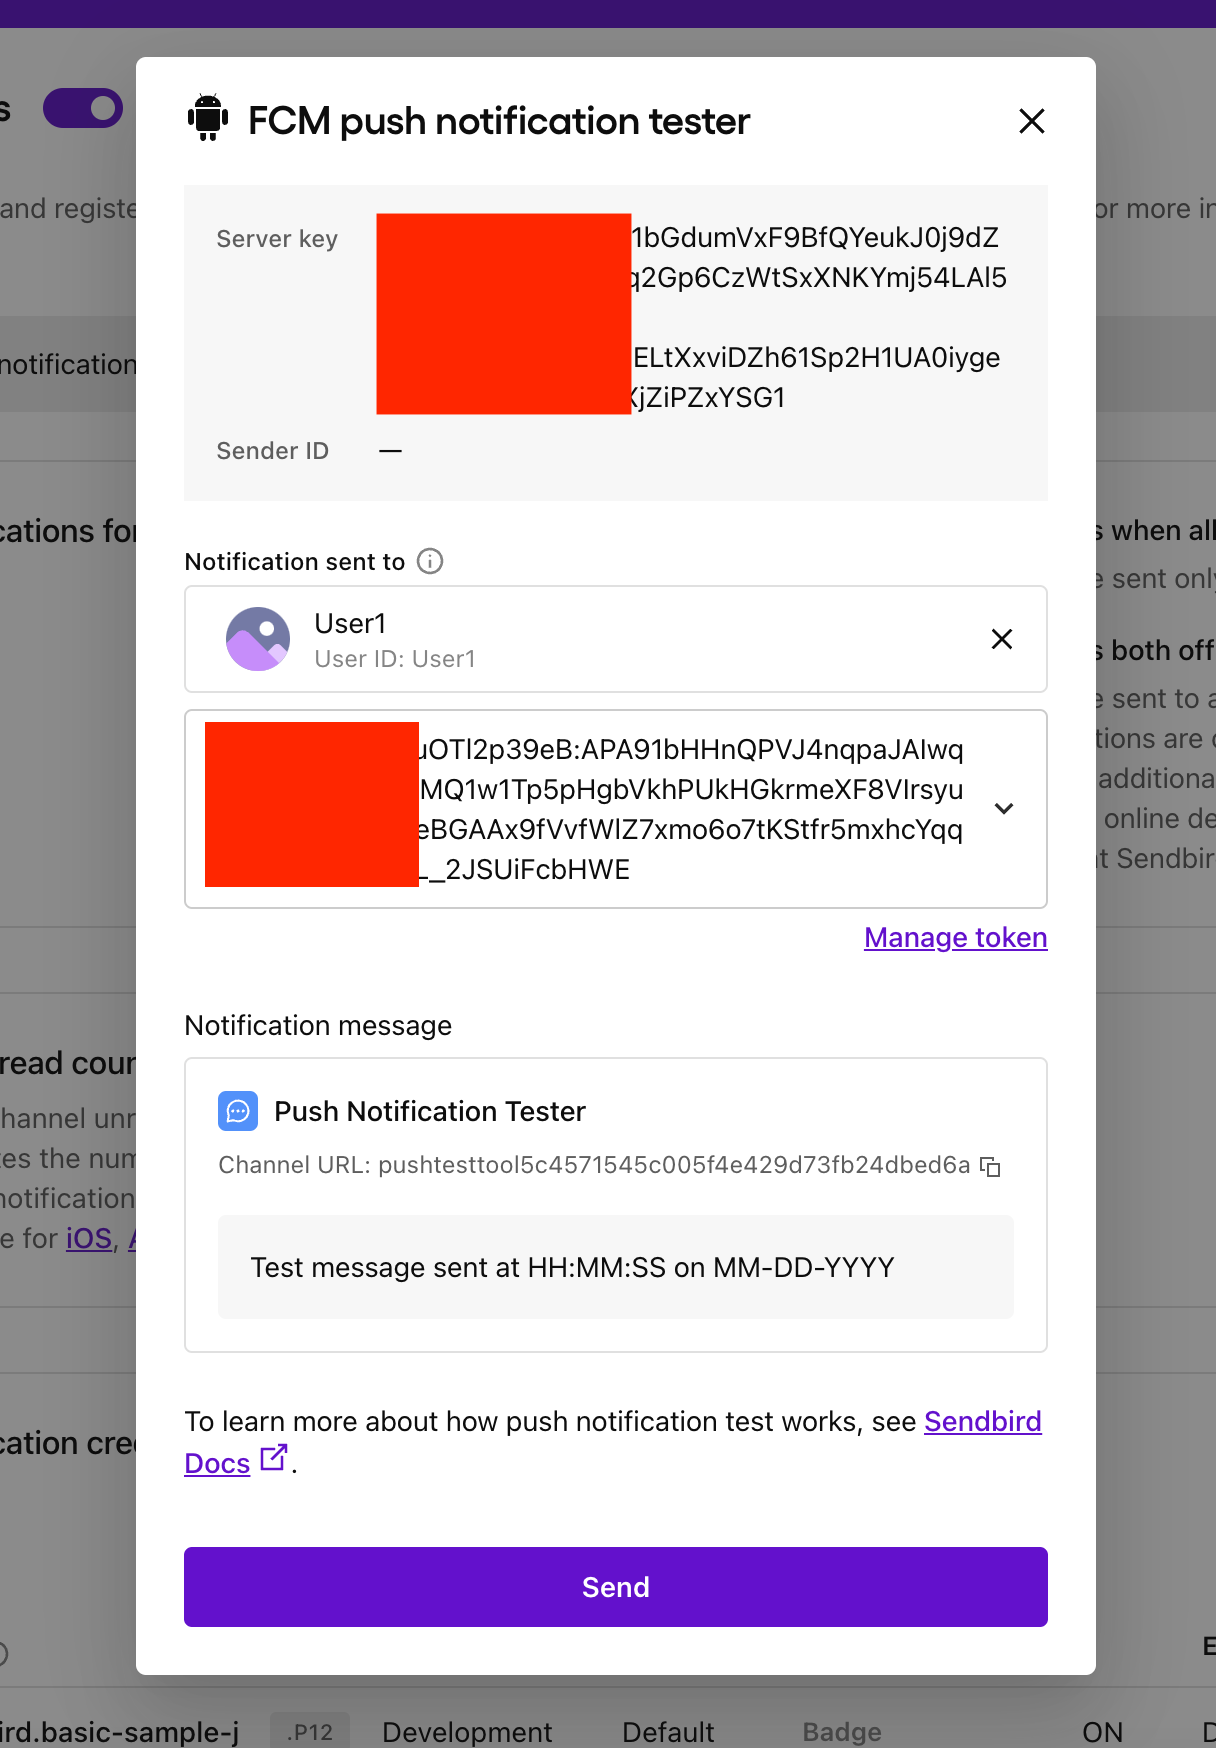
3. Click “Send”
4. Notifications on the Sendbird Dashboard will indicate if push notifications are being sent correctly.
Listening for FCM data messages (push notifications)
To set up our message handler for handling FCM data messages for push notifications, add the following to your firebase-messaging-sw.js file.
That’s it! Now you should be able to receive push notifications while the application is in the background, and/or foreground depending on your Sendbird Dashboard preferences.
Optional: Testing without Sendbird
You can check that the push notification set up works without Sendbird.
- The Firebase team has not developed a UI to send data-messages to your devices. Sendbird uses only FCM data-messages. This means that without exception, there is no way to use the Firebase Console for testing your PWA’s push notifications in relation to Sendbird.
- To test FCM data-messages, use Postman and close all tabs with your application in:
- POST → FCM
- Headers:
- Key: Content-Type, Value: application/json
- Key: Authorization, Value: key=<your-fcm-server-key>
- Your-fcm-server-key → Firebase Console → Your project → Project Overview Cog → Project Settings → Cloud Messaging → Server Key
- Collect the device token.
- See the index.js code above for a log of the device token or check that you have gotten the device token from the dashboard.
- Body:
Chart: Sending push notifications
Refer to the chart below to see the type of notification that will be generated based on connection status, background state, and whether the application’s tab is active:
Default: Send when all devices are offline.
| User Connected | Browser Running | Tab Focus | setBackgroundState() called | Channel Event Handler Applied | Notification Type | Notes |
| FALSE | TRUE | TRUE | TRUE | N/A | FCM Data Message | If firebase-messaging-sw is registered |
| FALSE | TRUE | FALSE | TRUE | N/A | FCM Data Message | If firebase-messaging-sw is registered |
| TRUE | TRUE | TRUE | FALSE | TRUE | onMessageReceived Fires via SendBird Websocket | |
| TRUE | TRUE | FALSE | FALSE | TRUE | onMessageReceived Fires via SendBird Websocket | |
| FALSE | TRUE | FALSE | FALSE | N/A | FCM Data Message | If firebase-messaging-sw is registered |
Send to all devices online and offline: (Dashboard → Settings → Notifications)
| User Connected | Browser Running | Tab Focus | Channel Event Handler Applied | Notification Type | Notes |
| FALSE | TRUE | TRUE | N/A | FCM Data Message | If firebase-messaging-sw is registered |
| FALSE | TRUE | FALSE | N/A | FCM Data Message | If firebase-messaging-sw is registered |
| TRUE | TRUE | TRUE | TRUE | onMessageReceived Fires via SendBird Websocket and FCM Data Message | |
| TRUE | TRUE | FALSE | TRUE | onMessageReceived Fires via SendBird Websocket and FCM Data Message | |
| FALSE | TRUE | FALSE | N/A | FCM Data Message | If firebase-messaging-sw is registered |
Conclusion
Your web app is now ready to send chat notifications from Sendbird using Firebase! You now know how to send push notifications to your PWA to keep your users engaged. If you have any questions, find us in the Sendbird community.
All the best! And happy app building! 💻 🚀


