
How to build a VoIP app with iOS CallKit and Sendbird Calls

VoIP calls and iOS CallKit: A seamless developer experience
Traditional voice calls have been transformed by Voice over Internet Protocol (VoIP), offering a more flexible and cost-effective in-app calling solution. Building upon this transformation, Apple's CallKit SDK takes it up a notch by enabling iOS users to experience VoIP calls just like native phone calls.
Moreover, as a trusted communications API platform, Sendbird further amplifies this progression by seamlessly integrating in-app chat, voice, and video capabilities, creating a real-time engagement powerhouse.
When used together, VoIP and iOS CallKit offer a seamless developer experience and open up a new world of interactive possibilities, including virtual office meetings, medical assistance, classrooms, and social networking.
In this article, you'll learn all about how to build a VoIP app with Sendbird Calls and iOS CallKit. We’ll also take a look at some of the challenges you'll face when building calling into iOS apps. You'll learn how to build a mobile app in Swift using Sendbird and iOS CallKit.
But first, let’s quickly brush up on the basics.
What is VoIP (Voice over IP)?
Voice over Internet Protocol, also called IP telephony or simply VoIP, is a technology that enables voice communications over Internet Protocol (IP) networks. Unlike traditional telephony that relies on dedicated circuit-switched networks, VoIP converts voice signals into digital packets and transmits them over the internet, enabling high quality voice calling. VoIP's integration with other applications opens the door for innovative communication solutions.
What is iOS CallKit?
iOS CallKit is a framework introduced by Apple for iOS. iOS CallKit is designed to integrate Voice over IP calls (VoIP calls) with the native Phone interface of the iPhone. This means that VoIP calls, like those from WhatsApp, Skype, or other similar apps, can behave almost like regular cellular calls on an iPhone. CallKit allows VoIP calls to use the regular iPhone interface for a seamless look and feel. This means that you can see incoming VoIP calls on the iPhone’s lock screen and interact with them using the same buttons and gestures you would use for a normal phone call.
How to build a VoIP App with iOS CallKit and Sendbird
Integrating VoIP, CallKit, and Sendbird may seem complex, but we will walk you through it in this tutorial. Together, the three create a cohesive communication experience that delights users and fosters community within your application.
Ready to take in-app communication to the next level? Let's dive in!
All the code for this tutorial can be found in this GitHub repo.
Step 1: Create a Sendbird Account
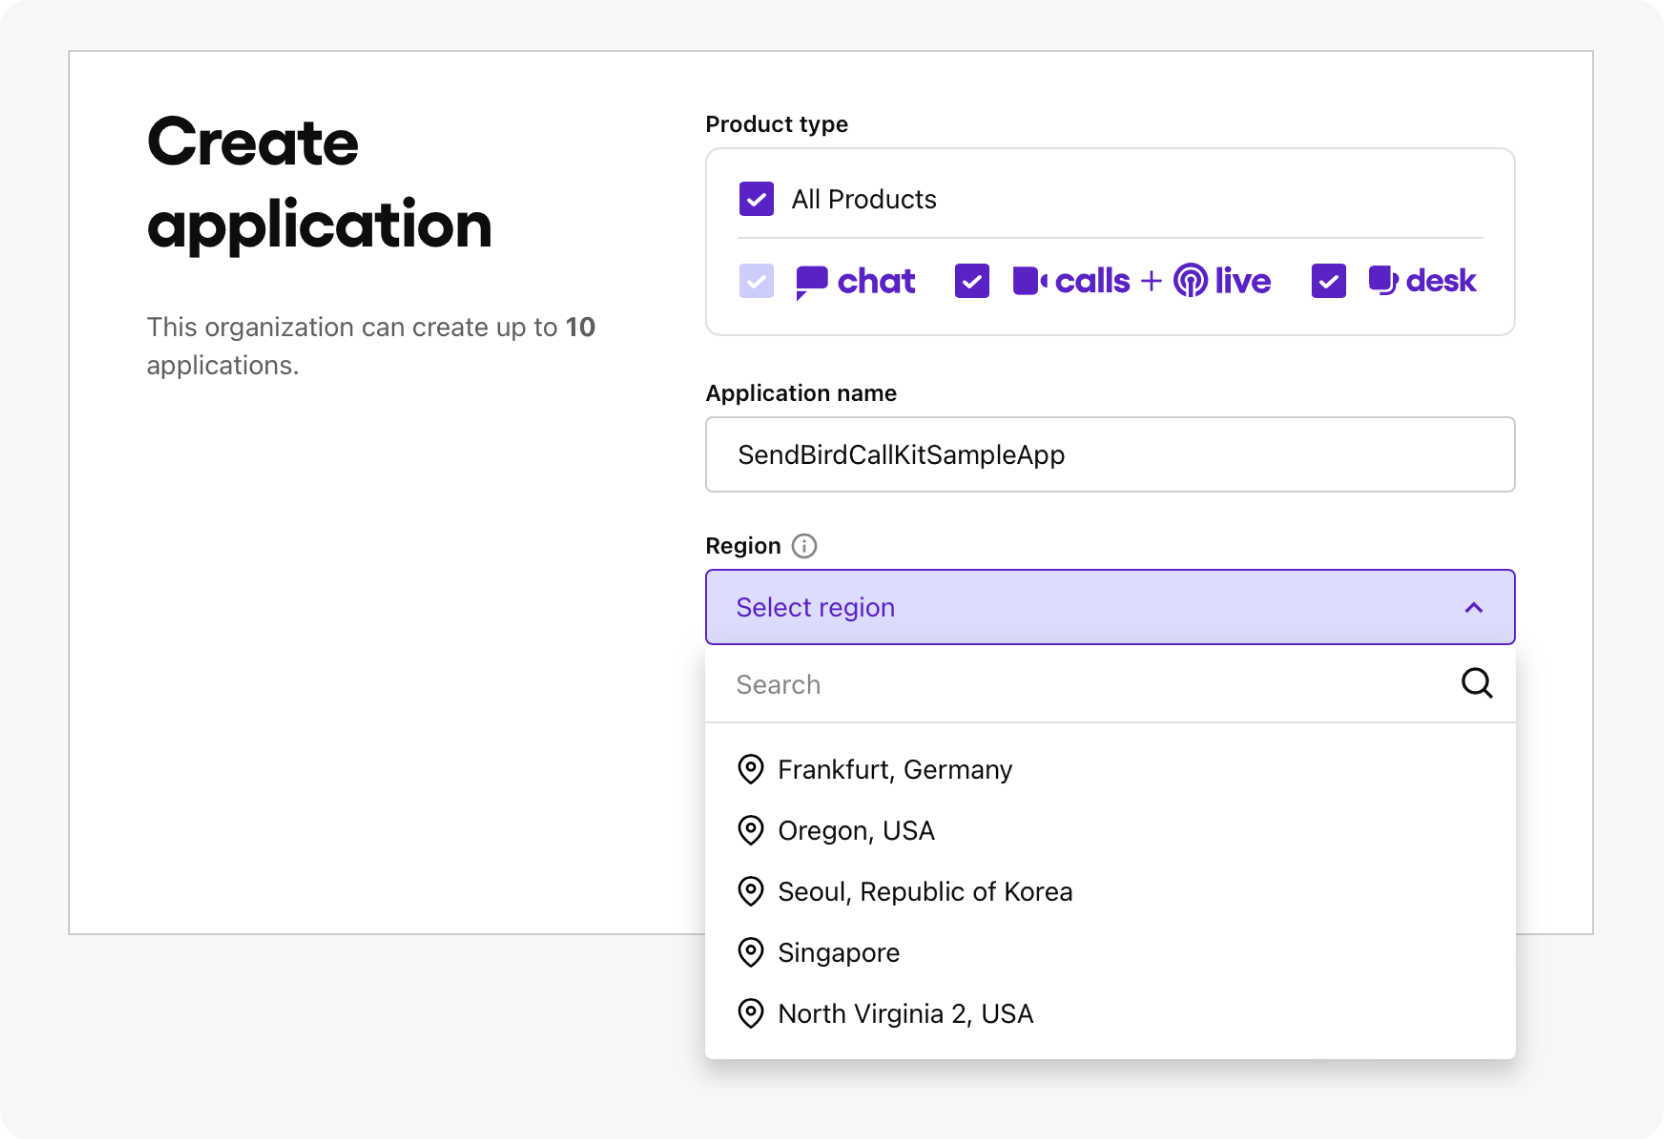
The first thing you need to do is sign up for a free Sendbird account. Follow the prompts and create a new chat- and calls-enabled application in the region closest to your locale:
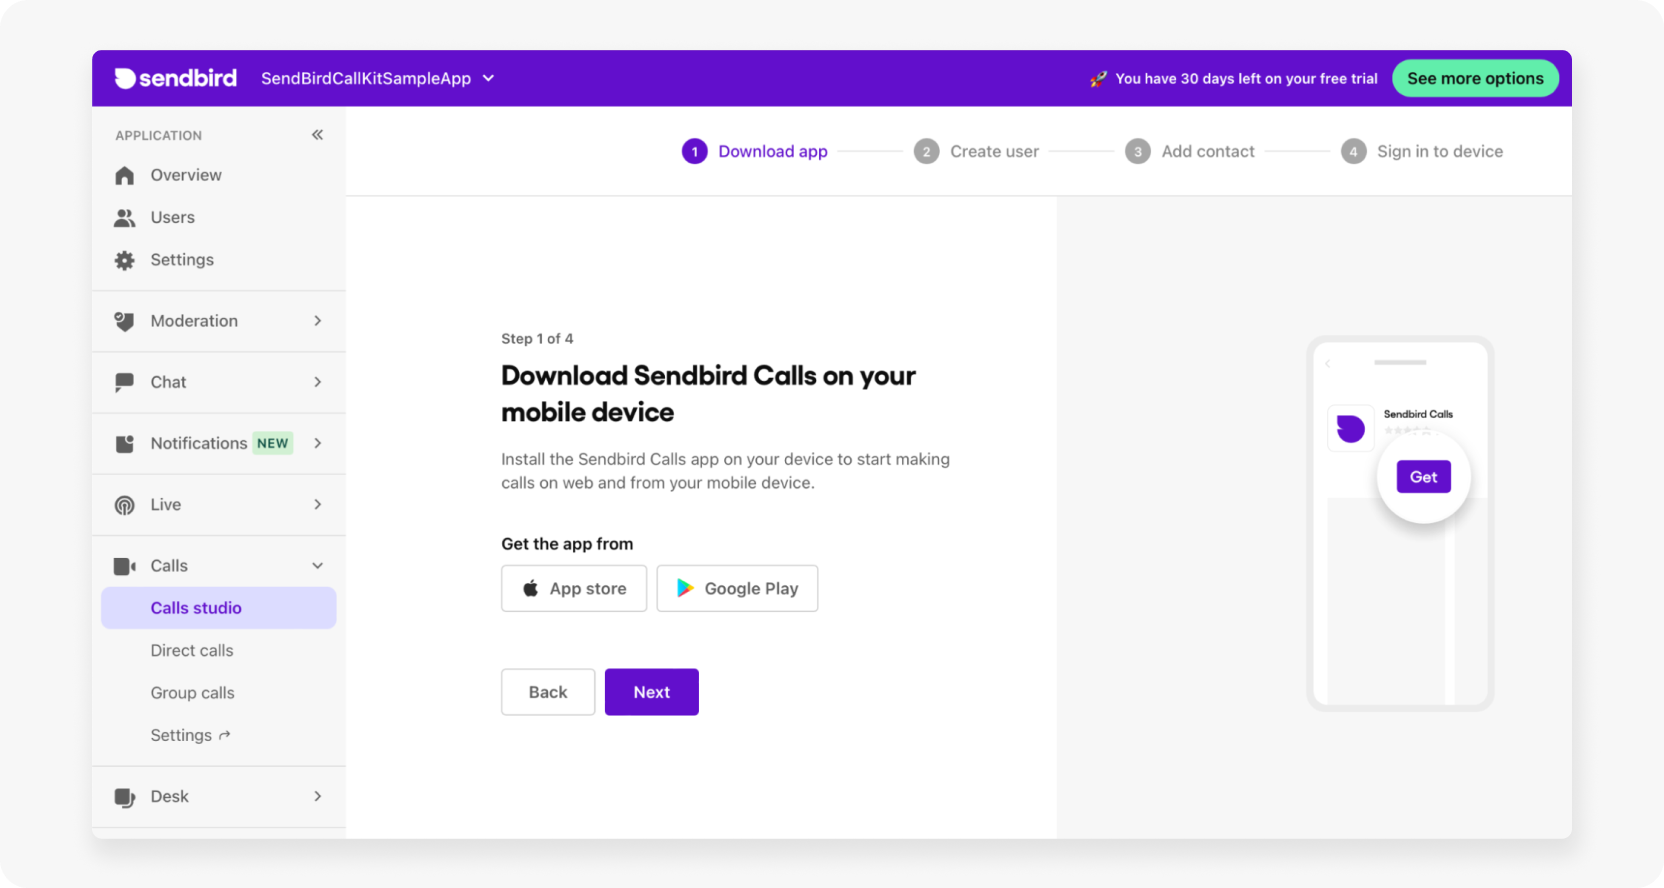
Then, on the left side of the screen, you should see a link to Calls Studio. Select it, create a new user, and follow the prompts:
Step 2: Configure iOS CallKit
Now that you've set up your Sendbird account and added a new user, it's time to configure CallKit before you write any code. This is important because you'll need to configure certain settings on different platforms, like the Apple Developer portal and the backend server (which, in this case, is Sendbird).
To develop a calling app via VoIP, you need a VoIP certificate issued by Apple that's specific to your app. To generate it, follow these steps:
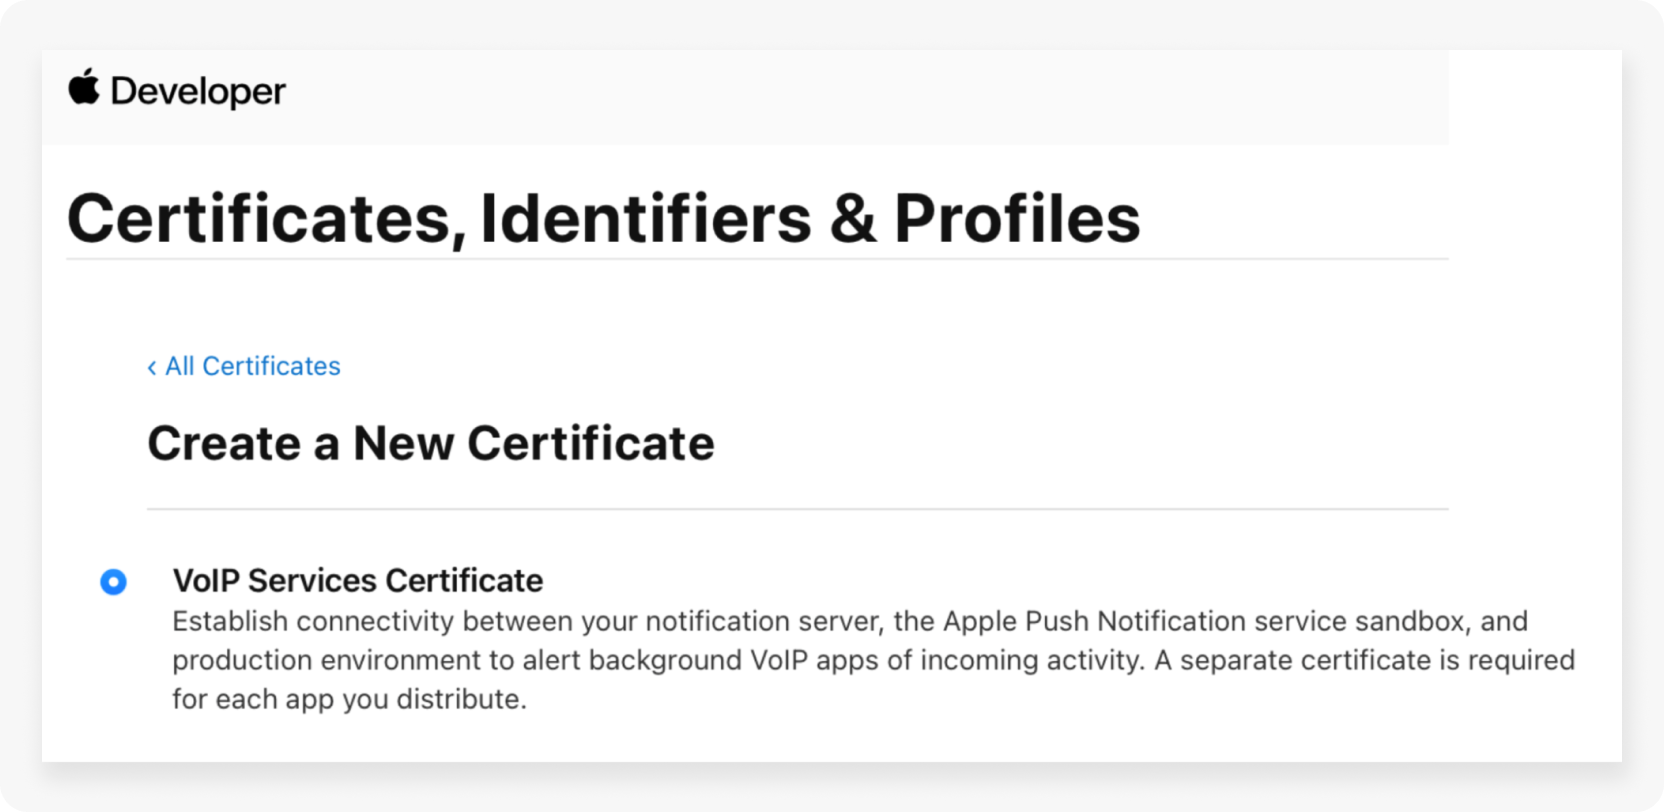
Go to the Apple Developer page and sign in. Then head to Certificate, Identifiers & Profiles > Certificates > Create a New Certificate.
You can find the VoIP Services Certificate under the Services section. Create the VoIP service certificate and save it at the end:
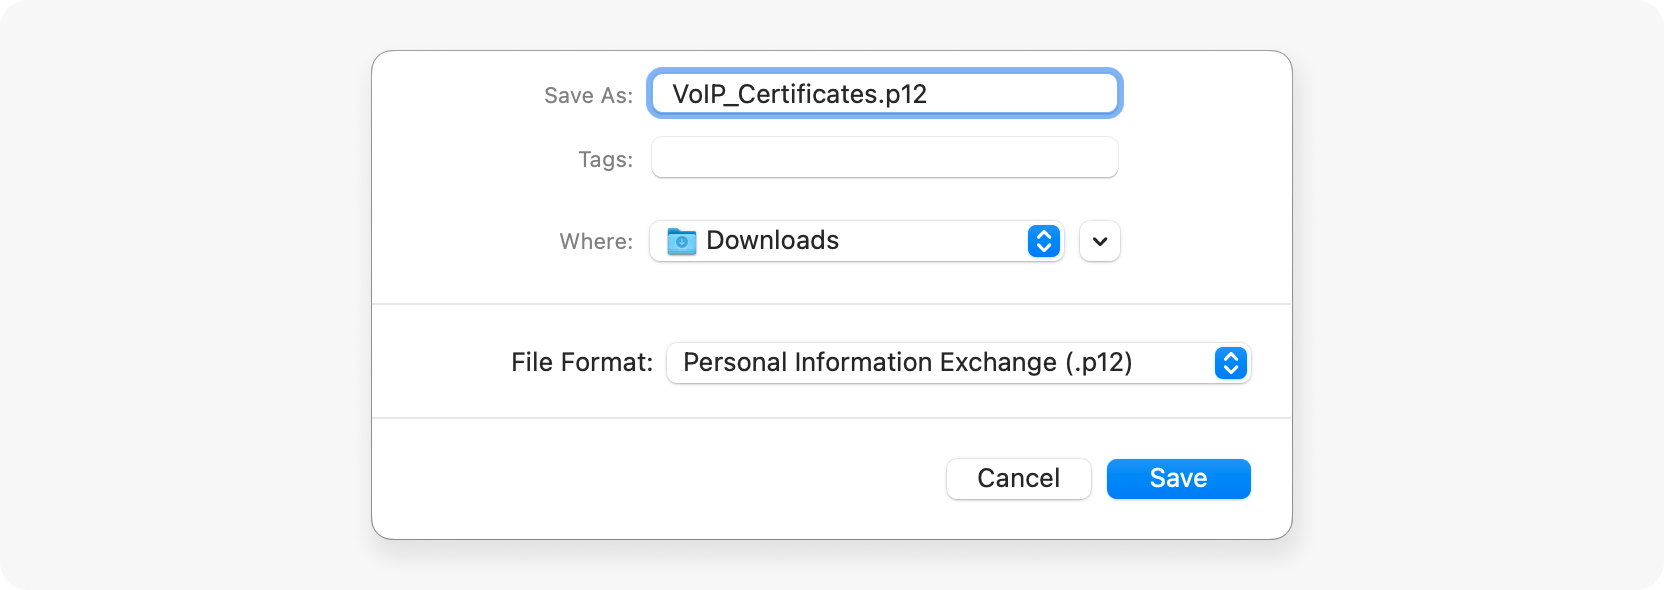
Next, you need to convert the certificate to a .p12 file, as this format is necessary for backend service providers like Sendbird.
In order to convert the certificate, double-click the certificate file to open it in the Keychain Access macOS app, then right-click it to select the export option (as shown in the following screenshot). Press Save to download:
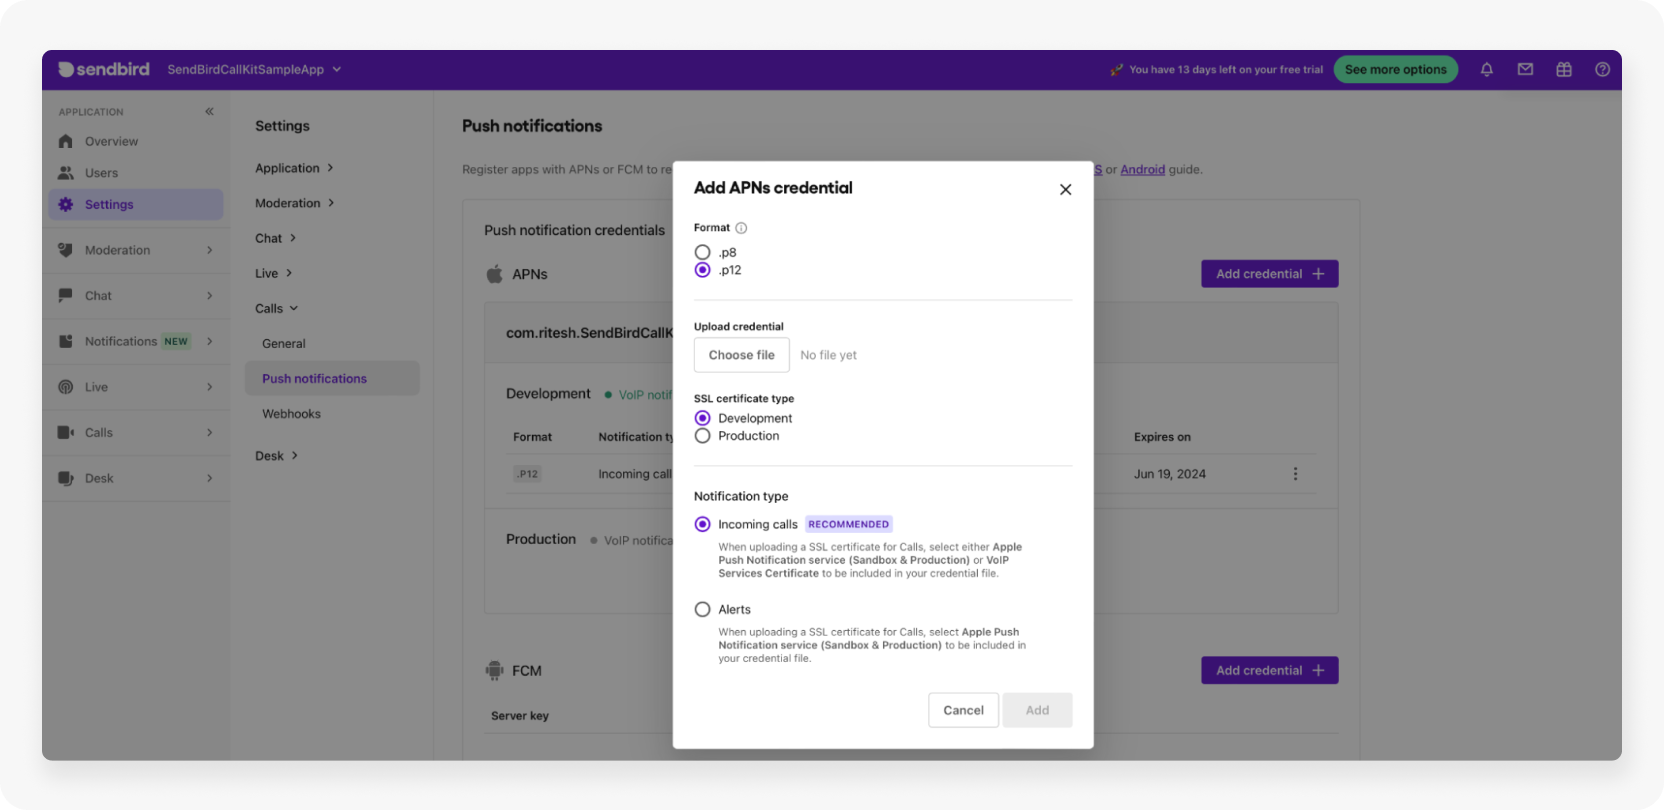
.p12 fileNext, in order to let Sendbird send push notifications for VoIP, you need to upload the .p12 file (downloaded in the previous step) to the Sendbird portal. Navigate to the Sendbird dashboard, then select Settings > Calls > Push notifications > APNs. Select the .p12 option, upload the file, and select Save:
Configure Xcode to Support VoIP
Once you've configured the Apple Developer portal and Sendbird portal to support VoIP, the next step is to activate this feature in Xcode, the IDE used for creating the iOS app. This ensures that the app you submit to the App Store can effectively manage VoIP functionality.
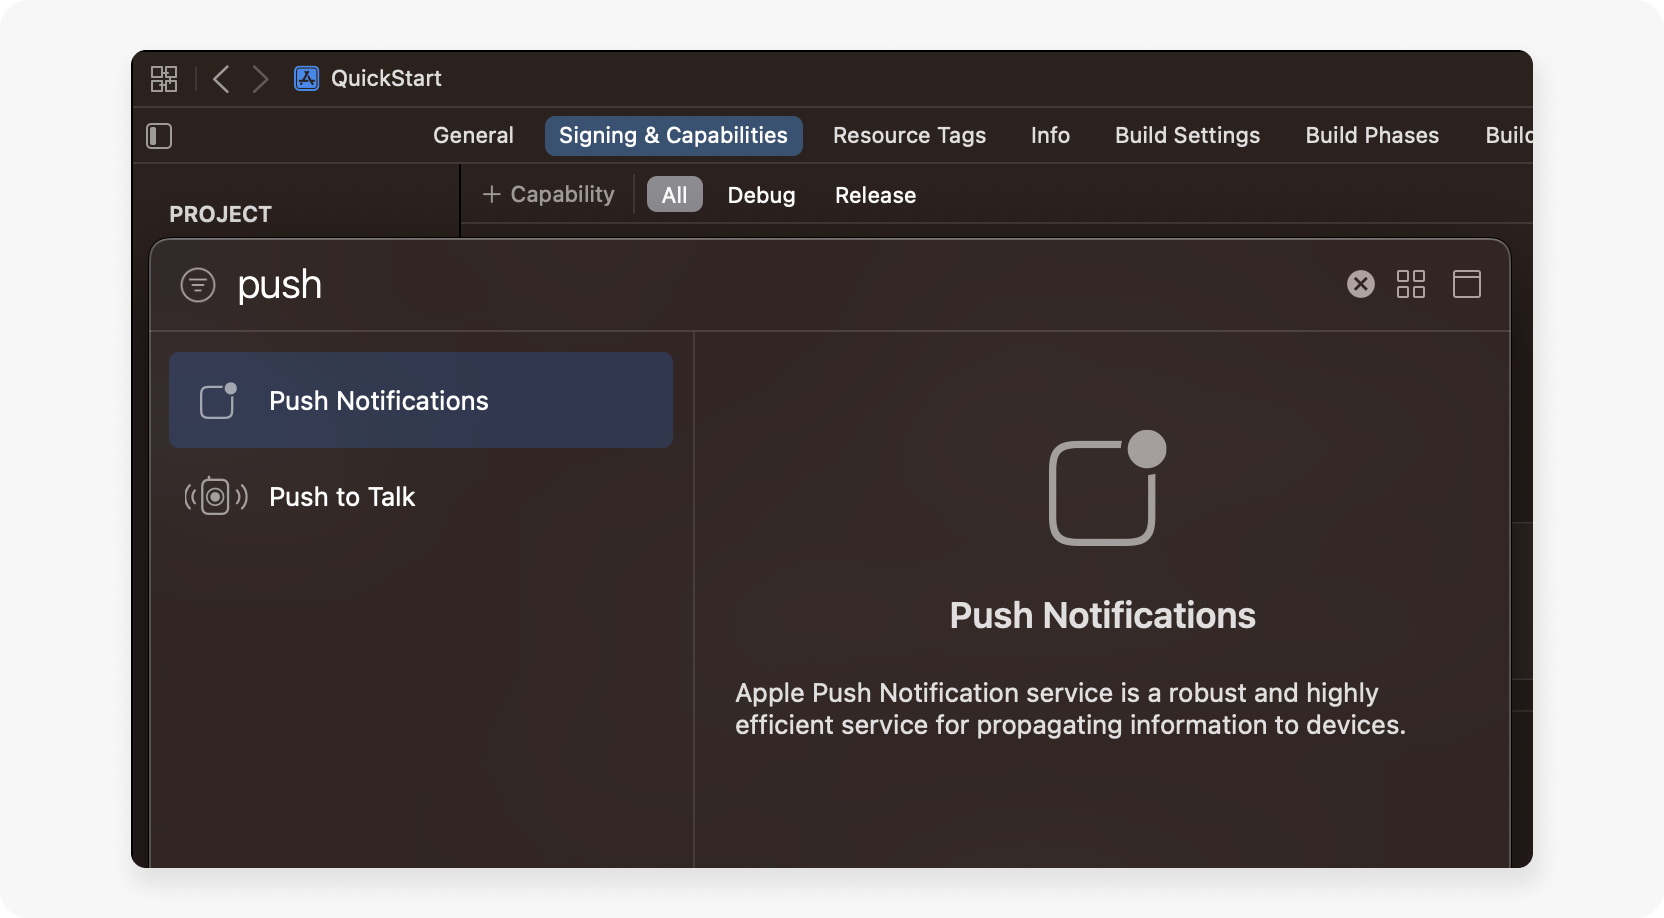
To do so, open Xcode and go to Target > Signing & Capabilities. Then, add Push Notifications:
To enable VoIP, select Background Modes and select Voice over IP:

Step 3: Design the CallKit UI
Now that you've successfully configured CallKit in Xcode and the Apple Developer portal, it's time to take a look at the design of your application and its user experience.
Designing the CallKit UI is relatively straightforward because CallKit provides a native user interface that you can customize to match your application's branding and design. The UI includes the incoming call screen, the active call screen, and the in-call screen.
While the default CallKit UI provides a functional and recognizable interface, it may not fully align with your app's visual identity and branding. By tailoring the CallKit UI, you can enhance the look and feel of the calling feature, reinforcing your brand's identity and creating a more immersive and unified experience for your users.
Now that you have the foundation of the app set, it's time to figure out how to customize the CallKit UI to make it uniquely yours. To achieve this, you'll learn about CallKit classes (such as CXProvider and CXProviderConfiguration) and how to use them to configure the design.
First, let's take a look at some CallKit classes.
CXProvider
A CXProvider object is responsible for reporting out-of-band notifications that occur to the system. A VoIP app should create only one instance of CXProvider and store it for use globally.
To start, create a new class called CXCallManager, create its singleton, and add the property let provider: CXProvider. Override the initializer and assign a shared instance of CXProvider to the provider property:
In order to get the shared instance of CXProvider, you need to initialize it with a configuration (CXProviderConfiguration) object, which you'll set up next:
For more information, check out the official Apple documentation for CXProvider.
A CXProviderConfiguration object controls the native call UI for incoming and outgoing calls, including the ringtone for incoming calls and the icon that's displayed during calls. A provider configuration can also set the maximum number of call groups and the number of calls in a single call group, determine whether to use emails and phone numbers as handles, and specify whether to support video.
Note: The initialization of the CXProviderConfiguration object with a localized name is now deprecated. The localized name will correspond to the app's product name set in Targets > General and will appear in the call's view when your users receive a call through CallKit.
If you're looking to customize CallKit even more, check out this table:
Name | Description | Default value |
The name of the sound resource in the app bundle to be used for the provider ringtone |
| |
The PNG data for the icon image to be displayed for the provider |
| |
The maximum number of call groups |
| |
The maximum number of calls per call group |
| |
The supported handle types |
| |
A Boolean value that indicates whether the provider supports video in addition to audio |
| |
A Boolean value that indicates whether the provider includes a call in the system's Recents list after the call ends |
|
Step 4: Request CallKit actions
Having explored the nuances of customizing the CallKit UI to align with your app's visual identity and branding, it's time to turn your attention to an equally vital aspect: CallKit actions. These actions are the heart and soul of how calls are handled within an iOS app, as they provide you with the power to control and manage calls in real-time.
CallKit provides many call-related features, such as dialing, ending, muting, and holding a call. Each of these features should be executed by appropriate CallKit actions called CXCallAction. These actions are called from a CXCallController object, which uses CXTransaction objects to execute each CXCallAction.
In order to control CallKit, you must create corresponding CXCallActions and execute them by requesting a transaction with CXTransaction.
There are three steps to send a request to CallKit:
Create a
CXCallActionobjectCreate a
CXTransactionobjectRequest the
CXTransactionobject viaCXCallController
Name | Description |
Telephony actions (such as start call, end call, mute call, and hold call) associated with a call object | |
An object that contains zero or more action objects to be performed by a call controller | |
An object that interacts with calls by performing actions and observing calls |
Add the CXCallController property and another method named requestTransaction(with:completionHandler:). The method creates CXTransaction with CXCallAction and requests the transaction via callController. You always have to call this method after creating a CXCallAction object:
Start and end call actions
Now that you know all about CXCallController, let's delve into the nuances of "start" and "end" call actions. These actions are pivotal, as they govern the primary interactions users have with calls—initiating and concluding them.
The following code implements a method for CXStartCallAction:
This action represents the start of a call. If the action is requested successfully, a corresponding CXProviderDelegate.provider(_:perform:) event is called. You have to create a CXHandle object associated with the call that will be used to identify the users involved with the call. This object is included in CXStartCallAction along with a UUID.
Note: Don't forget to call the requestTransaction(with:completionHandler:) method after creating a CXStartCallAction object.
The following code implements another method for CXEndCallAction:
This action represents the end of a call. If the action is requested successfully, a corresponding CXProviderDelegate.provider(_:perform:) event is called. The CXEndCallAction object only requires the UUID of the call.
Other call actions
Other CXCallActions can be implemented the same way as CXStartCallAction and CXEndCallAction. Here is a list of other call actions:
Call action | Description | Corresponding event |
Answers an incoming call | ||
Places a call on hold or removes a call from hold | ||
Mutes or unmutes a call | ||
Groups or ungroups a call |
Step 5: Manage Calls
To easily manage CXCallController and call IDs, you may want to create a call manager that must be accessible from anywhere. The call manager stores and manages UUIDs of the ongoing calls to handle call events:
Note: You can also use the CXCallController.callObserver.calls property, which manages a list of active calls (including ended calls) and observes call changes. Each call is a CXCall object that represents a call in CallKit. By checking the hasEnded attribute, you can handle ongoing calls. For more information, see the official Apple documentation about CXCallObserver and CXCall.
To create a call manager, create a new class named CallManager. Then, add a shared static instance to access it from everywhere (you may choose to use patterns other than singleton):
If you want to know more about this pattern, see the Apple documentation about managing a shared resource using a singleton.
Then, add a callIDs property with a type of [UUID] and add methods for managing the callIDs for addCall(uuid:), removeCall(uuid:), and removeAllCalls():
Step 6: Handle CallKit events
With the essential pieces in place, it's time to focus on the core of your CallKit integration—handling CallKit events. This phase ensures that users receive notifications for new incoming calls and allows the system to interact with ongoing calls.
To report new incoming calls or respond to new CallKit actions, you need to create a CXProvider object with the CXProviderConfiguration that was created in the third step. You can also handle CallKit events of the call via CXProviderDelegate.
To do so, import CallKit and create a ProviderDelegate class with NSObject and CXProviderDelegate conformance:
Then, add two properties: callManager and provider. The callManager is the CallManager class that you created in the fifth step. The provider reports actions for CallKit. When you initialize a provider, use the CXProviderConfiguration.custom that you previously created:
To report a new incoming call, you need to create a CXCallUpdate instance with the relevant information about the incoming call as well as the CXHandle that identifies the users involved in the call. To make your calls richer, you can customize the CXHandle and CXCallUpdate instances.
If the call has video, set hasVideo to true. The iPhone call log is based on the CXHandle object. Additionally, you should invoke provider.reportNewIncomingCall(:) with the CXCallUpdate you just created:
After reporting a new incoming call, you have to add it to CallManager.shared.calls by using the addCall(uuid:) method that was previously added:
CallKit keeps track of the connected time of the call and the end time of the call by listening to appropriate CallKit events. To tell CallKit that the call was connected, call reportOutgoingCall(with:connectedAt:). This initiates the call duration elapsing and informs the starting point of the call that's displayed in the call log of the iPhone app:
To tell CallKit that the call was ended, call reportCall(with:endedAt:reason:). This informs the end point of the call that will be displayed in the call log of the iPhone app as well:
This is what the whole snippet will look like:
Step 7: Handle CXCallAction events
Now that you know how to manage incoming and outgoing calls, it's time to fine-tune your app. The subtleties of call handling don't end with connecting or ending calls. What happens during an active call matters as well, and that's where CXCallAction events come into play.
CXCallAction events represent actions that users can take on a call, like holding, muting, or ending the call. Managing these events allows developers to create a responsive and interactive calling experience, mimicking the native phone app's behavior.
Interact with the CallKit UI
When the provider performs CXCallActions, corresponding CXProviderDelegate methods can be called. In order to properly respond to the users' actions, you have to implement appropriate Sendbird Calls actions in the method.
Note that to access the UUID of the call, you have to use the action.callUUID property, not action.uuid. Don't forget to execute action.fulfill() before the method is finished.

For more information about CXProviderDelegate methods, refer to the official Apple documentation.
This is what your code will look like:
Step 8: Interact with the UI
After successfully handling the CXCallAction events in the previous step, it's essential to connect this with the frontend to guarantee a user-friendly experience. This brings us to the current step, where you'll step into the world of user interface interactions. By merging your managed call actions with the UI, you can offer users easy-to-use controls and responsive cues, creating a seamless calling experience.
You can start and end calls with CallKit using its default view. In this section, you'll use a custom UI with CallKit. For the sake of clarity, this tutorial skips creating related storyboard files and ViewController files. Instead, let's suppose that there is one text field for entering the remote user's ID, one button for making an outgoing call, another button for receiving an incoming call, and one button for ending the call.
This is what your code will look like:
When making an outgoing call, the user takes the initiative to start the conversation, necessitating the creation of a call request. This action demands both the callee's user ID and the unique UUID associated with the call, so it's crucial to incorporate a corresponding action for the "end" button. This functionality ensures that the call is terminated based on its specific callID.
To answer an incoming audio call, you have to simulate one. Because CallKit is not aware of the incoming call, you have to report the incoming call to CallKit. This action requires the caller's user ID and the unique UUID of the call. Currently, because the incoming call is made locally, you will use a randomly generated UUID() instead of a real call's UUID. If you want to test incoming video calls, assign the value of the hasVideo parameter to true.
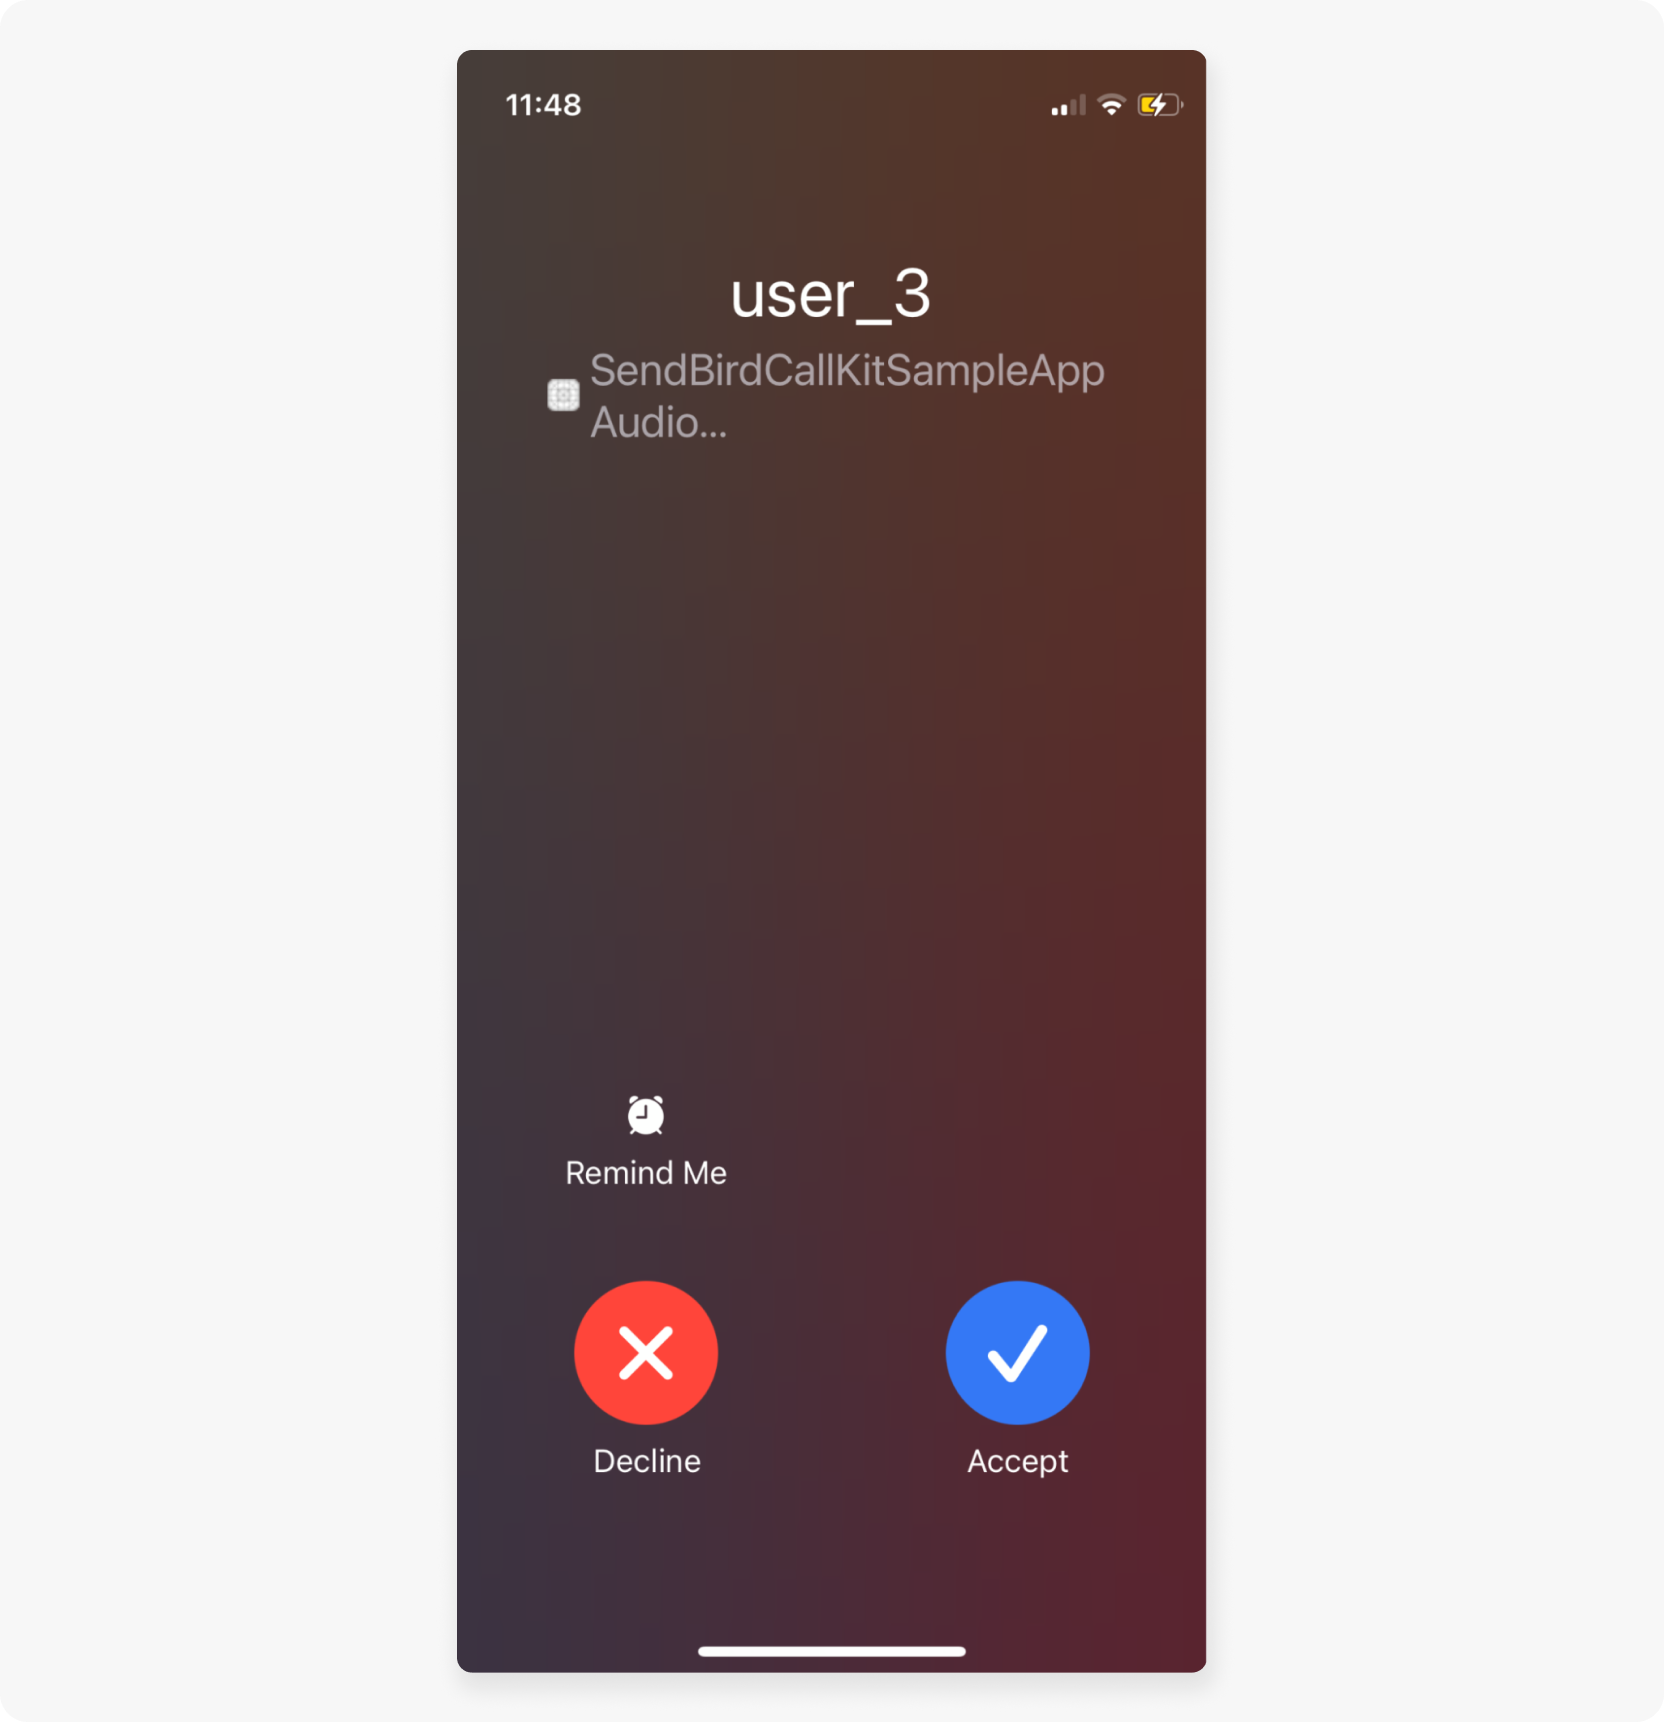
When everything works end to end, this is what it looks like:
In this setup, a physical device (labeled as user_4) communicates with the Sendbird call web portal (designated as user_3). This arrangement facilitates testing. Calls initiated from either end are seamlessly synchronized across both interfaces, thanks to the integration of CallKit and the Sendbird SDK.
Step 9: Apply further enhancements
The very essence of a CallKit-based app is to emulate the native calling experience seamlessly, allowing users to engage with calls just like they would with a regular phone call. However, to truly offer this level of integration, the app must ensure that incoming call notifications are delivered instantly and reliably. Enter PushKit.
PushKit notifications
PushKit, Apple's specialized push notification service for VoIP apps, is the secret sauce that powers this immediate delivery. Unlike standard push notifications that might experience slight delays or might not even wake up the app in certain conditions, PushKit is designed to be ultra-responsive. Its primary role is to promptly notify the app of an incoming call, ensuring that the user is alerted instantly.
Here are a few reasons this instantaneity is crucial for a CallKit-based app:
User expectation: When users receive a call, they expect an immediate alert. Delays or missed notifications can compromise the user experience, leading to missed calls and dissatisfaction.
App background restrictions: iOS has stringent app backgrounding policies to optimize device performance and battery life. PushKit ensures that even if your app is not active, it's awakened in time to process an incoming call.
Data integrity and synchronization: Especially if your app integrates with services like SendBird for real-time communication, you need a mechanism that ensures all call data is synchronized accurately and promptly. PushKit aids in this, acting as the reliable messenger that communicates incoming calls and ensures the app is prepped to handle them.
Let's take a look at the code for how to use PushKit with Sendbird. This is what PushKit registration looks like:
And this is how you would handle PushKit delegate events:
The rest of the code would remain the same since you're using SendBirdCallDelegate and DirectCallDelegate, which will ensure the rest of the logic flows as before without breaking anything.
For more information, check out these Apple docs:
Custom ringtones
The ringtoneSound property in a CallKit integration plays a vital role in customizing the call experience for users. It allows developers to set a specific ringtone for incoming calls managed through CallKit. By default, the system ringtone is used, but with the ringtoneSound attribute, you can provide a personalized touch by playing a custom ringtone that aligns with your app's branding or the preferences of the user:
Start building VoIP calls with iOS CallKit and Sendbird Calls
After completing this tutorial, you now know how to build a VoIP app using Sendbird Calls and the Apple CallKit framework. In this tutorial, you learned how to configure CallKit, design a calls UI, and manage and handle CallKit actions and events. Additionally, you learned all about PushKit's capabilities and how you can integrate it seamlessly with Sendbird and CallKit.
At this point, you're well on your way to building awesome, engaging apps with voice and video calls. For further assistance or to get started with more advanced features, check out Sendbird's Getting Started guide. If you need help, please see the docs, start a discussion on the Sendbird Community, or contact us to learn more. Our experts are always happy to help!
Happy iOS calling app building—we can't wait to see what you build!


