如何为开发者创建投票投票:Using Sendbird Polls with UIKit
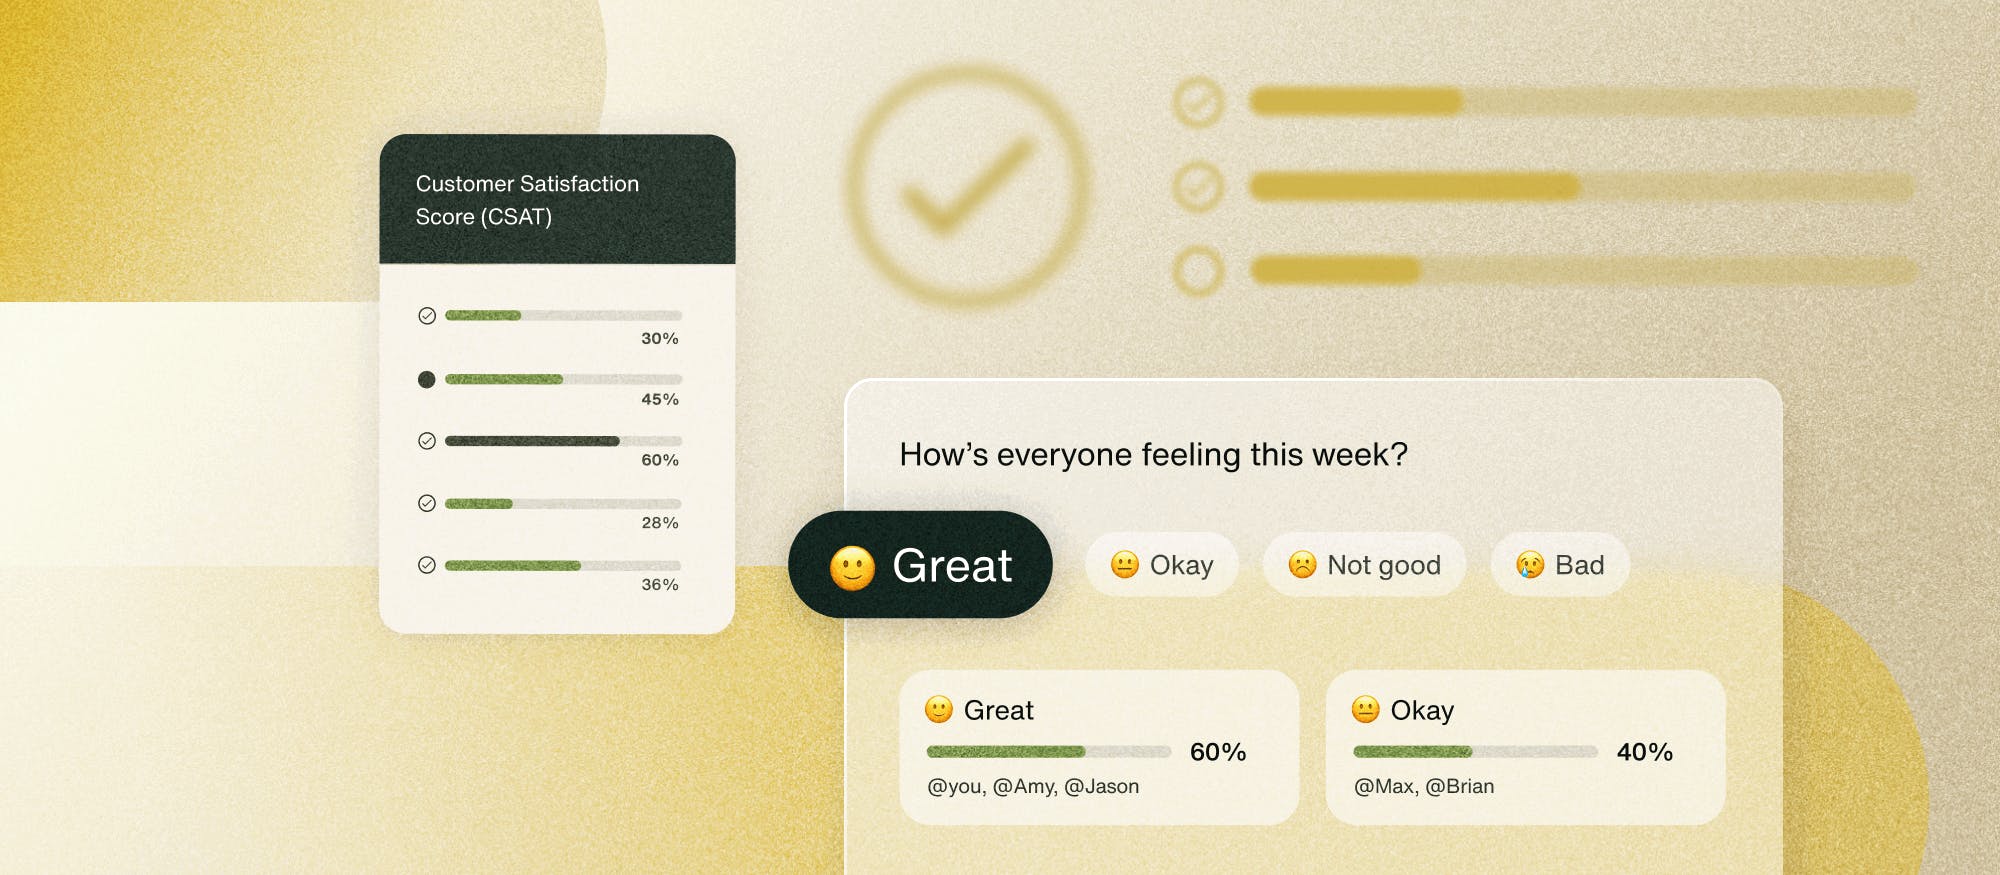
民意调查允许用户分享意见并相互互动。它们通过帮助个人以快速简洁的方式聚集在一起了解他人的偏好来实现快速决策。无论是选择会面地点、确定活动的最佳时间,还是决定观看哪些电影,投票都可以避免过多的对话,并为每个人提供快速明确的答案。
那么如何创建投票表决呢?本教程将向您展示如何使用集成在Sendbird UIKit for React中的 Sendbird Chat SDK 的新投票功能构建应用程序。
您可能还会发现观看此视频教程很有用。
入门
首先,在 Sendbird仪表板中创建一个新的应用程序和用户。仪表板是您可以访问聊天服务中所有内容的地方。
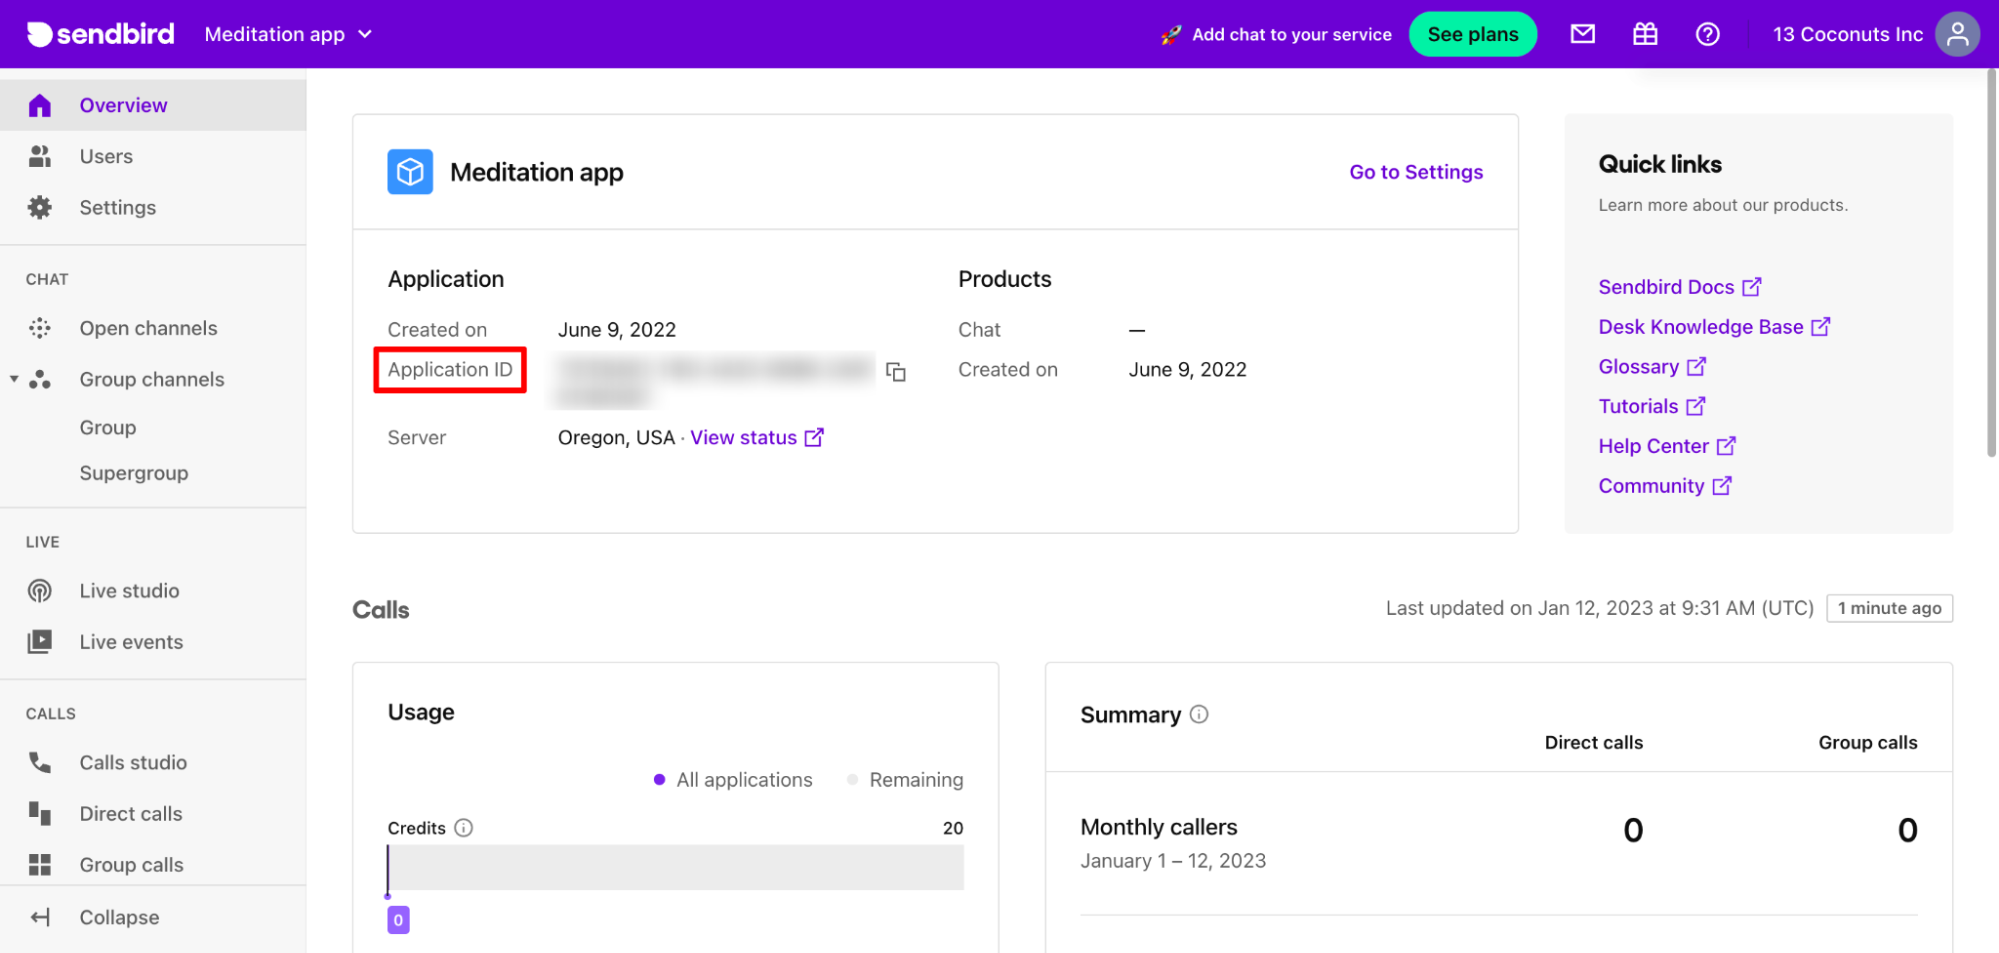
创建后,保存生成的应用程序ID。您将需要它来初始化应用程序中的 Chat Chat SDK和UIKit。
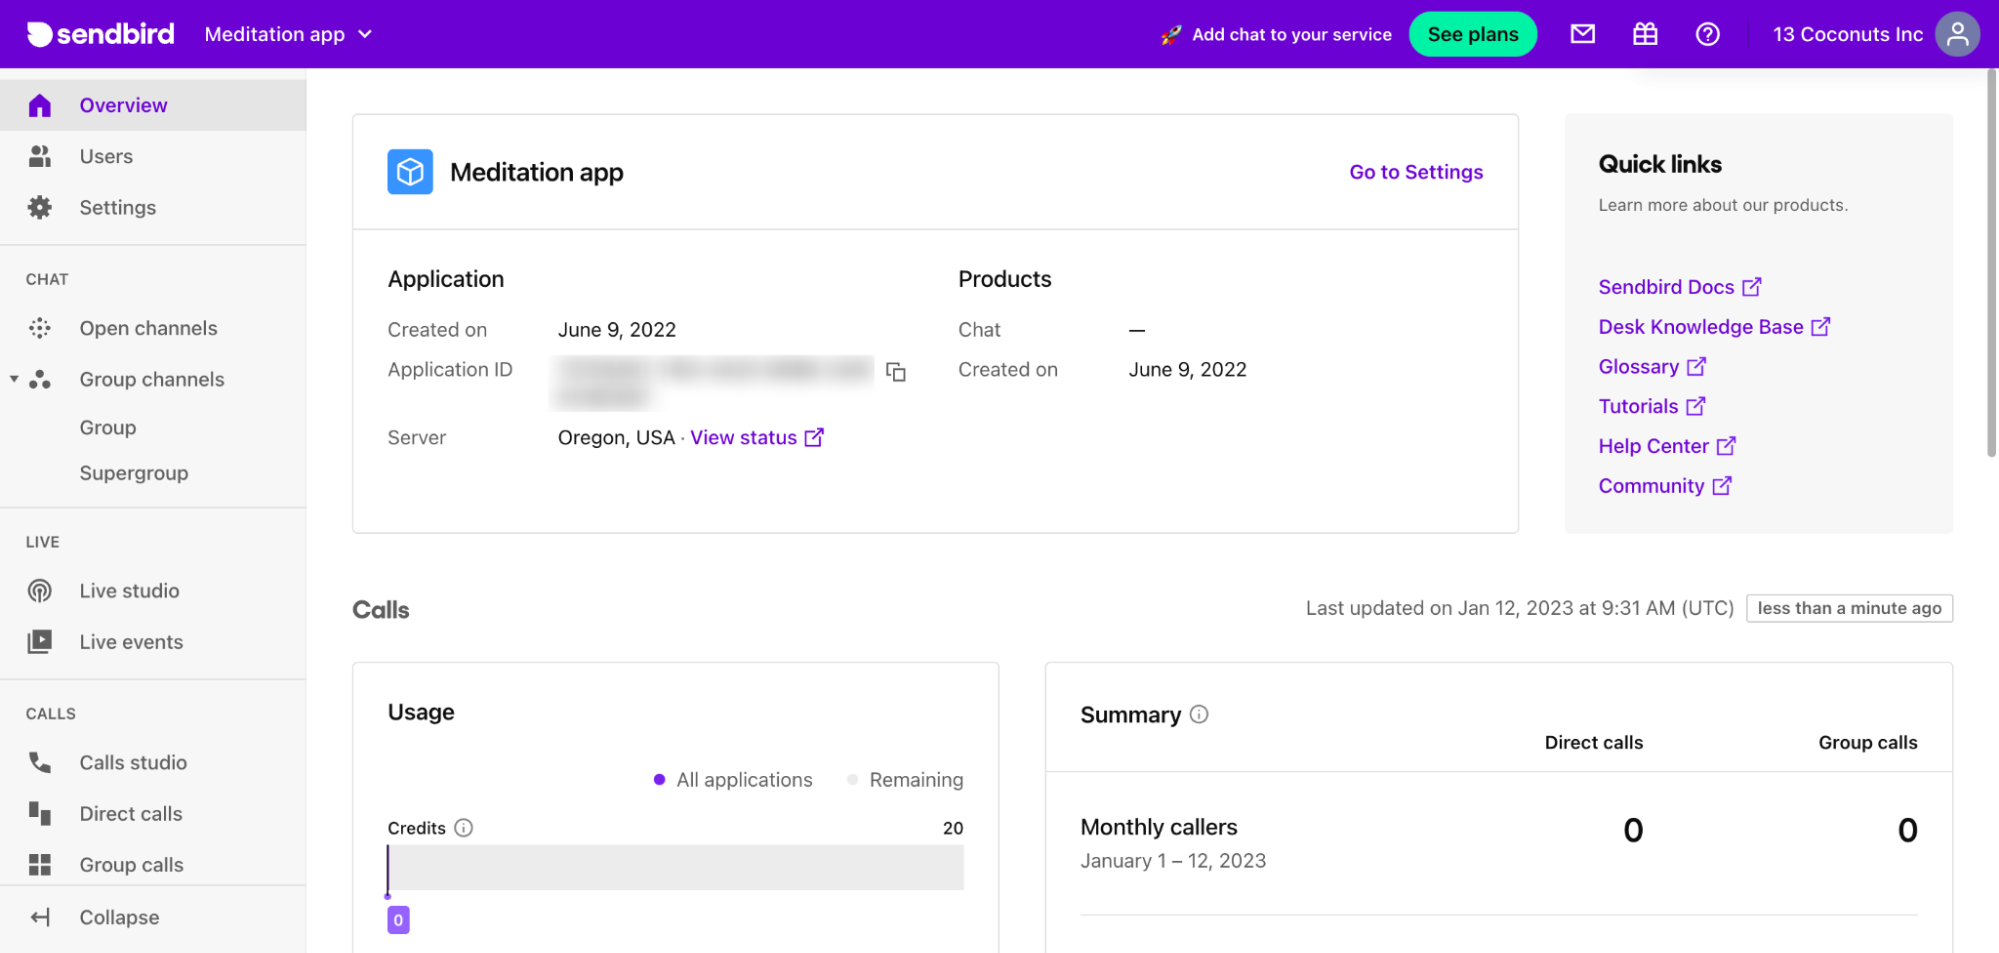
现在,创建一个 React 应用程序并使用 npm 安装 Sendbird SDK 和 Sendbird UIKit for React:
此示例将使用 Material UI,因此请同时安装 material 和 icons-material:
Please refer to MUI docs about Material UI icons.
In your application, create a .env file to store your App ID, user ID, nickname, and access token provided in the Sendbird dashboard. Then, import each variable into the App.js file to initialize the Chat SDK and UIKit.
In App.js, import the Sendbird Provider from Sendbird UIKit. This will be the wrapper for our application. Then create a new file called CustomizedApp.js and import it into App.js. CustomizedApp will be a child component of the SendbirdProvider and contain the ChannelList, Channel, and ChannelSettings components.
SendbirdProvider 是 UIKit 的上下文提供者。确保传入 appId、userId、昵称和 accessToken 以初始化 UIKit。
在 App.js 文件中初始化 Sendbird Chat SDK for JS。使用 SendbirdChat.init 函数并传入将使用的 appID 和模块。为了能够在我们的应用程序中使用 GroupChannelModule,请将 GroupChannelModule 作为模块传入。随着 SendbirdChat.init 的返回,我们用它来调用 .connect 并传入 userID 和 accessToken。

Your app is where users connect.
UIKit 组件
在 CustomizedApp 中,从 UIKit 导入 ChannelList、Channel、ChannelSettings、sendbirdSelectors 和 useSendbirdStateContext。
useSendbirdStateContext 是一个 useState 挂钩,它允许您访问 sendbirdProvider 的状态。当您使用 sendbirdSelectors 时,它将需要来自 useSendbirdStateContext 的状态。此示例将使用 sendbirdSelector 函数 getUpdateUserMessage,它将获取 useSendbirdStateContext 提供的状态。
频道列表
ChannelList 组件将在应用程序中呈现频道列表。我们将使用 onChannelSelect 属性来设置在频道列表中被点击的频道。
渠道
The Channel component will use the channelUrl, onChatHeaderActionClick, renderMessage, and renderMesageInput properties. channelUrl will set the currentChannelUrl and onChatHeaderActionClick renders the settings options to open on click.
The renderMesage property renders a CustomizedMessageItem component, which for our sample will check the type of message that is in the conversation window and return a specific layout based on the message. The types of messages in UIKit are: user, admin and file message. For this sample, there can be the 3 types of messages UIKit provides, as well as a poll message. We will go into detail about CustomizedMessageItem later in this post.
CustomizedMessageInput
Channel 组件将使用的最后一个属性是 renderMessageInput,它返回自定义消息输入。创建一个名为 CustomizedMessageInput 的自定义组件。该组件将使用对话窗口中输入字段的预设 UIKit 布局。我们将添加功能来检查输入框中键入的文本是否以“/poll”开头。如果是这样,那么它将触发一个表单出现。
如何创建投票
现在我们已经构建了应用程序并讨论了一些基本的 UIKit 组件,让我们来谈谈如何实际创建投票。
添加投票
创建名为 AddPoll 的表单。AddPoll 允许用户输入投票的标题并添加选项。AddPoll 将如下所示:
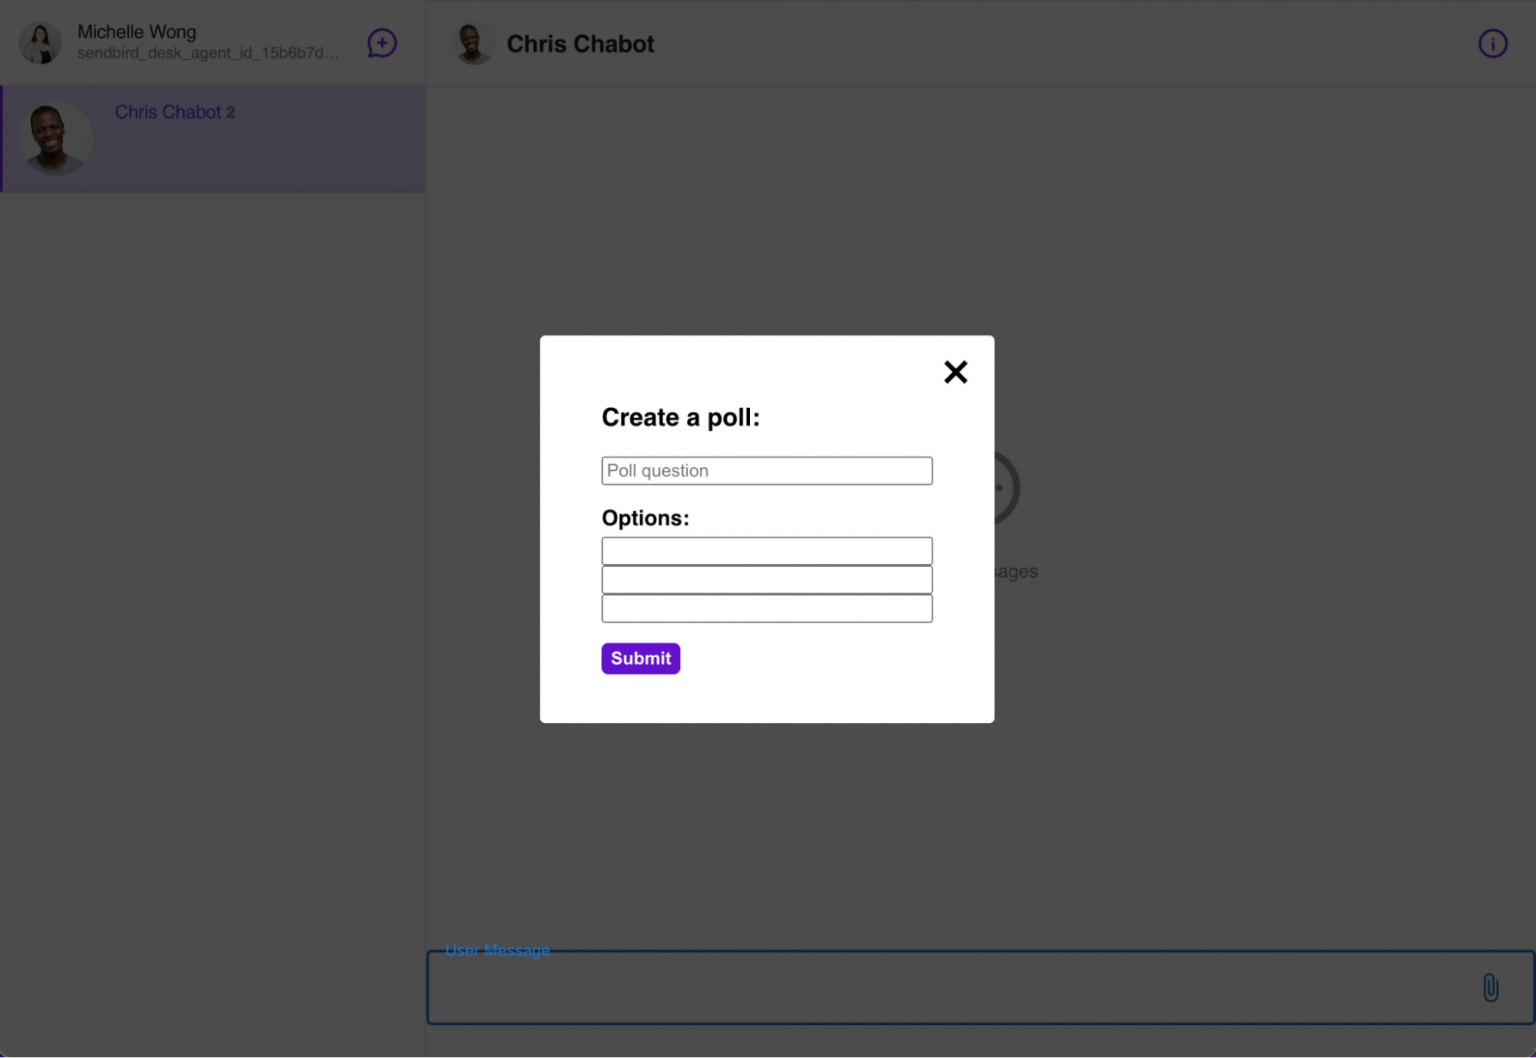
当用户点击Submit时,会调用CustomizedMessageInput中的submitPoll。submitPoll 函数采用从表单接收的参数(标题和选项),并调用聊天 SDK 中的create 方法来创建投票。
Once the poll is created, use sendUserMessage and pass in the channel and user message params. The user message params that need to be defined are the message and poll ID in order to send the user message and have the poll that was just created attached to that message.
Note: In the params, allowUserSuggestion is being set to true so that the poll will allow other users to add options to the poll.
Now let’s take a step back and see what the chat window looks like.
ChannelSettings
The ChannelSettings component passes in the channelUrl to update the current channel and onCloseClick to close the settings options menu.
After importing UIKit components, add the following elements to wrap around each component:
- A div with the class name “channel-list” around ChannelList
- A div with the class name “channel-chat” around Channel
- A div with the class name “channel-settings” around ChannelSettings
Now, create a div to wrap around all three components and their div wrappers with the class name “channel-wrap”. These class names have preset styling components from UIKit that we want to apply to our application.
To have the chat take up the entire view with the channel list on the left and the conversation window on the right, apply the following styling to the App.css file:
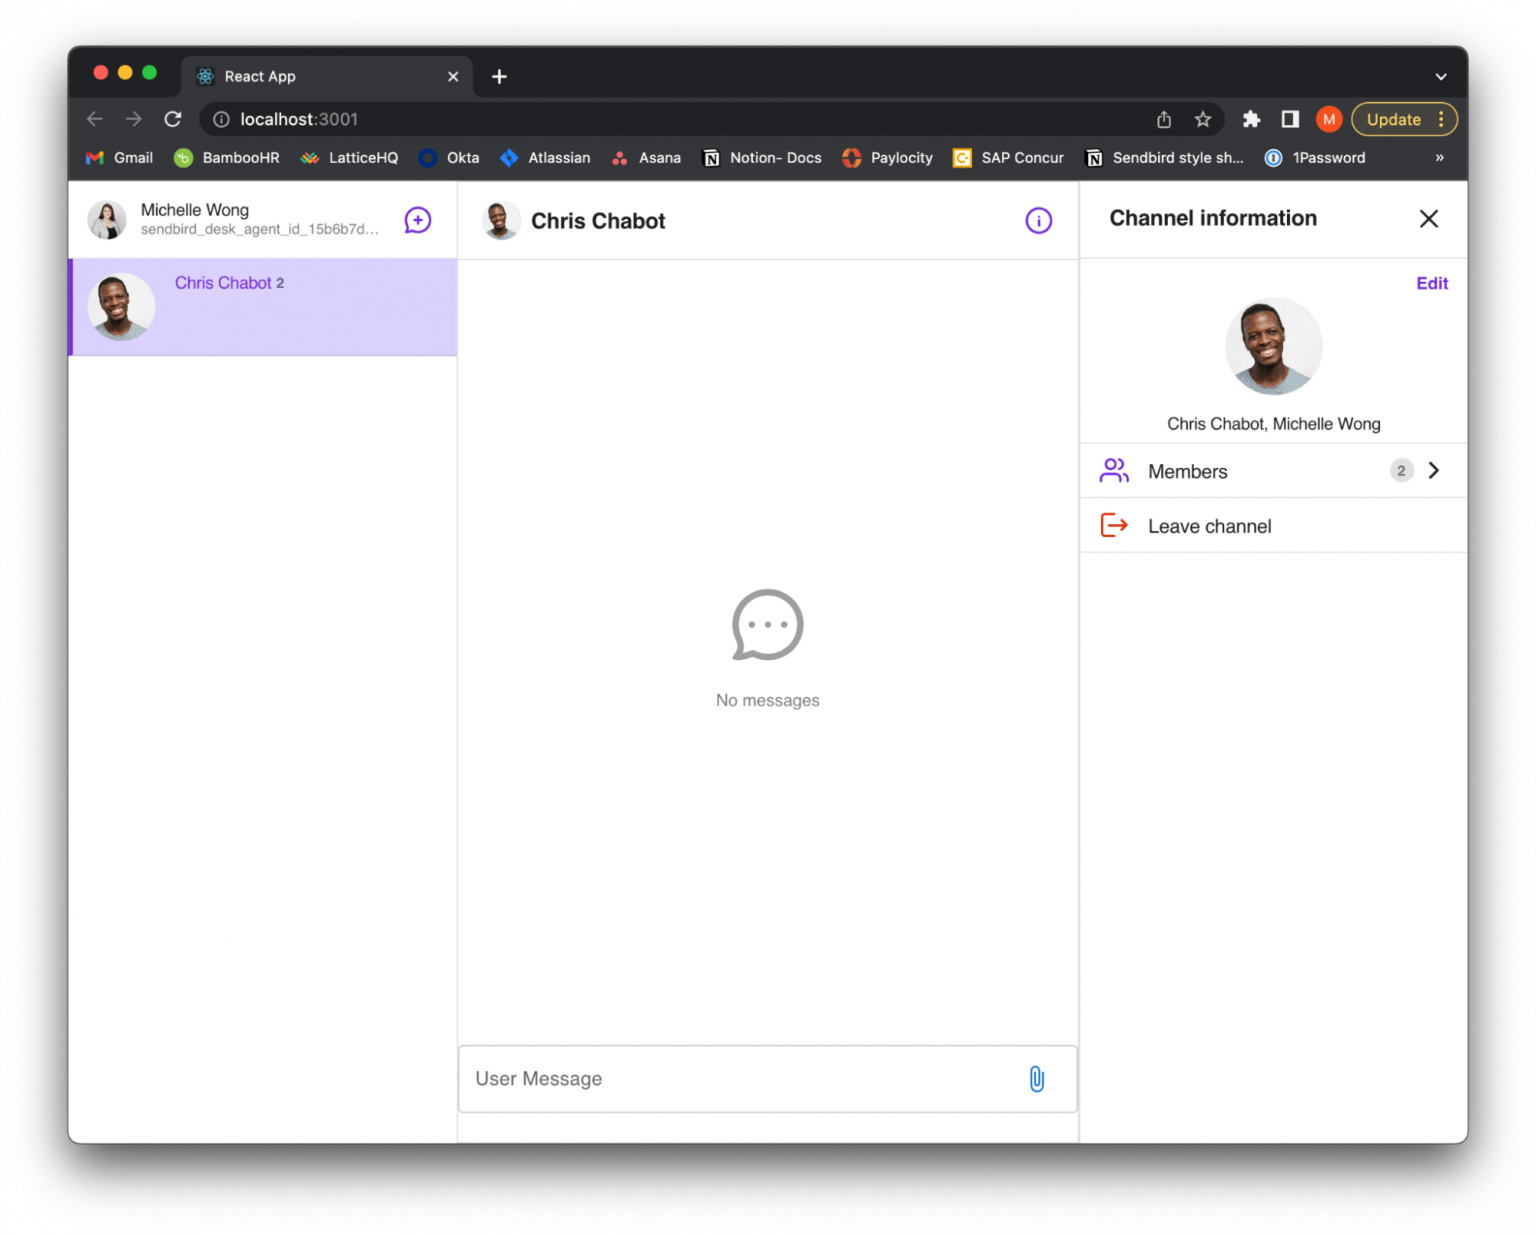
The application will be displayed as the following:
CustomizedMessageItem
As previously mentioned, the Channel component uses renderMessage to return the custom component, CustomizedMessageItem. Pass in message, userId, currentChannel, updateUserMessage and sb.CustomizedMessageItem will check each message in the conversation if it is an admin, file, user, or poll message.
Based on the type of message that it is, it will return the message to be formatted with a certain layout. Import each type of message that it can return, either an AdminMessage, FileMessage, or UserMessage from UIKit as well as a custom PollMessage component.
The AdminMessage, FileMessage and UserMessage utilize the default layouts provided by UIKit.
AdminMessage:
FileMessage:
用户留言:
虽然 UserMessage 使用 UIKit 的预设设计,但我们希望添加额外的功能来触发额外的选项,从而根据用户消息创建投票。用户可以单击其消息的下拉选项并查看默认选项,即编辑和删除按钮。添加另一个选项以创建投票。
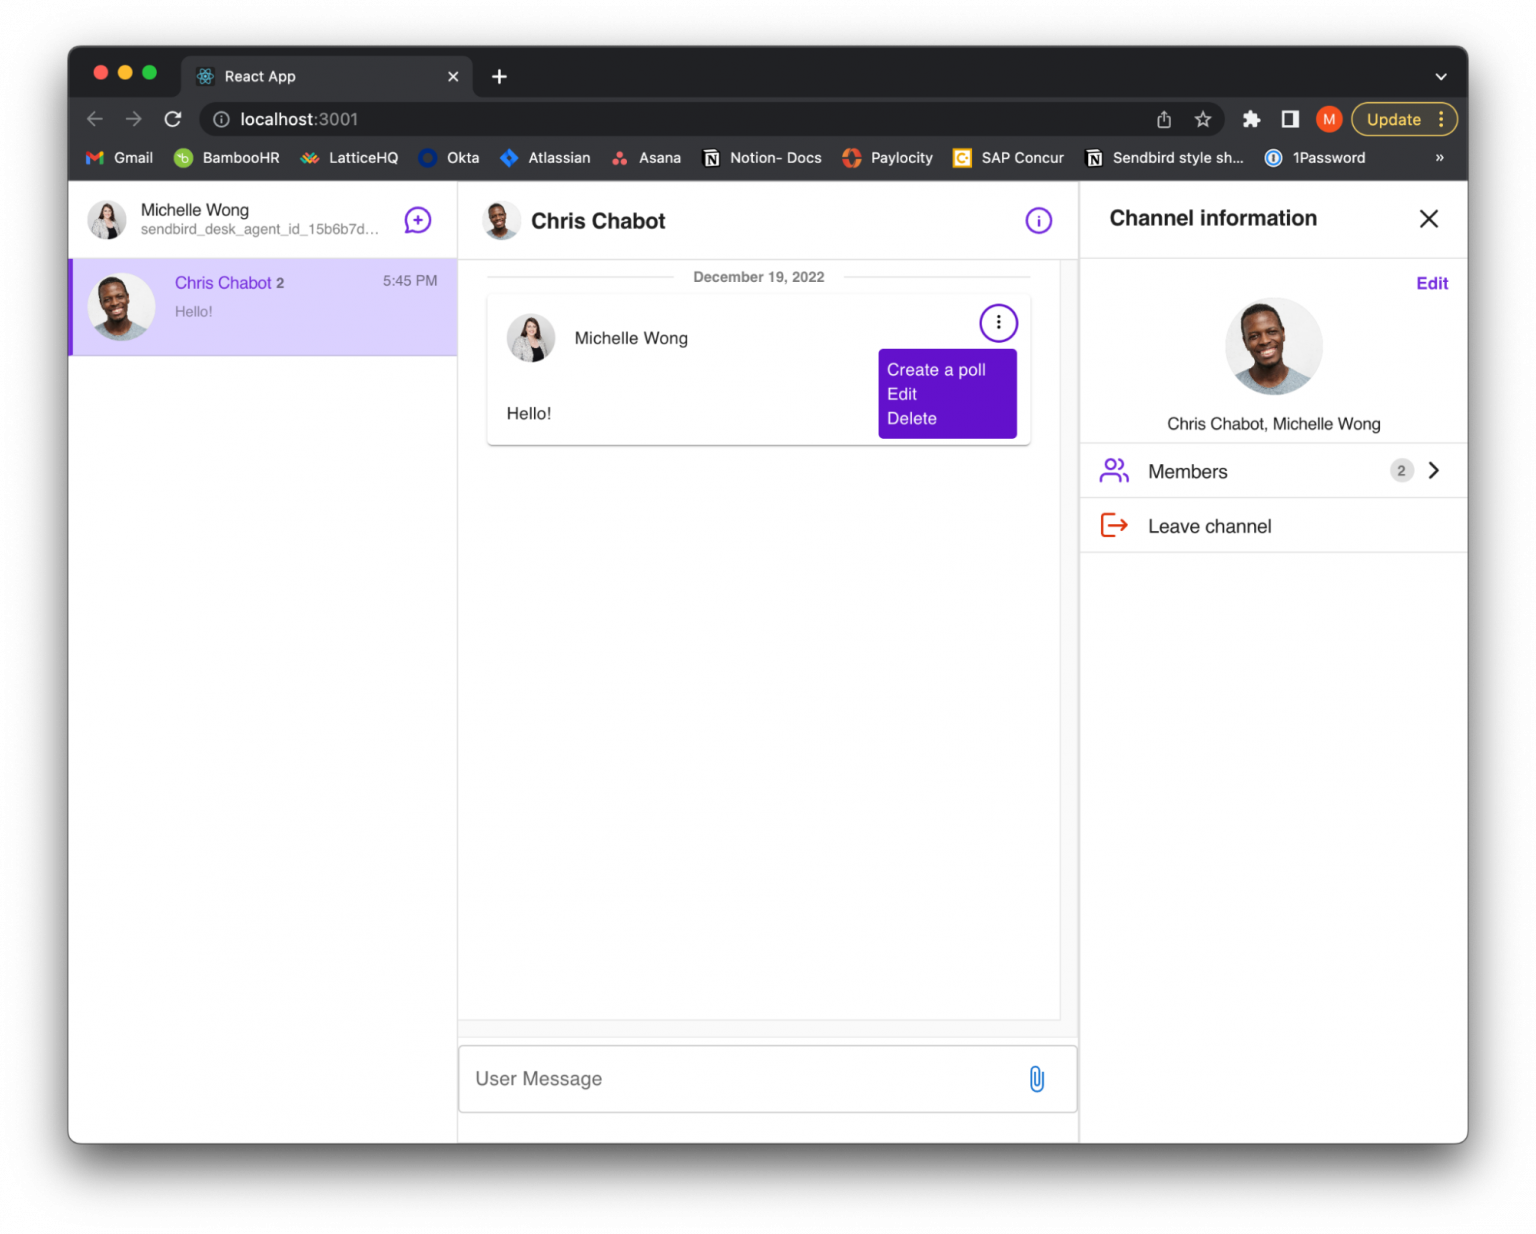
通过单击“创建投票”,将呈现一个表单并询问投票的问题和选项。要呈现表单,请创建一个 AddPoll 组件。在 UserMessage 中导入该组件。
The AddPoll form will be displayed as the following:
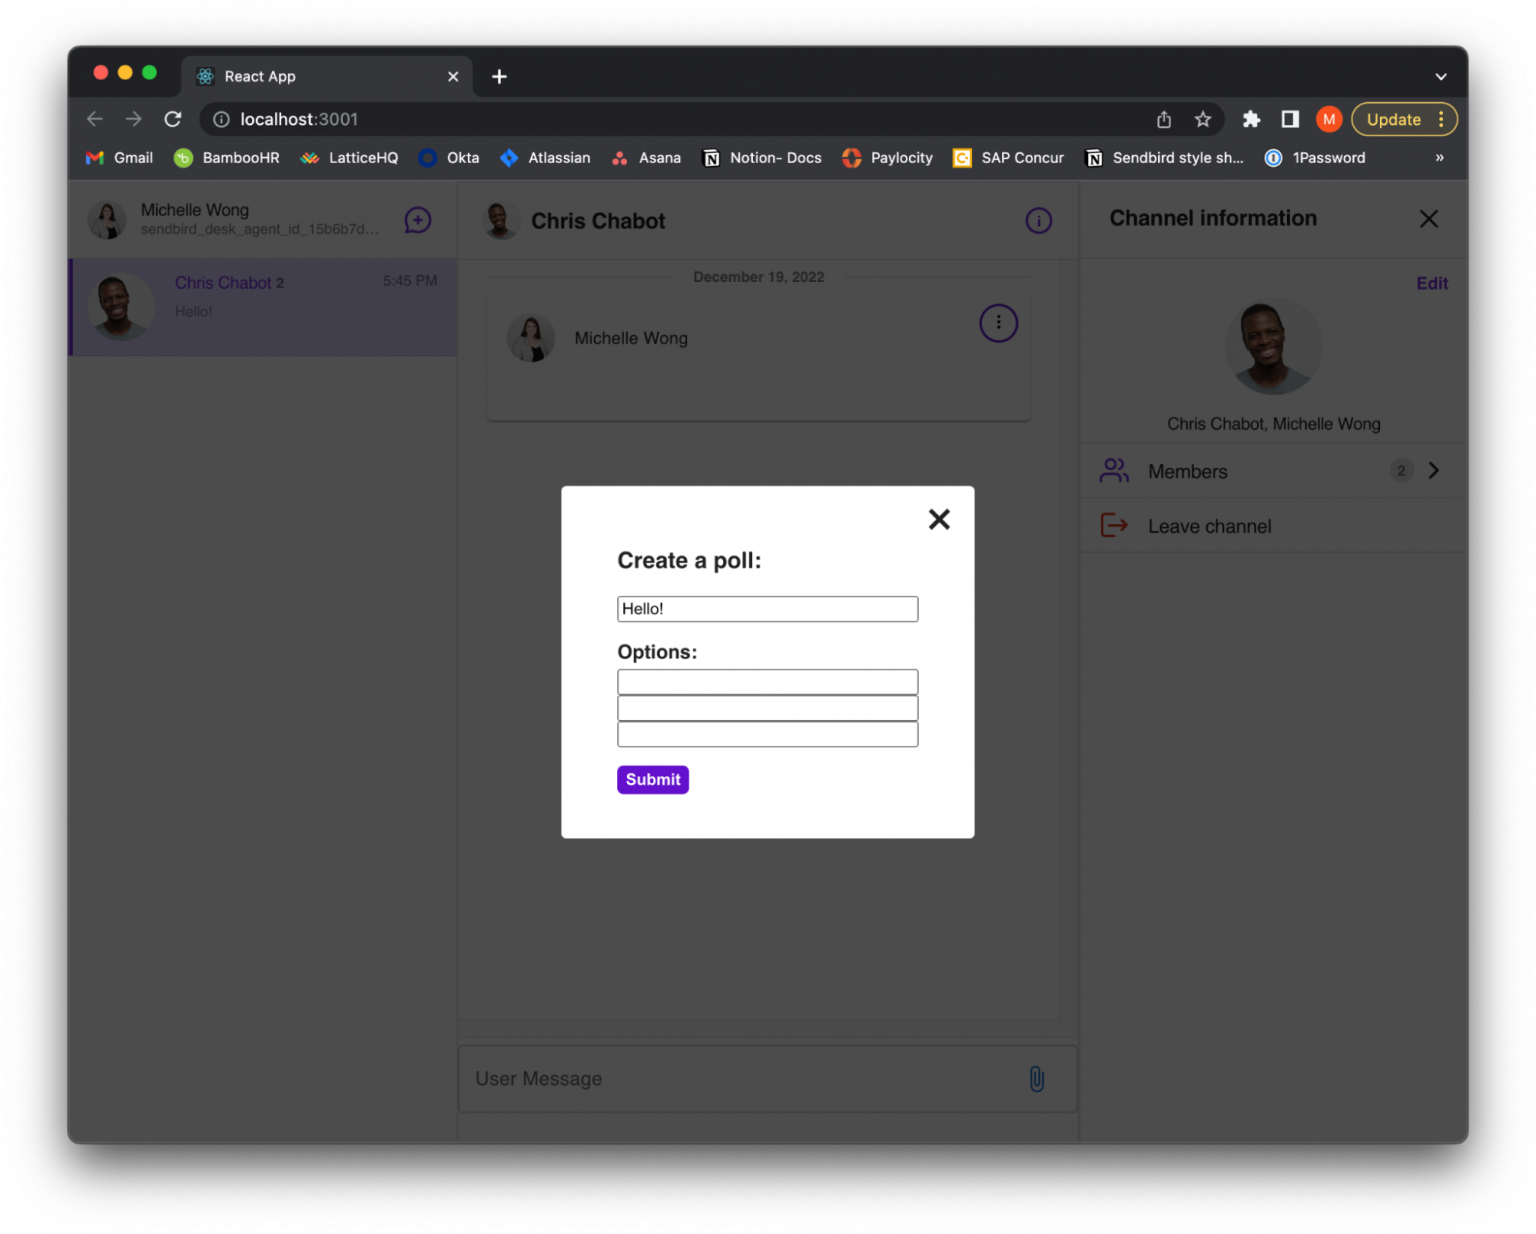
When this form is submitted, it will call the submitPoll function in UserMessage. In submitPoll, set the params that are received, such as the title and optionTexts.
Since we want other users to be able to add an option to someone else’s poll, we are also going to set the allowUserSuggestion to true. There are multiple params that are able to be set for a poll. Please refer to the polls properties.
Now, use Poll.create() and pass in the params object to create a poll. Once the poll is returned, set the userMessageParams. Set the userMessageParams’ message as the poll’s title that was passed in and set the userMessageParams’ poll ID; this is the new poll ID that was generated on creation of the poll. This will connect the new poll with the message.
After the userMessageParams are defined, call updateUserMessage and pass in the channel, message ID and userMessageParams. This will update the message to hold the new poll information.
The submitPoll function should look like this:
现在,由于该消息包含轮询数据,因此该消息被视为轮询,并将作为轮询消息呈现到对话窗口。这是完整的 UserMessage 组件:
轮询信息
如果消息包含轮询数据,它将呈现 PollMessage 组件。PollMessage 返回一个布局,该布局使用 UserMessage 的默认样式和附加功能。投票将显示标题、一个添加选项按钮,并将显示每个选项及其投票计数和相应的投票按钮。
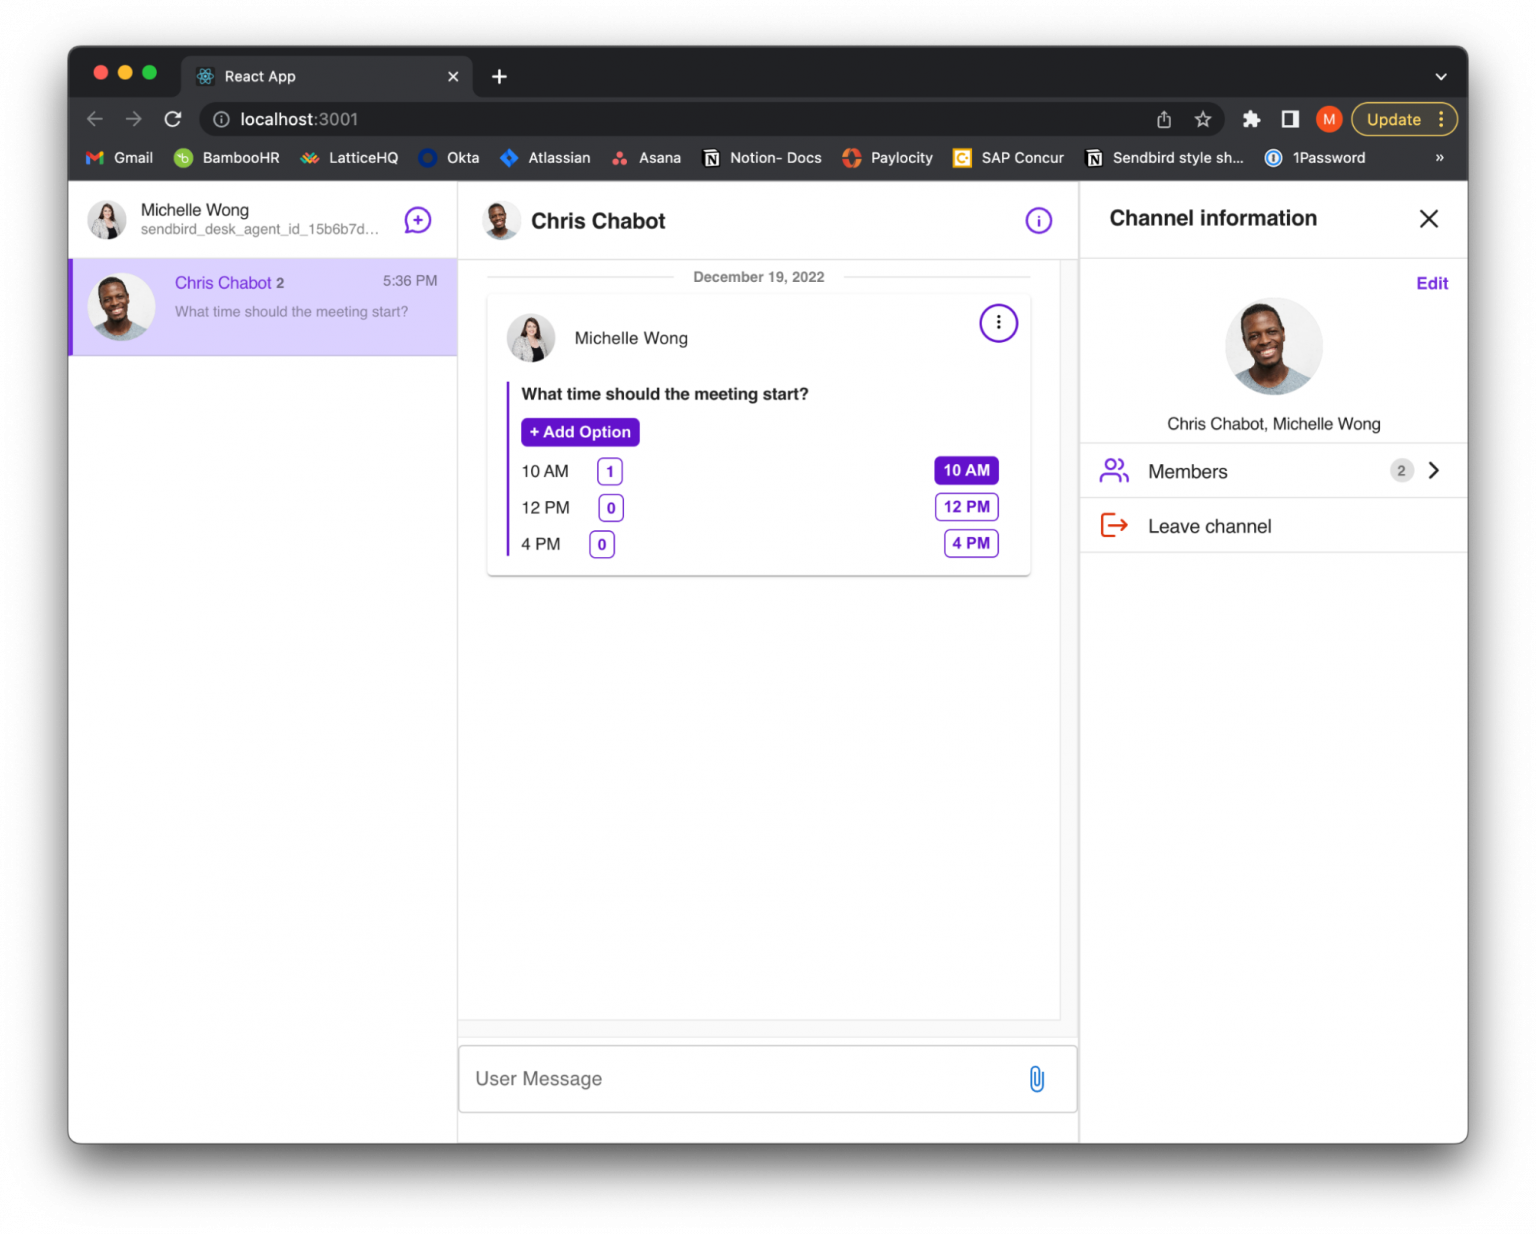
创建投票的用户将有一个选项菜单来更改投票、删除选项或删除投票。他们将能够查看菜单选项,如下所示:

删除投票选项
如果创建投票的用户单击以从投票中删除一个选项,它将呈现 DeleteOptionForm。此表格将显示投票中的每个选项。
这将显示为:
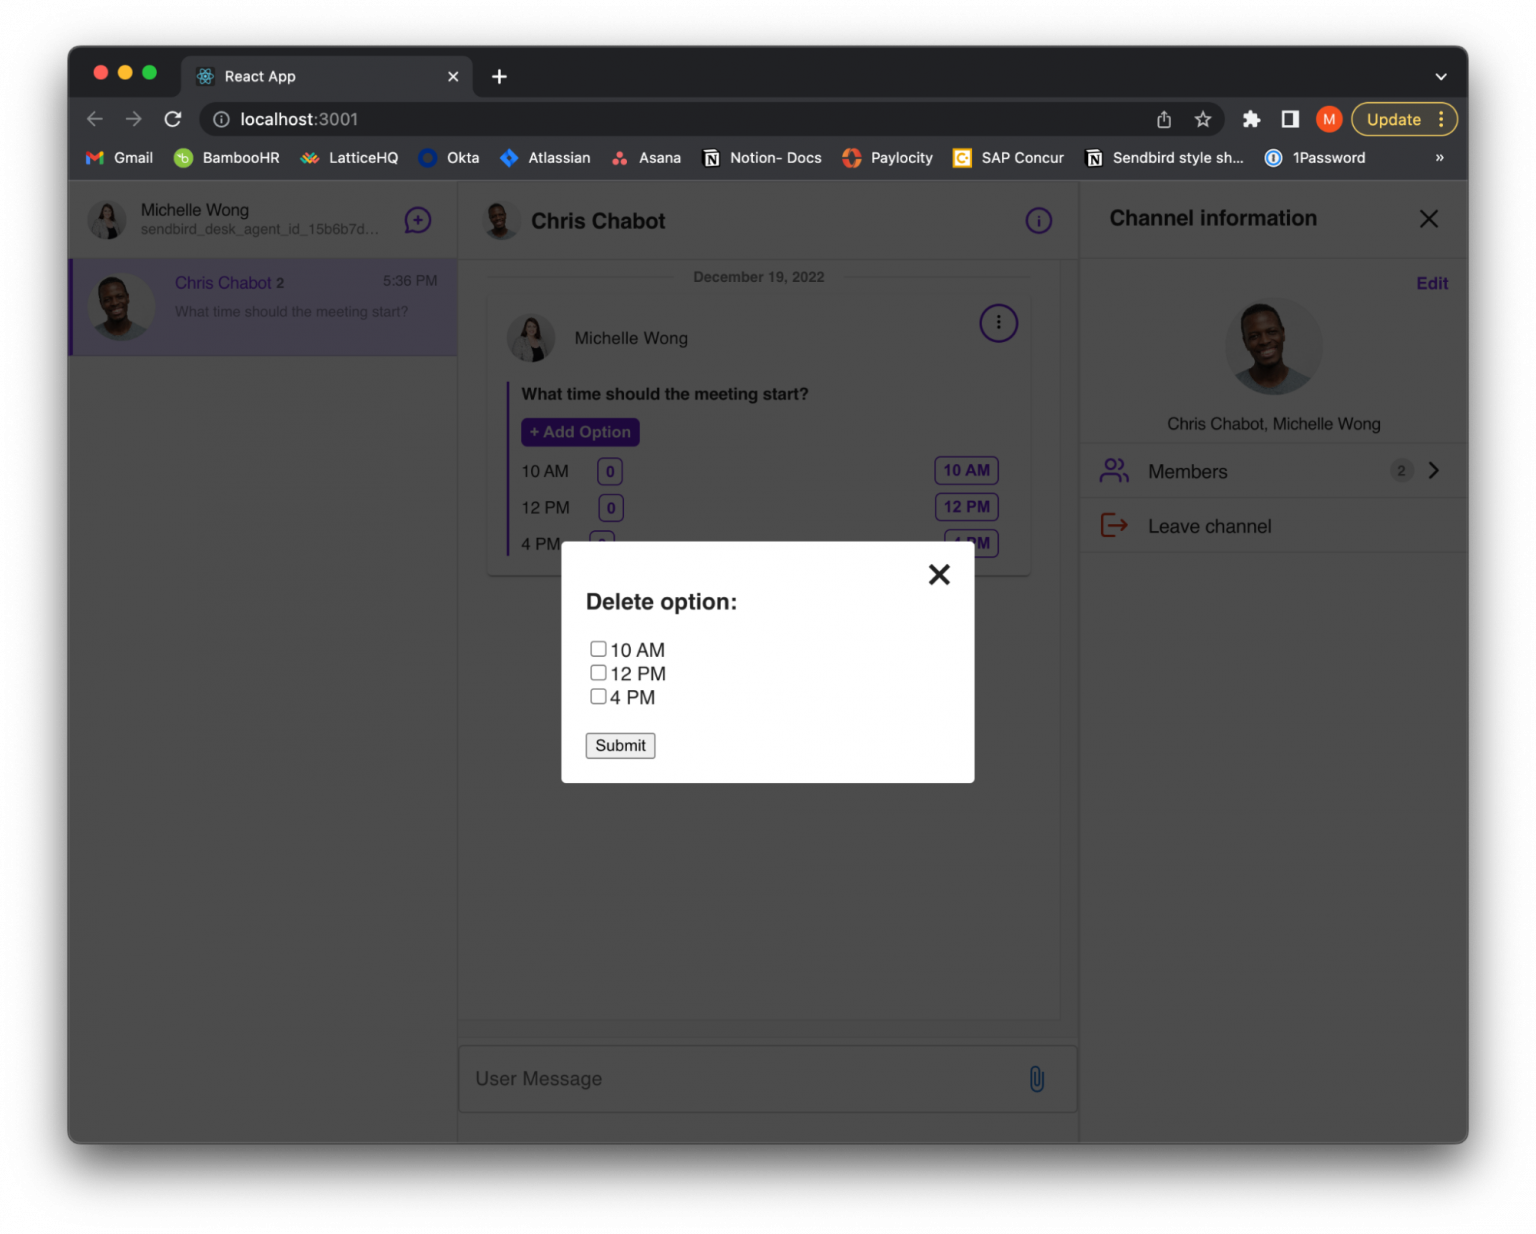
一旦用户选择了要删除的一个或多个选项并提交了表单,它将触发 deleteOption 函数。此函数接收选择要删除的选项并调用deletePollOption函数。它需要传入轮询 ID 和选项 ID,并从轮询中删除该选项。
更新投票
如果用户单击“更改投票”选项,它将呈现一个自定义的 UpdatePollForm 组件。
The update form will look like the following:
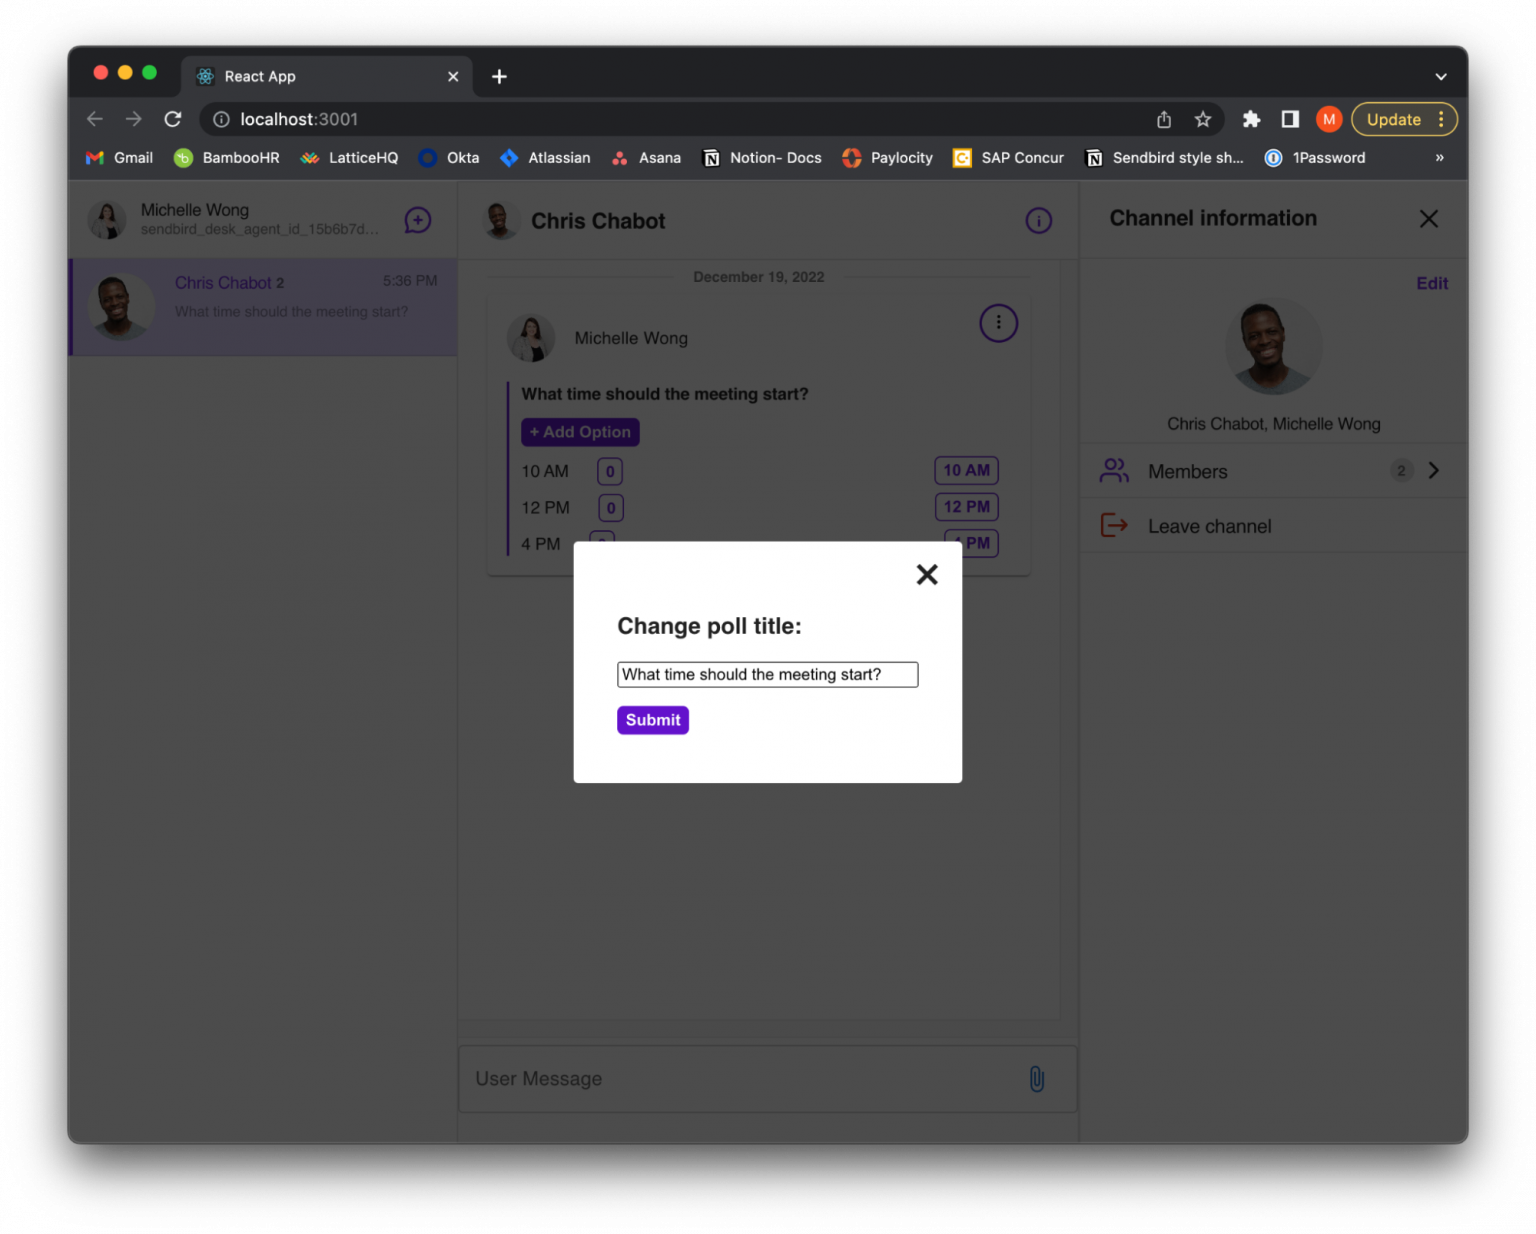
When the user submits the form, it will call updatePoll. In updatePoll, set the updated params, call updatePoll and pass in the poll’s ID and updated params.
删除投票
如果用户单击删除投票选项,它将调用接收投票 ID 的deletePoll函数。
添加投票选项
每个用户都可以向投票中添加选项。在 PollMessage 中,添加一个将触发输入框出现的按钮。
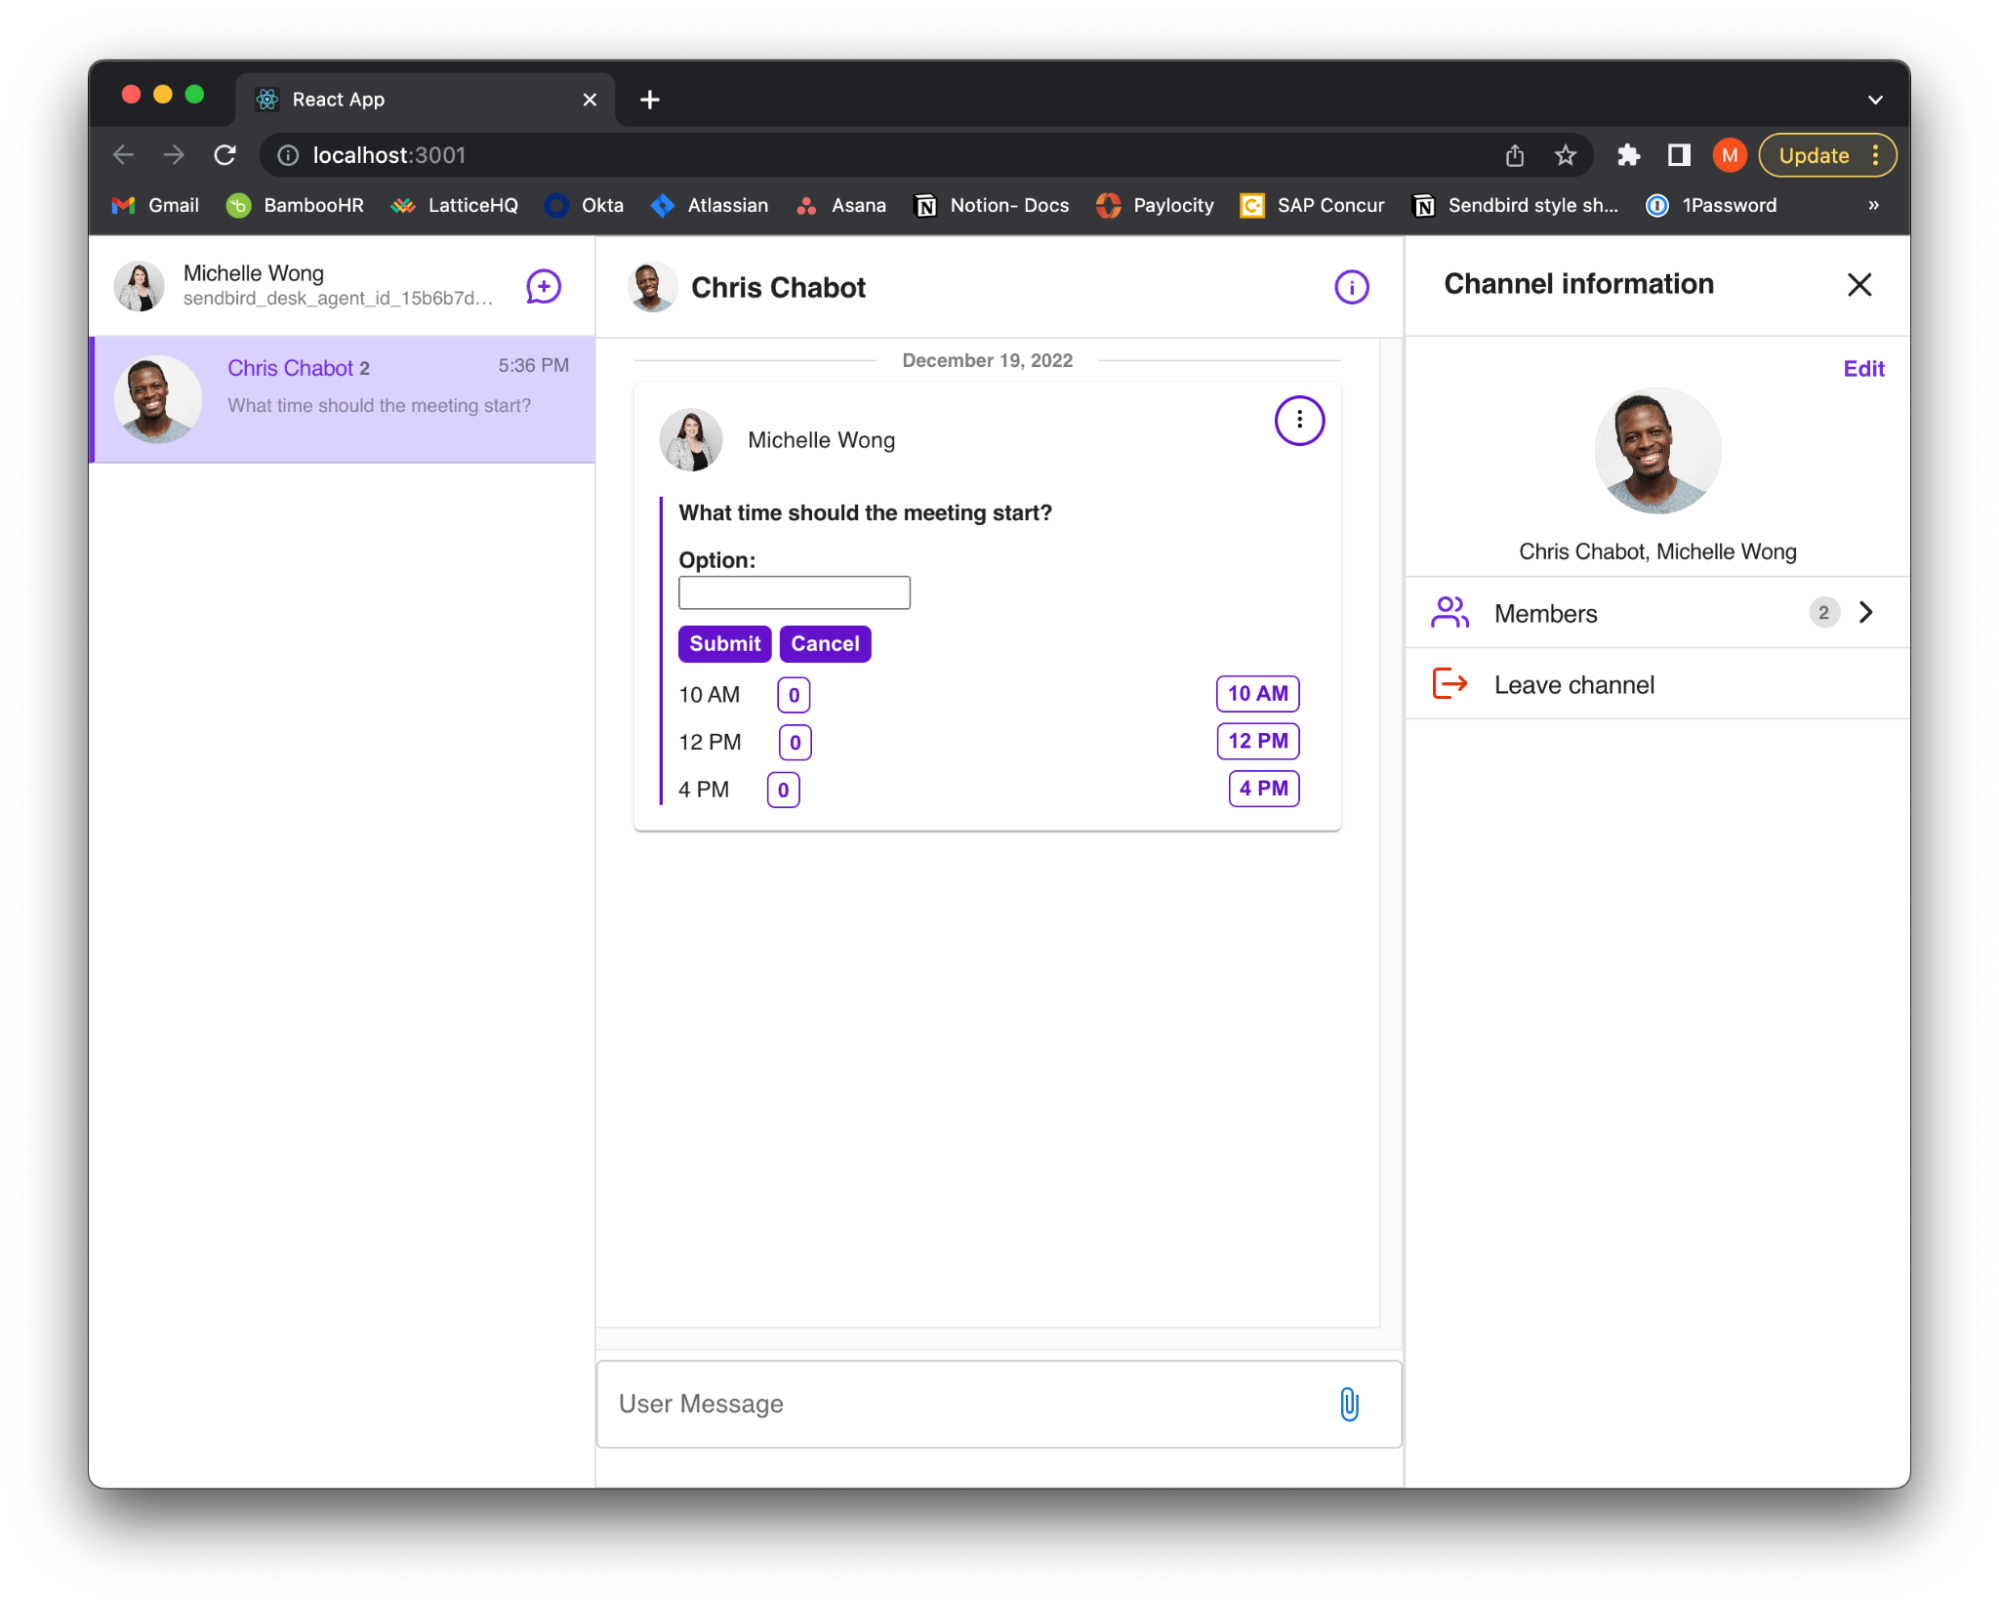
当输入框出现时,用户可以键入一个选项以添加到投票中。提交输入后,它将调用 handleOptionsSubmit 函数。handleOptionsSubmit 将使用addPollOption函数将选项添加到投票中。addPollOption 需要将轮询 ID 和选项作为字符串传入。
投票表决
要允许用户对投票选项进行投票,请为每个选项创建一个按钮。如果用户单击选项的投票按钮,它将调用 handleVote 函数。handleVote 将找到被点击的选项并将投票计数增加 1。
创建一个名为 updatedVoteCounts 的新对象来保存投票计数和选项 ID。接下来,创建一个 pollVoteEventPayload 对象并传入更新的投票计数、时间戳、轮询 ID 和消息 ID。
从 Sendbird Chat SDK 导入 PollVoteEvent 并创建它的新实例。PollVoteEvent 需要传入以下参数:轮询 ID、消息 ID 和 pollEventPayload。
因为我们有轮询事件的实例,所以使用 votePoll 函数。votePoll 需要投票 ID、投票的选项 ID 和投票事件。然后,使用从 votePoll 返回的事件,对投票使用applyPollVoteEvent函数并传入该事件。
将投票应用于民意调查后,遍历民意调查中的每个选项。对于每个选项,使用createPollVoterListQuery接收选民。然后,遍历列表查询中的每个选民,并检查选民是否与当前用户匹配。如果是这样,将投票设置为等于选项的 ID。这将设置当前用户在该投票中的投票状态。
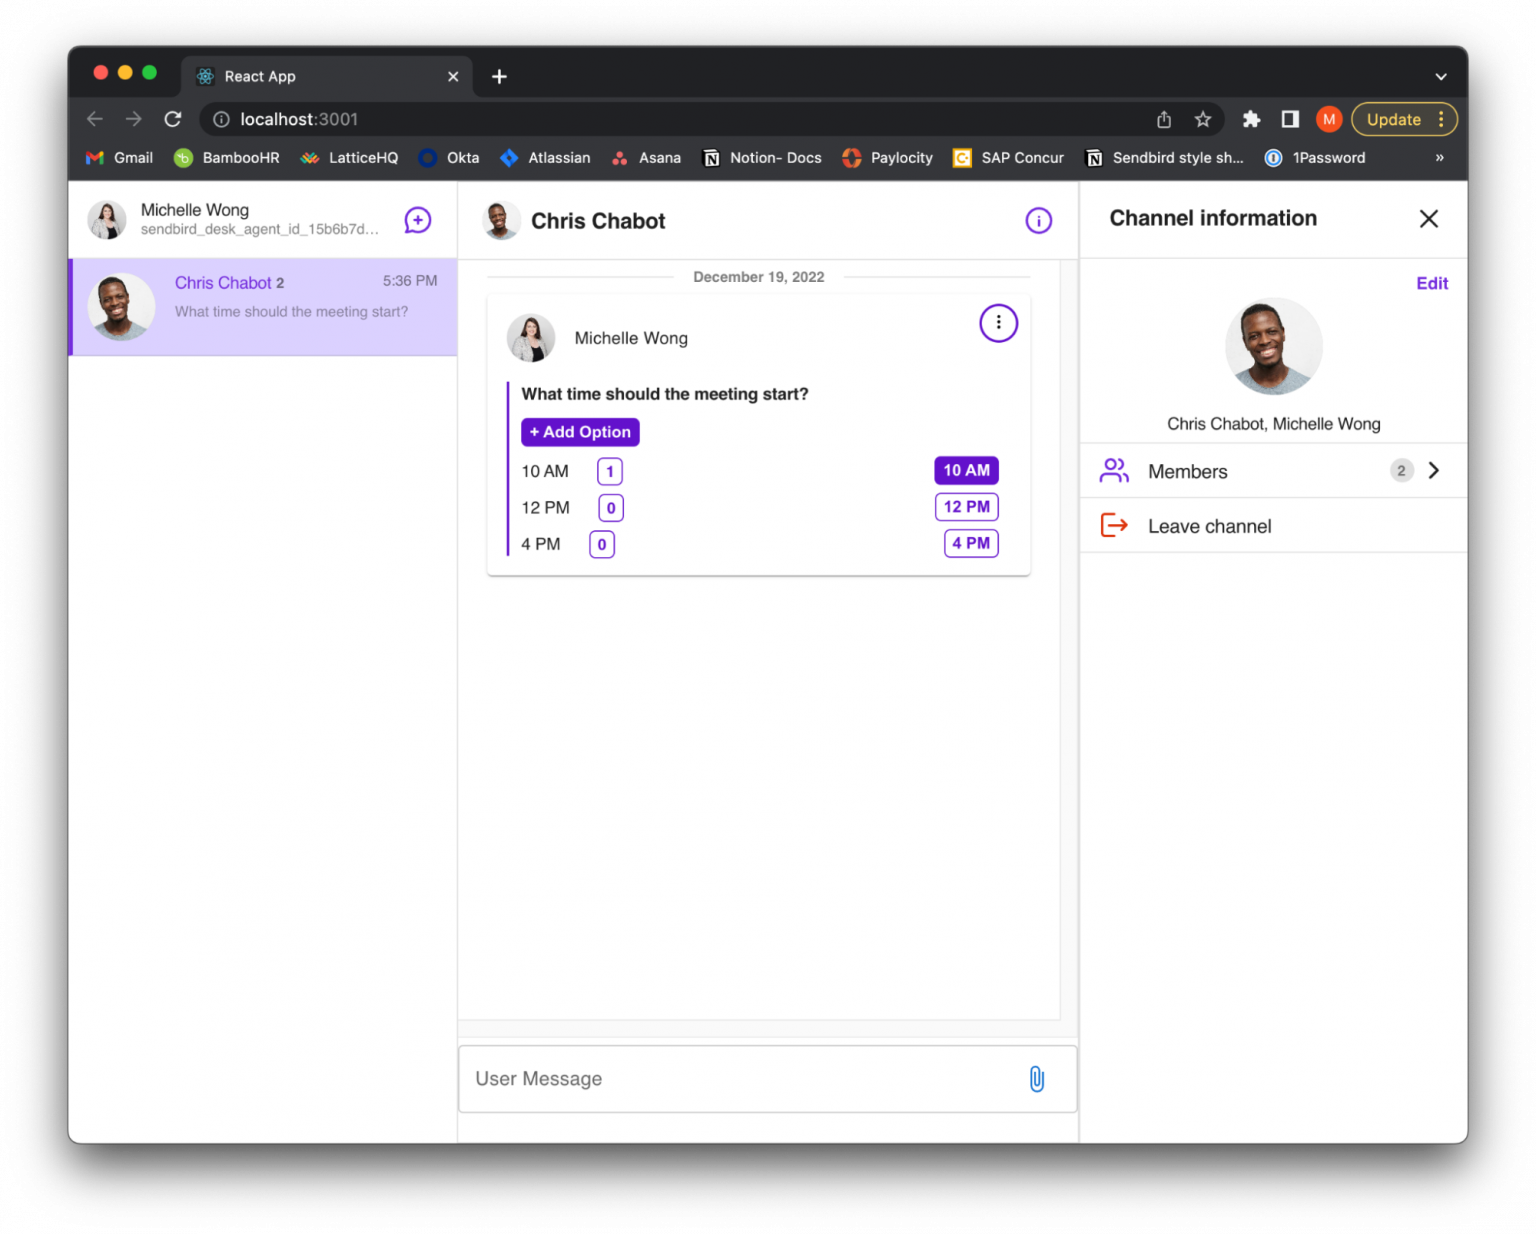
将用户的投票存储在状态中将允许轮询消息知道当前用户投票的选项并将其反映在 UI 中。现在,点击投票的按钮将以粗体显示,表明这是您投票的选项。
这将显示为:
handleVote 函数将如下所示:
现在用户的投票将在他们点击投票时显示在 UI 中,您还希望在初始页面加载时看到他们的投票。因此,当用户加载页面时,他们投票的选项对应的投票按钮将以粗体显示。
为此,请使用反应钩子 useEffect 使投票者渲染。循环投票的选项,并通过调用 createPollVoterListQuery 为每个选项获取选民。传入轮询 ID 和选项 ID。然后,遍历每个投票者以获得该意见,并检查当前用户是否在投票者列表中。如果是这样,将投票的投票设置为等于用户投票的选项 ID。
useEffect 看起来像这样:
Receiving poll vote changes
At this point, we have the current user able to make changes to the poll. However, you need other active users to receive the changes on their end as well. Import GroupChannelHandler from UIKit. Create a new instance of the handler. Then, get the chat SDK’s group channel and use the addGroupChannelHandler function. addGroupChannelHandler requires a unique handler ID, which will be set as the message’s ID, and the group channel handler instance.
现在组频道处理程序已连接到组频道,您希望让它侦听 onPollVoted 和 onPollUpdated 事件。
onPollVoted 事件侦听器在投票时被触发。当该操作发生时,对投票使用 applyPollVoteEvent 并传入从 onPollVoted 返回的事件。然后,您想要从 UIKit 导入 useChannelContext 以获取 messageDispatcher。拥有 messgeDispatcher 后,设置类型和负载以反映 UI 上的更改。现在,当其他用户对民意调查进行投票时,它将监听投票、应用投票事件并更新屏幕。
onPollUpdated 事件将监听民意调查何时发生更改,例如添加或删除选项或更改民意调查的标题。当此事件发生时,它将在轮询上使用 applyPollUpdateEvent 函数并传入已发生的事件。然后,它将使用 messageDispatcher 来更新 UI 中的更改。
通过上述所有实现,PollMessage 将如下所示:
结论
你有它!您已经学习了如何创建投票。在本教程中,我们讨论了如何创建一个包含Chat SDK投票的UIKIt应用程序。现在,用户可以在日常聊天体验中使用投票,避免浪费时间等待具体答案,并及时达成共识。从这里,您将了解如何在适合您需要的自定义应用程序中实施投票。
请查看完整的Github 存储库。有关投票的更多信息,请查看 Sendbird文档。有关所有 Sendbird 产品、用例等的讨论,请查看Sendbird 社区。如果您对本教程中涵盖的材料有更多疑问,请联系我们!我们的专家总是乐于提供帮助。
快乐的民意调查建设!📊


