
How to suggest a task message with Sendbird's React UIKit

Making decisions in a group chat: Suggest a task message
Making decisions in a large group chat can be challenging; with conflicting opinions, it can seem impossible to arrive at a consensus. That’s why it is useful to implement group chat functionality wherein users can suggest a task, allow group members to propose options, and then vote on each choice.
In this tutorial, we’ll talk about how to create a new message type and customize the rendering of in-app chat messages in Sendbird UIKit. As an example, we will create a message type to ask a question, offer suggestions, and collect votes from group channel participants. By the end of this tutorial, you will understand how to create a group channel, use React UIKit components, as well as set and update various functions and message parameters to implement this functionality.
Getting started
Sendbird’s UIKIt is the fastest way to create scalable and feature-rich chat with pre-built UI components. With UIKit, you can go beyond common in-app chat functionalities and shape each type of message to be displayed the way you’d like. This power of customization is critical to our goal of using React UIKit components to create and suggest a task message, update a user message, and collect votes.
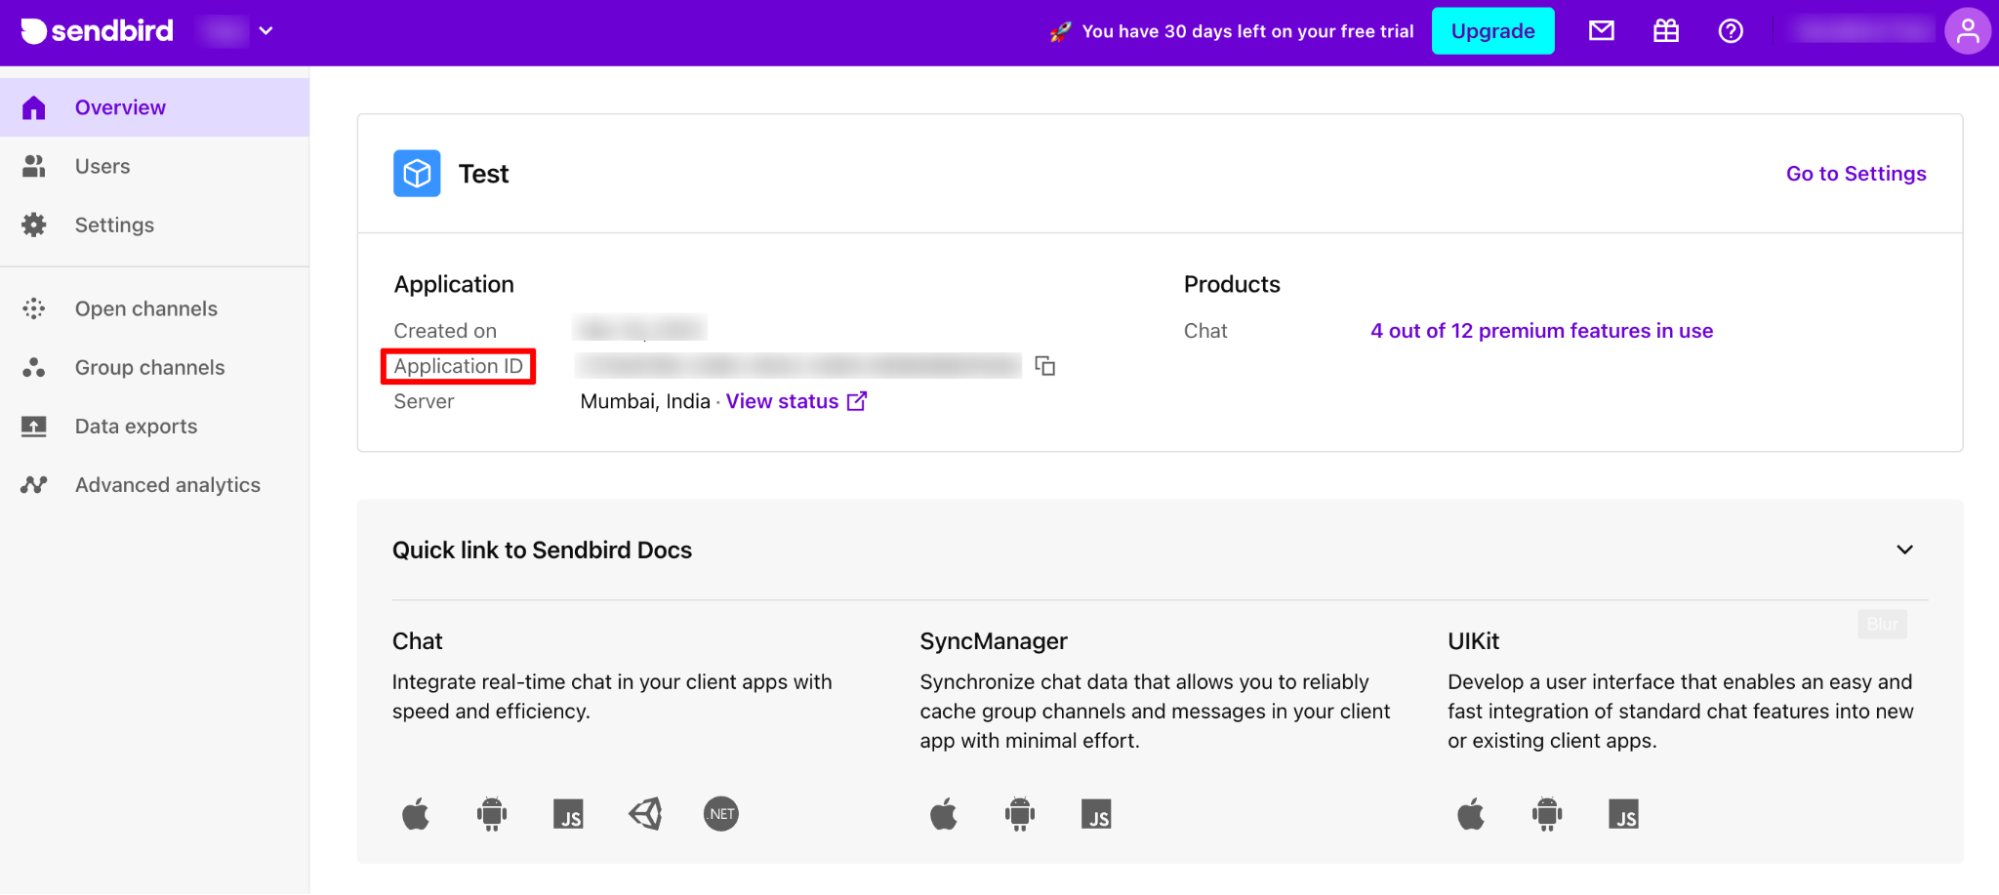
To start, create a new application in your Sendbird dashboard. Within that application, create a user and a Group Channel. On the left sidebar, in the ‘Overview’ tab, you can find the application ID.
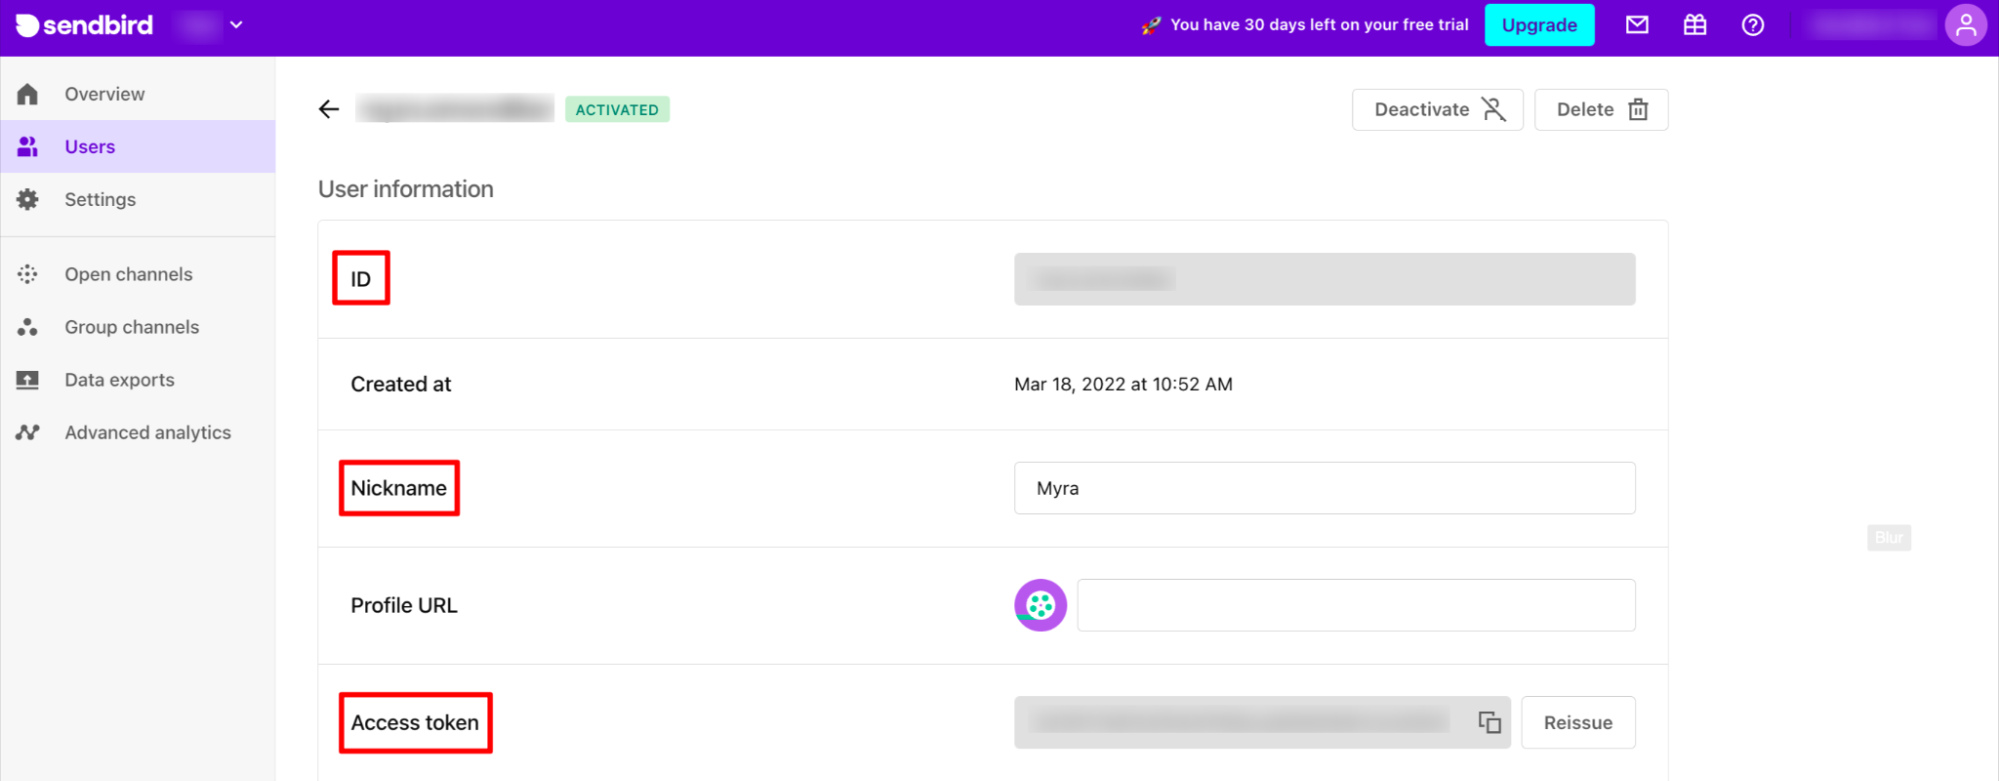
In the ‘Users’ tab, click on the user that you’ve created, and you’ll be able to see the user’s information, such as the user’s ID, nickname, and access token.
These are all variables you’ll need to include in your code. If you need additional guidance, see the quickstart guide to sending your first message.
Step 1: Install Sendbird UIKit
Now, open your application and install the Sendbird-UIKit with
‘npm install sendbird-uikit -save’
Upon installing the UIKit, create a .env file where you will export your:
- application ID
- user ID
- user’s nickname
- user’s access token
from the application you previously created in the dashboard. Note that these variable names must start with “REACT_APP” (e.g. REACT_APP_APP_ID). The application ID, user ID, nickname, and access token will then be imported in your App.js file.
Step 2: Set up the App file
In the App.js file, import the Sendbird Provider component from the UIKit. This component requires a(n):
- application ID
- user ID
- user nickname
- user access token
We’ll get these variables from the imported .env file. Then, wrap the SendBirdProvider component around a custom component we’re creating called ‘GroupChannel’. Pass in the userId.
Step 3: Create a group channel
GroupChannel will hold and return the:
- Channel List
ChannelList will utilize the onChannelSelect function. - Channel
The Channel component properties that we’ll be using are:- channelUrl: channelUrl is required when using the channel component to set the current channel.
- onChatHeaderActionClick: This is used to create custom actions when the icon button in the channel header is clicked. This function will render and close our channel settings sidebar on a click event.
- renderChatItem: The function renderChatItem returns our custom component and CustomizedMessageItem to format the display of each type of message.
- renderMessageInput: This allows you to customize the message input from the default version. This is where we will return CustomizedMessageInput.
- Channel Settings
These components are imported from UIKit. The properties we’ll be passing in are: channelUrl and onClickClose functions, to close the settings bar.
After implementing these three components from UIKit within our GroupChannel, you should have a working application.
Now that you’re all set up, let’s move on to implementing task messages.
Step 4: Implement channel conversation messages
Within the Channel component, using renderChatItem allows us to return the layout of how each specific type of message is formatted. In our case, renderChatItem calls our CustomizedMessageItem component, which will return a specific format depending on the type of message.
The message types include:
- AdminMessage
- FileMessage
- UserMessage
Now, we’re going to create a new message type, VotingMessage.
You can find the AdminMessage, FileMessage, and UserMessage default layouts in the open-source repo for UIKit. With the default information and provided format for each type of message, you can choose to delete the information you may not need.
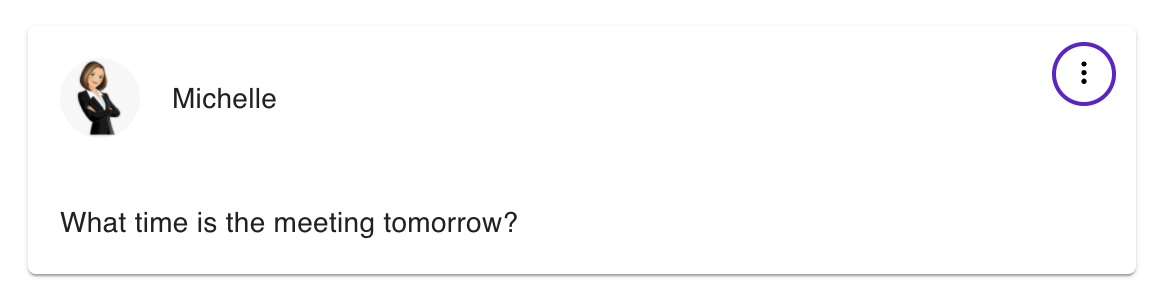
1. User message
The UserMessage component returns how a user message is displayed. The default format has the user’s name and avatar, followed by the message. In the sample, there’s a dropdown button option to edit or delete a message. We are going to add to the dropdown the option to ‘Suggest a task’.
2. Dropdown option to suggest a task
When a user clicks ’Suggest a task’, the AddSuggestedTask custom component created will render to the screen. AddSuggestedTask will return a form to alter the existing message into a suggestion message the user would like to send to the channel.
Step 5: Submit the task
When a user submits the task, the ‘User Message’ is now changed into a ‘Voting Message’ behind the scenes, thereby updating the text and format of that message.
The submit form calls the function suggestionSubmit to perform a number of operations.
- First, we call updateVotingMessage which takes in the message ID and message text. This function calls useUpdateMessageCallback, which needs to be passed the:
- currentChannel
- messageDispatcher
- onBeforeUpdateUsermessage
- updateLastMessage
- logger
- sdk
- pubSub
- The useUpdateMessageCallback function handles how a user message is updated. UIKit provides this functionality to edit the user messages and implement additional features, and in our case, to change it into a voting message.
Before updating user message
In the useUpdateMessageCallback function, we use onBeforeUpdateUserMessage to implement the functionality to update the group channel params and the user message params.
Note: See the additional information on user message params.
onBeforeUpdateUserMessagefirst calls updateChannelParams, which will handle the changes to channel params.
Step 6: Update channel params
We’ll be setting the channel’s data field equal to an object that holds each suggested task message and their voting options.
First, we’ll add the current message ID to the data object and set the message ID equal to an object that contains the voting options. The voting options are an array of each option for the suggested task.
Then, we’ll utilize the updateChannelParams function in order to submit the updates for group channel params.
Step 7: Set message params
Going back into the onBeforeUpdateUserMessage function, after updateChannelParams is called, we’ll set the message’s data field equal to an object with a ‘type’ of “VOTING_APP”, ‘version’ equal to 1, and a ‘title’ which will be equal to the text that was submitted from the form.
This allows the message to hold information on the message type, version, and title since it’s now a voting message. Keeping a ‘version’ key will enable future-proofing if there are any changes to the application.
Then, we’ll make the message’s customType equal to ‘VOTING_APP’ and set the message’s message equal to the captured text in the form. By setting these params, this will differentiate a user message from a voting message. With these message params set, we then return it as a whole.
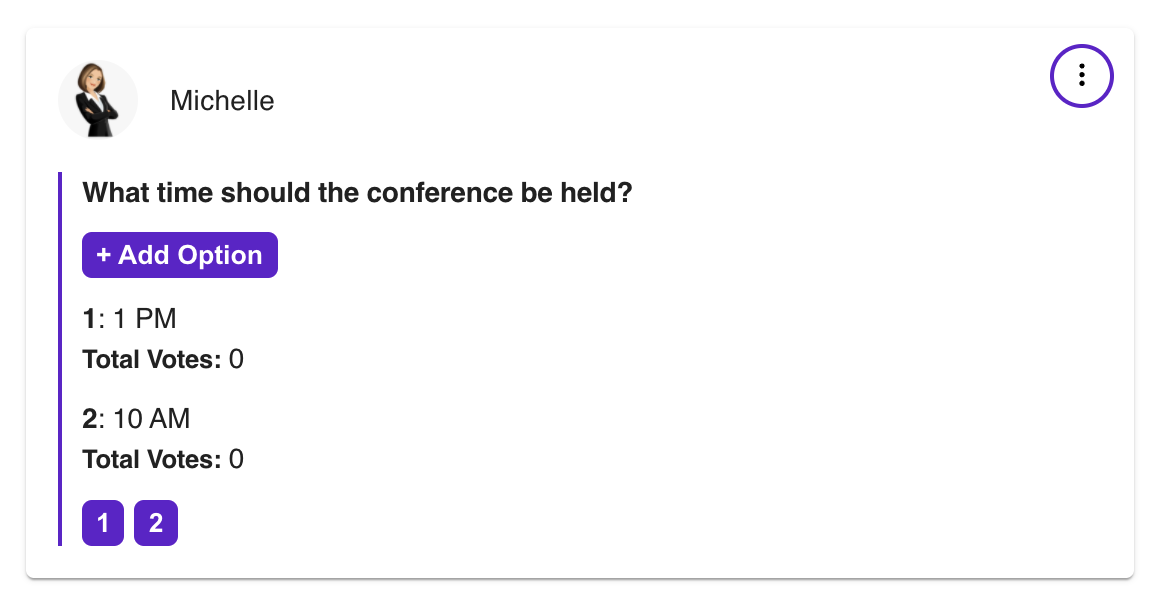
After you submit the task, the message type will change from a User Message to a Voting Message. And since it’s now considered to be a Voting Message, it’ll have a different layout than a User Message.
User message
Voting message
Starting in the CustomizedMessageItem component in which it returns each type of message, we’ll jump into our VotingMessage component.
A voting message will have the user’s name and avatar followed by the suggested task. There’s also a button to add an option. If there are any options, the options will be listed below that button, along with each option’s total votes. Each option is numbered in order of its submission, and the user can click the corresponding numbered button to vote for it.
The dropdown options for a Voting Message include ‘Change Task’ or ‘Delete’. If a user clicks Change Task, this allows the user to update the current suggested task using the same form previously used, AddSuggestedTask.
1. Add option
When a user submits an option for the suggested task, it’ll call the function handleOptionsSubmit.
This checks to see if the channel data contains the current message ID. If the message ID is already in the channel’s data, then it will go into the message’s voting_app_options array and push this new option into it. The new option will have the following:
- ID
- title voters array (which holds the ID of each voter)
- created_by key
We’ll then set the data equal to the updated data with the new option inside and use the updateChannel function to pass in the updated params.
On the other hand, if the new option does not contain the message ID, then it will call setMessageInChannelParams. This function has the channel’s data object, including the current message ID, and sets it equal to an object with a voting_app_options array. The voting app options array will add the new option being submitted with the following:
- ID
- title
- voters array
- ‘created_by’ key
Then, we’ll set the channel’s data with the updated data and call the updateChannel function to pass in the new params.
2. Voting
To vote for an option, when a user clicks the vote number button that corresponds to the option number, it will call our handleVote function.
This function checks each of the voting message’s options and finds the option that matches the one that the user clicked on to vote. If the option’s voters array does not include the current user, then it’ll push the current user’s ID into the voters array. This means that the current user didn’t vote on it previously.
However, if the option’s voters array already includes the current user, it’ll remove the user’s ID from the array and remove the vote from that option. This is set in place so that a user can only vote once on an option, or to allow them to remove their vote from an option.
Step 8: Create a voting message from message input
In the conversation window, when a user inputs a message that starts with ‘/task ’, this will trigger the ‘Suggest a task’ form to appear. So, instead of a user sending a message and then having to go to the dropdown menu to change it to suggest a task, the user can create the task straight from the conversation input field.
Starting in the Group Channel file, we’ll use the Channel component’s function renderMessageInput to return our CustomizedMessageInput component. This component will control how each type of message input is handled as it comes in and what to do as it’s sent out.
Submitting the task
When the user submits the task from the form, it will call our checkSendUserMessage_ function. This function checks if this is a normal message input being sent from the conversation window, or an input from our ‘Suggest a task’ form.
If it’s from the form, it’ll call our suggestionSubmit function which sets the userMessageParams to have the message’s data to:
- equal an object of type: ‘VOTING_APP’
- version: 1
- the key ‘title’ to equal the captured text.
Then, it will set the message’s customType to equal ’VOTING_APP’, and have the message’s message equal to the captured text.
Finally, it will use the sendUserMessage function to pass in and set our updated userMessageParams.
By setting these specific fields in the message params on submission of the form, it’ll trigger the sent message to be classified as a voting message and displayed as one immediately.
Conclusion
And that’s a wrap! UIKit’s highly flexible nature allows you to shape your chat into an experience that enriches the way your users communicate. Now that you know how to implement this custom message type, you’ll foster better communication and collaboration between users by allowing them to make efficient group decisions.
Please view the GitHub repository for an overview of everything that’s been presented here!
We can’t wait to see you connect your app’s users in richer ways! Happy in-app conversations building! ✌️


