
How to test and debug mobile push notifications with the Sendbird tester tool

Introduction
Push notifications are vital mobile prompts for apps. They not only help to deliver important information but also help to re-engage users who switched to a different app or stepped away from their phone. Because of this, push notifications are invaluable implementations in mobile app development. Our guide to mobile push notifications has everything you need to know about push notifications, their benefits, and how they can be used.
In fact, the numbers indicate that push notifications are better than email (another widely used form of communication) at engaging users and bringing your app into the foreground. For example, push notifications had an open rate of 20%, while the open rate for emails is less than 2%!
However, push notifications are not always simple to implement in your app. To help developers troubleshoot and test their push notification implementation, we have built a push notification tester tool that is available to you on the Sendbird Dashboard.
In this tutorial, we’ll start by introducing the push notification tester tool and listing some prerequisites that we recommend completing before going ahead. After reviewing the prerequisites, you can skip to the section for the device you are testing with; in this tutorial, we’ll cover testing for iOS, Android, and Huawei devices.
Let’s get started!
What is the push notification tester tool?
The Push Notification Tester allows you to send a test push notification to any registered user’s device in your application. For example, you can send a test push notification to user Janna’s iPhone!
Push notifications can also be sent to Android and Huawei devices with full support for Firebase Cloud Messaging (FCM), HUAWEI Mobile Services (HMS), and Apple Push Notification service (APNs).
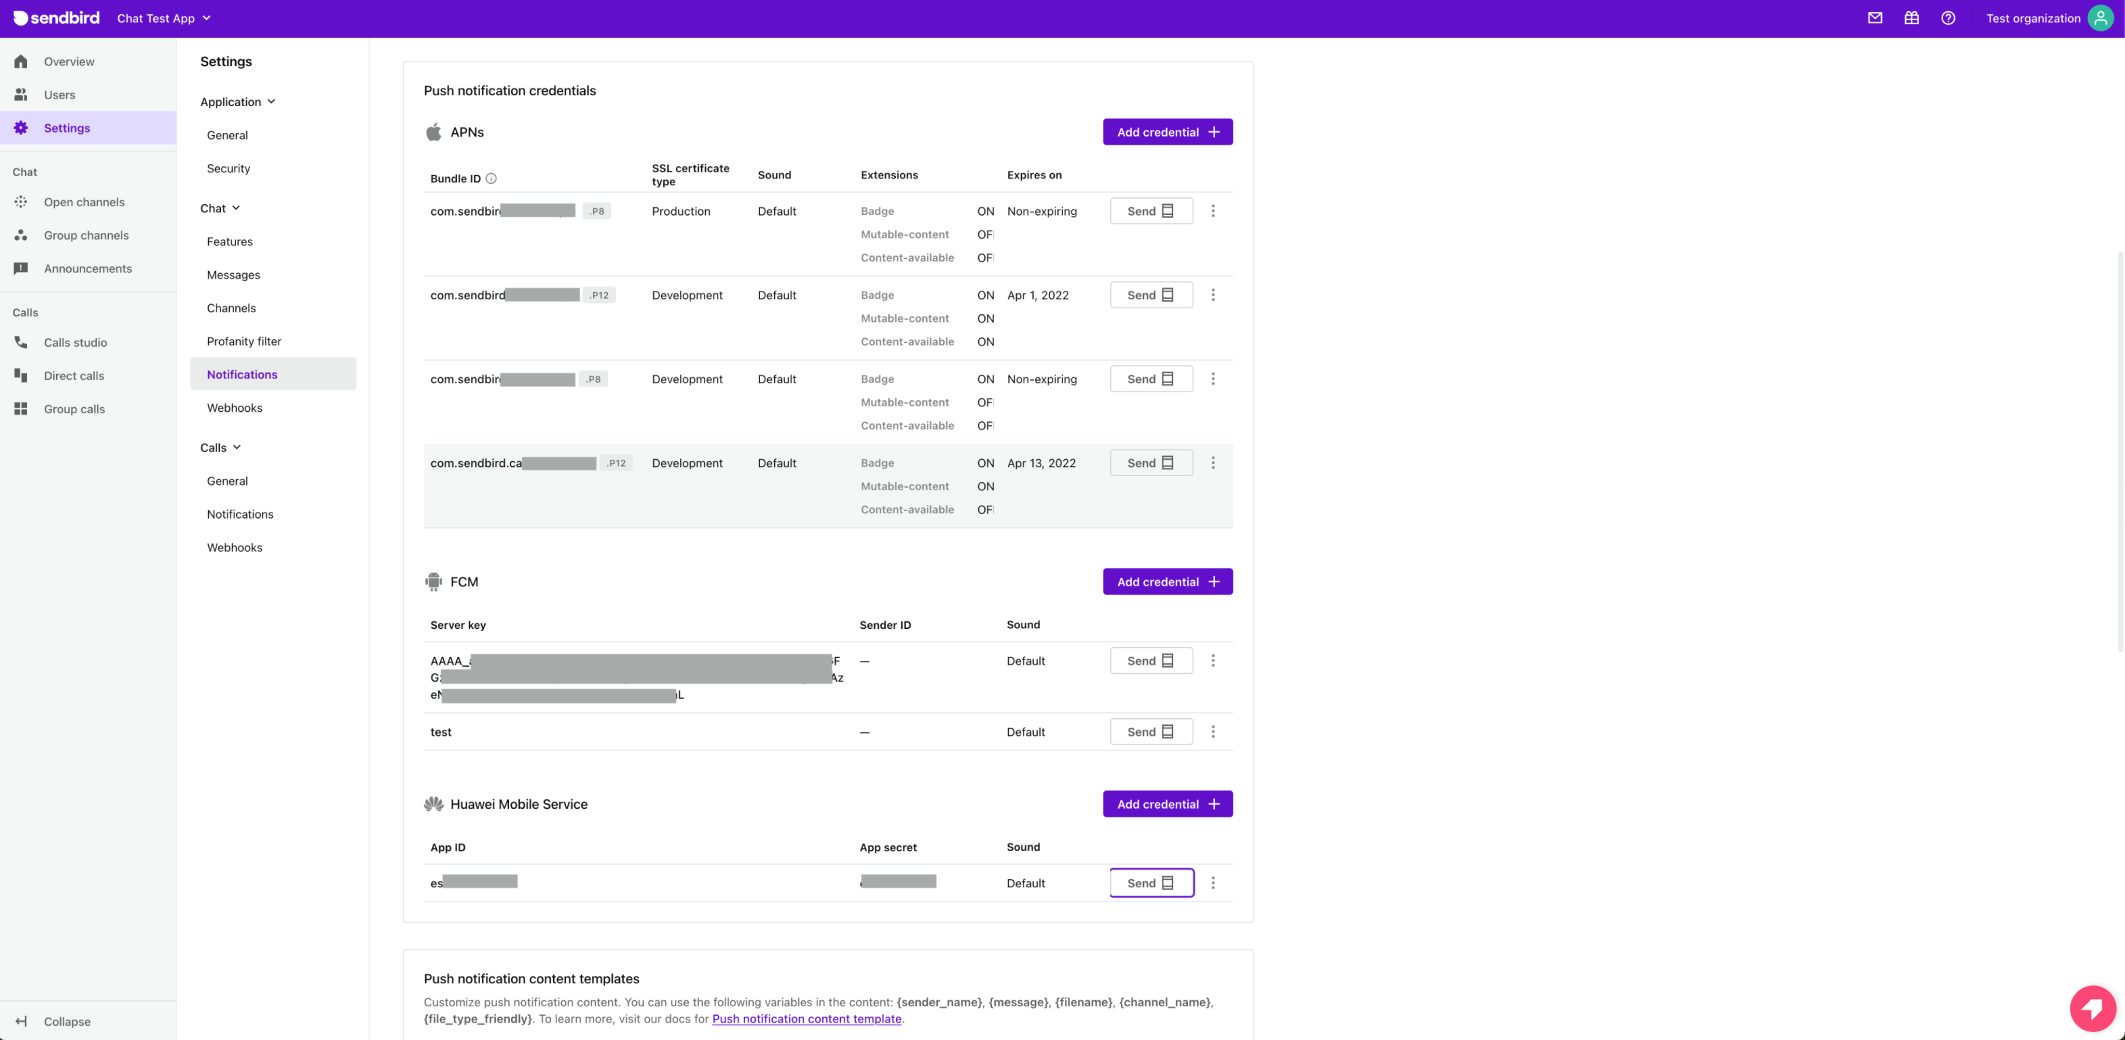
To view the push notifications tester tool, select your Sendbird application and navigate to the Settings > Chat > Notifications section as shown in the below image.
Prerequisites
Before you can test sending a push notification with the Push Notification Tester, you will need to:
- Upload a push notification certificate, key, or app ID to the Sendbird dashboard
- Implement push notifications in your application
- Create a user, run your app that has push notifications implemented, and register a device token via the app
If you need additional guidance, check out our documentation for iOS, Android, JavaScript (React Native), and Flutter.
Part 1: iOS Devices
Testing your first push notification on iOS
Navigate to the Notifications section of your Sendbird dashboard and select the ‘Send’ option next to the APNs certificate that matches the bundle ID of the app you are testing.
Tips:
- If you are testing push notifications by running the app from Xcode, be sure to test with a ‘Development’ certificate.
- We recommend testing with a physical device instead of with the iOS Simulator.
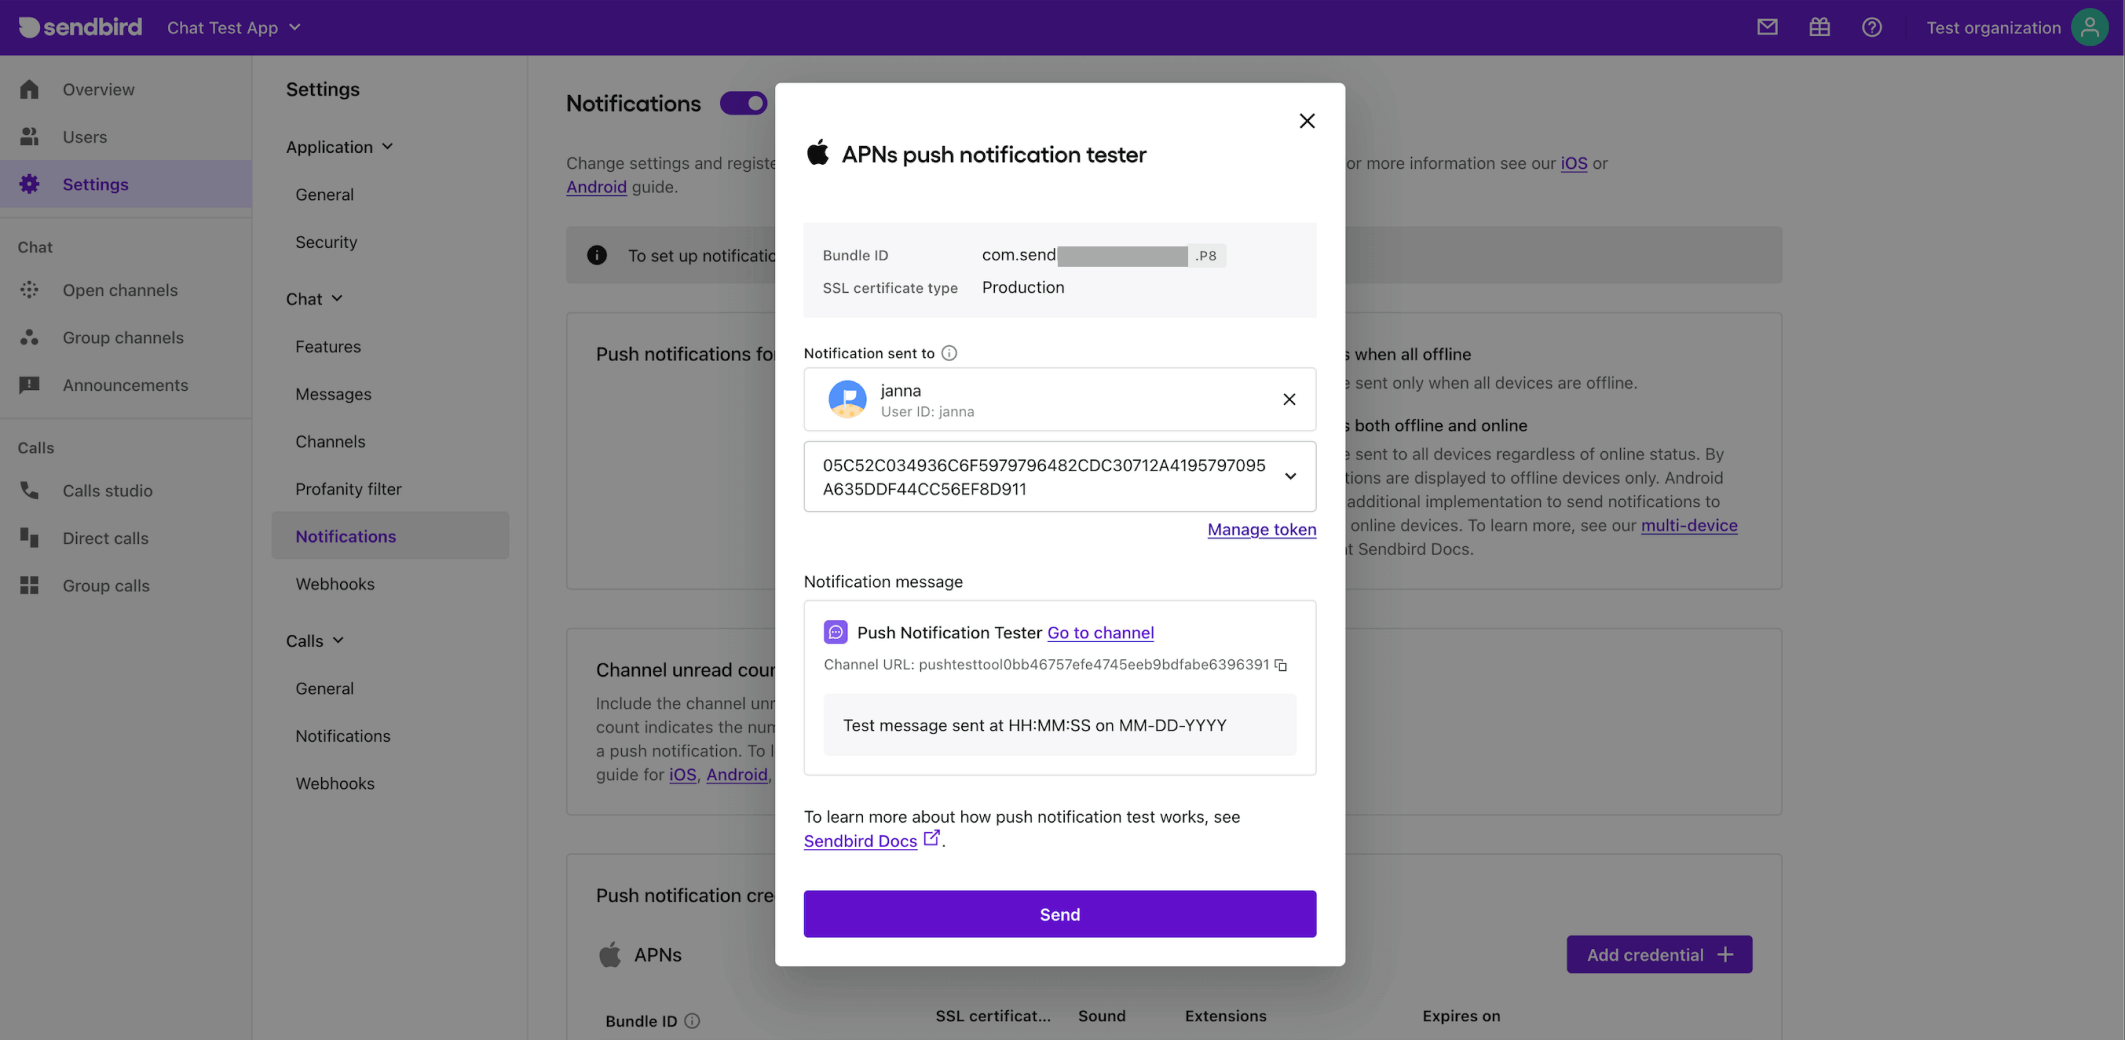
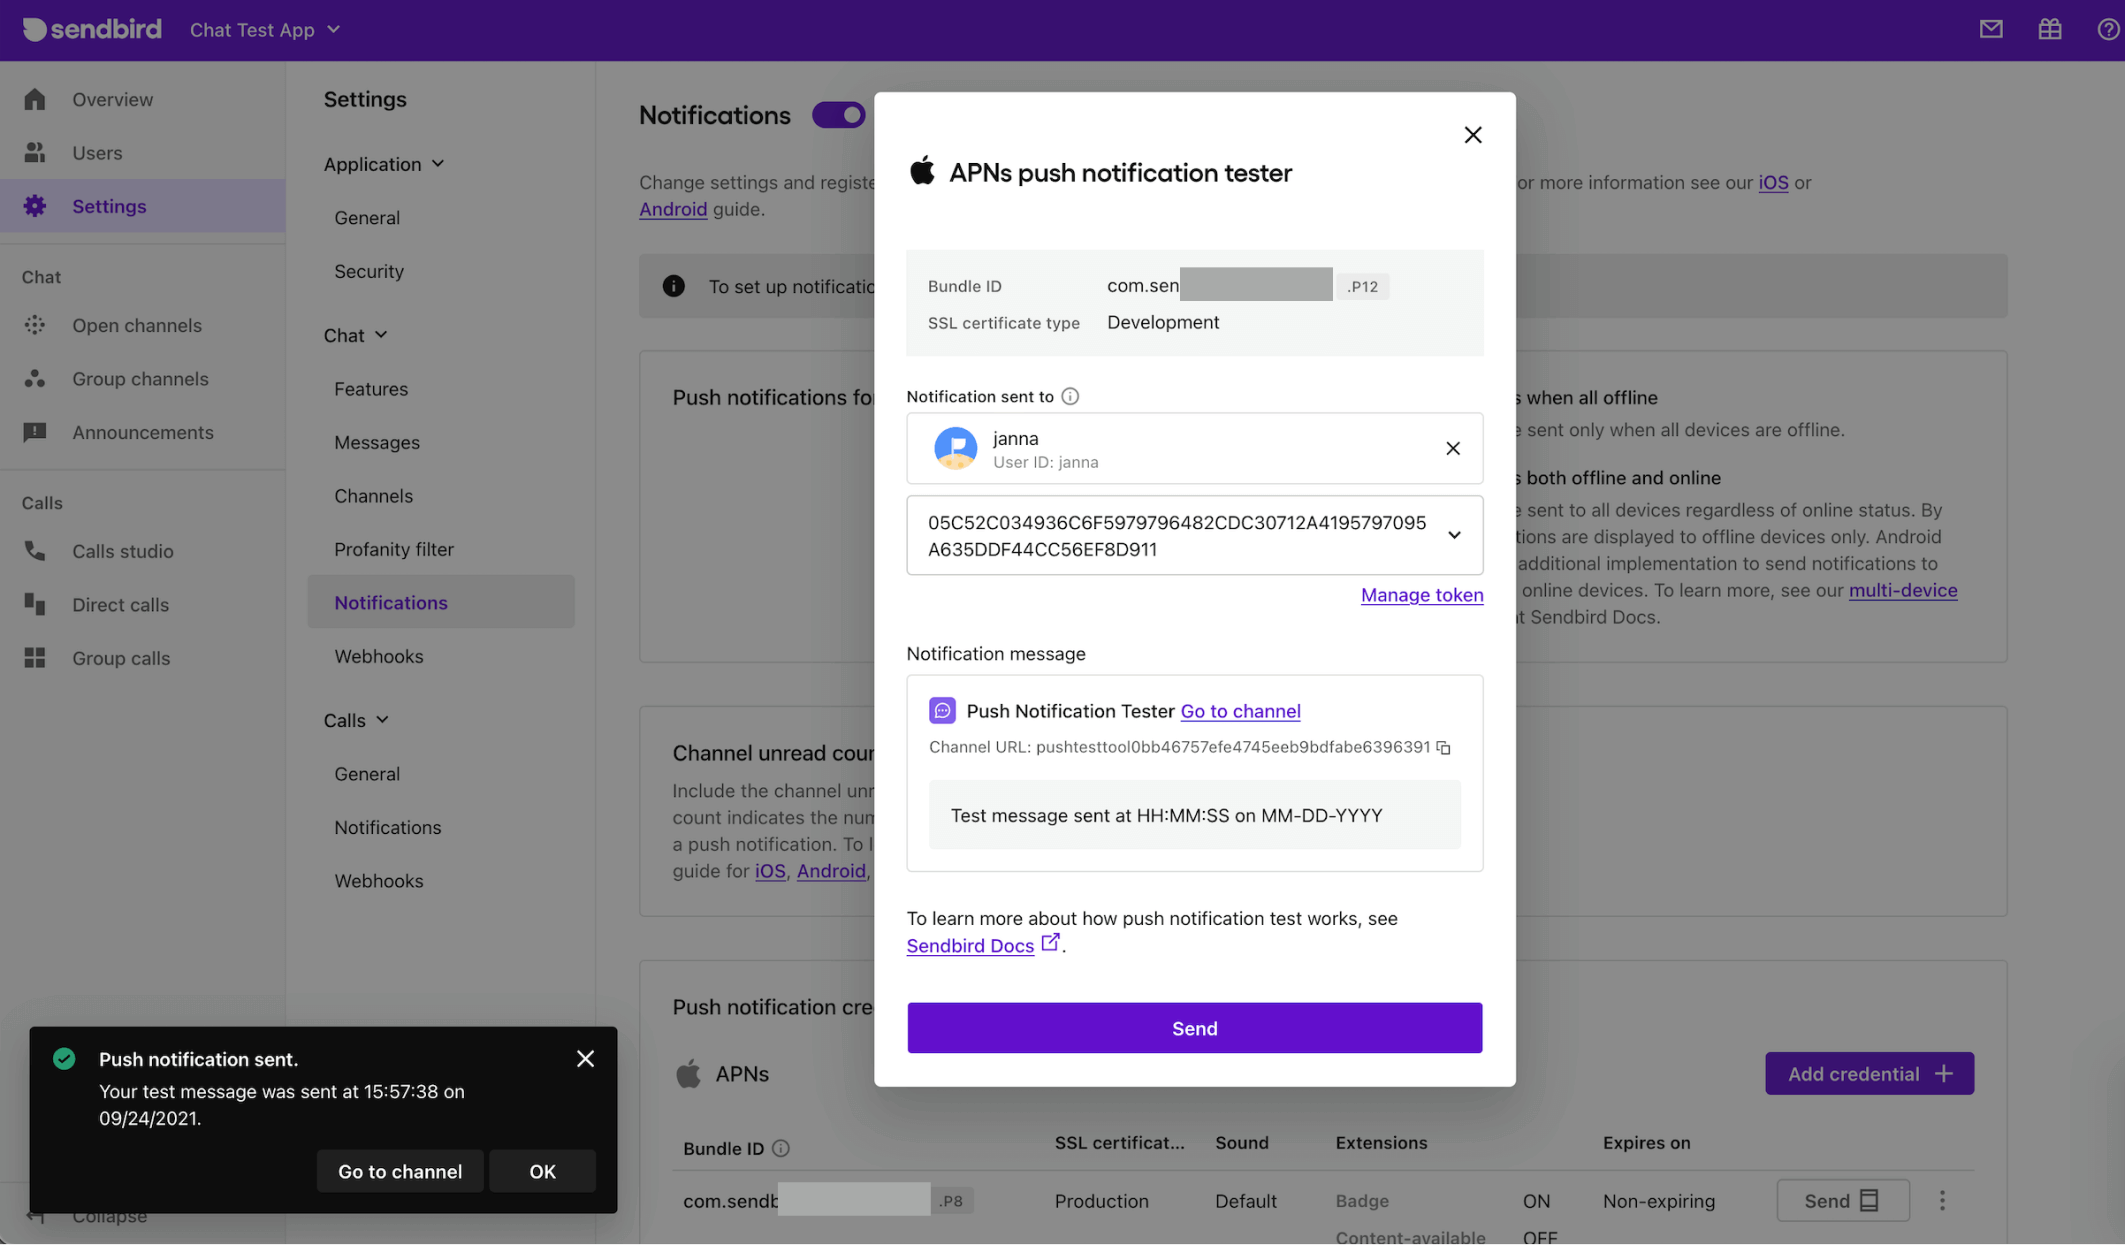
Select the ‘Send’ button, and you will see the “APNs push notification tester” popup window, as shown below.
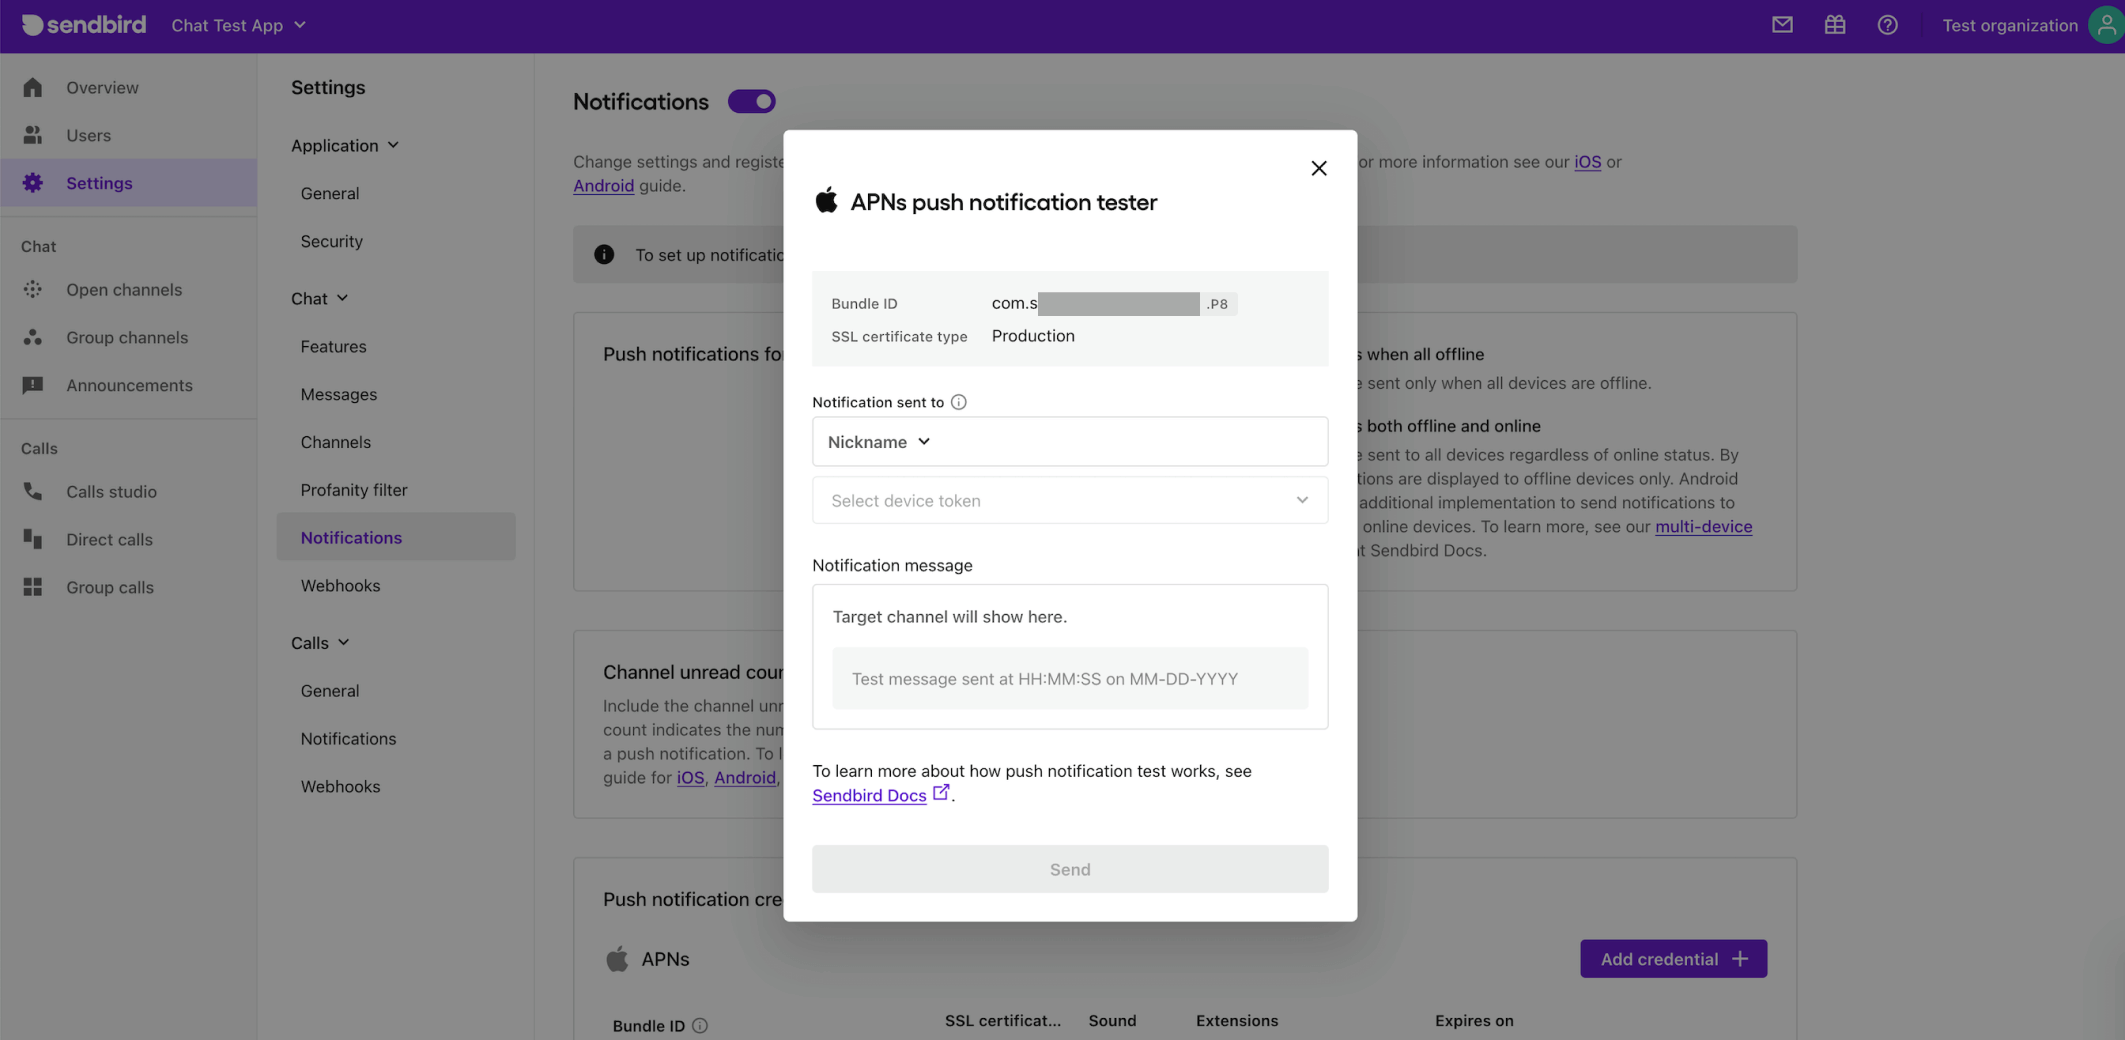
In the ‘Nickname’ section, type in the user’s name to whom you want to send a push notification. Alternatively, search for a user by ‘User ID’.

If that user has a registered device token on file for APNs, one will be automatically populated in the box below the user search box. If the user has multiple device tokens registered, you can select a different token by clicking on the populated token and selecting another token from the dropdown box.
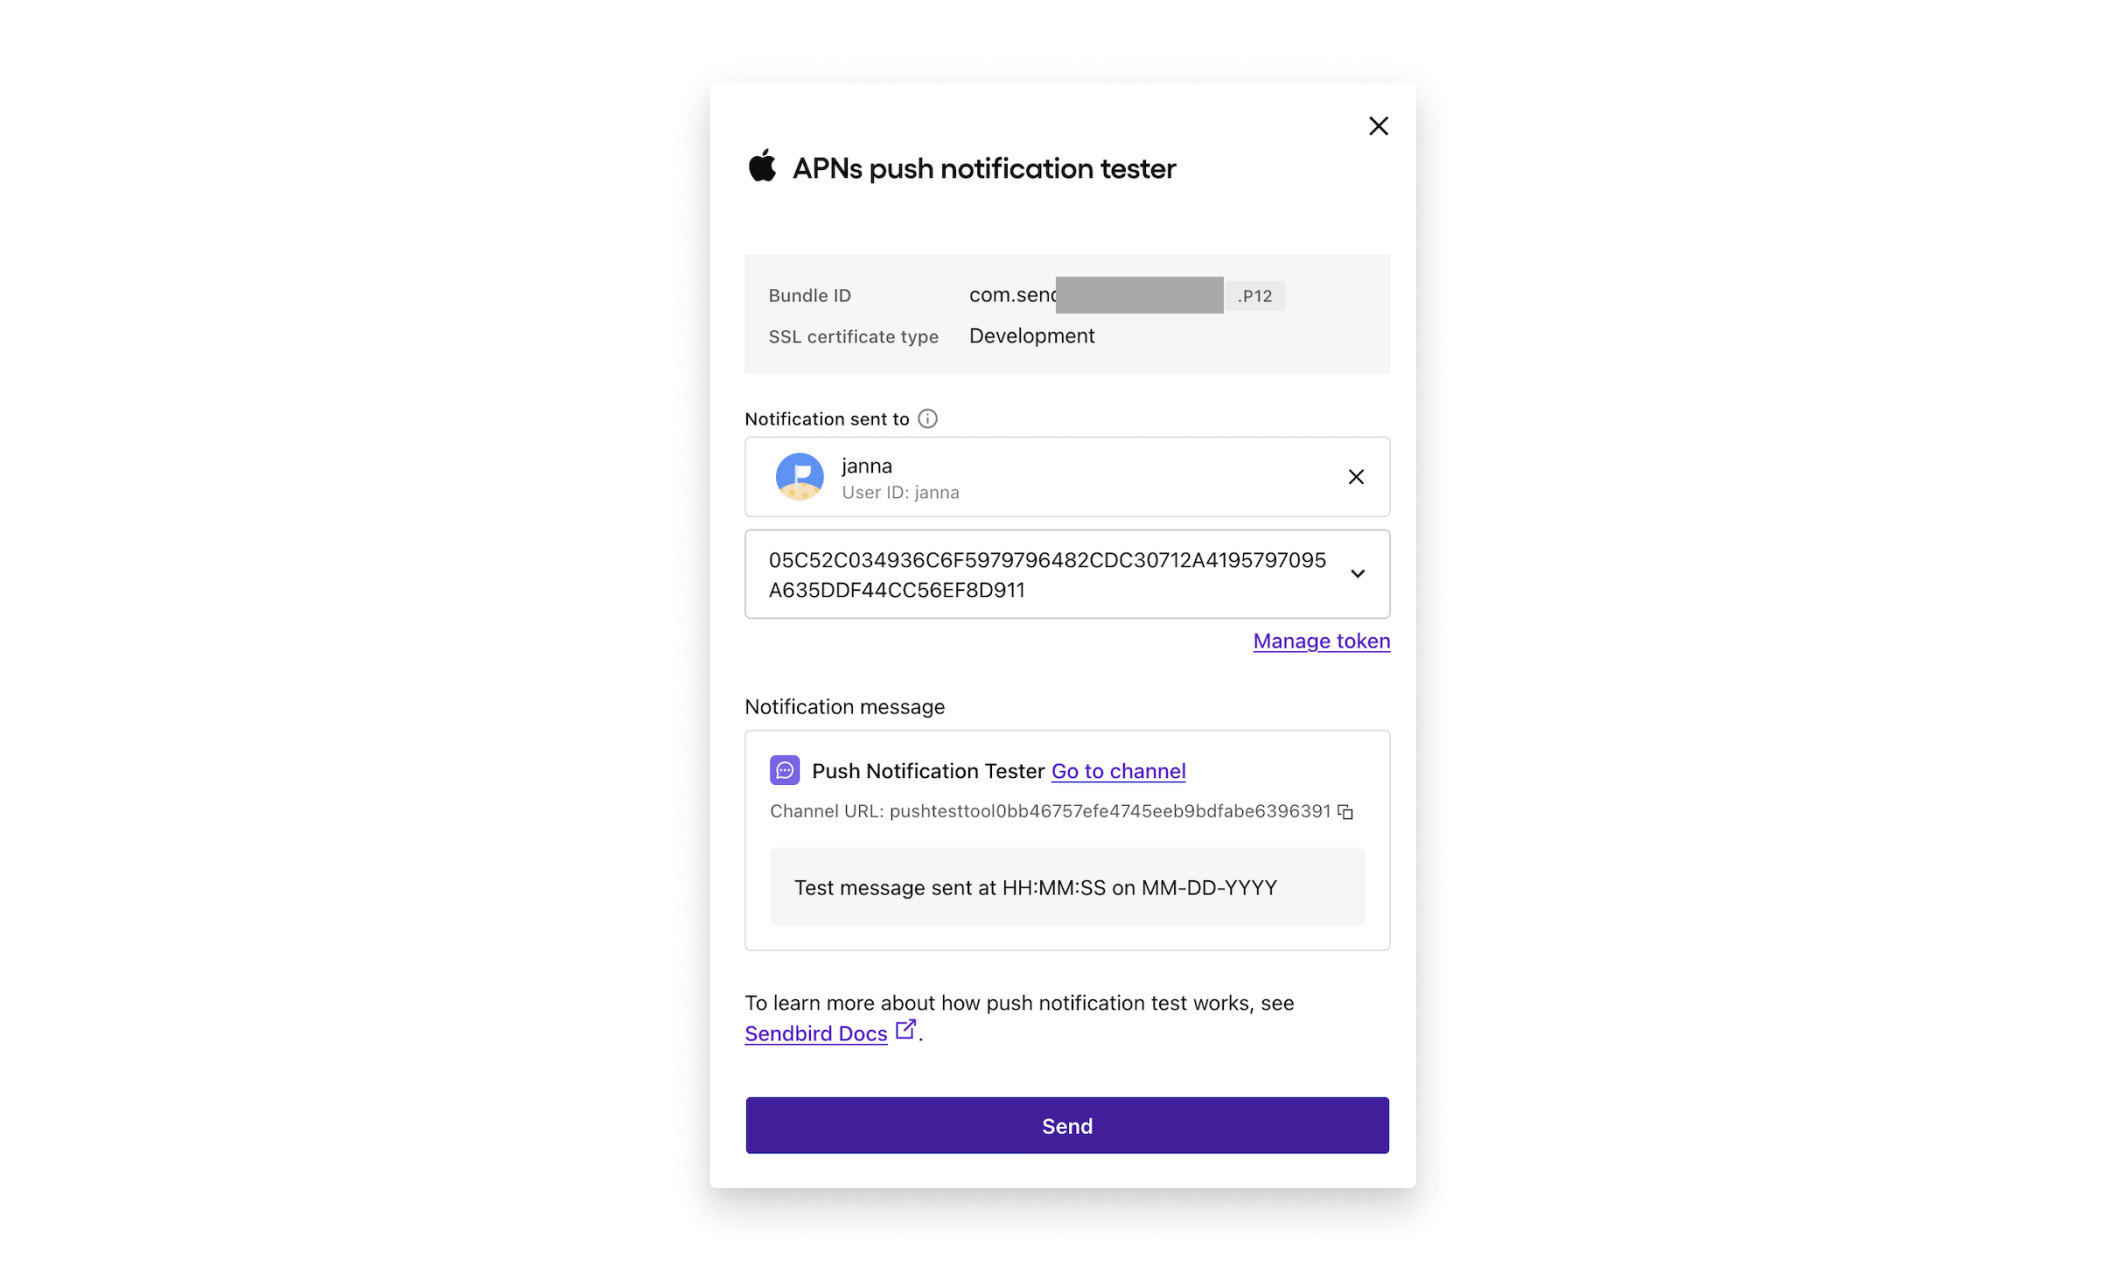
Once your user and device token are selected, you’re ready to send to your device! Click the ‘Send’ button and allow up to 30 seconds to receive the notification on your mobile device.

If the push notification is sent successfully, you will see the notification on your phone:
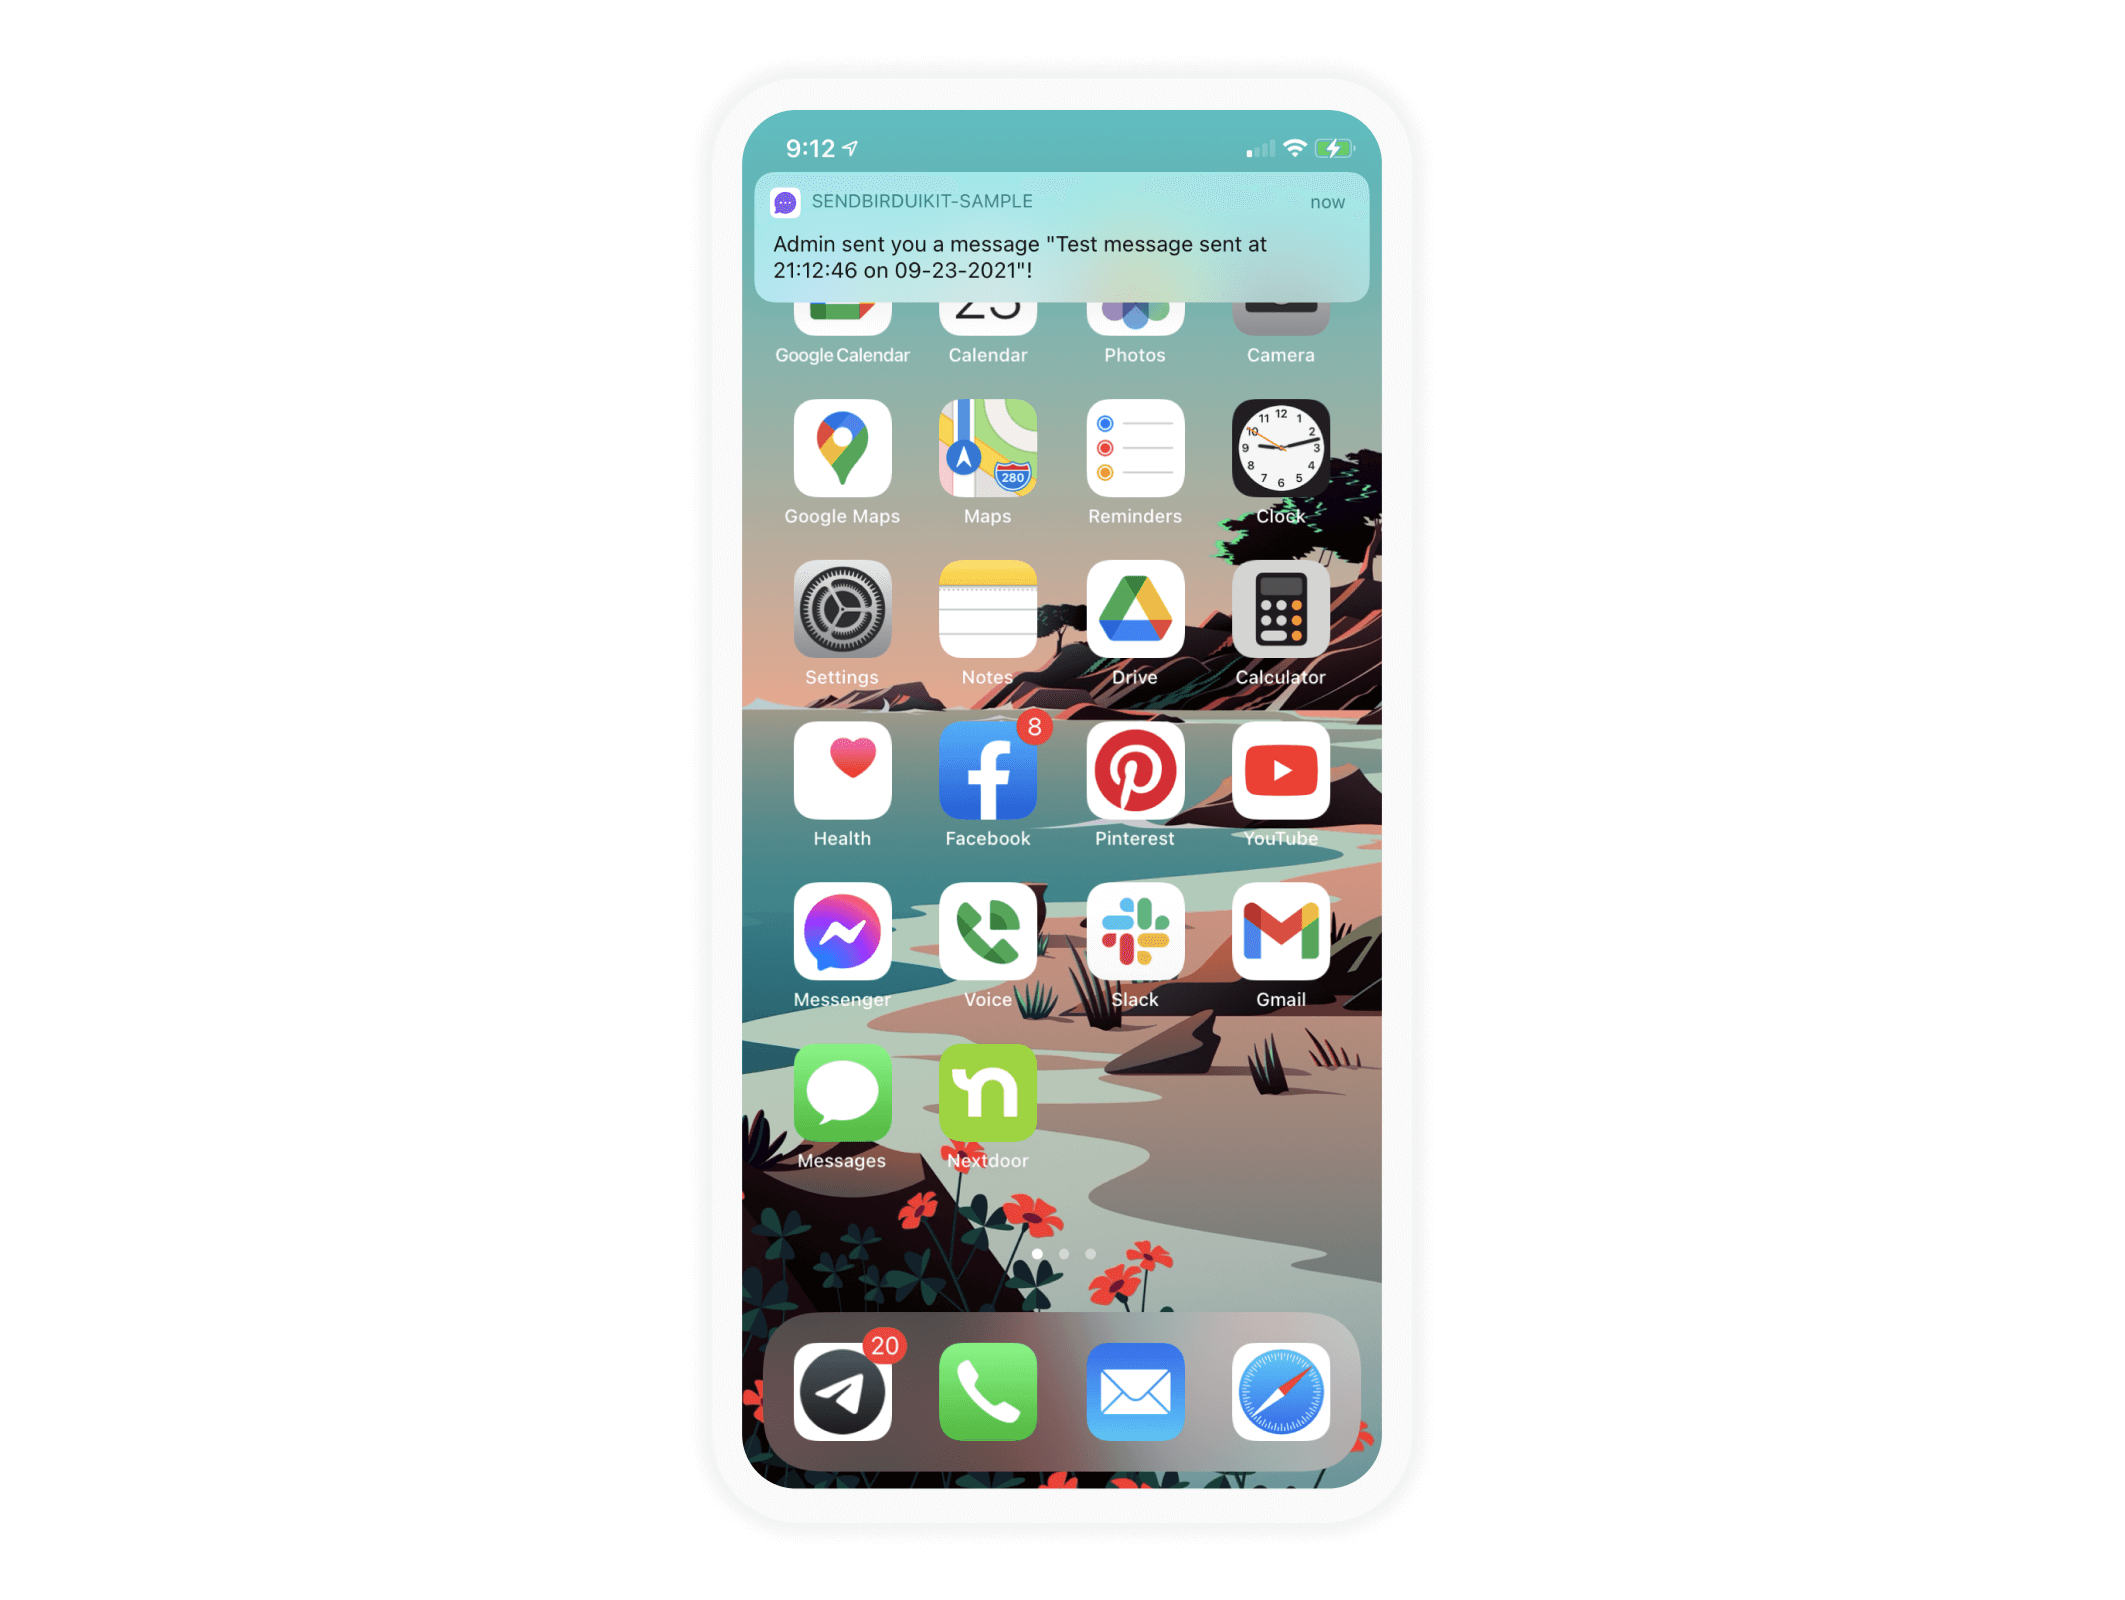
On the Sendbird dashboard, there will be a popup window that shows your push notification was sent successfully. It will also show the sent timestamp.
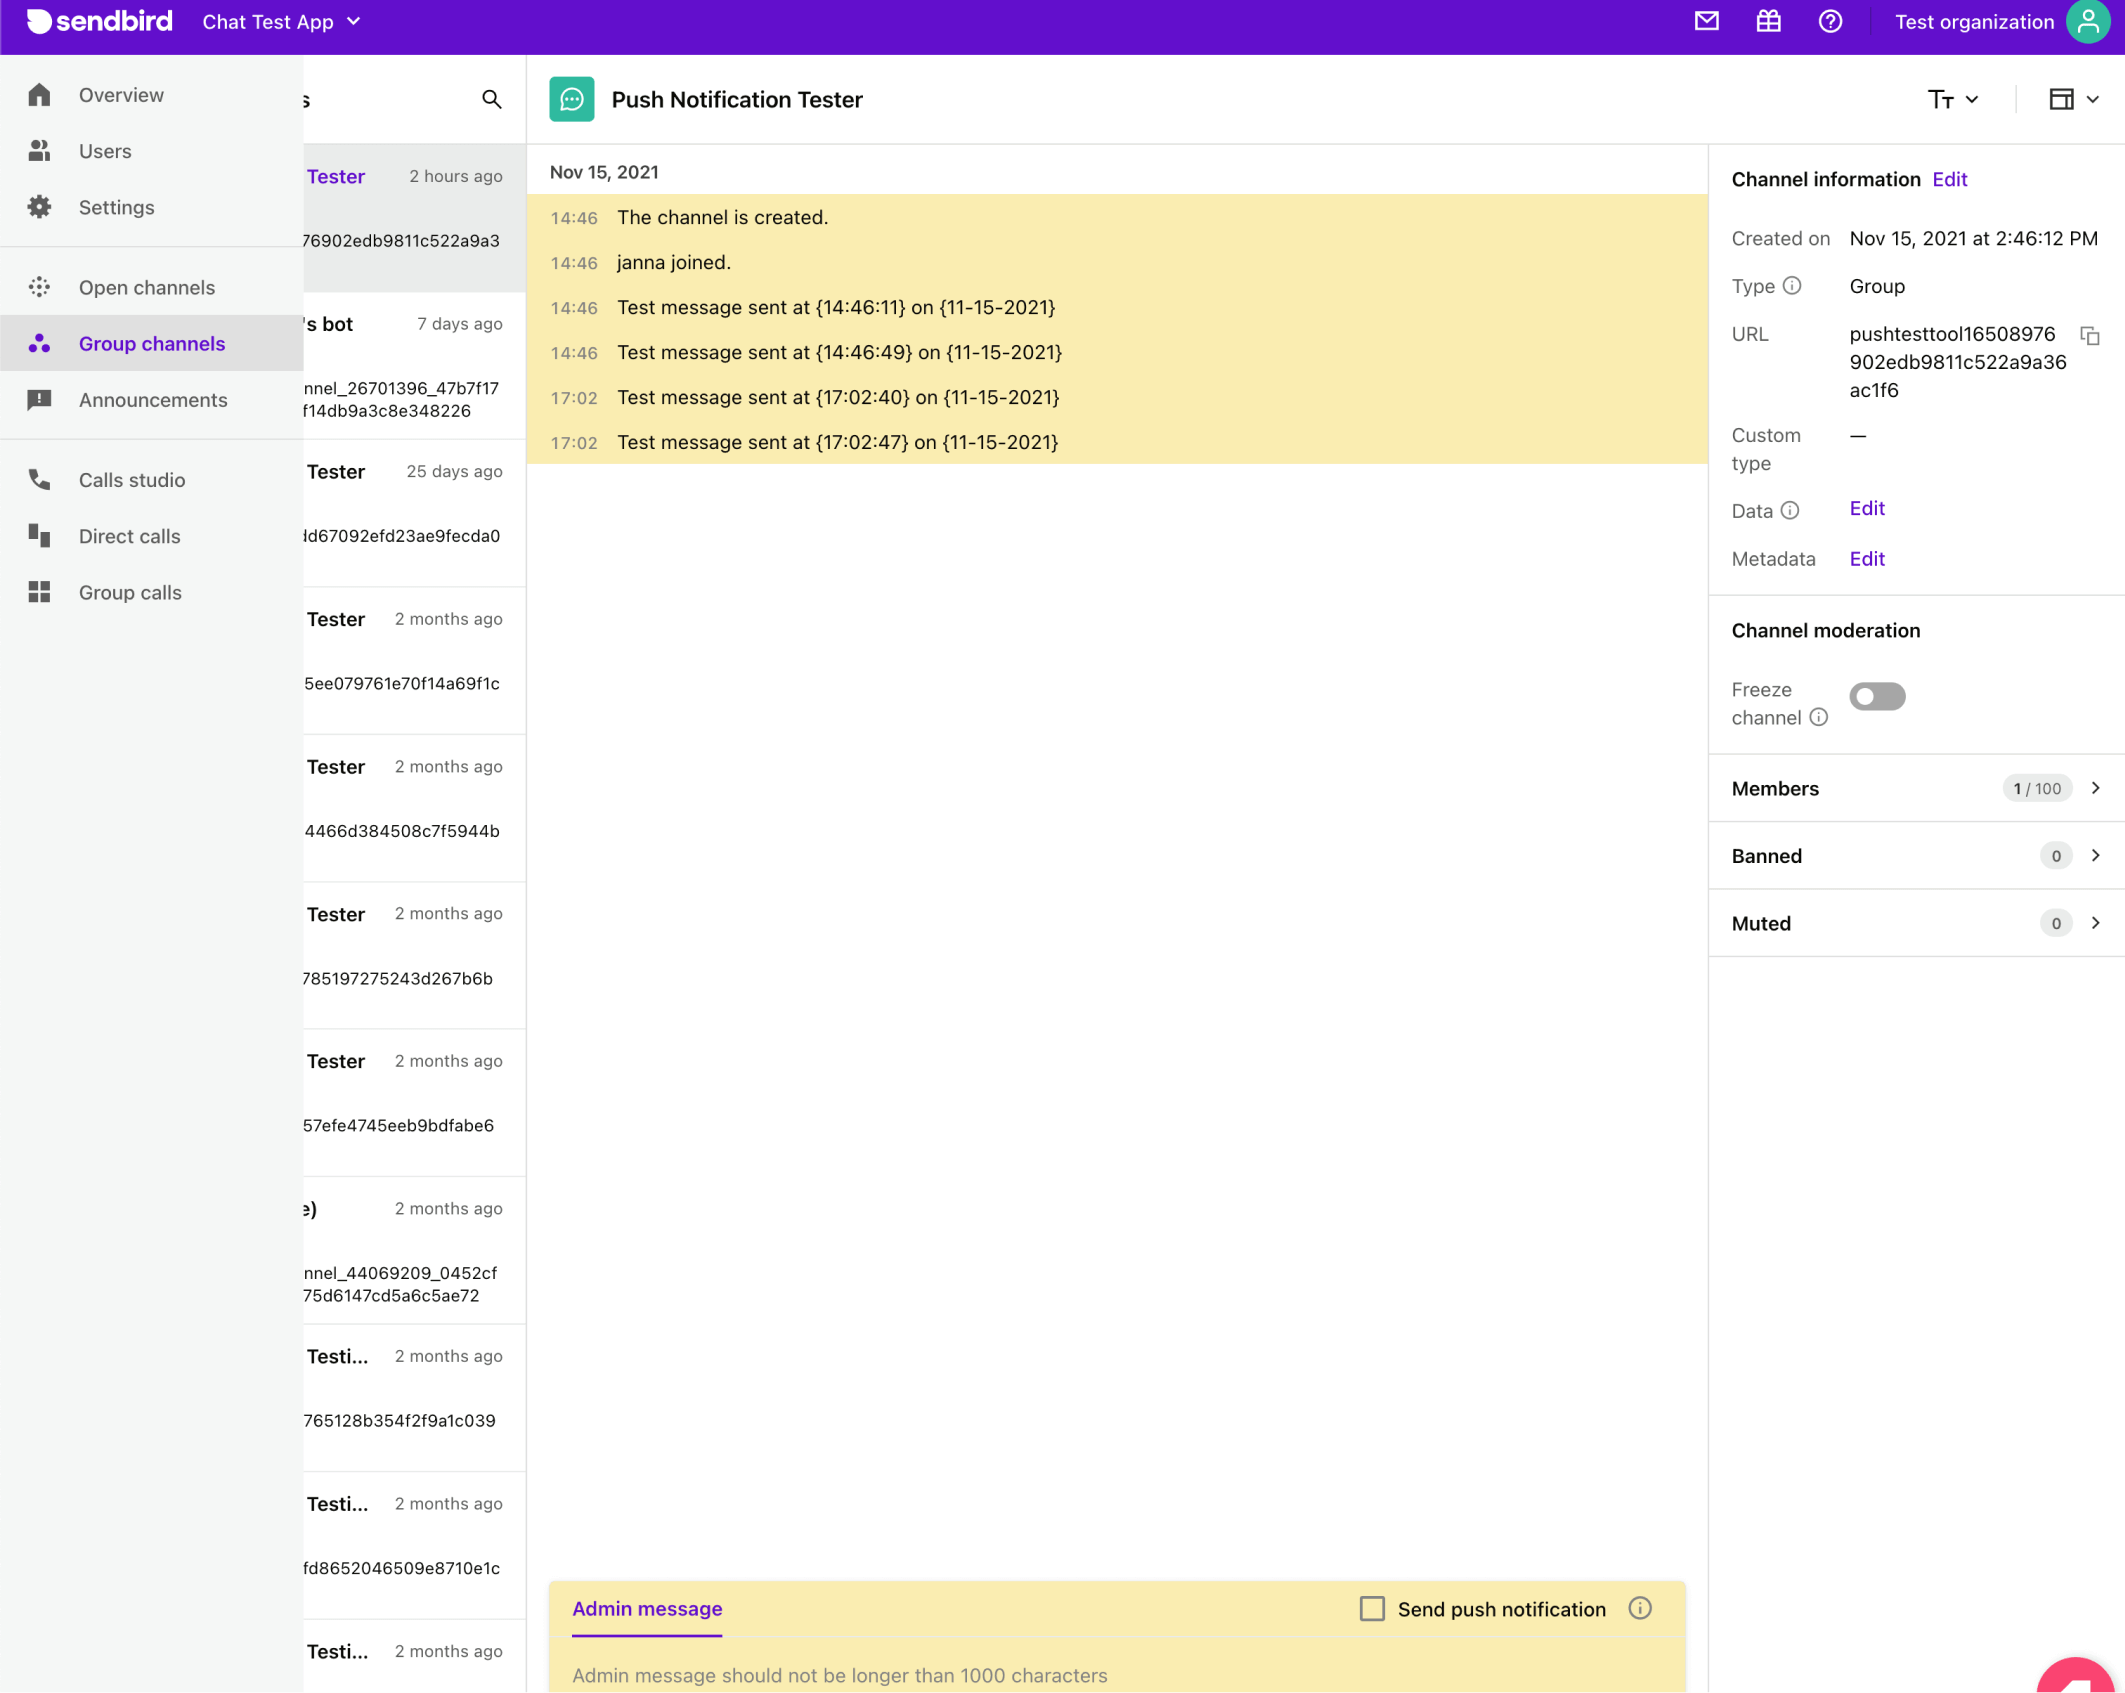
When the push notification is sent to the device, Sendbird creates a new group channel under the hood for that user with the channel name ‘Push Notification Tester’. One implementation of push notifications allows you to click on the push notification so the app will open into the group channels list. There, you can see the ‘Push Notification Tester’ channel and select it to see the message from the tool. A test message will be in the following date and time format so that you can find the exact notification that you are looking for:
“Test message sent at <timestamp> on <date>”,
When sending subsequent push notification messages to the same user and device token, those messages will be inserted into the existing created channel.
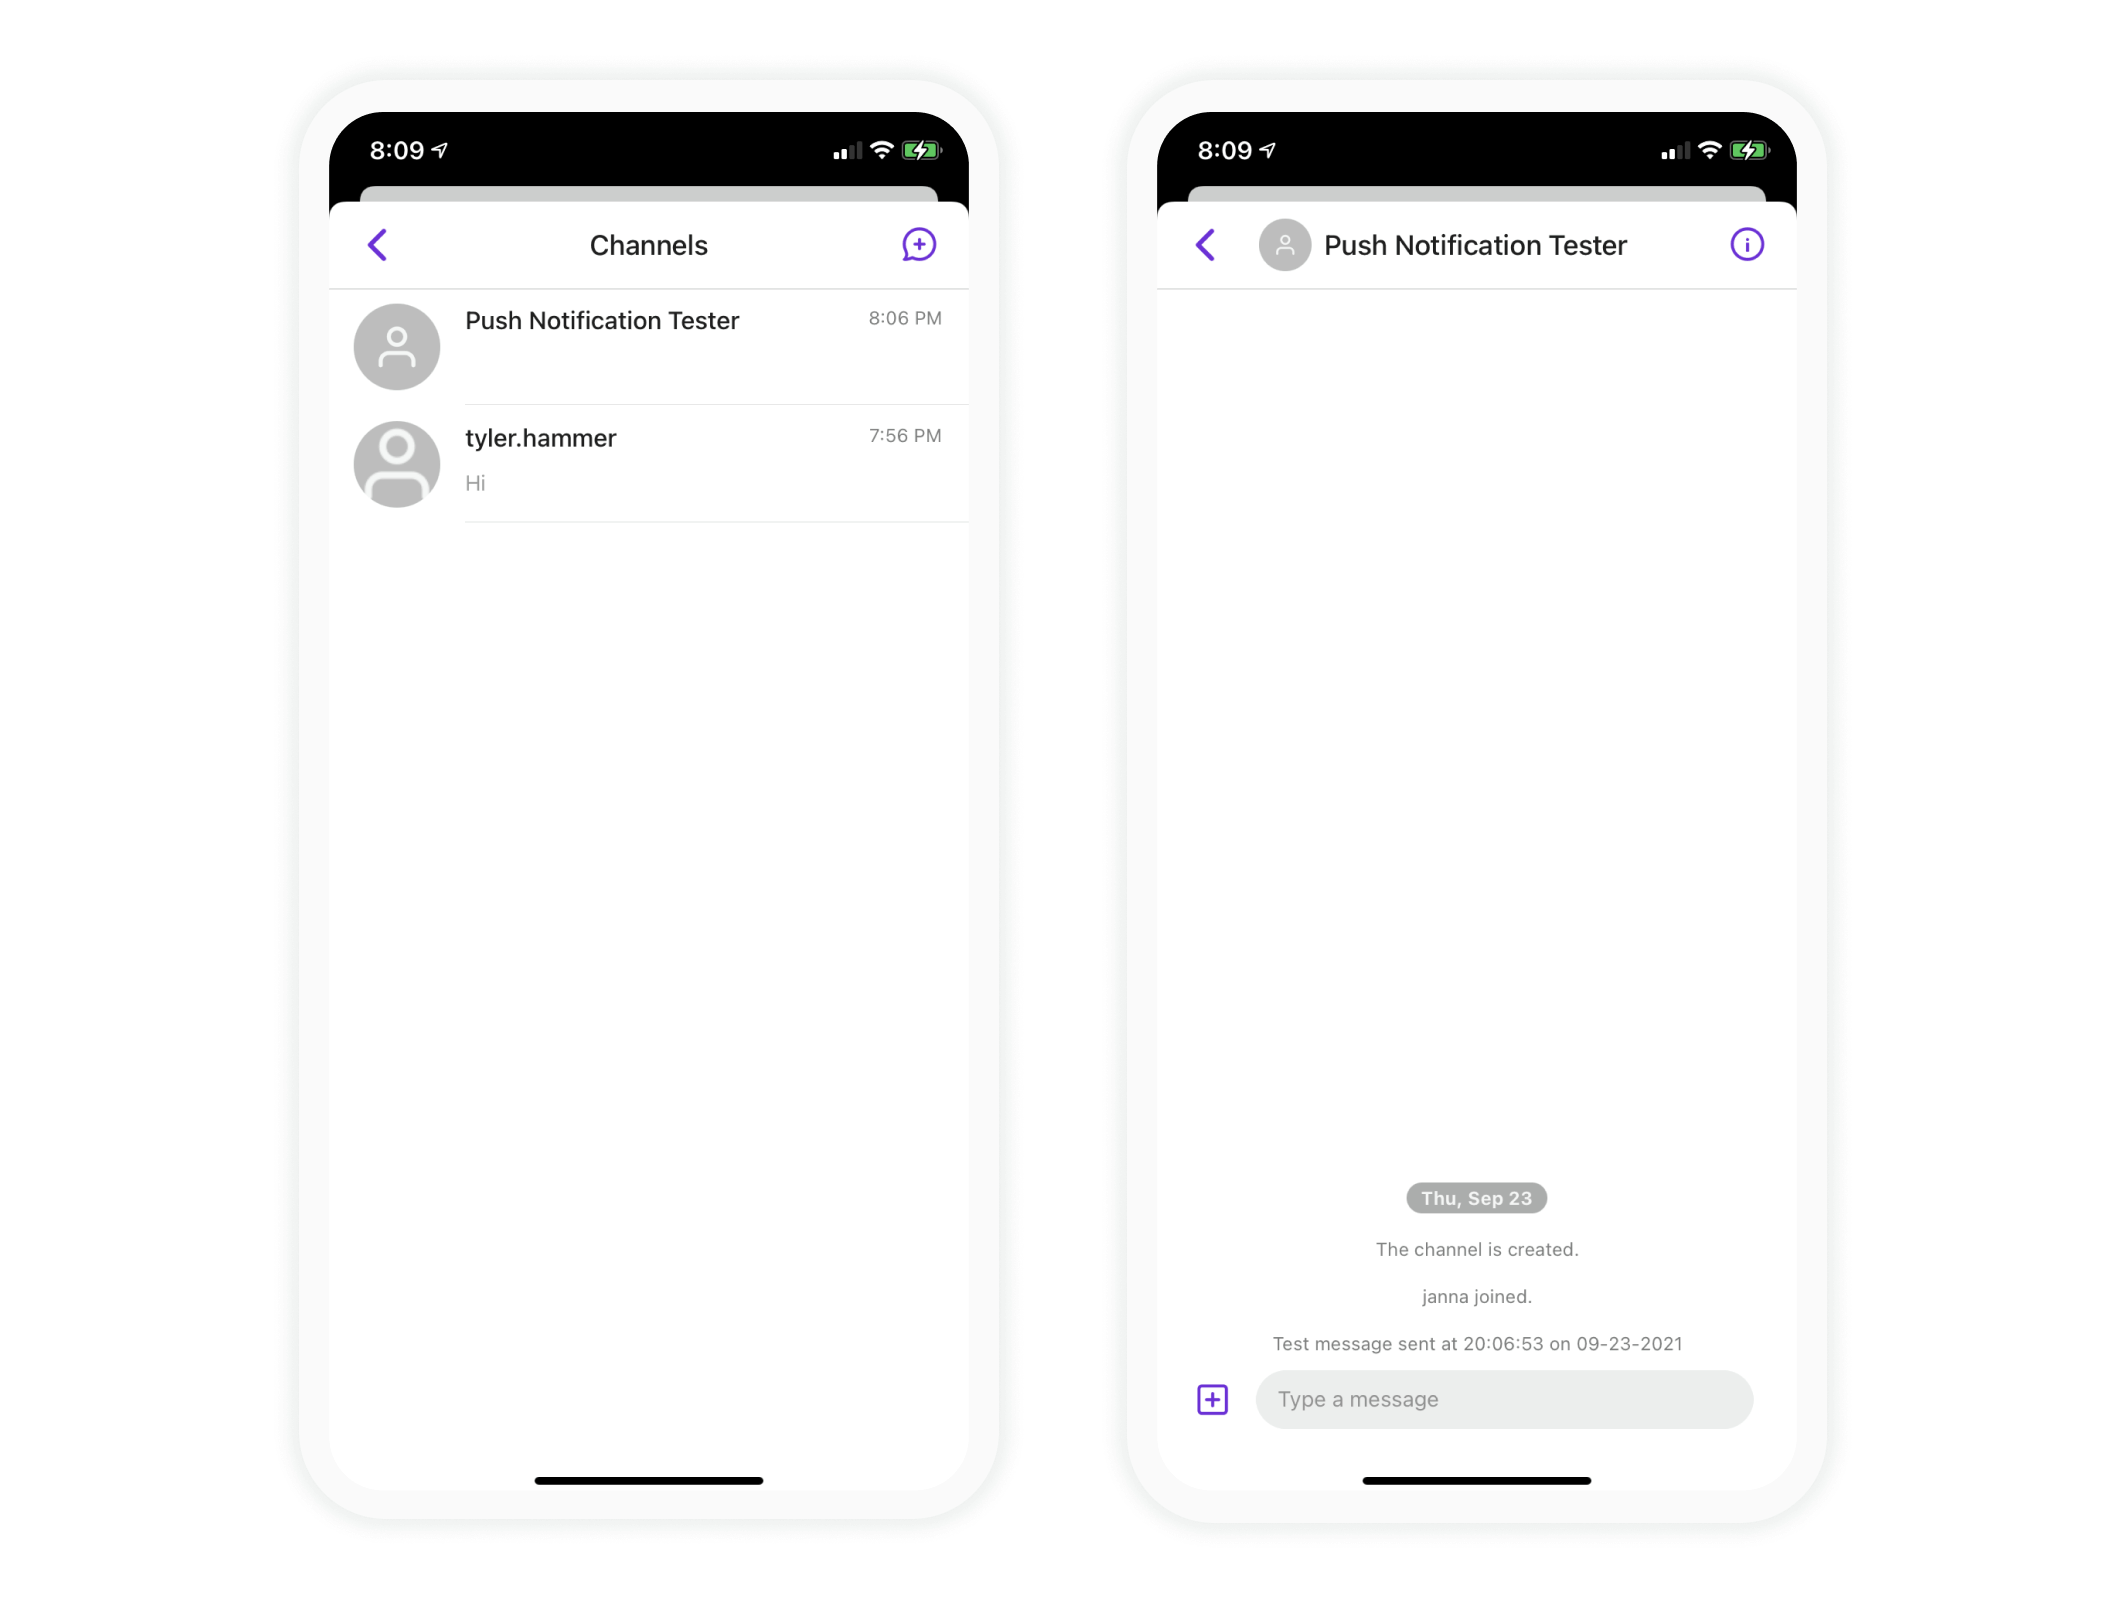
You can see the new channel on the Sendbird dashboard as well. If you have Sendbird’s moderation tools, you can see the channel to view the test messages.
Troubleshooting iOS push notification issues
It can be a challenge when push notifications are not sent to your device. To help you resolve the issue, Sendbird’s Push Notification Tester passes along the response received from APNs.. This section covers the most common issues the Sendbird team has seen when troubleshooting.
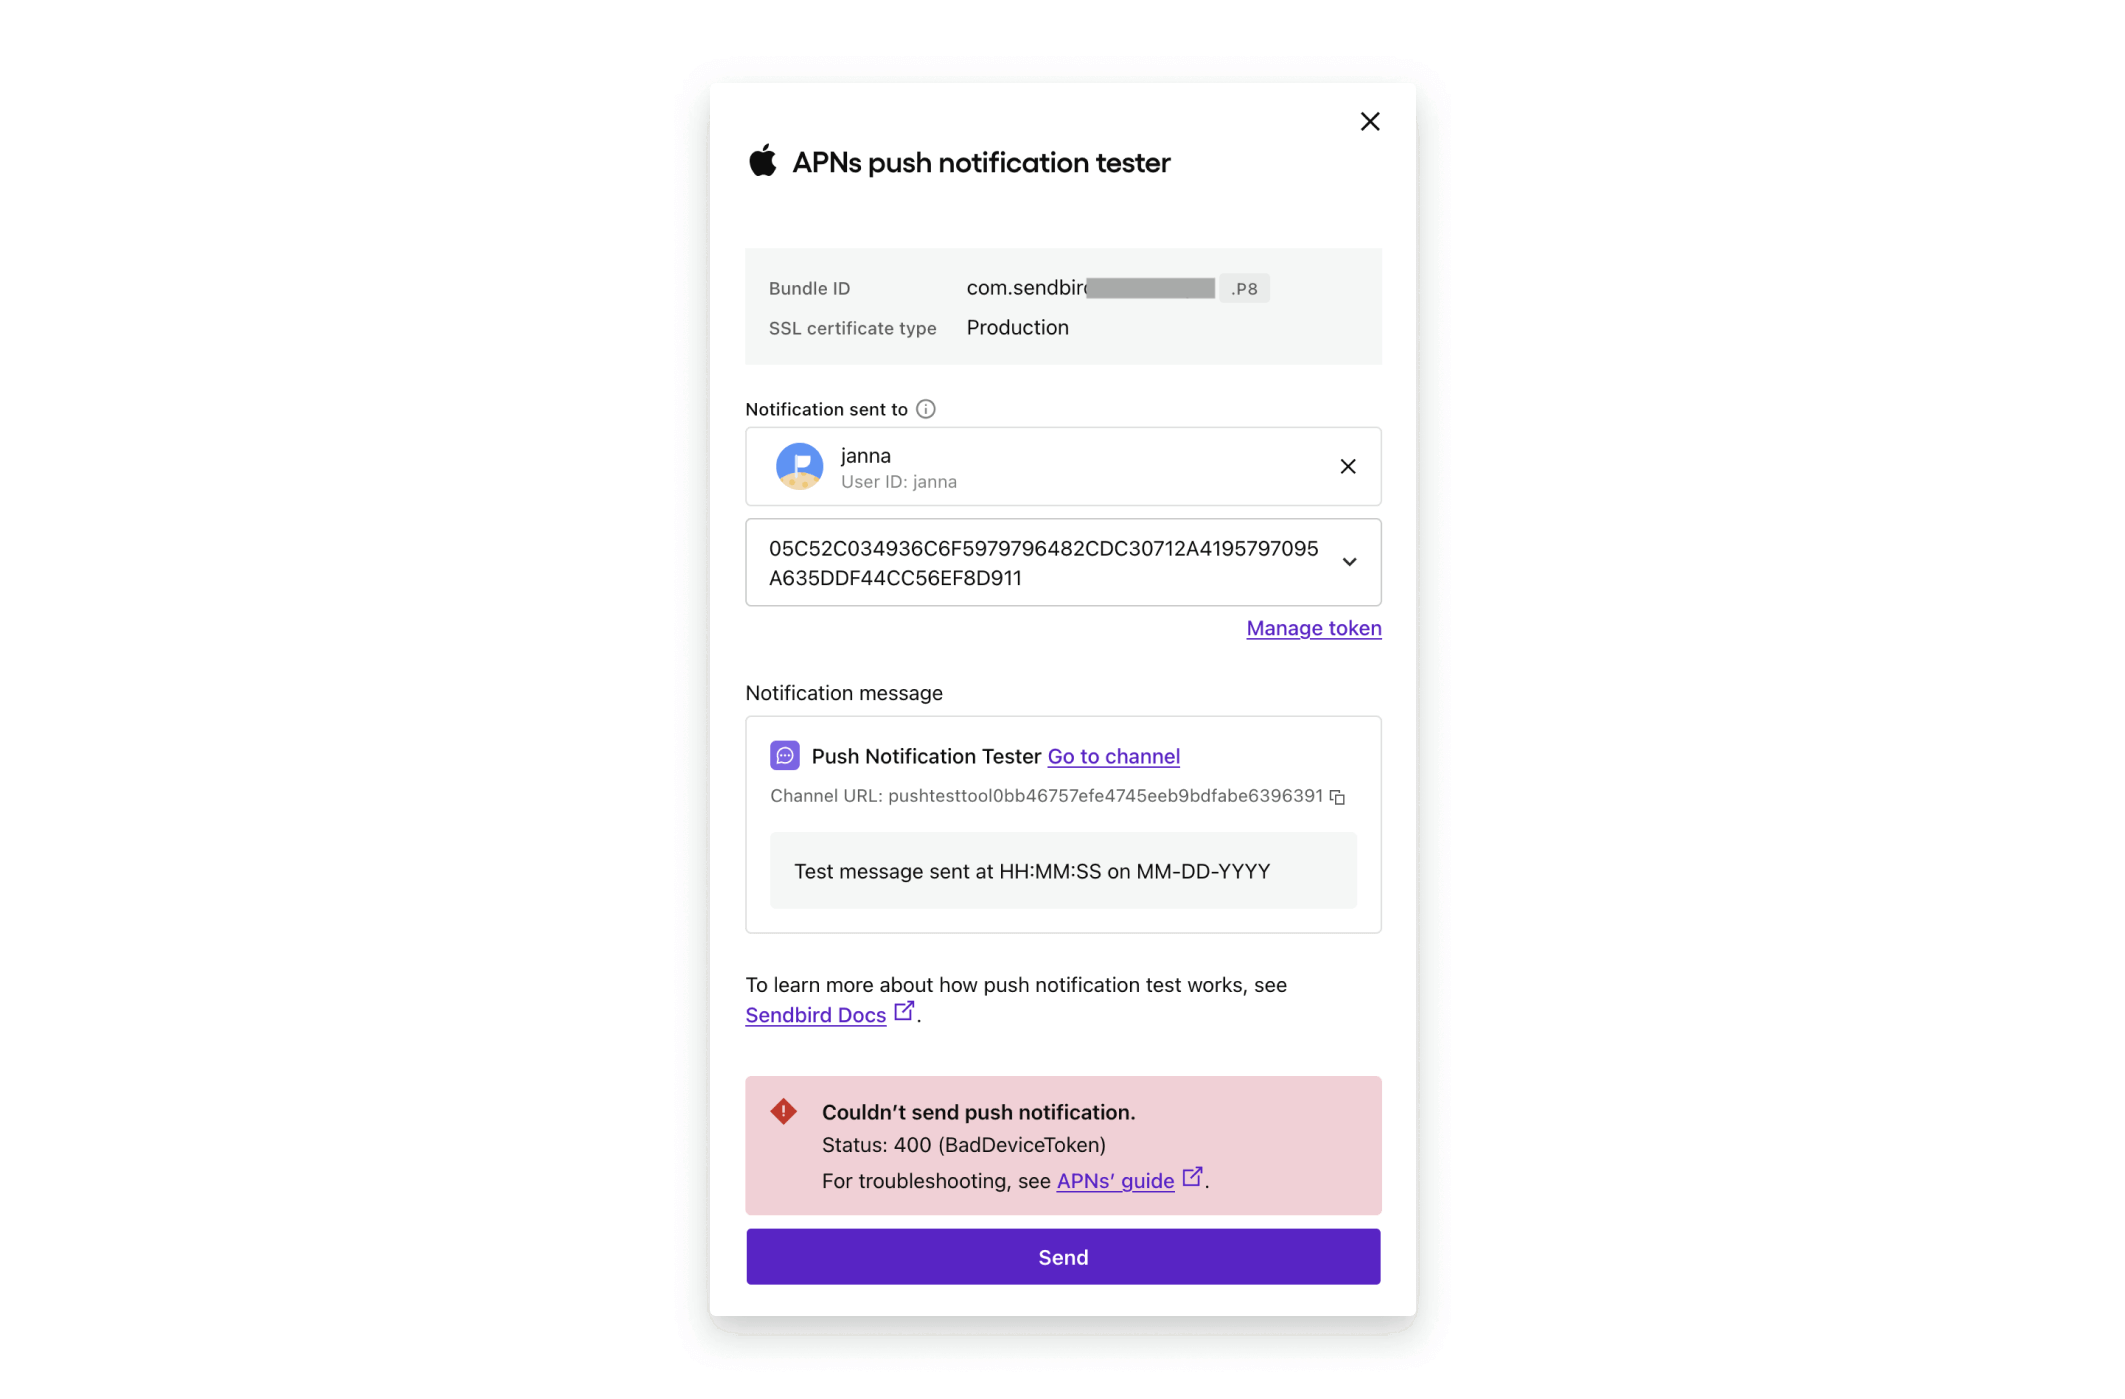
BadDeviceToken
Possible cause
The registered device token is for production, but you are testing push notifications in development by running the app from Xcode.
Possible solutions
- Test on an ad hoc builds using TestFlight.
- Register the user’s device token by connecting as that user in your production app.
- Update the certificate to development if it was intended for development purposes only.
- Upload the certificate again as a development certificate.
Another possible cause
The user has an expired device token on file. This can happen when the app was re-installed, but the device token was not re-registered with Sendbird.
Possible solutions
- Register the device token again via the app. This will refresh the token.
- Try registering the user’s device token through Sendbird’s platform API endpoint.
DeviceTokenNotForTopic
This means that the user’s registered device token does not match the certificate that is on file. This can happen when the user’s device token was registered from an app with a different bundle ID than the bundle ID of the certificate.
Possible solutions
- Register the user’s device token again when running the app, with the matching bundle ID as the bundle ID of the certificate.
- Adjust the bundle ID in your app to match the certificate on file.
- Test sending a push notification from a different certificate.
- Register a p8 auth key with Sendbird that can be used with multiple apps. According to the official Apple documentation, “You can use a single, token-based connection between a provider and APNs can send push notification requests to all the apps whose bundle IDs are listed in your online developer account.”
Part 2: Android devices
Testing your first push notification for Android
Navigate to the Notifications section of your Sendbird dashboard and select the ‘Send’ option next to the FCM server key that matches the Android package of the app you are testing with.
Tip:
- We recommend testing with a physical device instead of testing with the Android emulator.
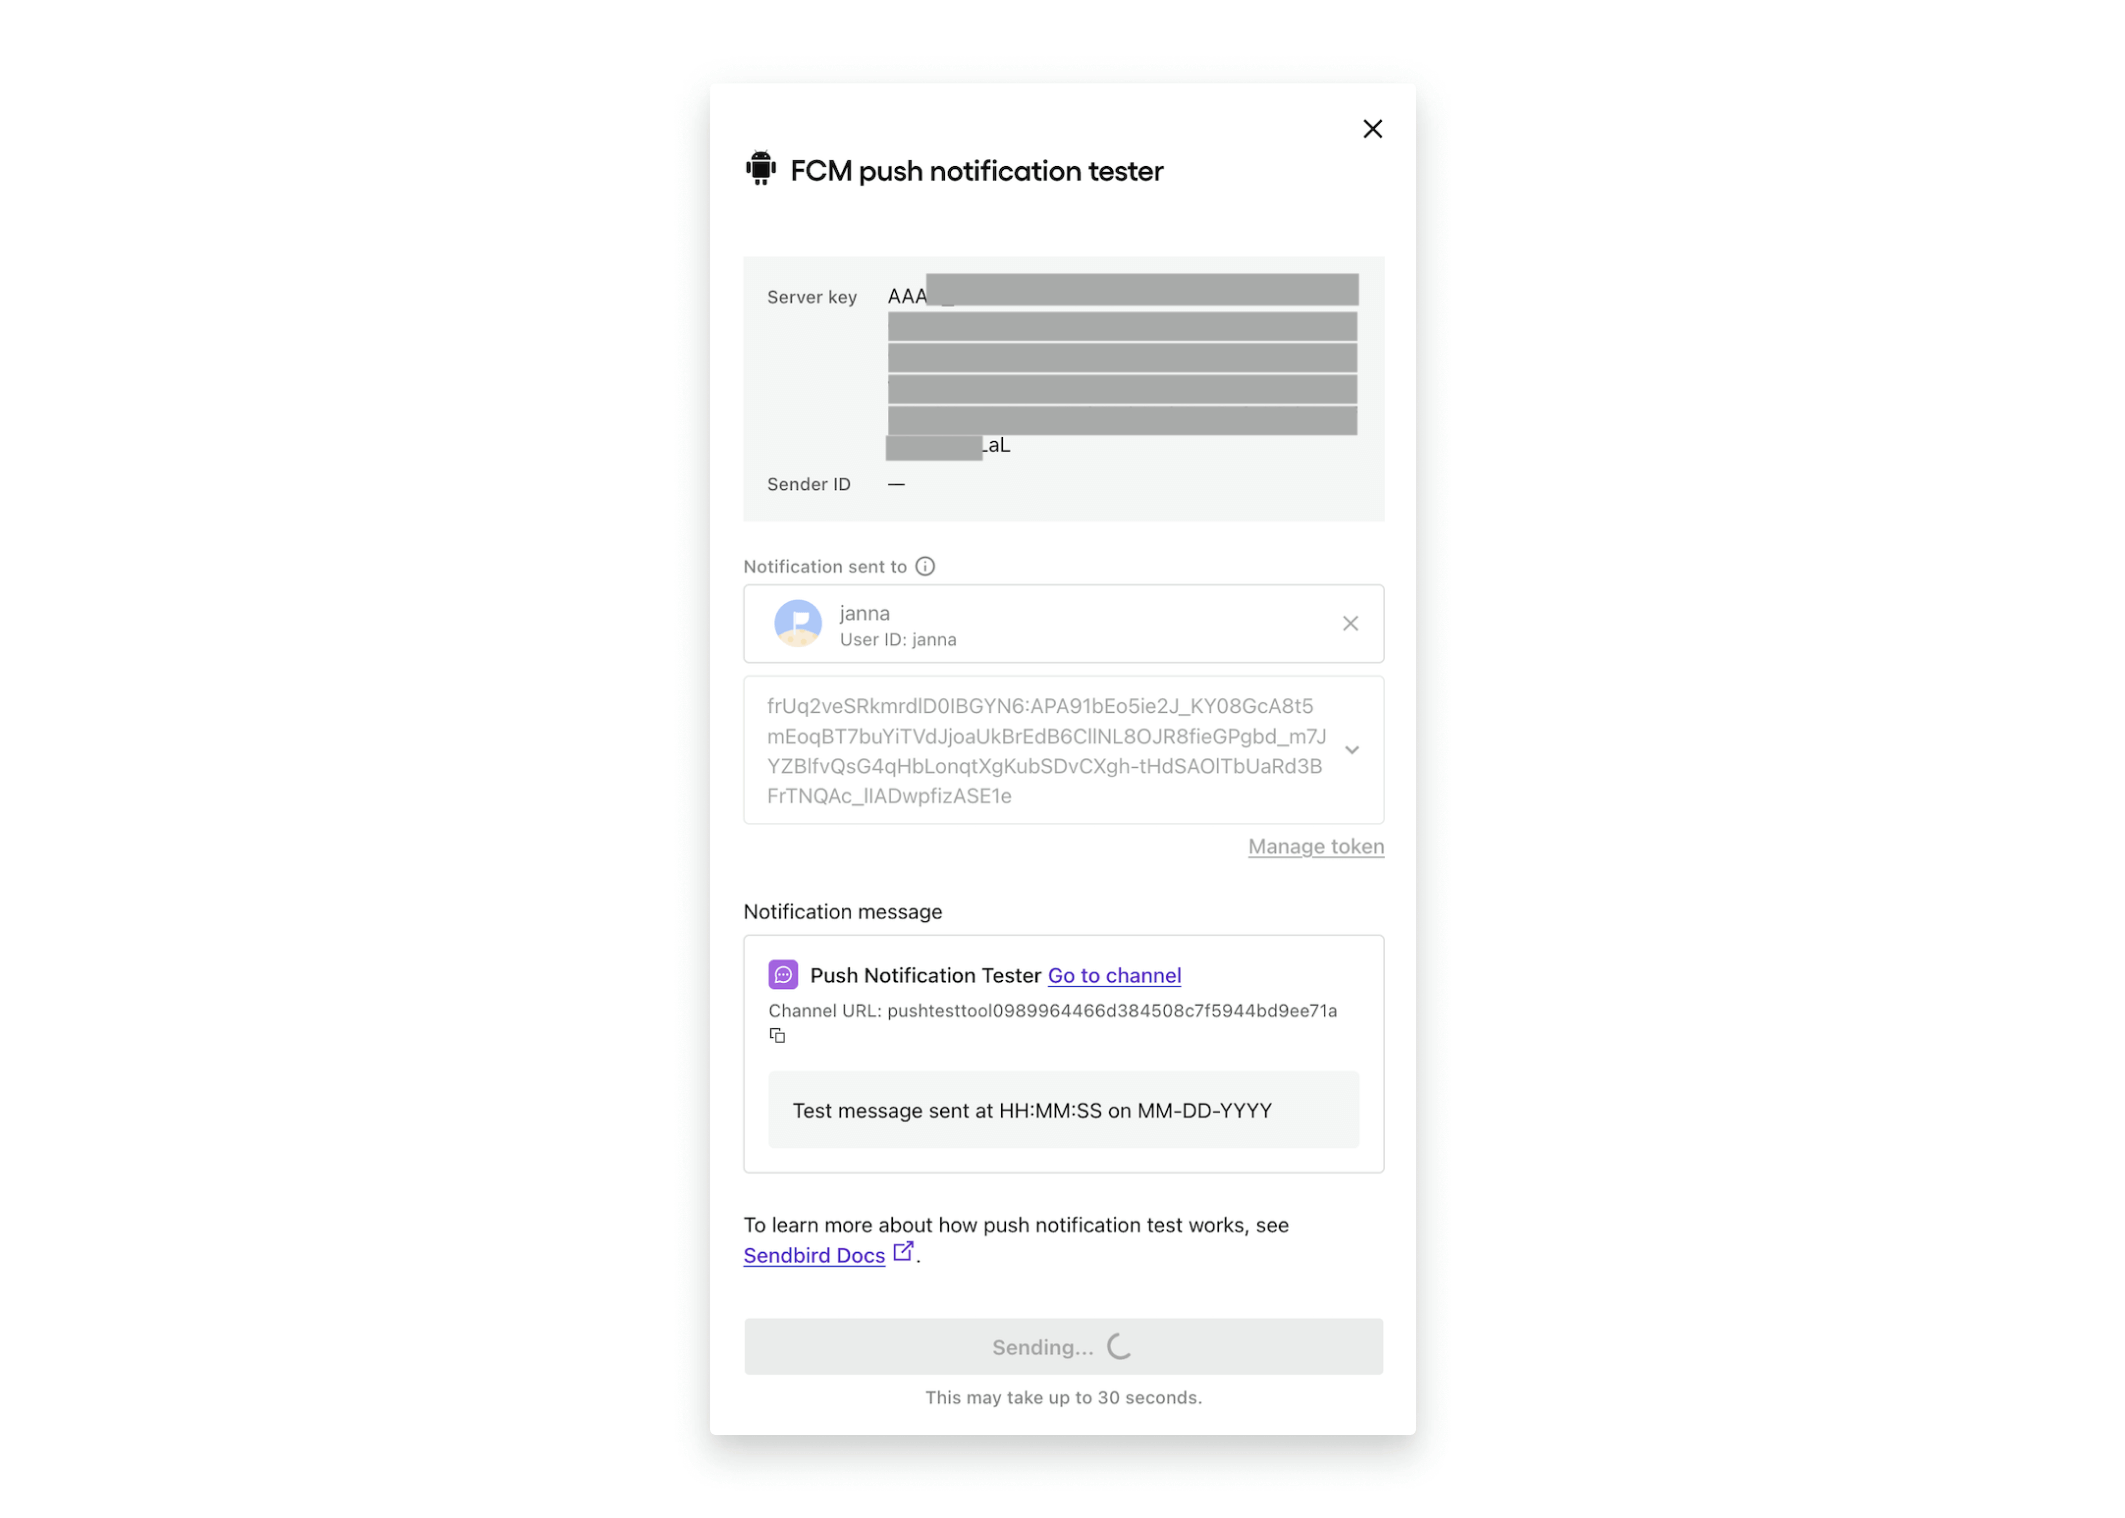
Select the ‘Send’ button, and you will see the “FCM push notification tester” popup window.
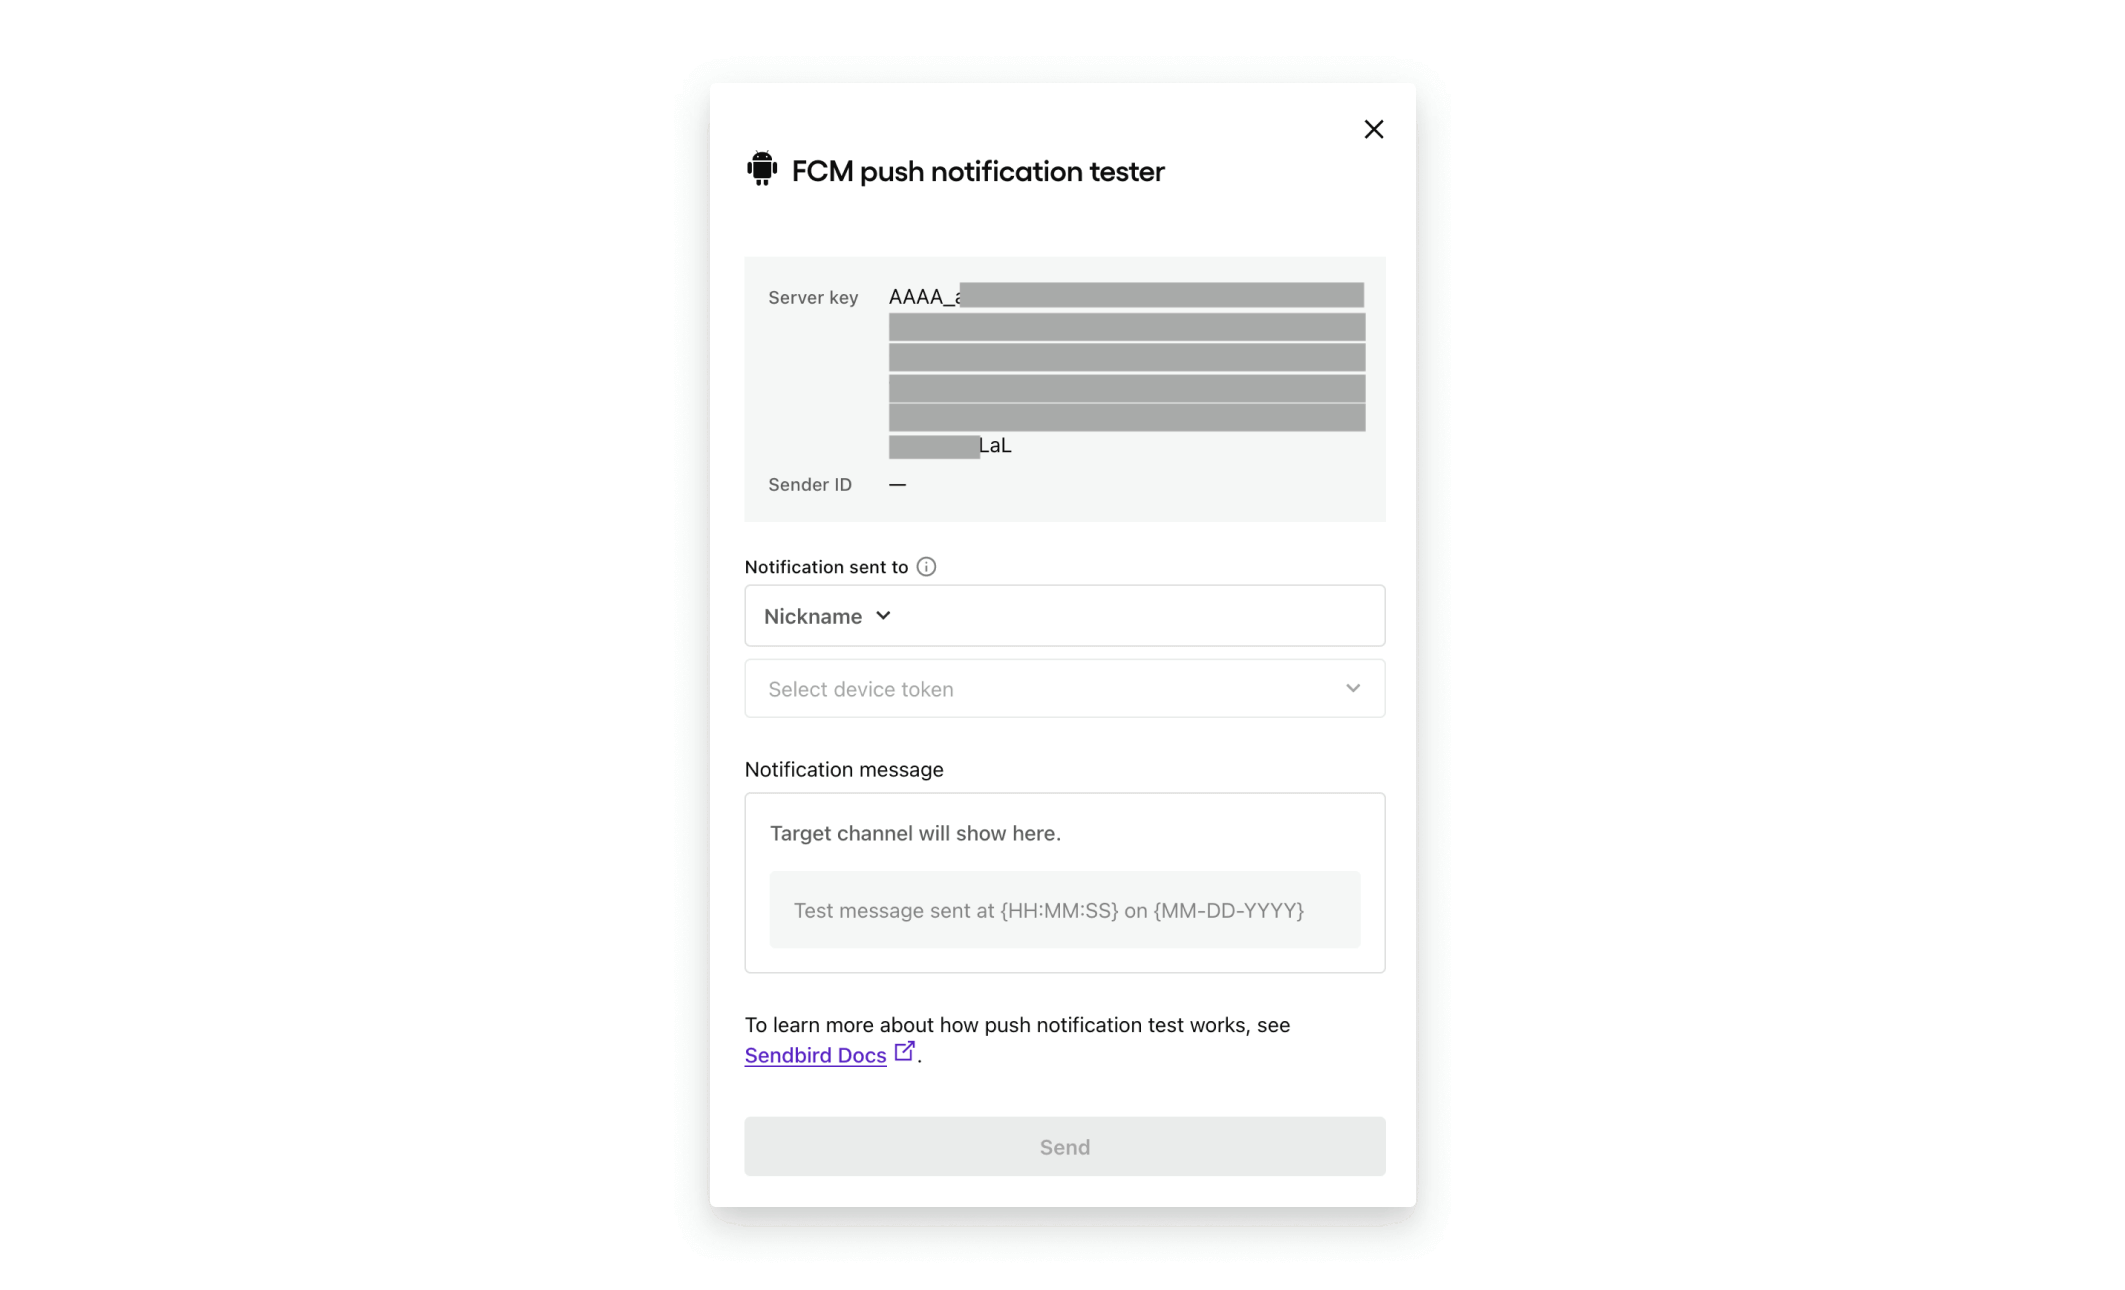
In the Nickname section, type in the user to whom you want to send a push notification. Alternatively, search for a user by ‘User ID’.
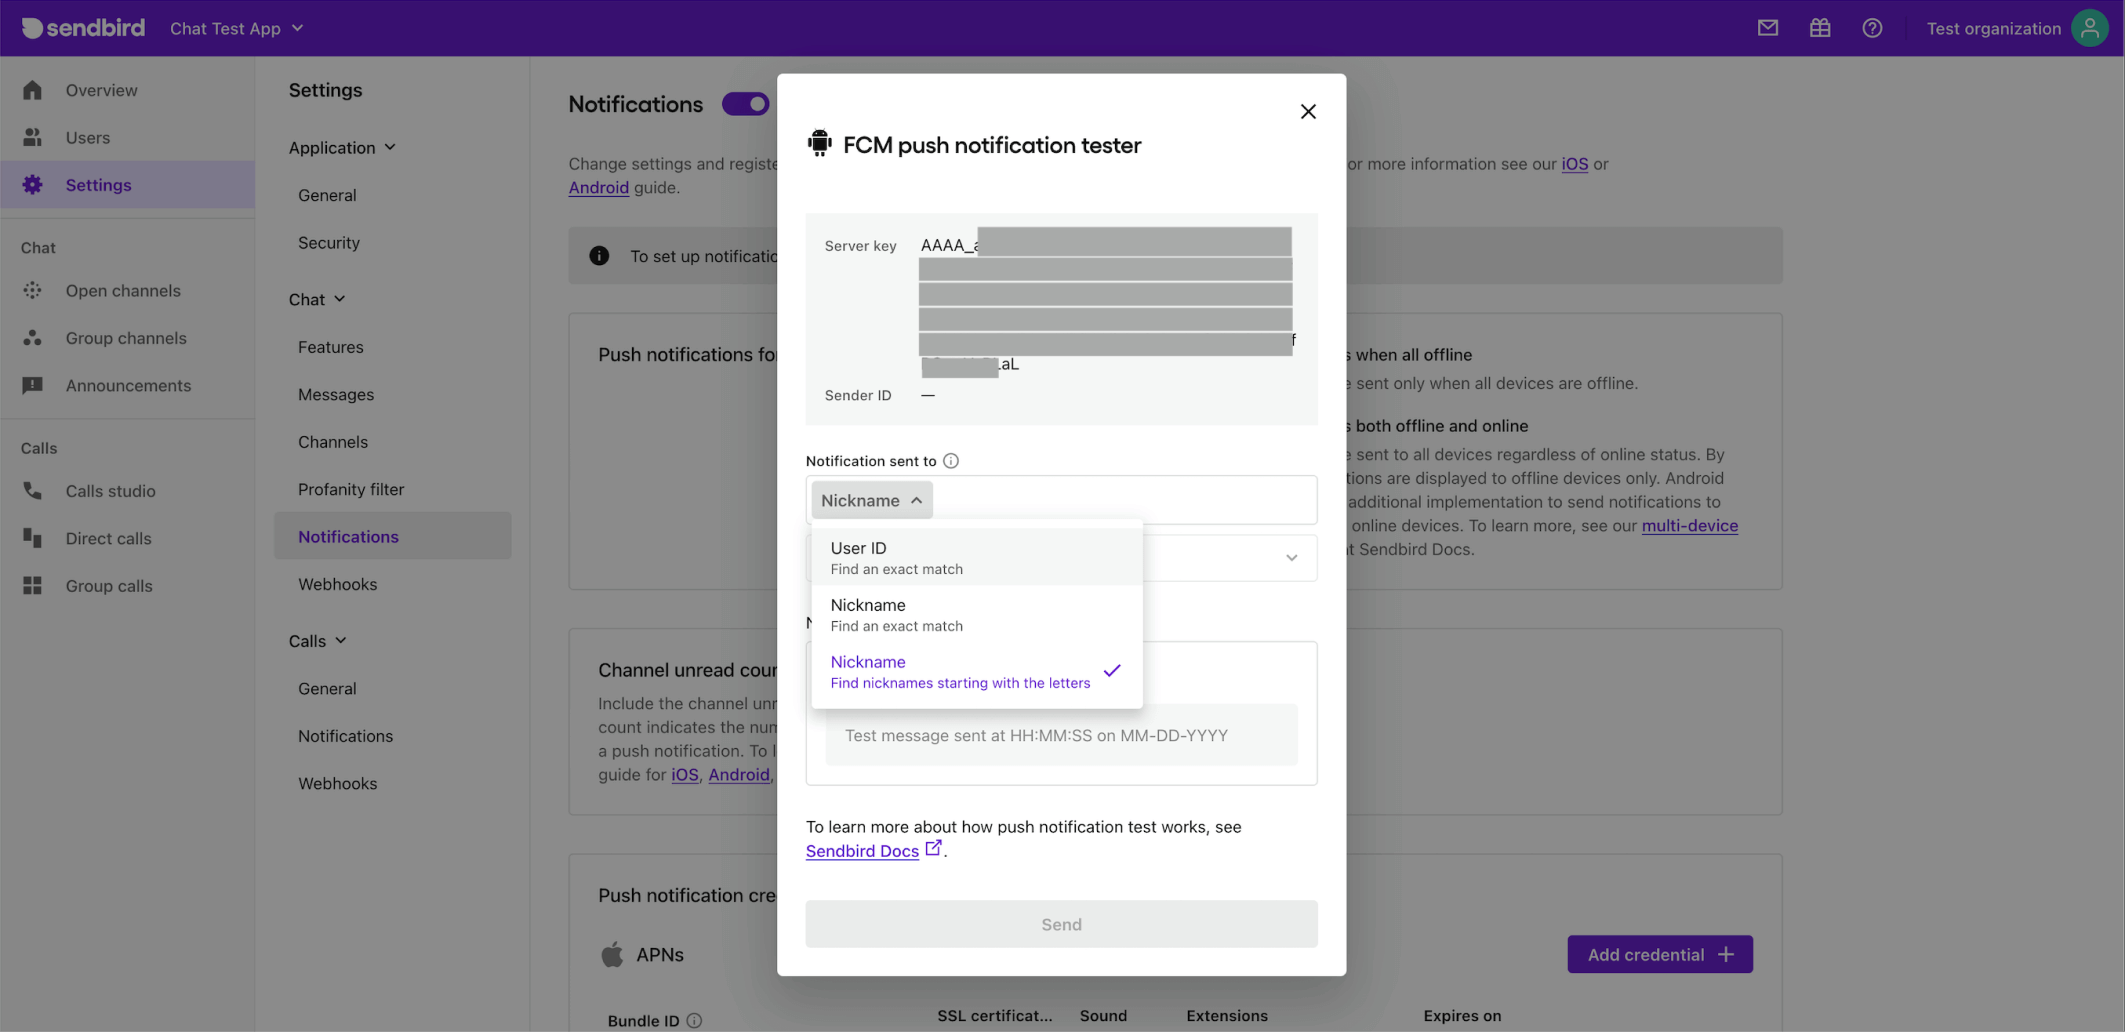
If that user has a registered device token on file for FCM, one will be automatically populated in the box below the user search box. If the user has multiple device tokens registered, you can select a different token by clicking on the populated token and selecting another token from the dropdown box.
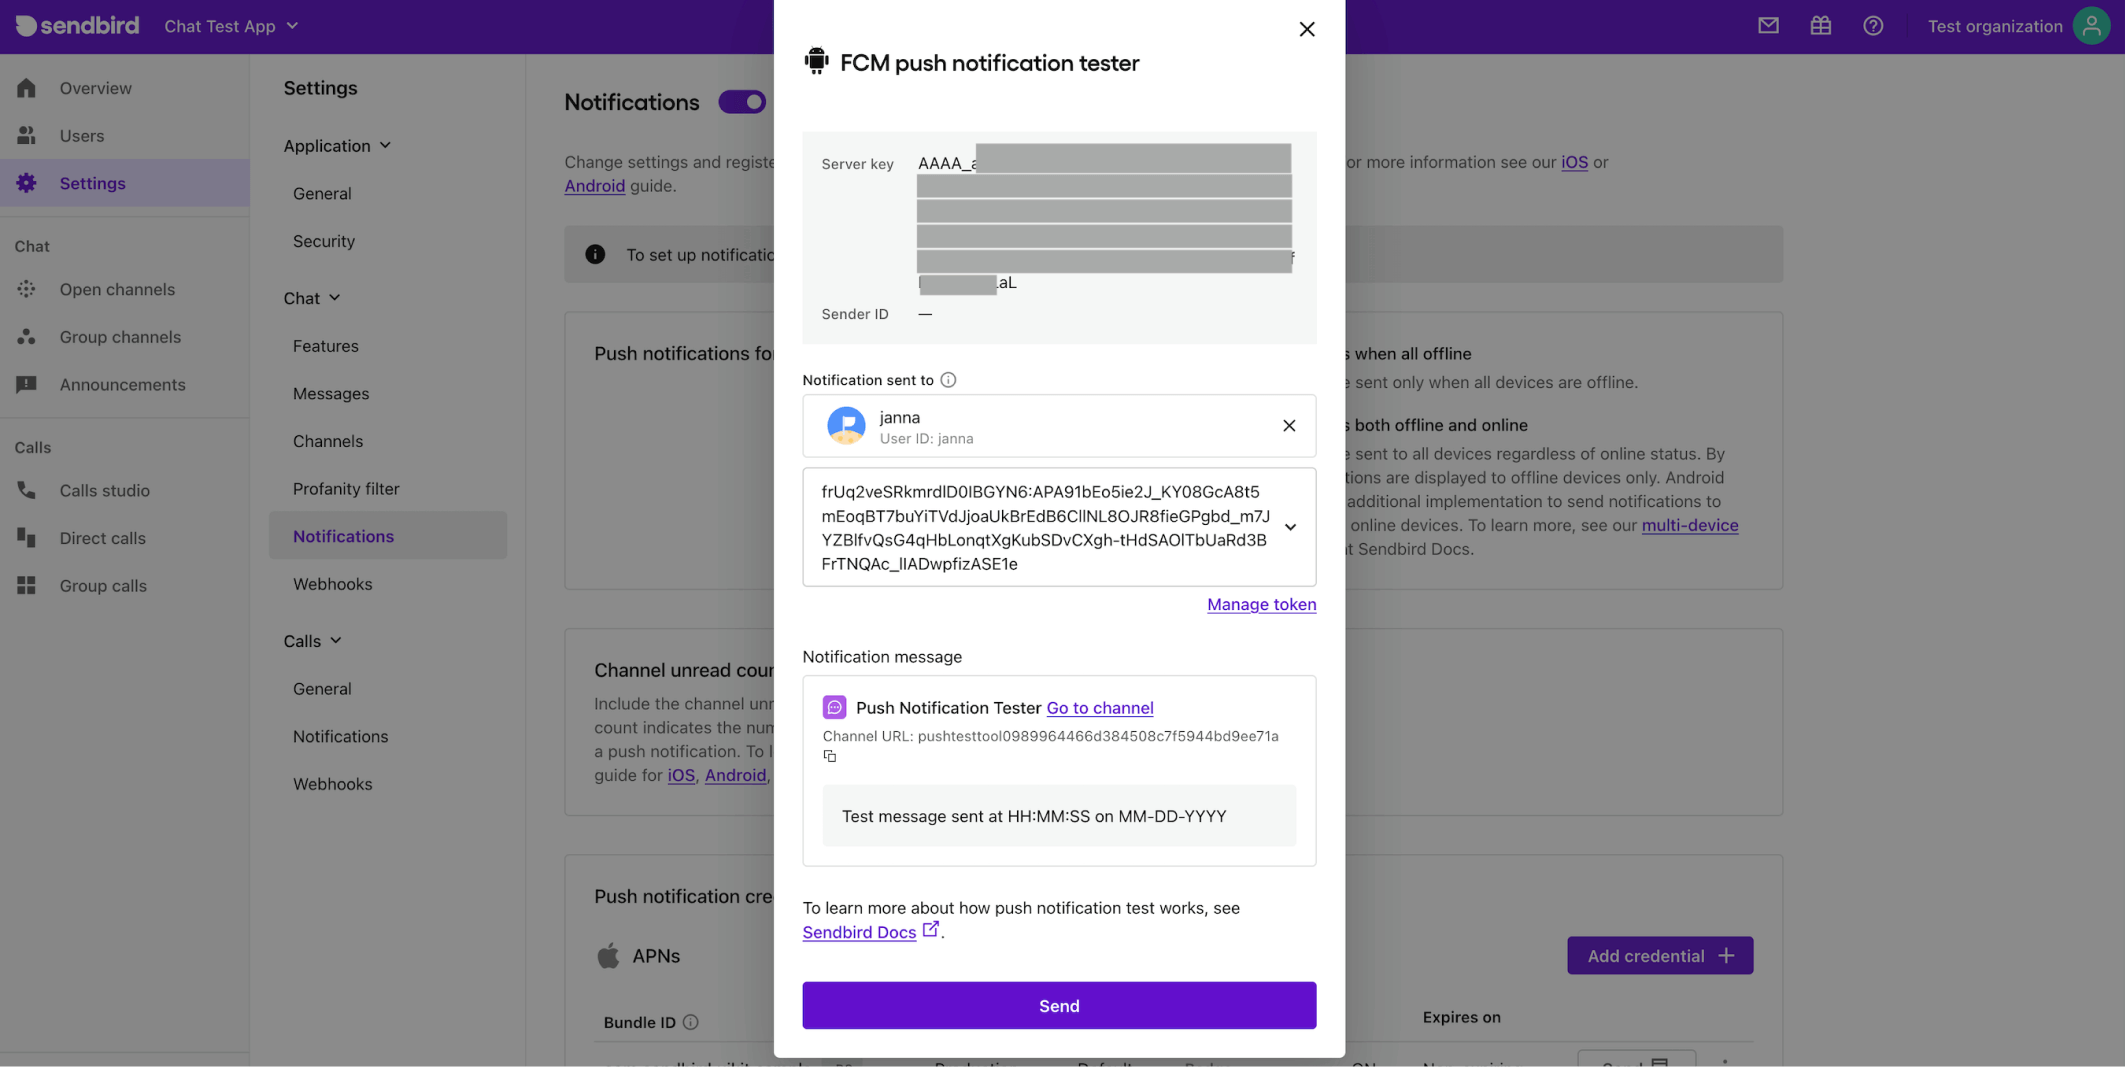
Once your user and device token are selected, you’re ready to send to your device! Click the ‘Send’ button and allow up to 30 seconds to receive the notification on your mobile device.
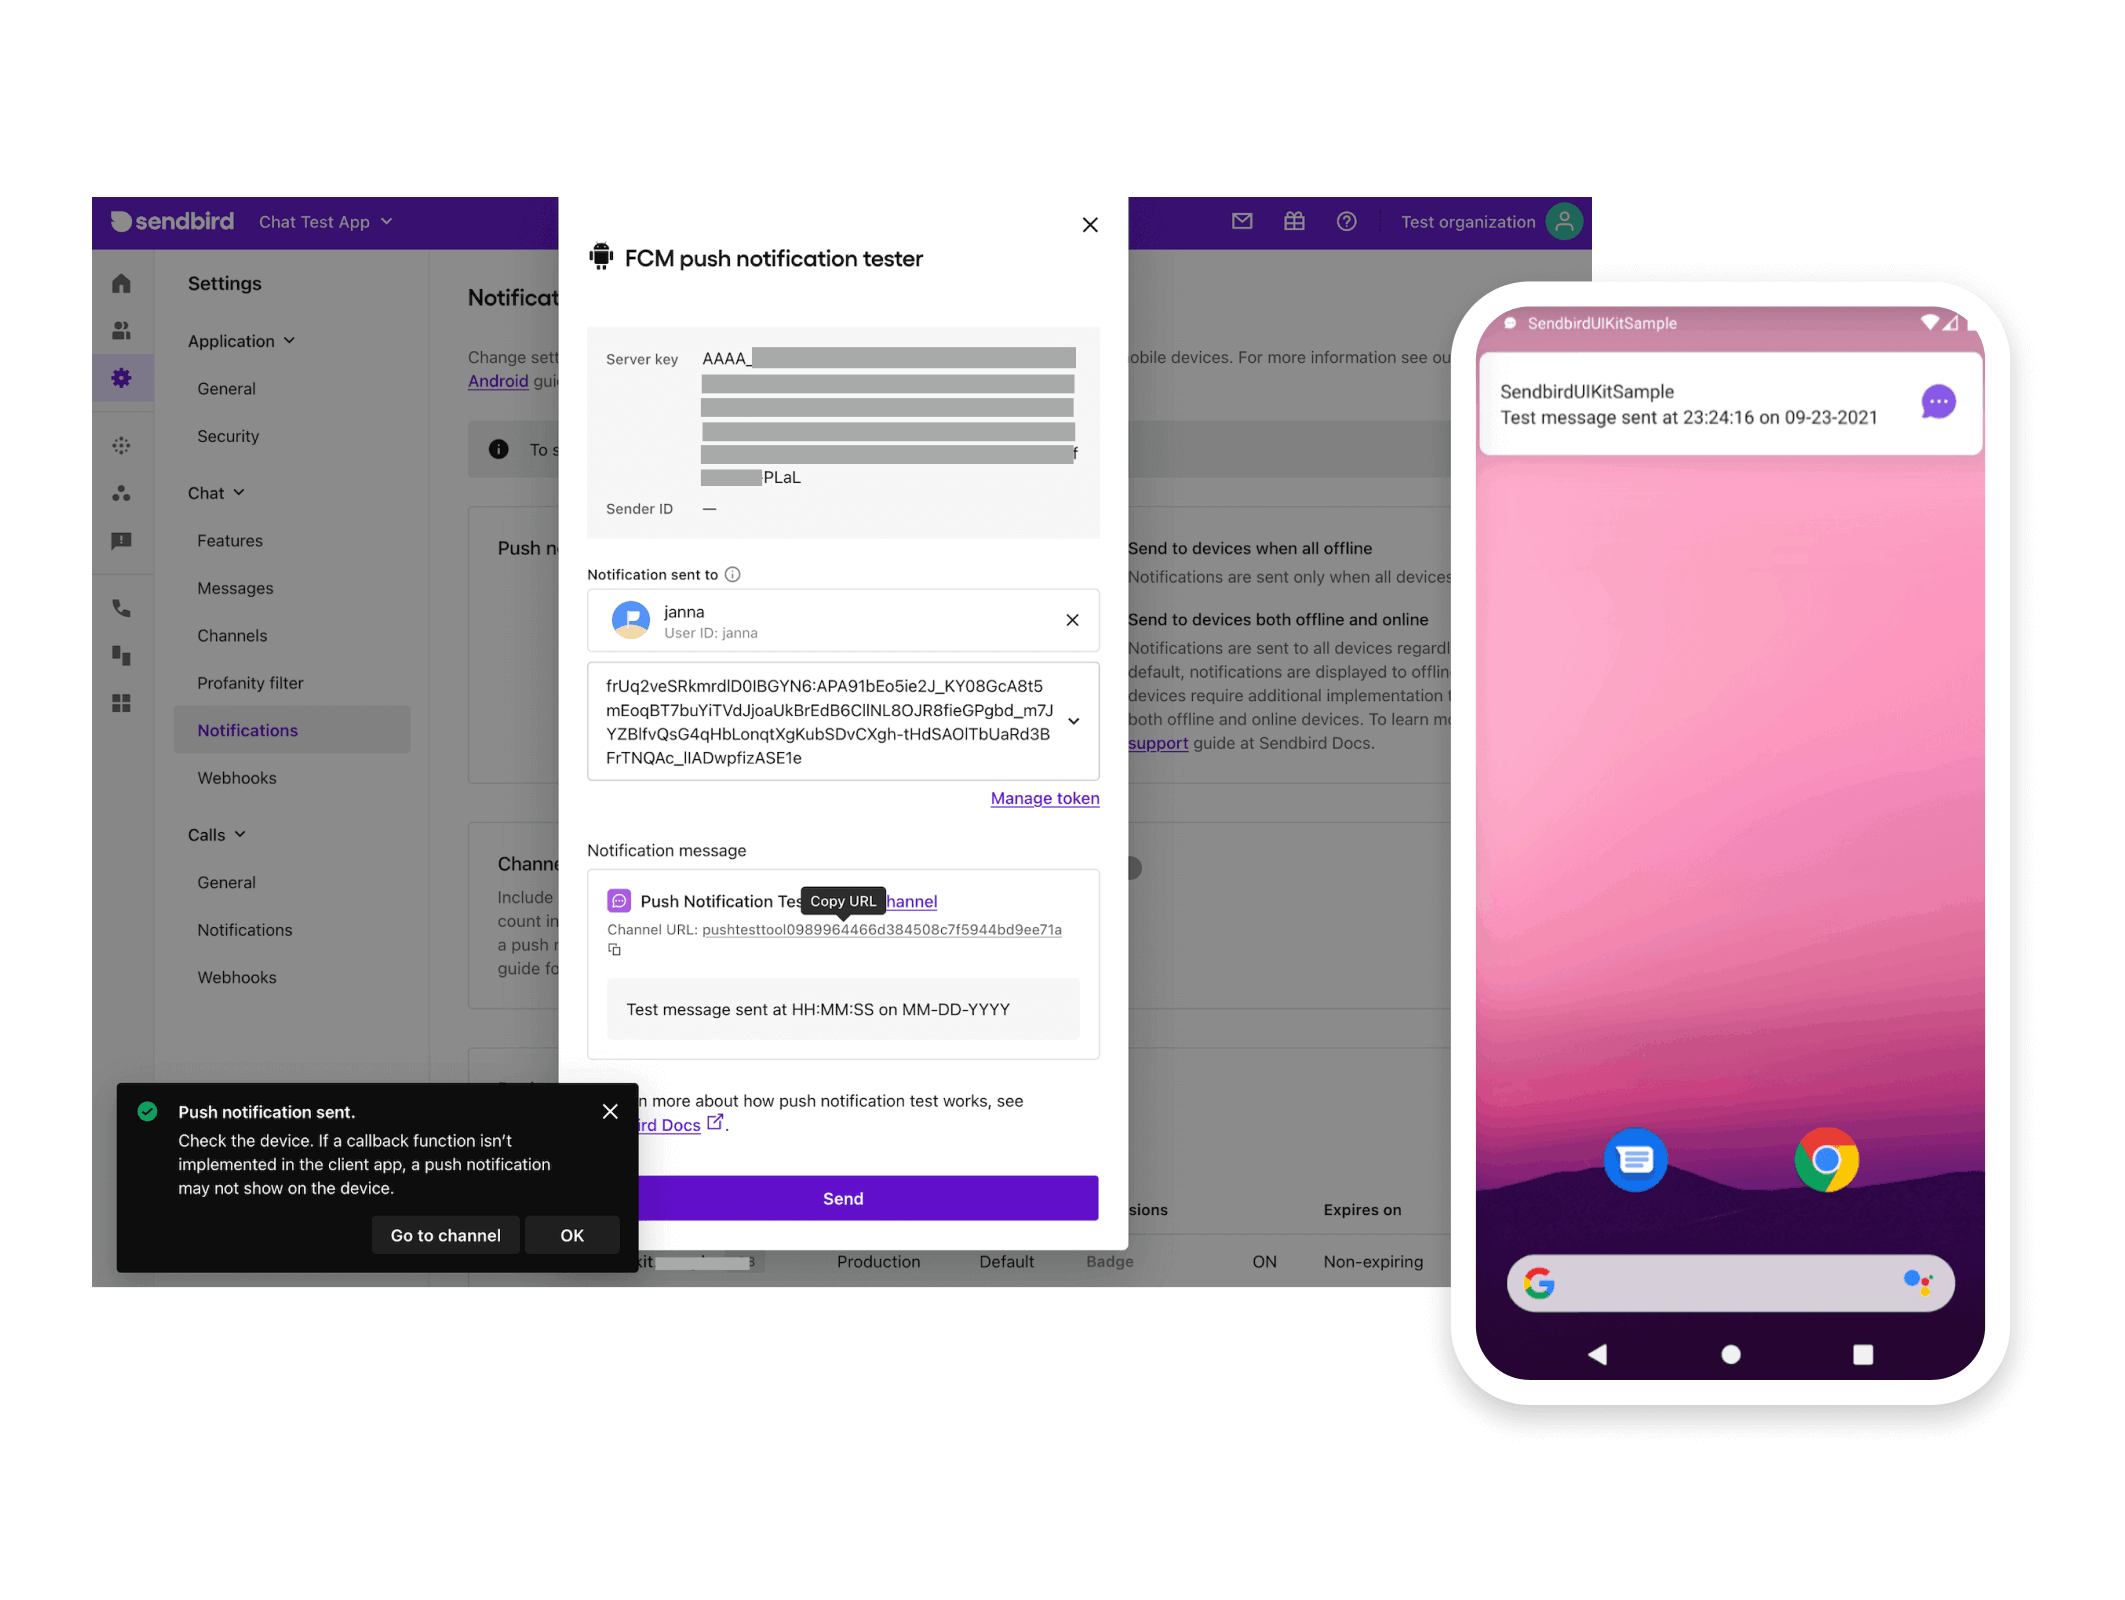
On the Sendbird dashboard, there will be a popup window that shows your push notification was sent successfully and the sent timestamp, as shown below on the left.
If the push notification is sent successfully, you will see the notification on your phone, as shown below on the right.
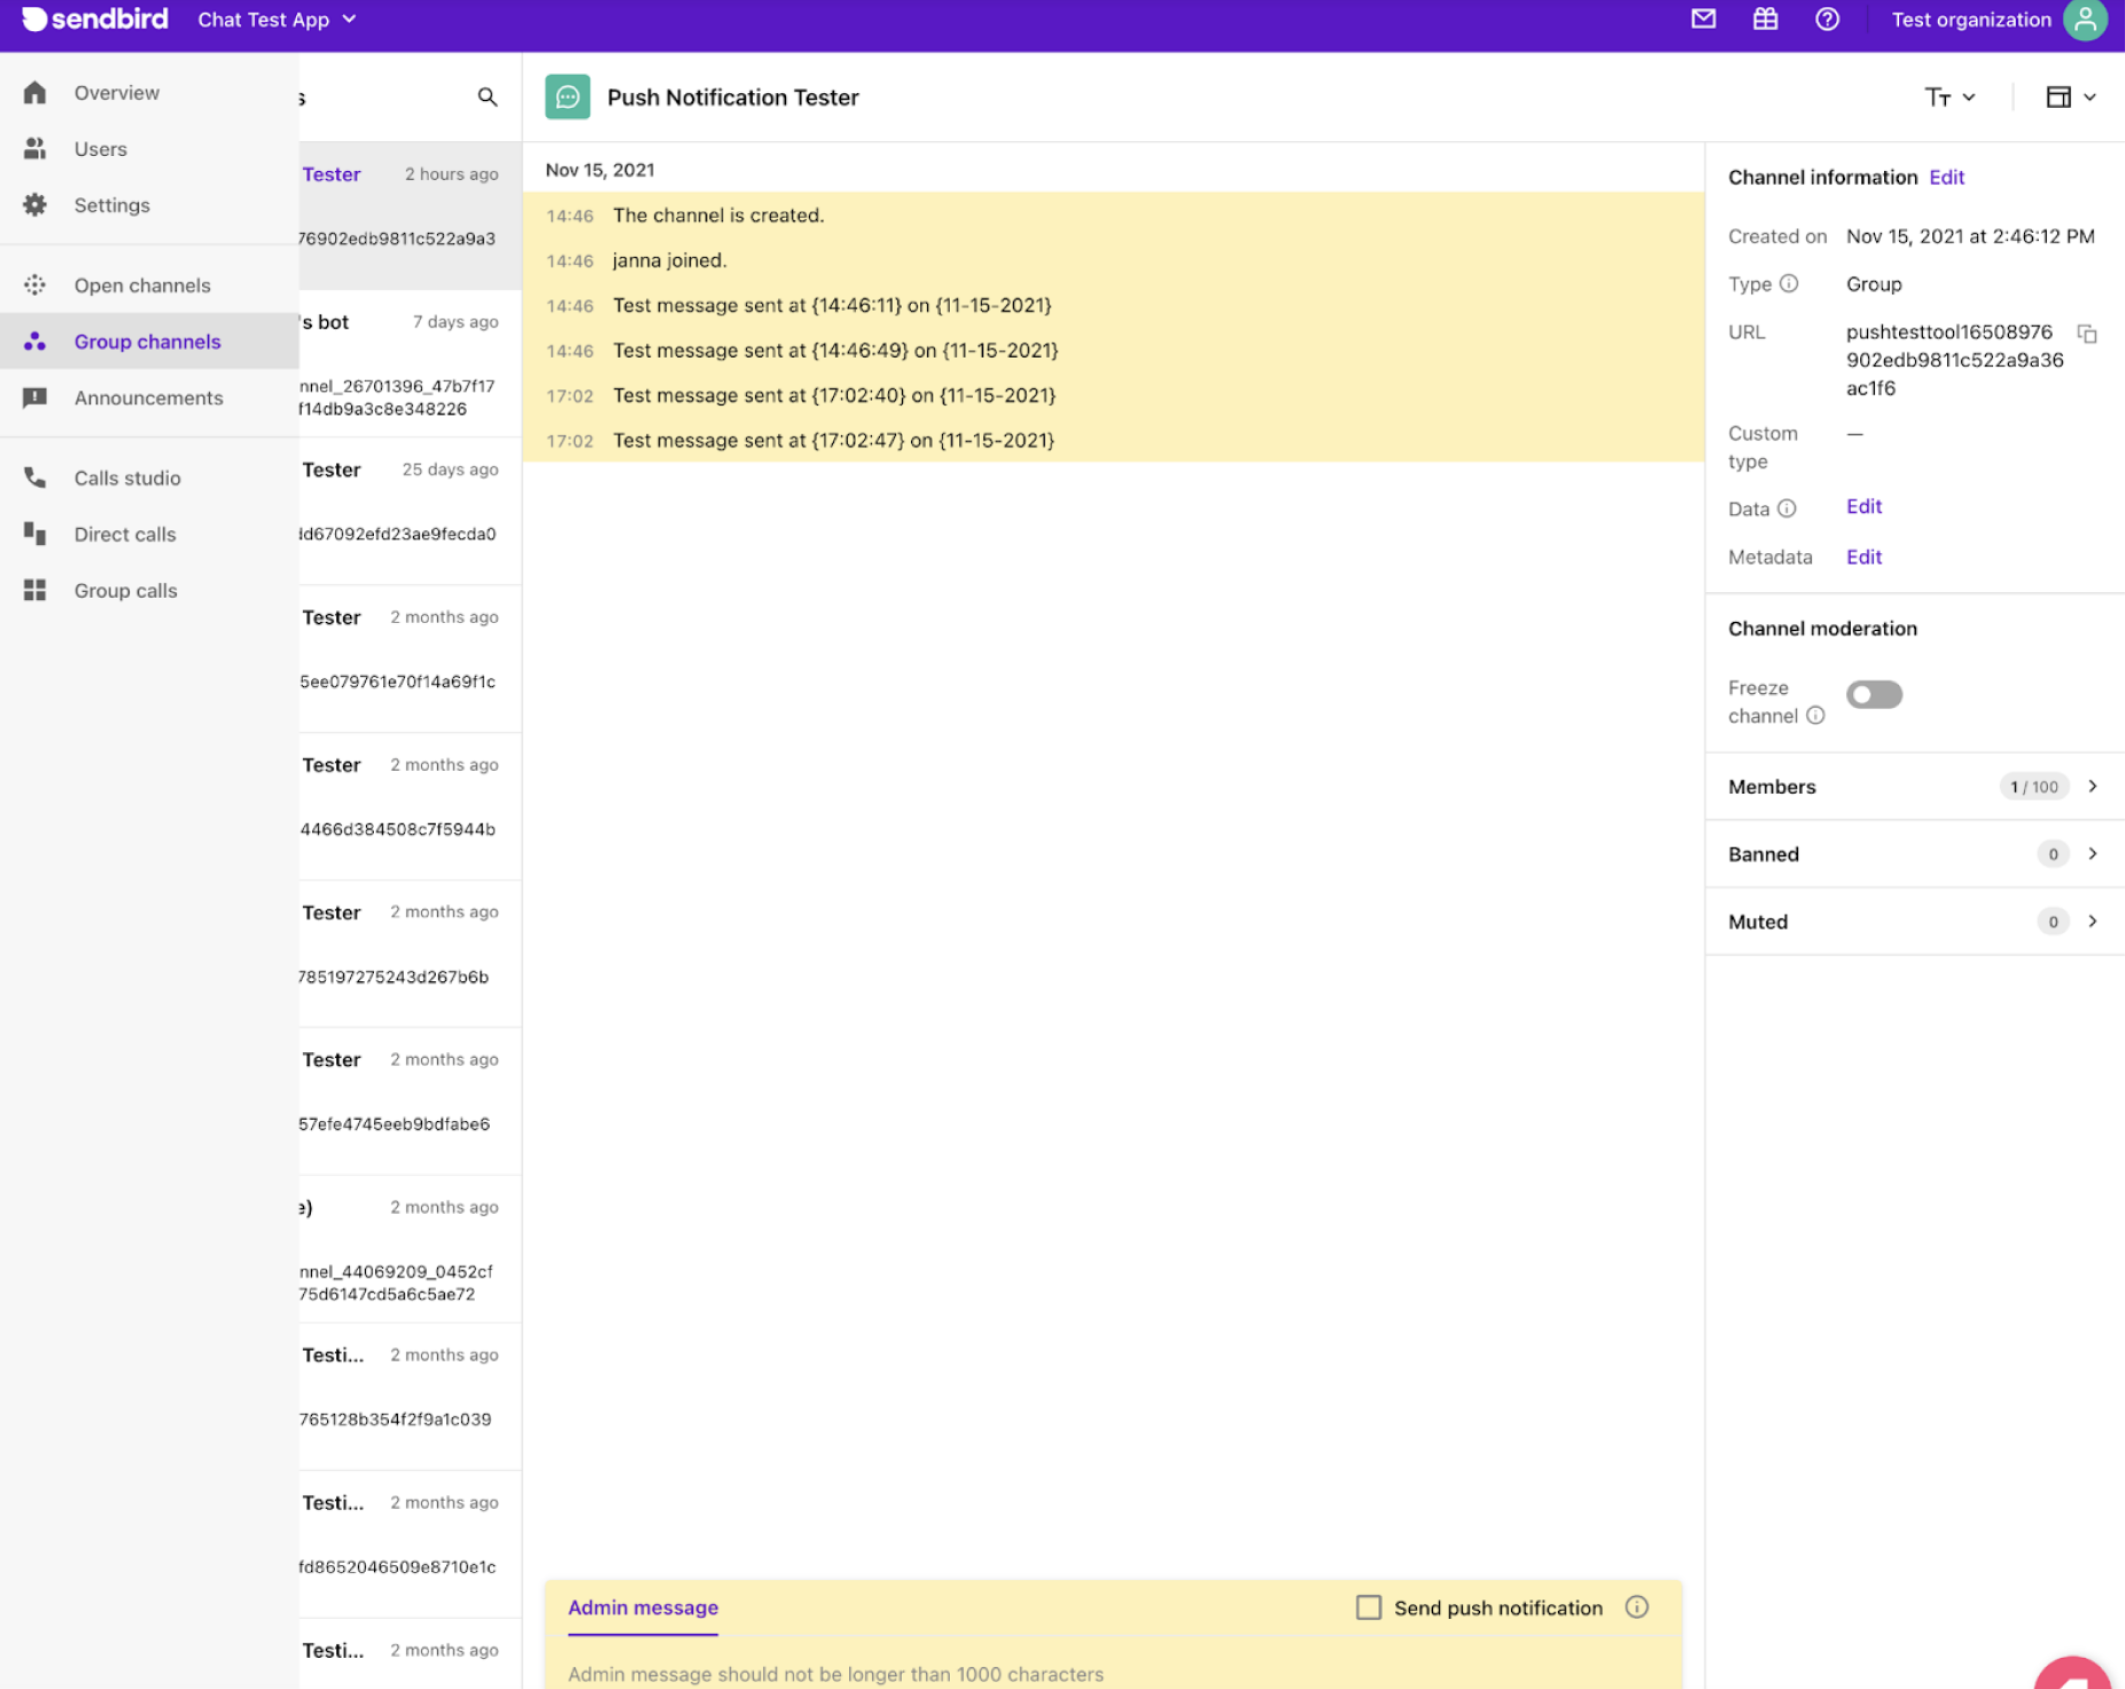
When the push notification is sent to the device, Sendbird creates a new group channel under the hood for that user with the channel name ‘Push Notification Tester’. One implementation of push notifications allows you to click on the push notification so the app will open into the group channels list. There you can see the ‘Push Notification Tester’ channel and select it to see the message from the tool. A test message will be in the following date and time format so that you can find the notification that you are looking for at the right time:
“Test message sent at <timestamp> on <date>”,
When sending subsequent push notification messages to the same user and device token, those messages will be inserted into the existing created channel.
Troubleshooting Android push notification issues
It can be a challenge when push notifications are not sent to your device. To help you solve the issue, Sendbird’s Push Notification Tester passes along the response received from FCM. This section covers the most common issues the Sendbird team has seen when troubleshooting.
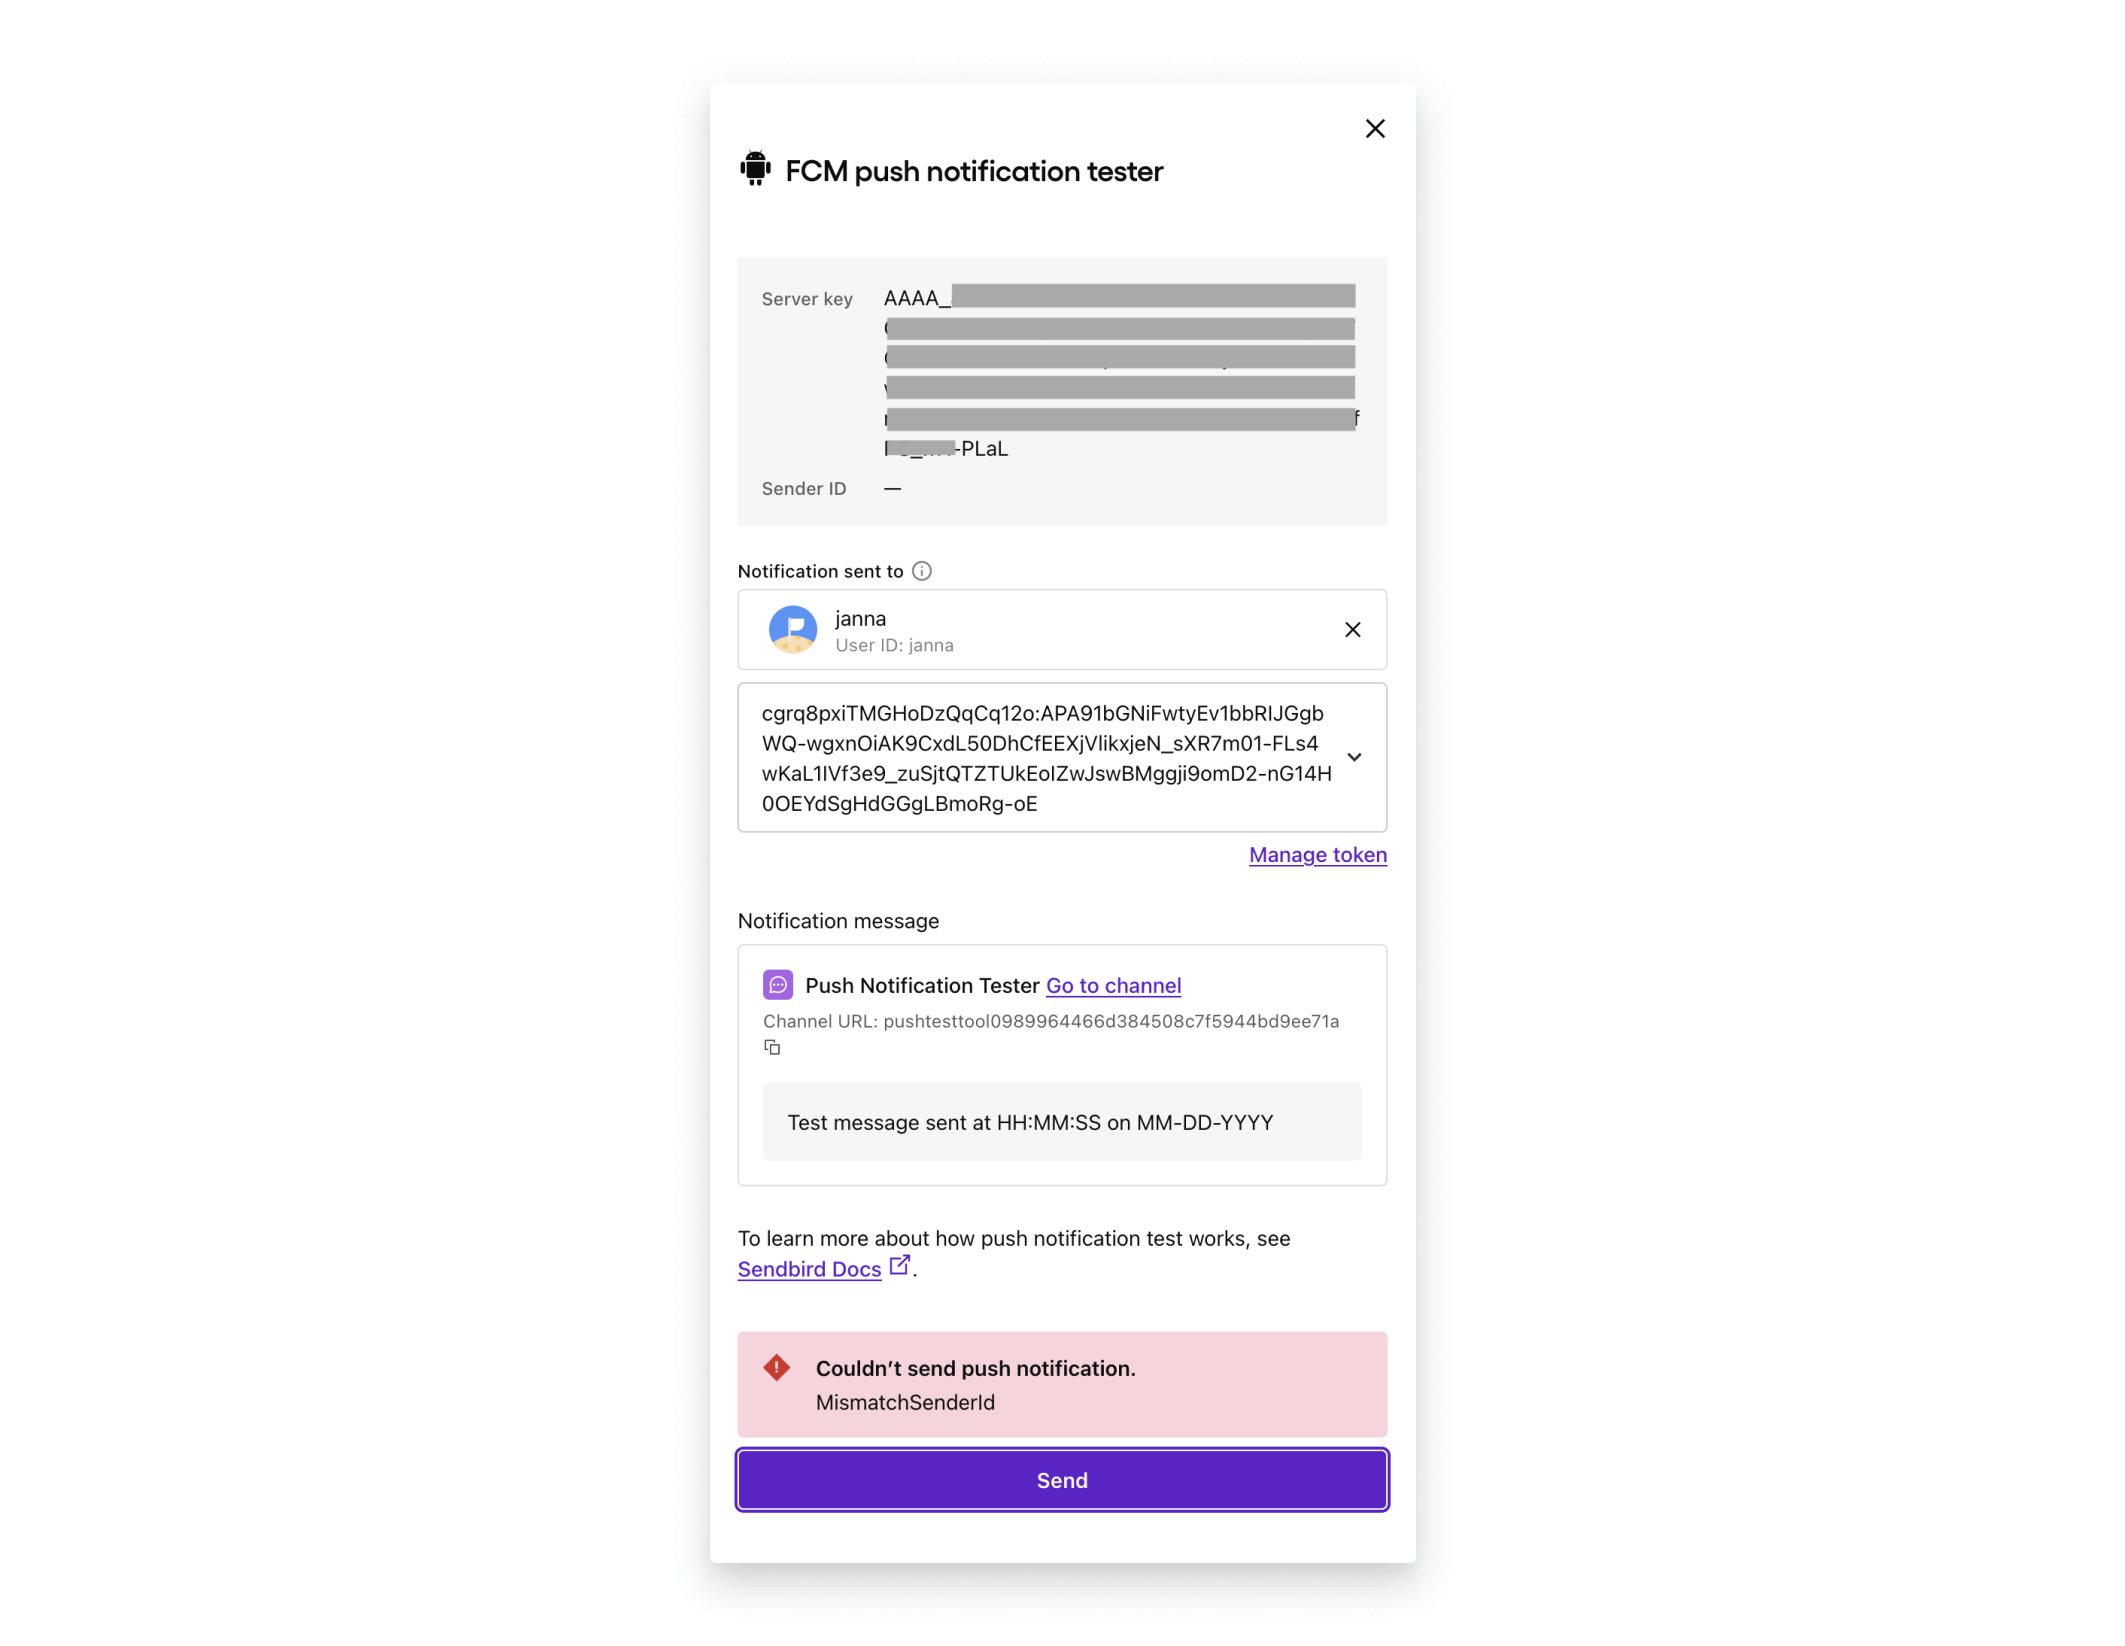
MismatchSenderId
This means that the user’s registered device token does not match the server key on file. This can happen when the user’s device token was registered from an app with a different package name than the package name associated with the server key.
Possible solutions
- Register a new device token for your user. As a best practice, Sendbird recommends registering the device token every single time the user connects to Sendbird. This ensures the device token is always up to date since the FCM token may expire automatically in some cases, such as when the app is reinstalled or the data is deleted.
- Try registering the user’s device token through Sendbird’s platform API endpoint.
- Check your Android application’s configuration against your FCM project in Firebase. The google-services.json file and package name registered for your FCM project should match the package name of your app in the Manifest File. Your server key in your FCM project should match the server key uploaded to the Sendbird dashboard.
- It may be the case that your application has more than one FCM server key registered on the Sendbird dashboard, and this device token does not match the FCM server key that was tested. Please try sending a notification to a different server key on file.
Part 3: Huawei devices
Testing your first push notification for Huawei
Navigate to the Notifications section of your Sendbird dashboard and select the ‘Send’ option next to the HMS app ID that matches the class name for the HMS service of the app you are testing with. You will see the “HMS push notification tester” popup window, as shown below.
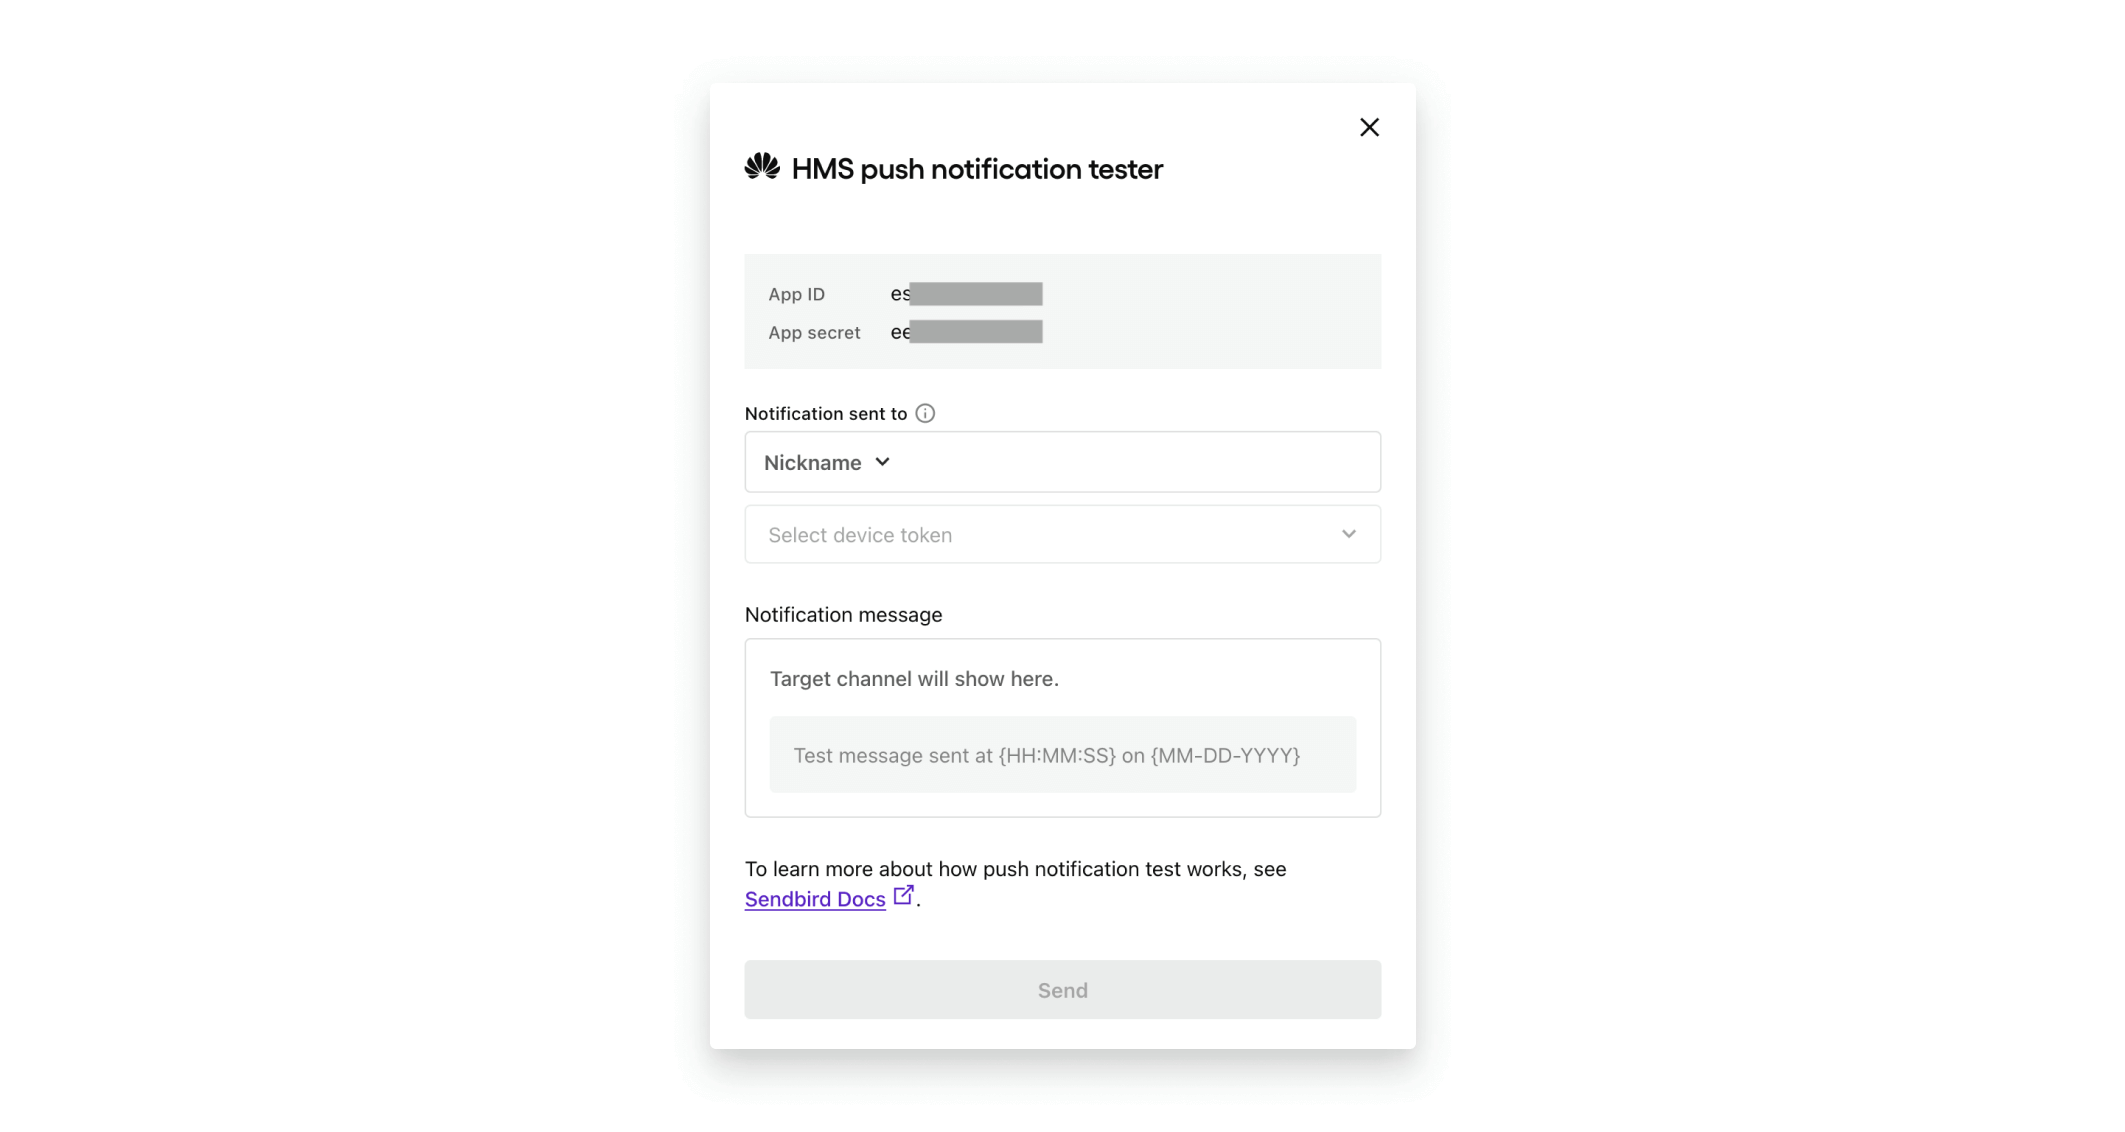
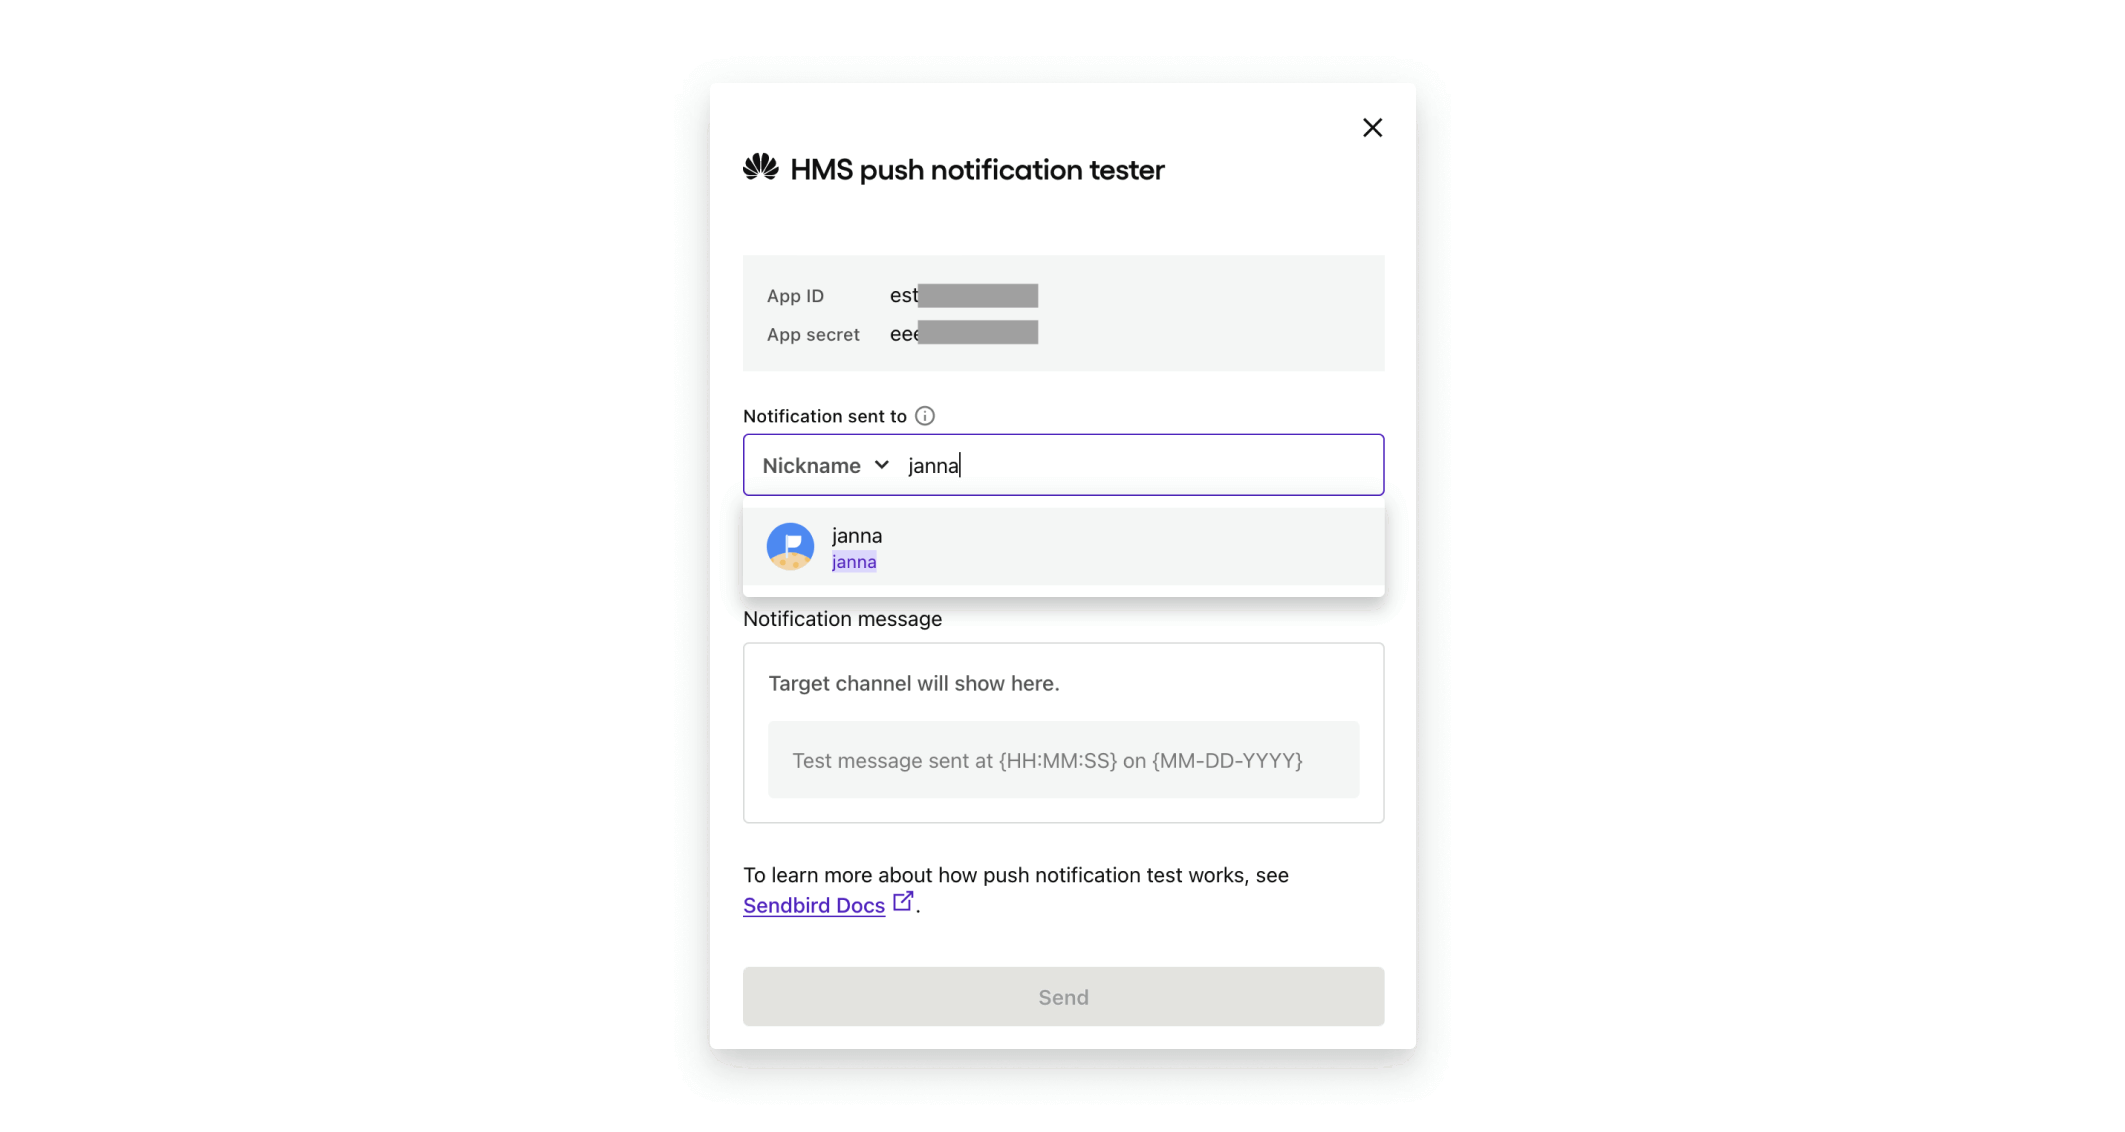
In the ‘Nickname’ section, type in the user to whom you want to send a push notification. Alternatively, search for a user by ‘User ID’.
If that user has a registered device token on file for HMS, one will be automatically populated for you in the box below the user search box. If the user has multiple device tokens registered, you can select a different token by clicking on the populated token and selecting another token from the dropdown box.
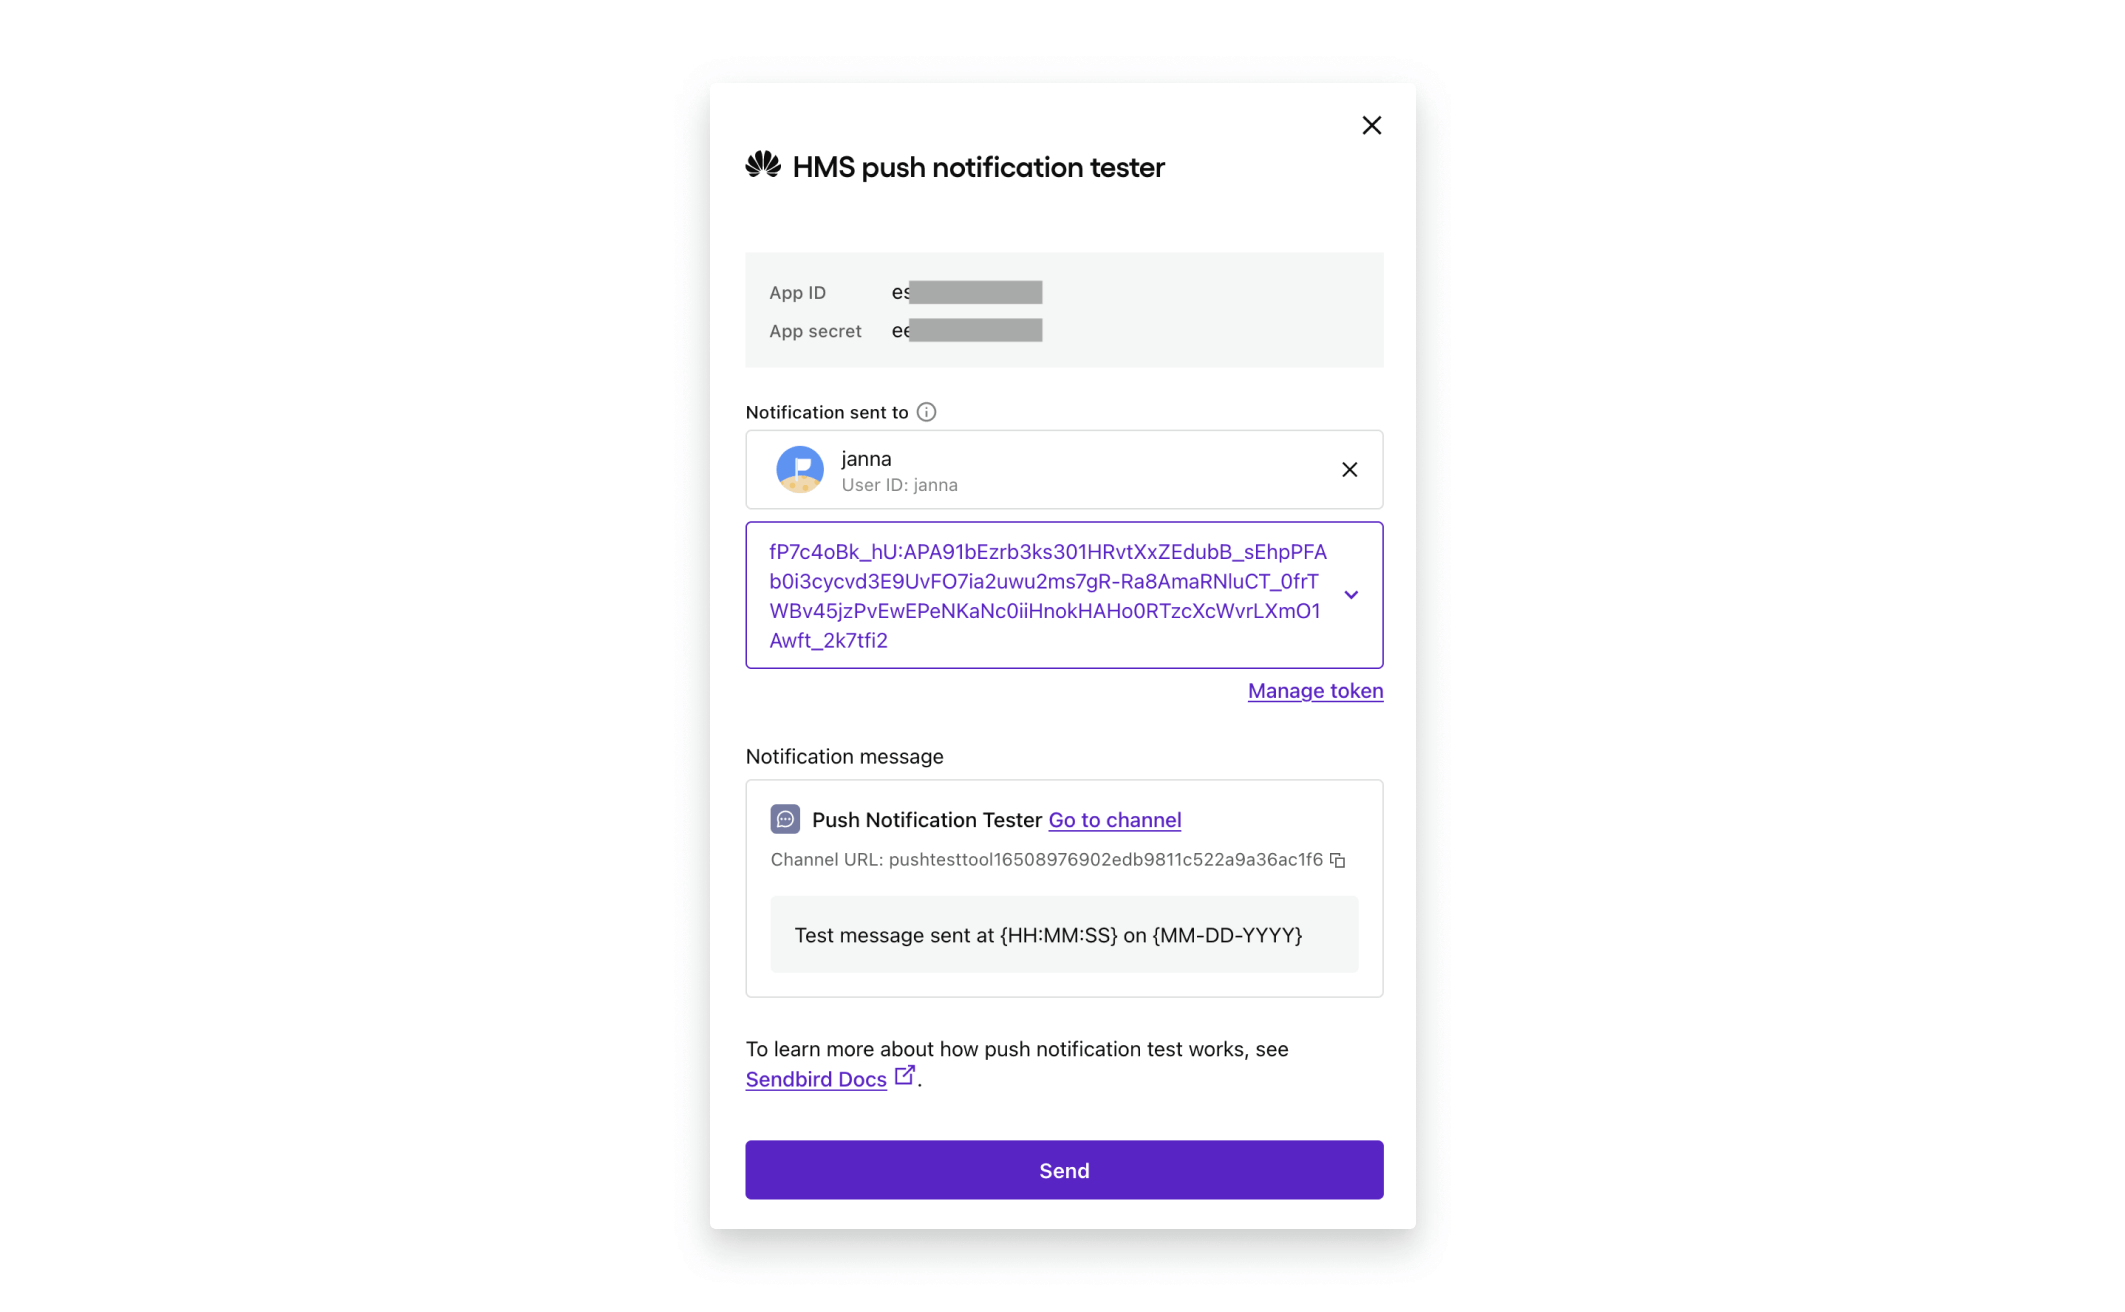
Once your user and device token are selected, you’re ready to send to your device! Click the ‘Send’ button and allow up to 30 seconds to receive the notification on your mobile device.

On the Sendbird dashboard, there will be a popup window that shows your push notification was sent successfully and the sent timestamp. If the push notification is sent successfully, you will see the notification on your phone.
When the push notification is sent to the device, Sendbird creates a new group channel under the hood for that user with the channel name ‘Push Notification Tester’. One implementation of push notifications allows you to click on the push notification so the app will open into the group channels list. There you can see the ‘Push Notification Tester’ channel and select it to see the message from the tool. A test message will be in the following date and time format so that you can find the exact notification that you are looking for at the right time:
“Test message sent at <timestamp> on <date>”,
When sending subsequent push notification messages to the same user and device token, those messages will be inserted into the existing created channel.

Troubleshooting Huawei push notification issues
It can be a challenge when push notifications cannot be sent to your device. Sendbird’s Push Notification Tester is here to let you know there’s been an issue with sending a push notification from Sendbird’s server to Huawei to the device.
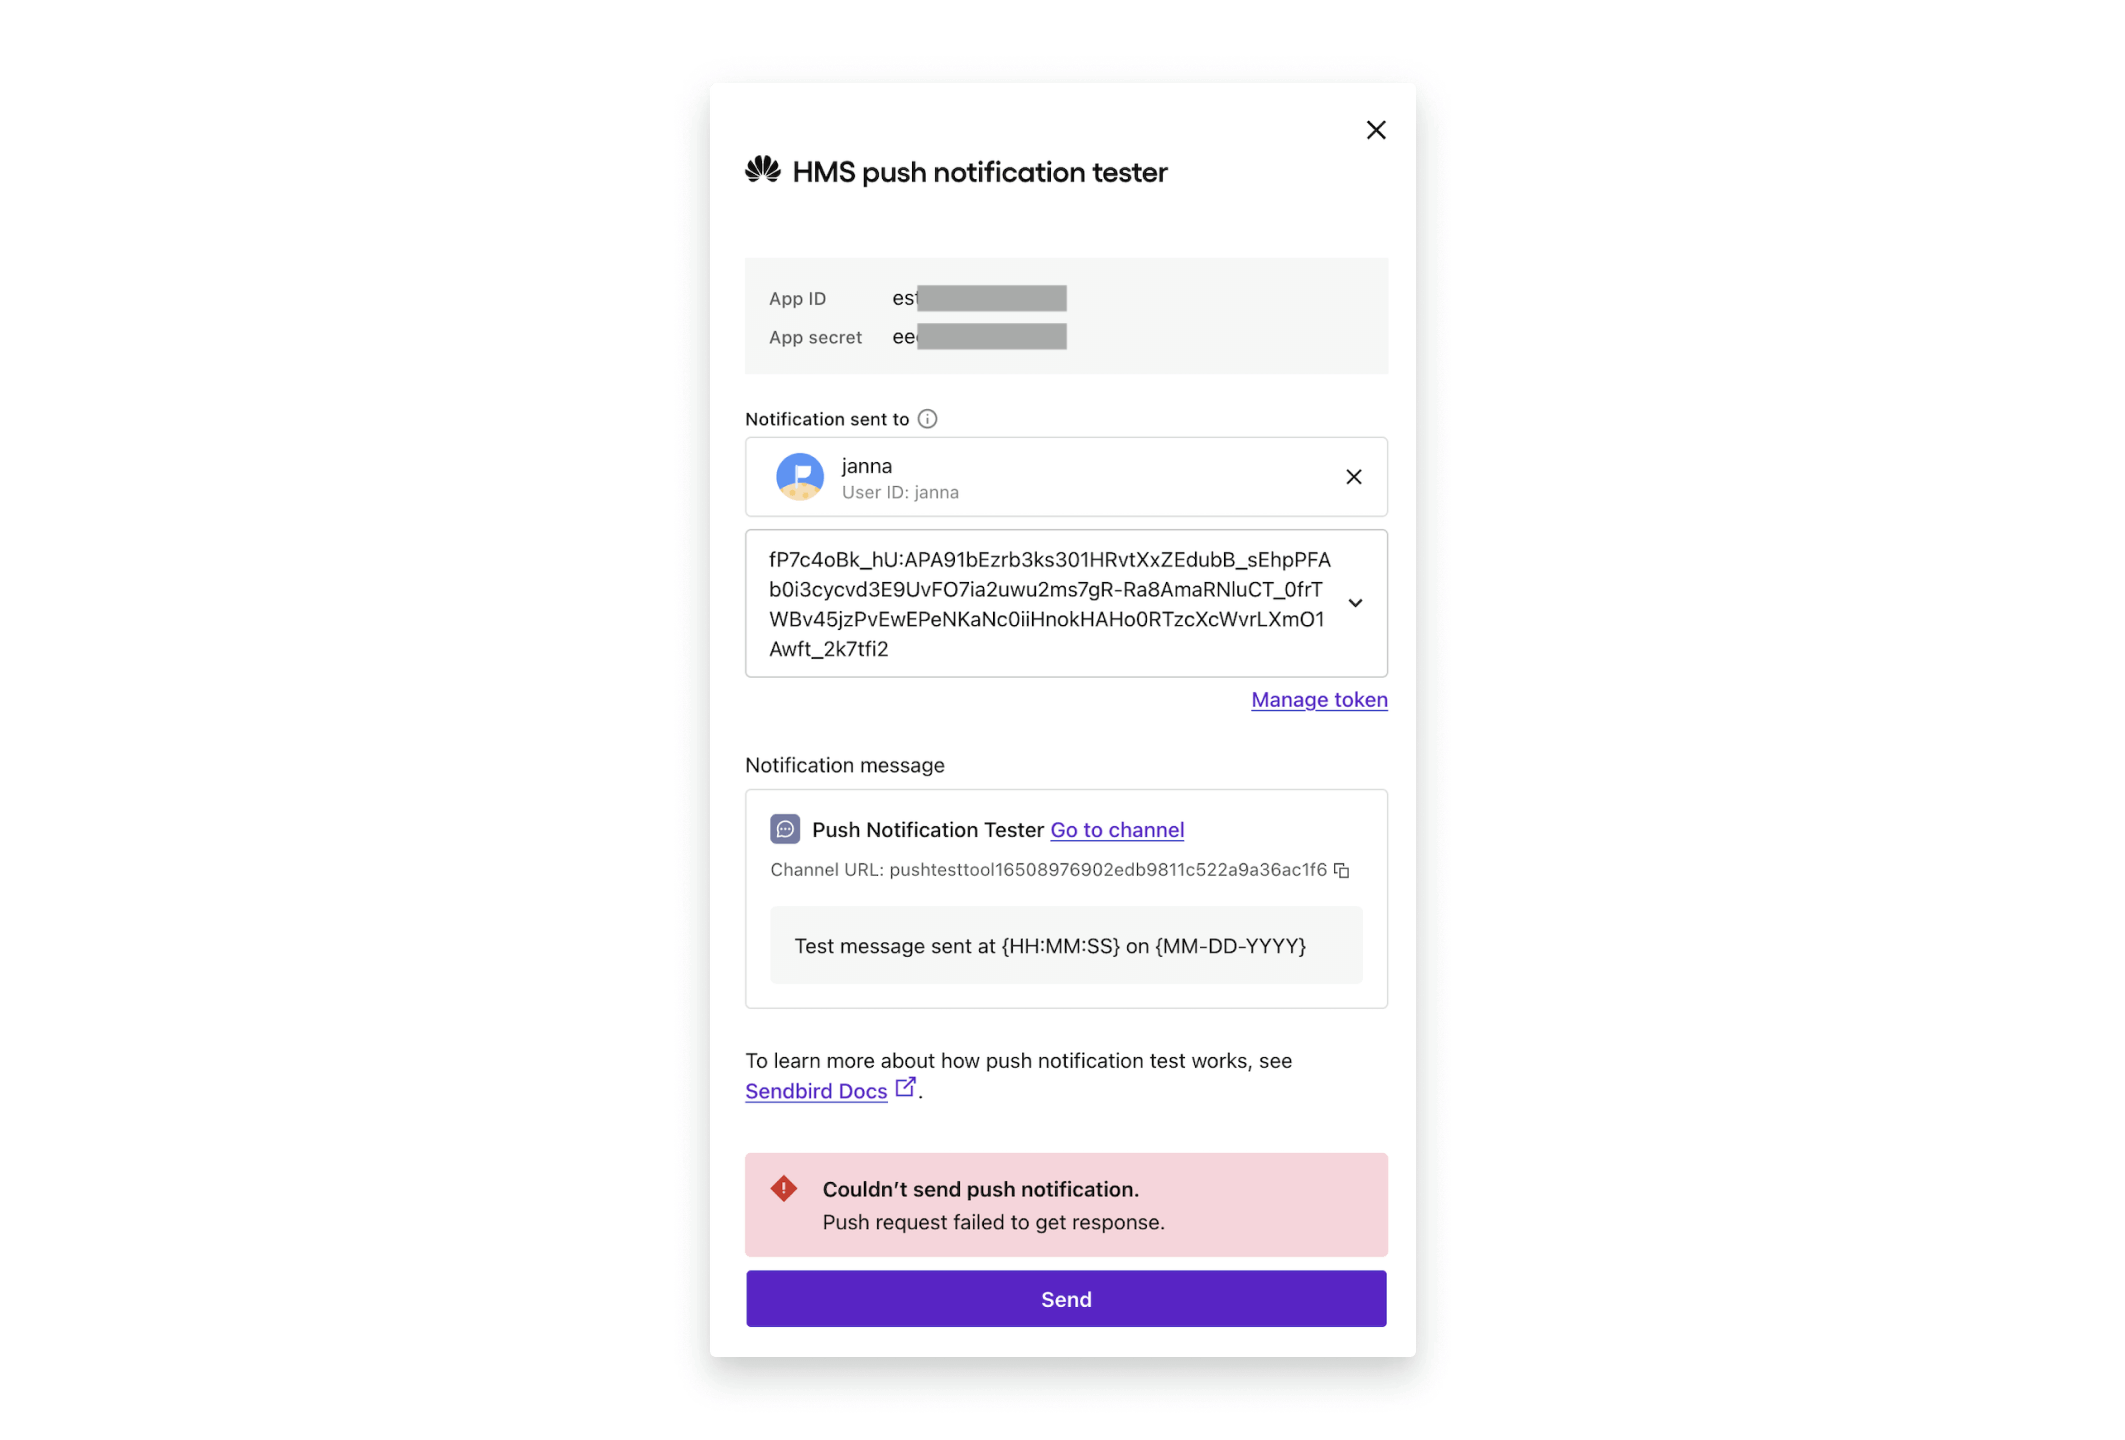
Issue with the device token
This means that the user’s registered device token does not match the app ID that is on file. This can happen when the user’s device token was registered from an app with a different HMS app ID and class name for the HMS service of the app you are testing with.
Possible solutions
- Register a new device token for your user via the app. As a best practice, Sendbird recommends registering the device token every single time the user connects to Sendbird. This ensures that the device token is always up to date since the HMS token may expire automatically in some cases, such as when the app is reinstalled or device data is deleted.
- Try registering the user’s device token through Sendbird’s platform API endpoint.
- Check your application’s configuration against your HMS project in AppGallery Connect. The app ID and class name registered for your project should match the class name of your app in your manifest file. Your app ID and secret for your project should match the app ID and secret uploaded to the Sendbird dashboard.
- It could be the case that your application has more than one HMS app ID registered on the Sendbird dashboard, and this device token does not match the HMS app ID that was tested. In this case, please try sending a notification to a different HMS app ID on file.
Conclusion

We hope this guide has helped you to troubleshoot sending push notifications with Sendbird! If you need more information, please read our push notifications FAQs. For more help, please feel free to reach out to the Sendbird team through the Sendbird dashboard.
Happy chat building!


