
What is ngrok? How does ngrok work?

What is ngrok?
ngrok is a cross-platform application that creates secure tunnels from a public endpoint to a locally running web service, allowing developers to expose their local servers to the internet. In simple terms, ngrok creates a secure tunnel between your locally hosted web server and an endpoint on ngrok servers (or a subdomain on ngrok.com). This endpoint is publicly available online, and forwards requests to your local server. You do not need a public IP or domain name.
ngrok integrates all the essential components (such as an API gateway, reverse proxy, load balancer, DDoS protection, delivery network, and firewall) that deliver traffic from your local services to the internet. With ngrok, your services can deliver traffic to other services running in any environment without making any changes to your environment’s network setup. Since its initial release in 2013, ngrok has evolved with several additional features and security enhancements that ensure that data passing through ngrok tunnels is not exposed to malicious actors.
ngrok offers various pricing tiers depending on your usage requirements. Some ngrok alternatives can also offer similar functionality.
In this article, you’ll learn all about ngrok, including its features and more details about how it works. You’ll also learn how to use ngrok to make a local Node.js server accessible over the internet. Let’s start by answering the question, ‘How does ngrok work?’
How does ngrok work?
In a nutshell, ngrok works by creating a public URL that redirects requests to your local development environment. This is particularly useful for testing webhooks, showcasing development progress to remote stakeholders, or running personal web servers without configuring complex network settings. ngrok handles authentication, encryption, and connection management, ensuring secure and reliable access.
Let’s take a look at this in more detail.
A deeper dive into how ngrok works
To really understand how ngrok works, you need to first understand how the internet works.
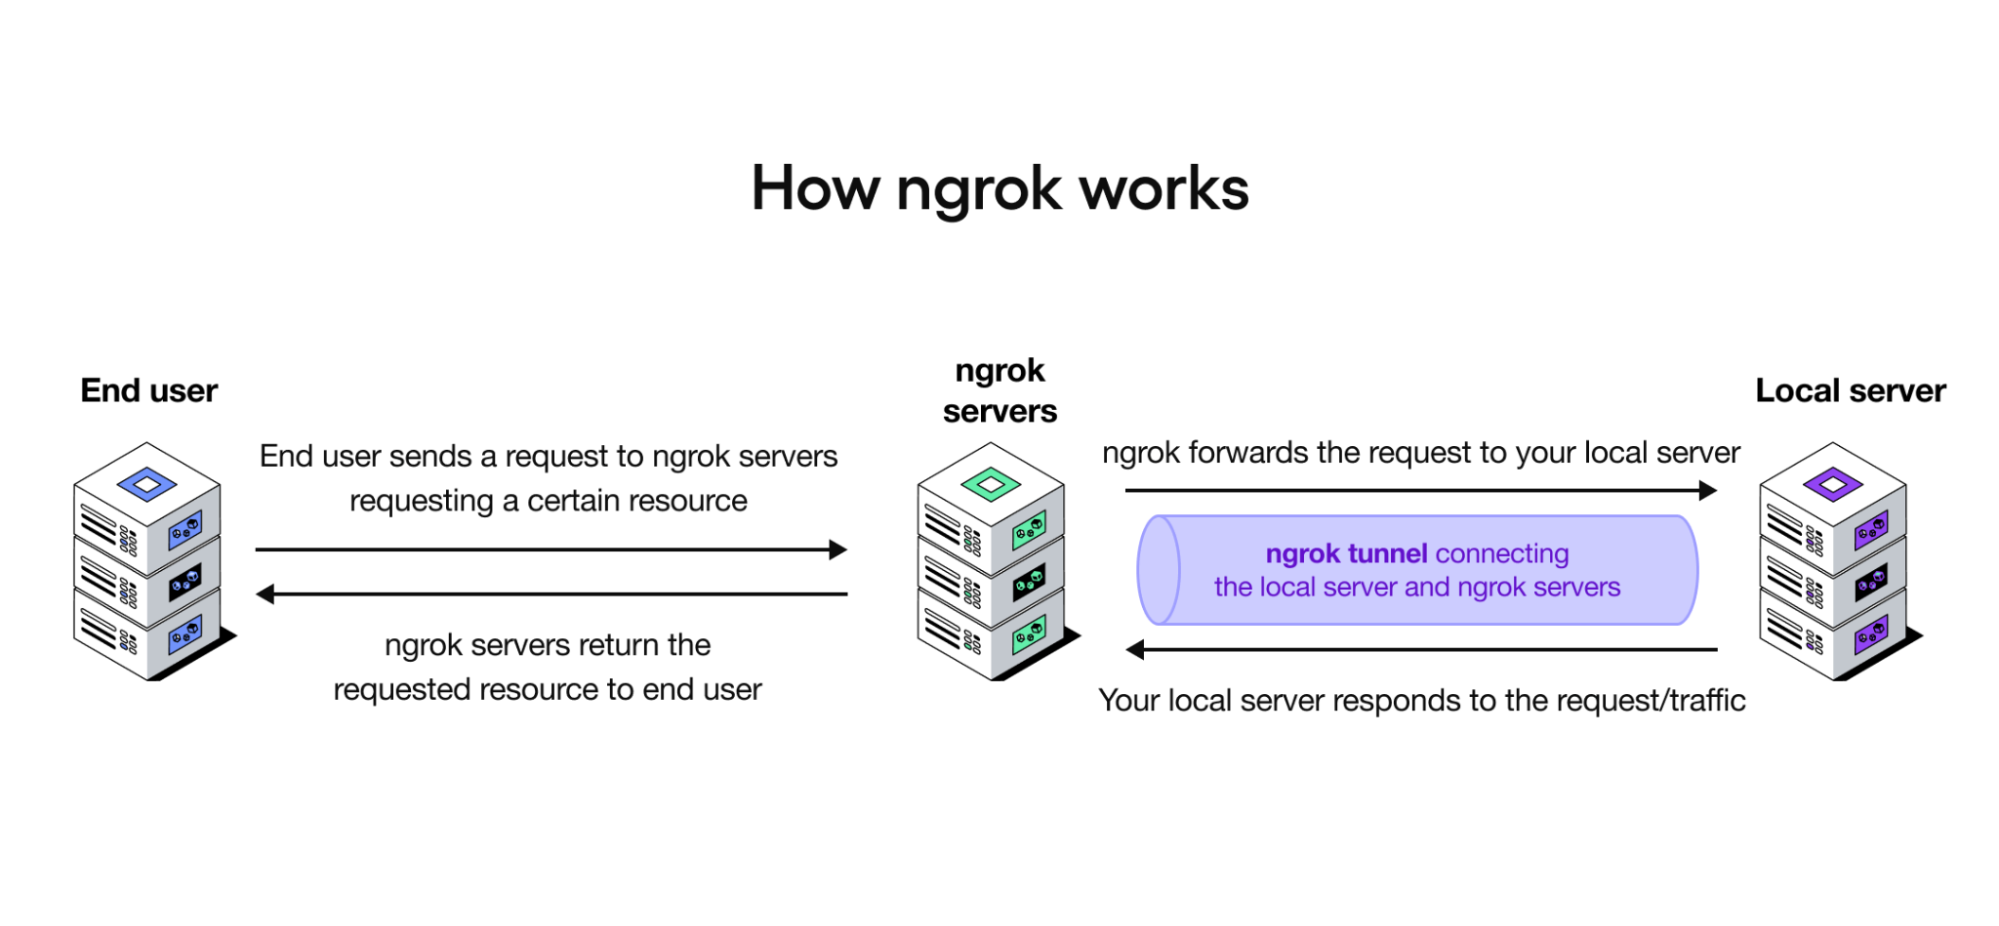
On the internet, a device can either act as a server or a client. Devices have a private IP address and use the router’s public address to request resources from other devices on the internet. When you run a server on your local machine, your device acts as a server, but other devices cannot request resources from your server since your IP address is private. This is where ngrok fits in.
When you run the ngrok client on your local machine and specify the port number of the server that you want to expose, the ngrok client creates a secure tunnel between the local server and a publicly available endpoint on ngrok servers. This way, if other devices need to request resources from your local server, they can make requests to the publicly available ngrok endpoint, and ngrok forwards the traffic to the local server as a request. Your local server can then respond to this request. This technique is known as port forwarding or localhost tunneling.
Ngrok handles the complexity of network configurations and firewalls, providing a seamless and secure connection. By making local servers accessible from anywhere, ngrok facilitates real-time debugging and development.
What is ngrok tunneling?
Ngrok tunneling involves using ngrok to create a secure, temporary tunnel between a public URL and a local web server. Ngrok tunnels are secure; ngrok only supports HTTPS for HTTP traffic by default when using a standard ngrok subdomain. Ngrok offers options for persistent tunnels and custom domains with its paid plans. This can be useful for more consistent testing environments and professional use cases where a stable public URL is necessary.
Now let’s see ngrok in action!
How to use ngrok to make a local Node.js server accessible over the internet
Now that you know more about how ngrok works, let’s use it to expose a local Node.js server to the internet. To follow along, make sure you have the following prerequisites:
Node.js installed on your local machine
An ngrok account
A code editor and a web browser (this guide uses VS Code and the Firefox Browser)
Once you have these in place, you need to create a Node.js application. Execute the following commands in the terminal to create a folder named node-ngrok-demo, cd into it, and initialize a Node.js app:
Then, execute the following command to install the required dependencies:
You’ll use the express dependency to create a Node.js web server and node-fetch@2 to make HTTP requests to an external server. ejs creates dynamic HTML pages.
In the project’s root folder, create a file named server.js and add the following code:
This code imports the necessary packages and sets the view engine to EJS. It then defines a / route that fetches a list of ten dummy products using node-fetch. If the products are fetched successfully, it renders an EJS template named index with the products. If an error occurs, it logs the error to the console and returns a 500 Internal Server Error response. Finally, the Node.js server listens for incoming connections on port 5000.
Create a file named views/index.ejs in the project root folder and add the following code:
This code loops through the list of products and renders each product on a card.
With the local Node.js web server ready, you can now use ngrok to expose it to the internet.
To start, install ngrok. You can either download the ngrok agent from the official website or use the terminal.
For macOS, use the following command:
For Debian Linux, use the following:
Use the following command for Windows:
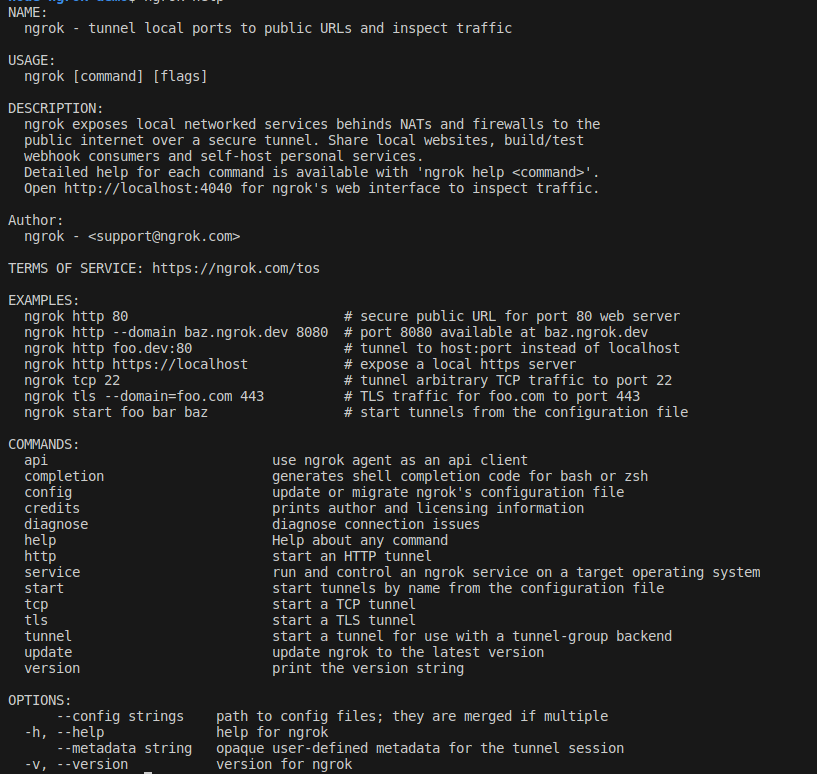
To confirm that ngrok was successfully installed, run the command ngrok help. You should see the ngrok help text:
Next, head over to the ngrok dashboard, copy your auth token, and execute the following command in your terminal to connect your ngrok agent to your ngrok account:
Make sure you replace <YOUR-AUTH-TOKEN> with the value you copied from the dashboard.
Run your local web server using the command node server.js. Once you’ve confirmed that your server is running successfully, you can expose it to the internet by running either of the following commands in a separate terminal:
Make sure you do not stop your Node.js web server when running the ngrok command.
After running this command, the ngrok agent will display something that looks like this:
Copy the “Forwarding” URL and open it in a web browser. This is a public URL and can be accessed by anyone on the internet. You should see your application displaying all the products:

You can access the full code for this application on GitHub.
ngrok security
ngrok provides secure tunneling capabilities. However, like any other software, its security depends on proper configuration and usage.
Ngrok security features
ngrok automatically encrypts all the data that passes through its tunnels. Additionally, ngrok also automatically generates random domains by default, which makes it harder for malicious actors to discover the tunnels.
With ngrok, you can use various forms of authentication to control who can access your application. For example, its traffic inspector lets you examine your HTTP traffic and export events to third-party destinations such as CloudWatch or Datadog to help detect malicious activities.
Challenges with ngrok security
One of the major risks associated with ngrok is the potential exposure of confidential data if it’s not properly configured. Because ngrok creates a direct connection (ngrok tunnel) between the local server and the internet, any potential vulnerabilities in the local server could be exploited by malicious actors.
Solving ngrok security challenges
Proper configuration is required to effectively address the challenges associated with ngrok.
Don't run ngrok as root, and always ensure that no additional firewall ports are opened since ngrok initiates outbound connections automatically.
Assign unique auth tokens to each deployment, coupled with a minimum ACL to limit endpoint access.
Use HTTPS by default for HTTP tunnels and set up TLS encryption for connections between the ngrok agent and upstream services.
For enhanced security, restrict IPs that can access the API. Implement role-based access control (RBAC) and Single Sign-On (SSO) for dashboard access.
What is an ngrok auth token?
ngrok requires that you provide an auth token to create and use tunnels. This token acts as a form of authentication between the ngrok client and servers but does not secure the server being exposed to the internet. By default, ngrok provides an auth token on the free tier but also allows you to upgrade to a paid plan to restrict what an auth token can do using ACLs.
Do hackers and bad actors use ngrok tunneling?
Yes, hackers and bad actors can misuse ngrok tunneling to bypass network security measures, allowing them to create hidden pathways to compromised systems. To prevent unauthorized access and potential data breaches, organizations must monitor ngrok usage, enforce strict access controls, and properly configure security settings. ngrok is also widely used by malicious actors to execute phishing schemes by creating fake login pages and distributing malicious URLs.
We’ve talked about what ngrok is, how it works, and how it can be used. Let’s take a step back and discuss some use cases, features, and ngrok pricing.
Top 4 ngrok use cases
ngrok offers versatile solutions for various scenarios, including the following:
Ingress for development and testing: With ngrok, you can easily set up a URL to receive webhooks in your local application, demo a local site without the hassle of deployment, and test mobile applications against a local backend server.
Ingress for external networks: ngrok facilitates secure connections to APIs in customer environments. It also facilitates secure connections on devices that allow cloud services to control and administrate them without complex network configurations.
Ingress for production applications and APIs: With ngrok’s HTTP modules, you can secure and accelerate traffic to your production APIs. At the same time, its Ingress Controller offers you an easy ingress setup for services across Kubernetes clusters. ngrok also provides Identity-Aware Proxy functionality for federating app authentication to identity providers and a load balancer for improved scalability.
API gateway (early access): With ngrok’s developer-defined API gateway, you can easily bring secure connectivity to your APIs across various environments with just one command or function call. You can leverage advanced capabilities, such as JWT authentication and rate limiting, for enhanced security.
Top 8 ngrok features to know
ngrok has many features that make it a powerful tool for developers looking to expose their local servers to the internet. Some of these features include:
ngrok tunneling: ngrok provides secure tunnels that let you expose your local server to the internet.
Encryption: ngrok encrypts all data that passes through its tunnels.
Instant domains: ngrok offers instant, randomly generated domains for your tunnels that save you from the hassle of a custom domain setup.
Support for authentication protocols: ngrok supports OAuth, Security Assertion Markup Language (SAML), and OpenID Connect (OIDC), which allow you to restrict endpoint access only to authorized users.
Load balancing: ngrok’s edges let you easily set up traffic load balancing for improved scalability.
Global network: ngrok operates on a global network of servers that let you create tunnels from anywhere in the world to anywhere else, with minimal latency.
Observability: ngrok offers an event system that listens to changes in your account and traffic going through your endpoints and allows you to publish them to any destination.
Native support for protocols: ngrok’s native support for HTTP, Transport Layer Security (TLS), and any Transmission Control Protocol (TCP)-based protocols makes it suitable for a wide range of applications and use cases.
ngrok pricing
ngrok offers flexible pricing plans for both production and development environments. Additionally, if you’re starting a new project, ngrok offers a free tier that allows you to test your application without incurring any charges.
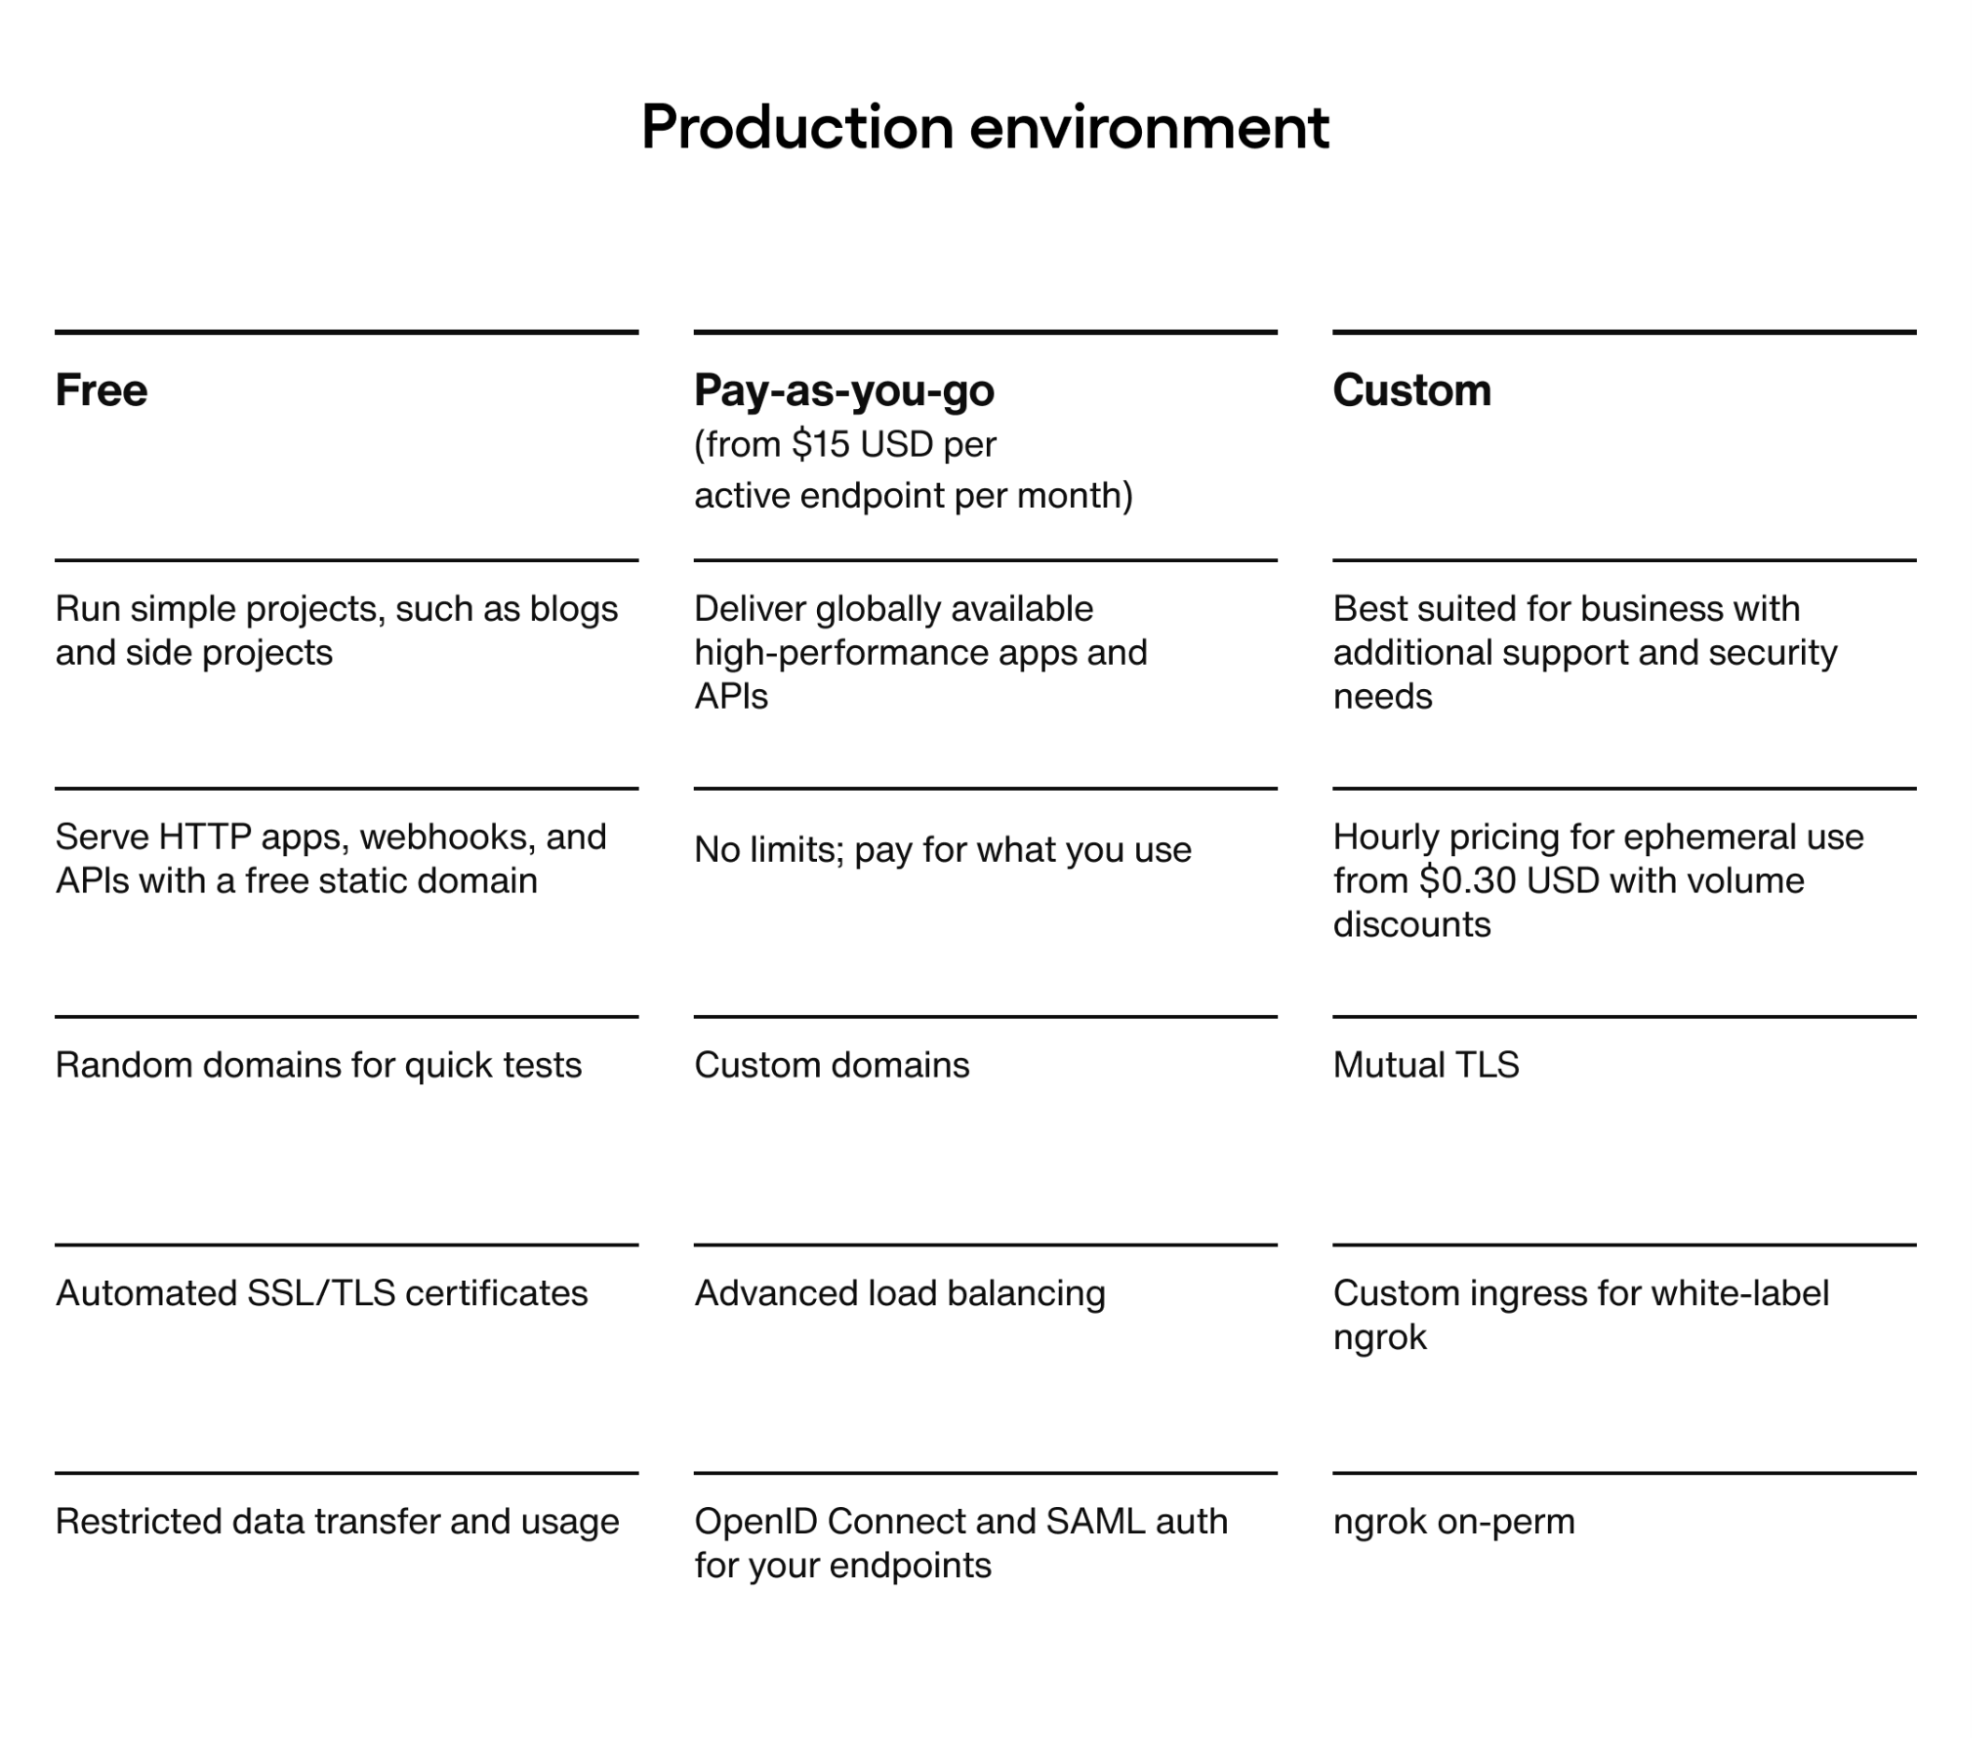
Production environment
The table below depicts the pricing of the production environment.
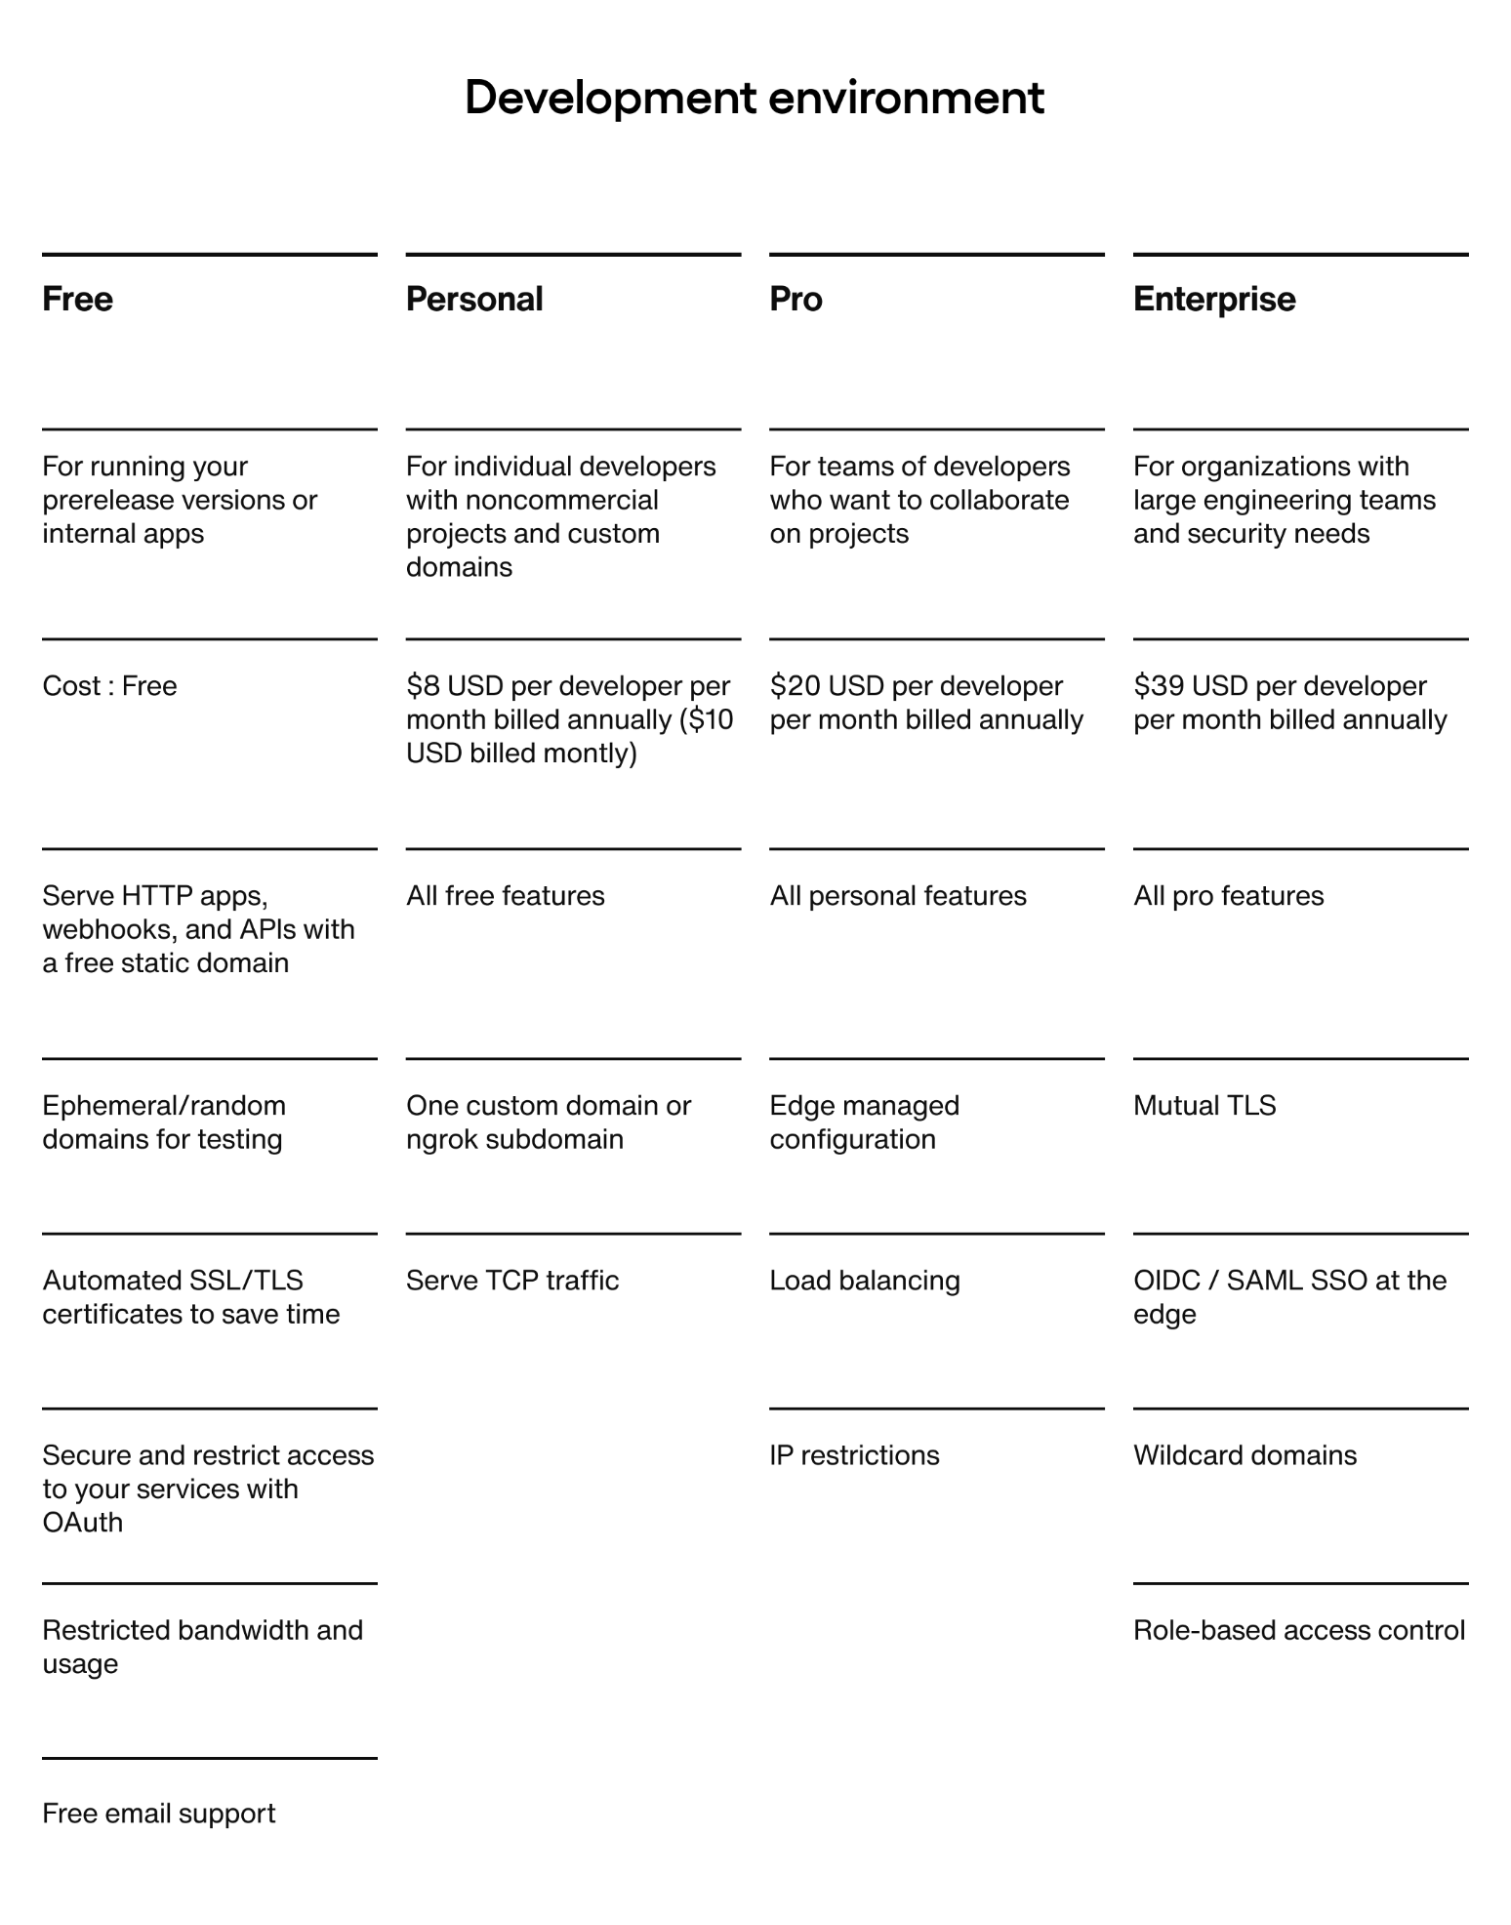
Development environment
The table below depicts the pricing of the development environment.
You can find more information about these plans on ngrok’s pricing page.
5 best ngrok alternatives
While ngrok is a great choice for securely exposing your local services to the internet, there are several alternatives worth exploring because of their approach to tunneling, ease of use, and pricing plans. These include:
Localtunnel: This comes as an npm package and allows you to create HTTP/HTTPS tunnels to your localhost. It’s simple to use, but it can’t be used in environments that don’t support Node.js.
Pinggy: This lets you create tunnels without downloading anything or signing up for an account.
LocalXpose: This lets you create HTTP, TLS, TCP, and UDP tunnels. It also has a built-in file server that allows you to share your files instantly.
localhost.run: This offers a very simple approach to tunneling that doesn’t require you to download an agent or sign up for an account.
PageKite: This can be run on any system that supports Python and is run as a single Python file (
pagekit.py).
Each alternative offers various features and approaches to tunneling. From this list, you can choose one that best suits your needs.
Expose your local development server to the internet with ngrok and take your app to the next level
ngrok is a powerful cross-platform application that simplifies the process of exposing local servers to the internet by creating secure tunnels and providing instant domains that are publicly accessible. This eliminates the need for complex network configurations.
In this article, we answered the question ‘What is ngrok?’, talked about the ngrok server, and learned how to use ngrok. We also saw how to use ngrok to expose a local Node.js server to the internet.
ngrok can be a wonderful tool to use regardless of which application you are building. If you want to take your application to the next level and add superior customer communication capabilities, consider building with Sendbird.
As the leading communications API platform, Sendbird has a comprehensive set of features that can help you easily incorporate powerful functionalities in your application, such as chats, Business Messaging, custom AI chatbots, and voice and video calls. Sign up for a free trial, or contact us to learn more!


