
How to build in-app chat using Kotlin – Part 2

Introduction
This tutorial follows part 1 of the tutorial on how to build in-app chat using Kotlin. This 2-part guide aims to help you get up and running by showcasing a simple chat implementation.
Getting started with the UIKit is wonderfully accessible, but in some cases, you may need to implement chat from our Core SDK. This guide picks up where we left off in part 1. In part 1, we built out the:
- login
- ability to create and list channels
In this tutorial, we will create the:
- UI for the ChatActivity
- MessageAdapter which sets the UI components
- ChannelActivity class
Before we dive in, please note the following:
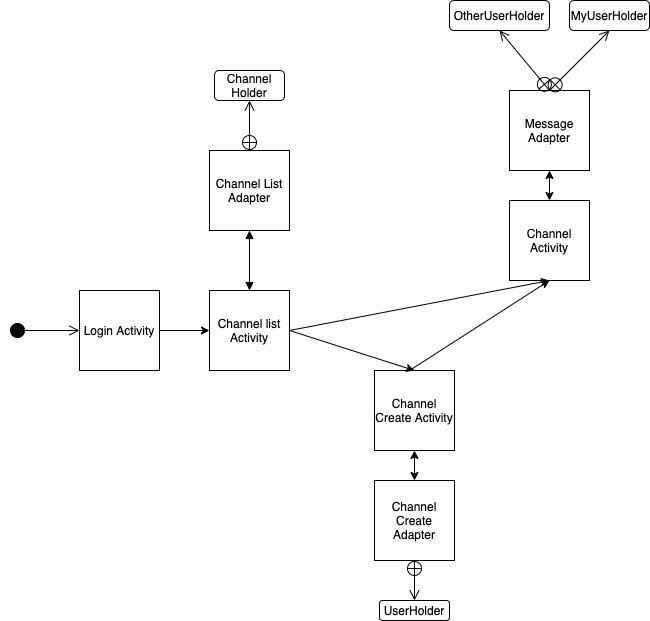
1. a. The diagram below depicts class relationships. You may find it to be a helpful reference as you proceed through this tutorial.
b. This guide only covers sending and receiving User Messages. To see how to send File Messages, please visit our docs.
c. This guide focuses on three different parts:
- UI for the Channel Activity
- MessageAdapter.kt class
- ChannelActivity.kt class
d. This tutorial was built using:
- Android Studio: 4.0.2
- Android Version: 10 API 29
- Kotlin: 1.3.72
- Sendbird Core SDK: 3.0.148
e. This tutorial assumes prior knowledge of Android and Android concepts.
f. Here is the completed source code for both part-1 and part-2.
Step 1: Building the UI for the channel activity
1. activity_chat.xml
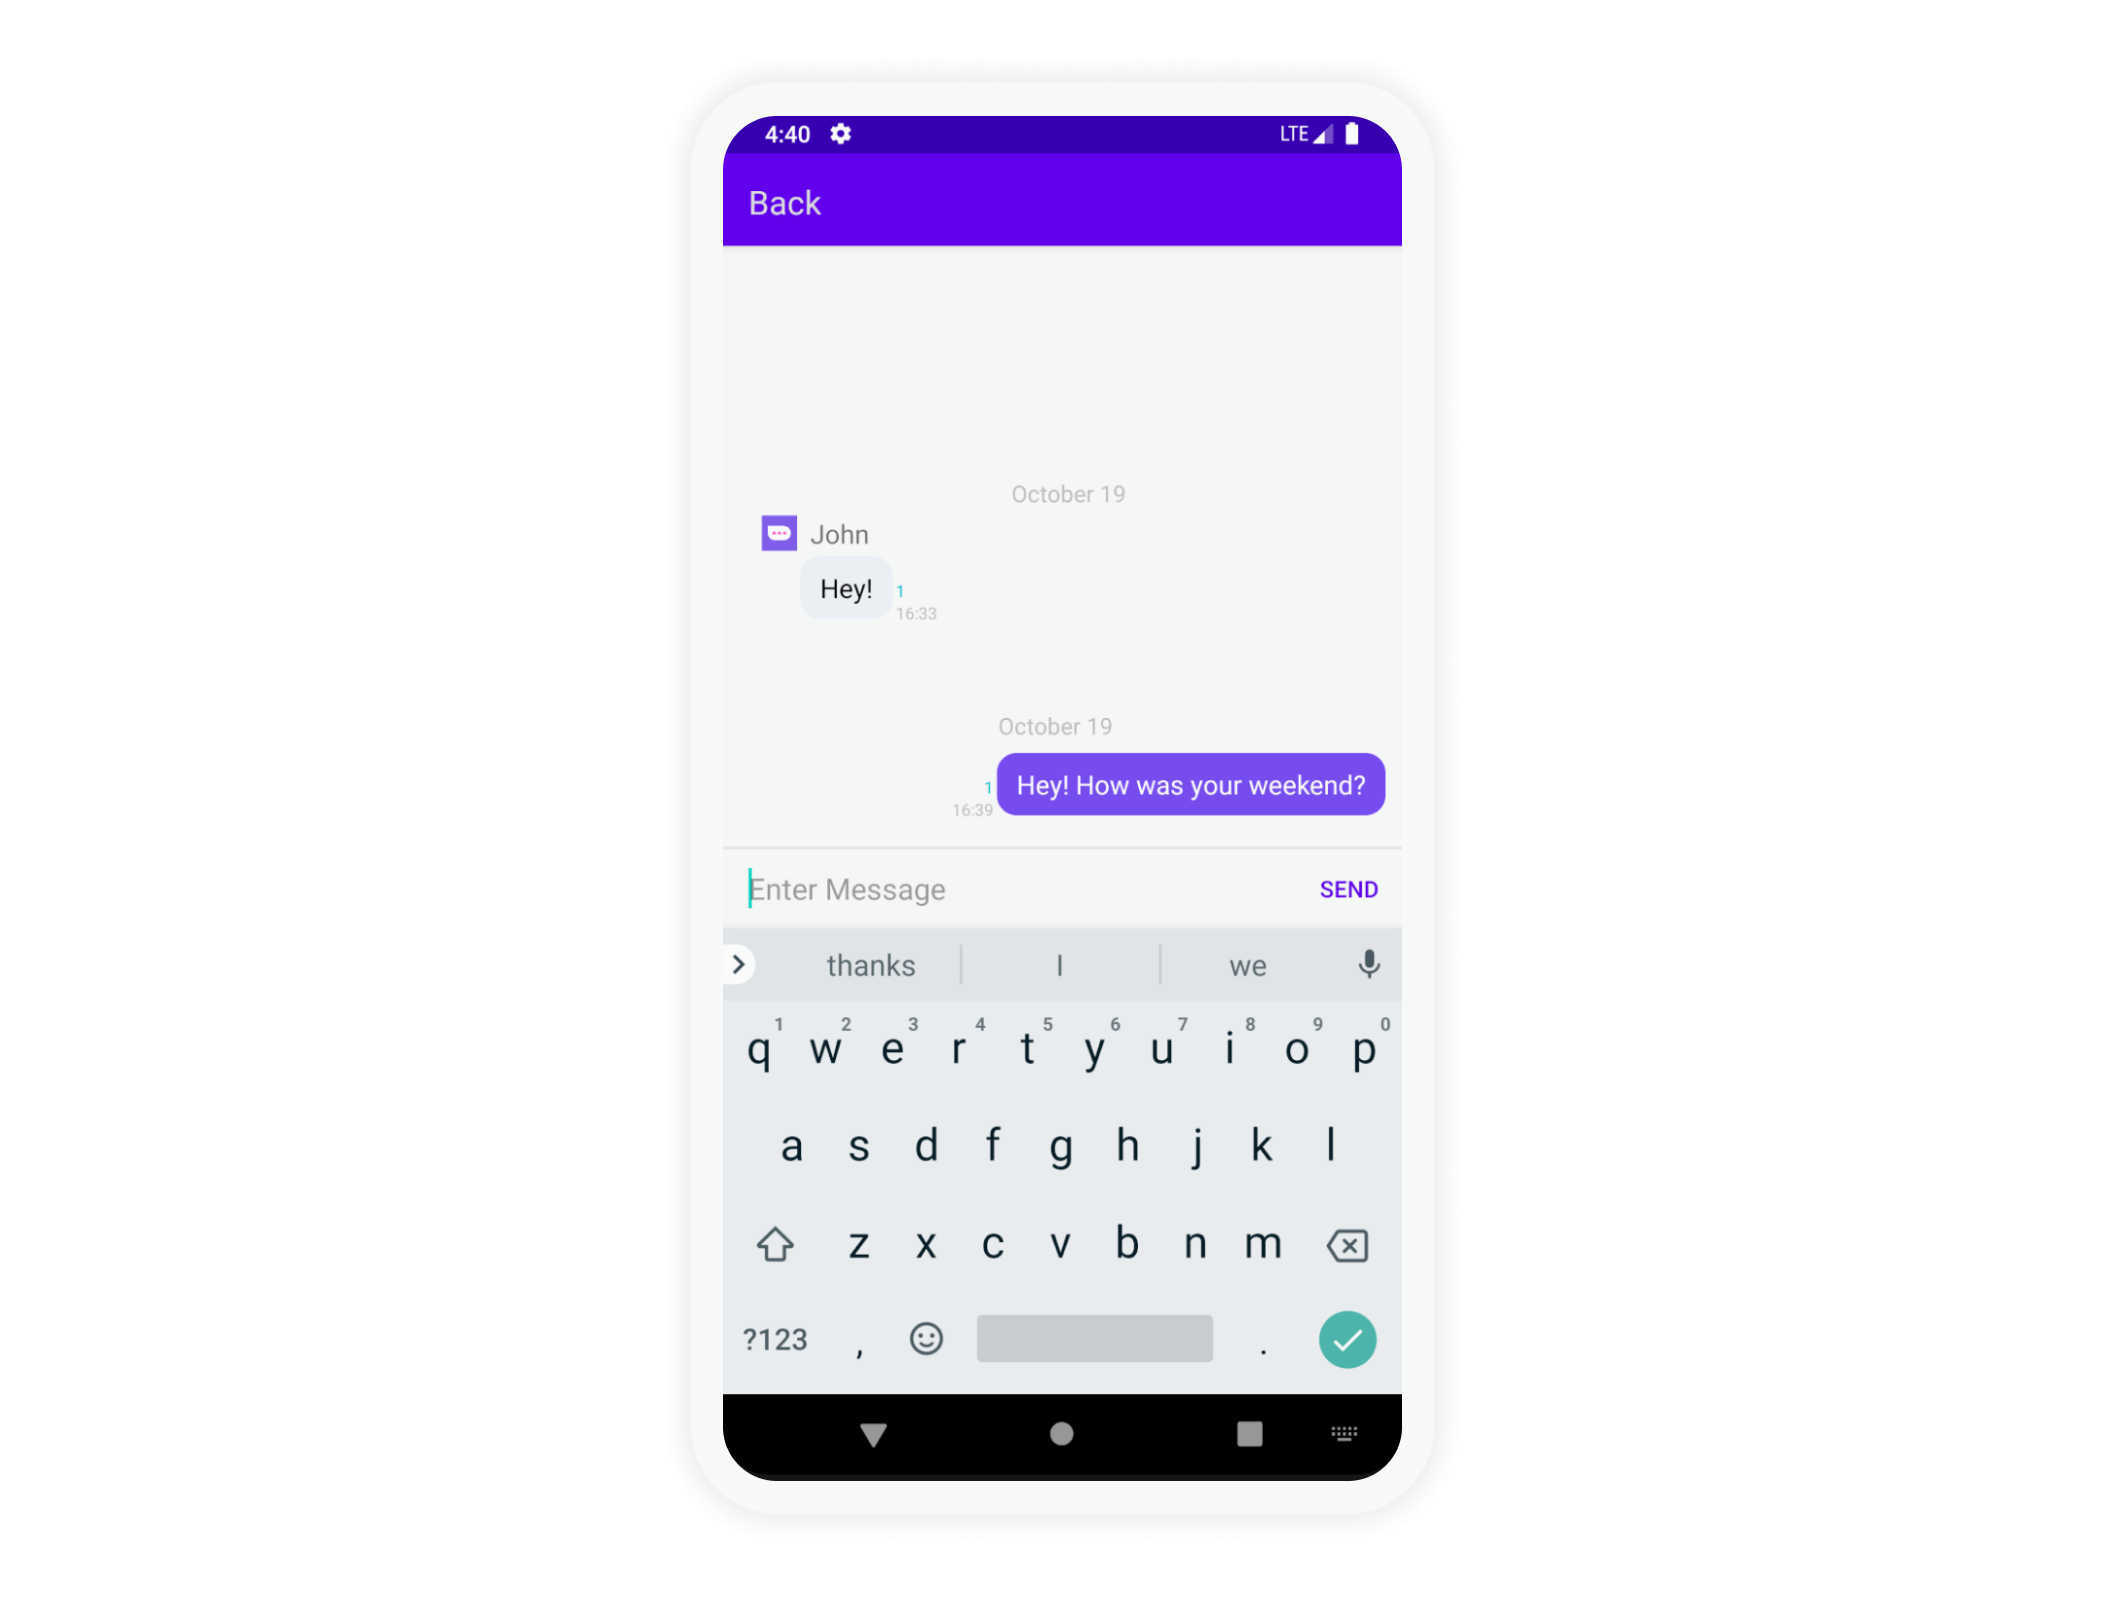
The first thing we will need to do is create a UI for how the chat will look. We will add an AppBarLayout with a “Back” button on the top to return to the ChannelListActivity. Below that, we’ll add a RecyclerView to show the actual messages. Finally, at the bottom, we’ll add a simple layout to handle entering and sending messages. This is the gist:
2. item_chat_me.xml
Now that we have completed the UI for the skeleton of this Activity, we will need to create two different item views for the messages. We will need to do this because we will have a different UI for messages sent by the current user, and we will have a different UI for messages sent by others in the chat. (As you implement more types of messages, you’ll have more such .xmls.)
The first .xml will be for messages that are from the “Me” perspective, or messages sent by the current users. For this, we have opted to have a TextView for the actual message, which is wrapped in a Cardview. Surrounding this TextView are other TextViews for things like the date. This is the gist:
3. item_chat_other.xml
The second .xml will be for messages that are from the “Other” perspective or any message not from the current user. This UI will be similar to the “Me” UI; however, it is left aligned and contains information about the “Other” user. This includes things like an ImageView for the profile image, and a TextField for the user’s name. Other than that, the views are relatively similar. This is the gist:
Step 2. The MessageAdapter.kt class
Now that we have implemented the UI, we are going to implement the MessageAdapter.kt class. We are skipping the ChannelActivity.kt, as it makes more sense to talk about how the UI will be set before we get into things like channel handlers. This class will handle attaching data passed to it to a particular view in the recyclerView.
Now, create a class called MessageAdapter.kt. This class will extend RecyclerView.Adapter<RecyclerView.ViewHolder>(), so you will need to make sure to implement the following methods:
- onCreateViewHolder
This will return the customViewHolder that corresponds to the type of message. - getItemViewType
This is where we figure out the message type. Currently, we only implement UserMessage. This function will determine whether it is a “Me” message or an “Other” Message. We will return accordingly. - onBindViewHolder
This function binds the messages to the views. - getItemCount
This function returns the current position of the message.
There are two additional functions we need to add. These are:
- loadMessages
The point of this method is to load the initial past messages which we will get in the ChannelActivity. - addFirst
This function will just add recently sent or received messages to the adapter. Obviously, both of these functions will need to call notifyDataSetChanged() to update the recyclerView. This is the gist:
After we have handled the essential functions for a recyclerView Adapter, we will need to implement our own customViewHolders. We have two inner classes denoted by:
1. MyUserHolder
This class simply binds the respective message sent by “Me” to the item, for which we have earlier created the view. This is the gist:
2. OtherUserHolder
This class simply binds the respective message sent by “Other” to the item, for which we have earlier created the view.
This is the gist:
For the sake of a cleaner look, we also added an object that has two functions that help with date formatting. This is the gist:
This completes the code for the MessageAdapter class. To see the completed class for MessageAdapter.kt, go here.
Step 3. The ChannelActivity.kt class
Now that we have implemented the UI and taken care of the Adapter to connect the UI to the passed data, we will implement the ChannelActivity.kt.
The following class will:
- Set up the recyclerView and Adapter
- Handle getting and entering the channel passed by either CreateChannelActivity or ChannelListActivity
- Handle sending and receiving messages
First, create a ChannelActivity.kt class. In the onCreate function, we will set the contentView and call two functions to handle setting up.
onCreate
The first function sets up the recyclerView and the messageAdapter we just created. This code follows a basic implementation for instantiating a recyclerView. Be sure to pass the context of the Activity for the messageAdapter as we will need that when setting the image, as we did above.
setUpRecyclerView.kt
The second function handles setting the two buttons on the Activity: Back and Send. The Back button is self-explanatory, so let’s focus on the Send button.
setButtonListeners
For the Send button, we have a method called sendMessage. This function takes the text from the editText, and sets it on the param of UserMessageParams(). There is a lot more you can do with UserMessageParams(), and I encourage you to check it out, but for the sake of simplicity, we will just add the message. Then we’ll take the groupChannel instance and sendMessage(). Upon the return that it was successfully sent, we will add it to the adapter, then clear the editText.
sendMessage
Now that we have taken the case of the onCreate call, let’s get to the onResume call. This call is where we will handle getting the passed channel, and where we will register the channel handler to get various events – in this case, the onMessageReceived event.
First, we will want to get the channelURL from the intent. We will move this to a separate method for sake of visibility.
getChannelUrl
After we have the channelURL, we will need to make a call with the function GroupChannel.getChannel(). This call will take the channelUrl and retrieve the channel object to send messages and get relevant channel information. Once it returns successfully the channel, set the channel and be sure to call getMessages().
This function is pretty straightforward. It creates a previousMessageListQuery (There is a lot of customizing you can do here as well), then loads the messages, and finally calls loadMessages on the Adapter. This gets all the previous messages in the conversation. This function does support pagination so you can get the entire conversation history.
getMessages()
The final thing we need to do in the onResume call is to set a channel handler. The channel handler is how you can get various events such as typing indicators, message read, message delivered events, and onMessageReceived events. The only method we implemented was onMessageReceived. This event fires every time a message comes in from another user. Once we get the event, we add it to the Adapter as described in the following code.
onResume()
Since we had an onResume call, let’s add an onPause. The only thing we will do here is to remove the channel handler for clean-up.
onPause()
That completes the code for the ChannelActivity class. See the completed class for ChannelActivity.kt here.
Conclusion
In this tutorial, we covered how to:
- create a chat UI
- hook up that chat UI to be able to send/receive and display messages
This tutorial is a stepping stone to the many things you can do with the Sendbird SDK. With what we have just implemented, you can easily start to:
- incorporate additional types of messages
- add a more complete view to the message life cycle
- add push notifications, typing indicators, translations, and so much more
You did it! You are now connecting users with chat in your Android app! Check our docs and developer portal to build more features. If you have questions, contact us on the community site. In the meantime, happy chat building! 🙂


