
How Sendbird halved test runtime and improved test success rate


Code quality and delivery speed are two of the most important goals for the Sendbird SDK team. To achieve these goals, we utilize automated testing. While our testing pipeline functions well, there’s some room for improvement: the low success rate and the long runtime.
This blog post highlights how we achieved a 40% increase in success rate (from 47.7% to 91.8%), a 45% decrease in runtime (from 35 min/run to 16 min/run), the precise location of the bottleneck, and details how we used Firebase Test Lab – a solution that led to these improvements.
Introduction
As a B2B company with hundreds of millions of monthly active users (MAU), code quality is one of our highest prioritized goals. Since our customers cannot fix code errors in the SDK directly, it is critical that we deliver the most bug-free version of the SDK to our customers.
Another priority is the speed of delivery. We try to respond to the market as fast as possible and fulfill our customers’ needs quickly, which is why we release the Messaging Android SDK every two weeks.
But achieving these two goals is not easy. We must optimize every step to improve speed without compromising quality. To do that, we are obsessed with automated testing. We write tests for every new feature, bug fix, and significant code change. All pull requests must pass all integration tests before being merged – and we have more than 1,000 integration tests. Our build pipeline automatically triggers the test pipeline, runs the test in parallel, collects the log, and sends the log to our internal data platform.
The problem
Unfortunately, even if the binary is safe and sound, sometimes a test fails with no clear reason. With the old setup, only 47.7% of the perfectly working binaries passed the test. This means there were so many false negatives that we were unsure if the test failed because our code was buggy or that the test environment was being flaky. Even though the code itself was perfectly fine, there was a 52.3% chance that it would not pass the test. So test success means the code is not buggy, but not vice versa.
On top of that, test runtime was 35 minutes. We run tests multiple times a day and 35 minutes per run is quite expensive. When we combine a high false-negative rate and long runtime, this leads to a significant decrease in productivity.

Virgin Mobile UAE improved their CSAT with Sendbird Desk.
The root cause
We tested multiple hypotheses: Can we utilize more parallel executions? Does the OS difference affect test environments? We read Android and Unix logs and benchmarked Android and Unix processes. Then we found a lead: the same code ran noticeably slower in the CI server’s virtual machine (VM). This meant that there was something wrong with the CI server’s virtual machine. We dug deep and discovered that our local AVD was on x86_64, while the CI server’s AVD was on armeabi-v7a (those are ABI names). Hooray! We uncovered the reason for the error, and tried to use the x86_64 image on the CI server, but discovered additional challenges.
What was still troubling was the “hardware acceleration.” The following is what Google reported when we tried to run the x86_64 device on containers:
| $ emulator -avd test -noaudio -no-boot-anim -no-window -accel on
emulator: ERROR: x86_64 emulation currently requires hardware acceleration! Please ensure KVM is properly installed and usable. CPU acceleration status: KVM requires a CPU that supports vmx or svm More info on configuring VM acceleration on Linux: https://developer.android.com/...#vm-linux General information on acceleration: https://developer.android.com/.... |
Thankfully, Google attached enough information for us to understand what was happening. In summary:
- x86_64 AVDs need hardware acceleration, which is why they are faster than arm AVDs
- We cannot use hardware acceleration inside Docker, as Google explicitly states below:
| You can’t run a VM-accelerated emulator inside another VM, such as a VM hosted by VirtualBox, VMware, or Docker. |
- We run tests in a Dockerized environment, hence no x86_64 for us
The solution candidates
Apparently, the direct way was blocked. Google specifically stated that we could not use both Docker and x86_64, so we needed to change one of them. But since we could not give up x86_64, which was the objective of this project, we needed to change Docker.
So what were our options? We could use bare metal instances – the server instances that are not virtualized. They are not VM, so we could use hardware acceleration on such server instances. Or we could have our own physical server that is not virtualized at all. Last, if there is a solution that lends an AVD instance that is well virtualized versus a server instance, that could be an option too.
We investigated all the above options and identified the pros and cons of each:
| Solution | Pros | Cons |
| Bare metal server instances |
|
|
| Our own physical server |
|
|
| A solution made for this purpose |
|
|
We compared the three categories and chose to consider the available solutions. Our research revealed that AWS and GCP offered some good candidates: the AWS Device Farm and the Firebase Test Lab.
AWS Device Farm vs. Firebase Test Lab
At first, we leaned more toward AWS, since most of our service stack was on AWS and we’re more familiar with AWS’s UI/UX and structures. It would also be much easier to integrate, optimize, or monitor things in AWS than in GCP.
However, there were two intriguing features that GCP offered that AWS did not. So we ultimately chose GCP.
- GCP offered virtual device options.
AWS only offered physical devices, which we did not need. GCP offered a virtual device option, which made a huge difference in pricing: $0.17 per device minute on AWS versus $1 per device hour (billed per minute, about $0.0167 per minute) on GCP (verified Dec 10, 2020). AWS costs 10 times more than GCP.
- GCP offered an option that is flaky-resistant.
In GCP, when the flag “–num-flaky-test-attempts k” is set, GCP automatically tries k more times upon failure. If any of the test attempts succeed, then the test result is not “failure,” but “flaky.” It’s not a success, but still not a failure. At first, we thought this would negatively affect interpreting the test results. However, after some trials, we learned that having this option significantly boosts productivity. This is useful for two scenarios: 1. We know there are flaky tests, but other priorities hinder us from fixing the flaky tests, and 2. The staging server is unstable and tests randomly fail. We worried that enabling this option would make us “lazy,” because we may treat “flaky” as a “success” and no longer fix flaky tests. Fortunately, this was not the case. We used Datadog to monitor test results and continued to fix flaky tests, since having zero flaky tests ensured the shortest test runtime. If we succeeded at the first trial and it took 10 minutes, than we only spent 10 minutes. But if we had a flaky test and had to run it again, it would take another 10 minutes and double the runtime.
Based on our findings, we chose GCP’s Firebase Test Lab.
Our configuration
GCP provides multiple ways to execute tests on Firebase Test Lab. We first tried it on a web console since it required near-zero setup cost. We then checked to see if it was working and wrote our own script in Python. We could have used gcloud CLI, but for maximum flexibility and ease of integration with other services we decided to use the REST API directly using the googleapiclient.discovery package.
The setup is pretty straightforward. You can set up the Python environment following this guide provided by Google. Then you can use the packages, as shown below:
Our testMatrix looks like this, we can create and execute a test like below.:
Then we waited until the test execution finished.
When finished, you can use the data in the testMatrix to determine
if the test succeeded or failed and gather additional data. For
example, you can tell if the trial succeeded by doing the following:
Or we can pull HISTORY_ID and EXECUTION_ID to get all the steps.
Using these steps you can download logs for individual tests and so on.
Comparison setup
So we found a way that could possibly make our test run faster and less flaky. Now we needed to thoroughly test it to ensure we don’t ship buggy code to our customers.
In setting up a comparison test, we did not remove any previously existing tests but added the Firebase Test Lab as an independent test step. Then we developed as usual for 8 weeks and evaluated how this new test configuration behaved. We mainly focused on the following parameters:
- If the new test environment is faster
- If the new test environment fails less
- If false-positive results are zero
- If false-negative results are low
Comparison result
The results were astonishing. The success rate did not just increase – it soared. The time per test run halved, and the total time was one-third!
The success rate
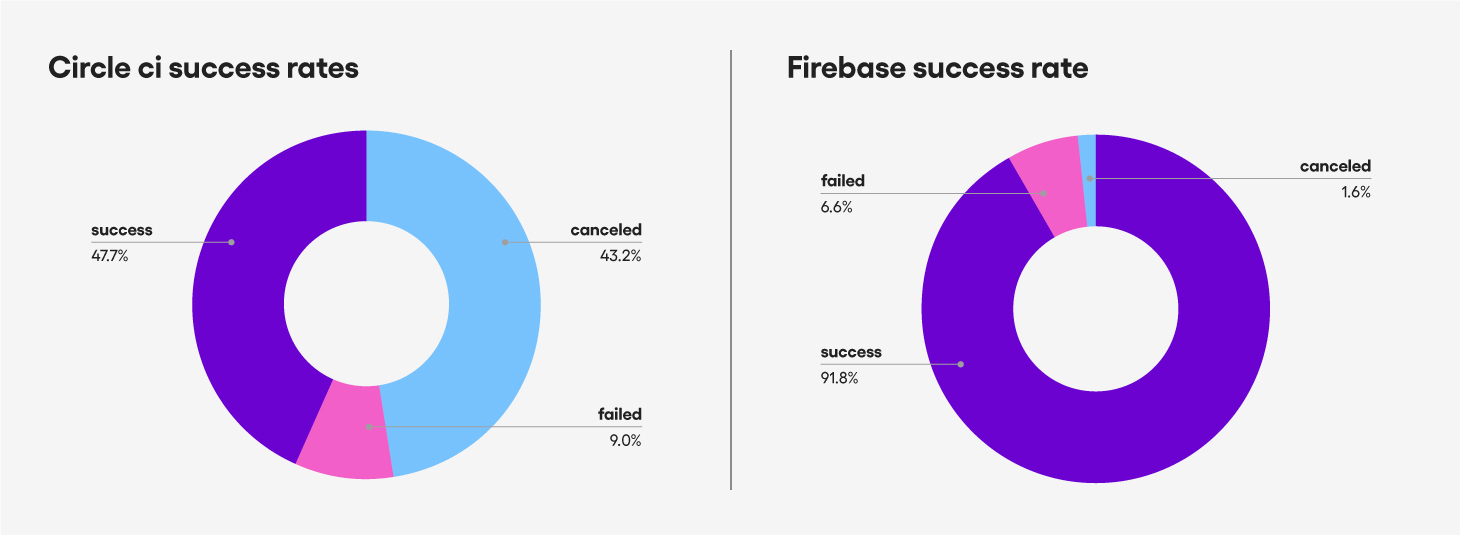
As you can see, the previous success rate was only 47.7%. We
canceled the test during the test run at the moment the first failed
test case was detected – so a canceled test is actually a failure.
But now, the success rate is 91.8% – it nearly doubled. It increased by 40% or 190%.
The average time to success
Previously, it took 35 minutes for the test suite to succeed.
Since we run multiple tests a day, 35 minutes is pretty costly. But now,
it only costs 16 minutes, which is an amazing improvement. We spend
only 45% of the previous time taken.
Total time taken for tests during 8 weeks
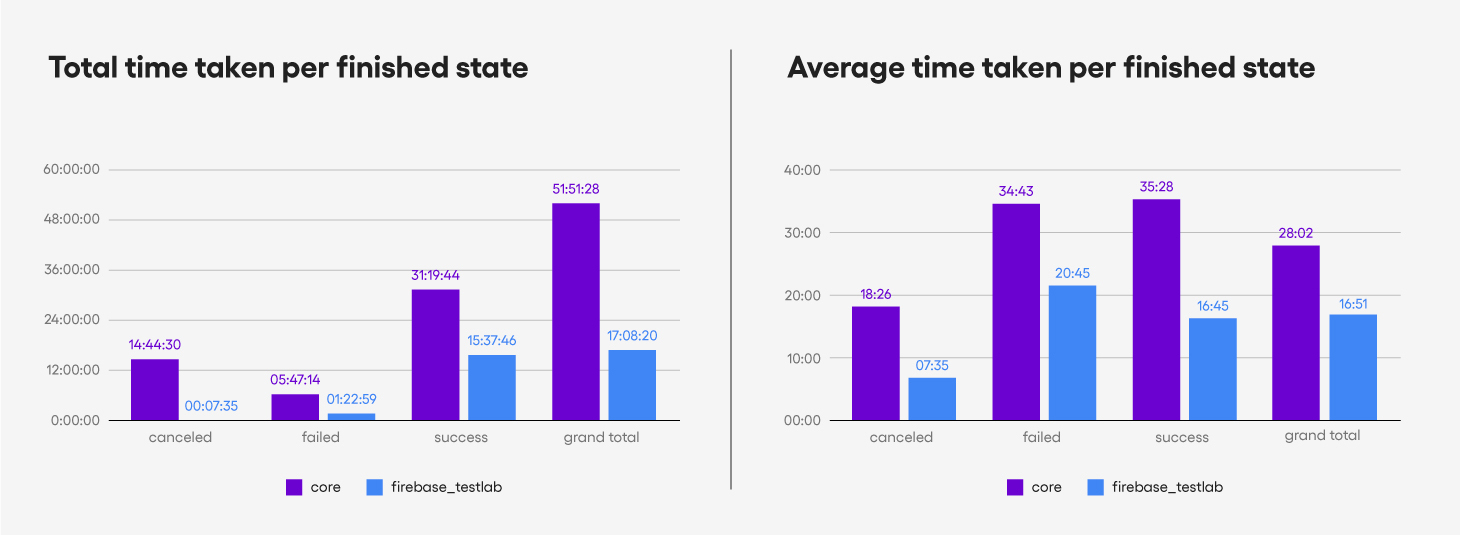
We also measured the length of time we spent on test runs over 8
weeks. It turns out that we spent 51 hours on the old test setup versus
17 hours on the new test setup. This means that if we switched to the
Firebase Test Lab, we could save 34 hours waiting for the test result to
come out. This is almost a whole work week (40 hours), and is a third
of the original.
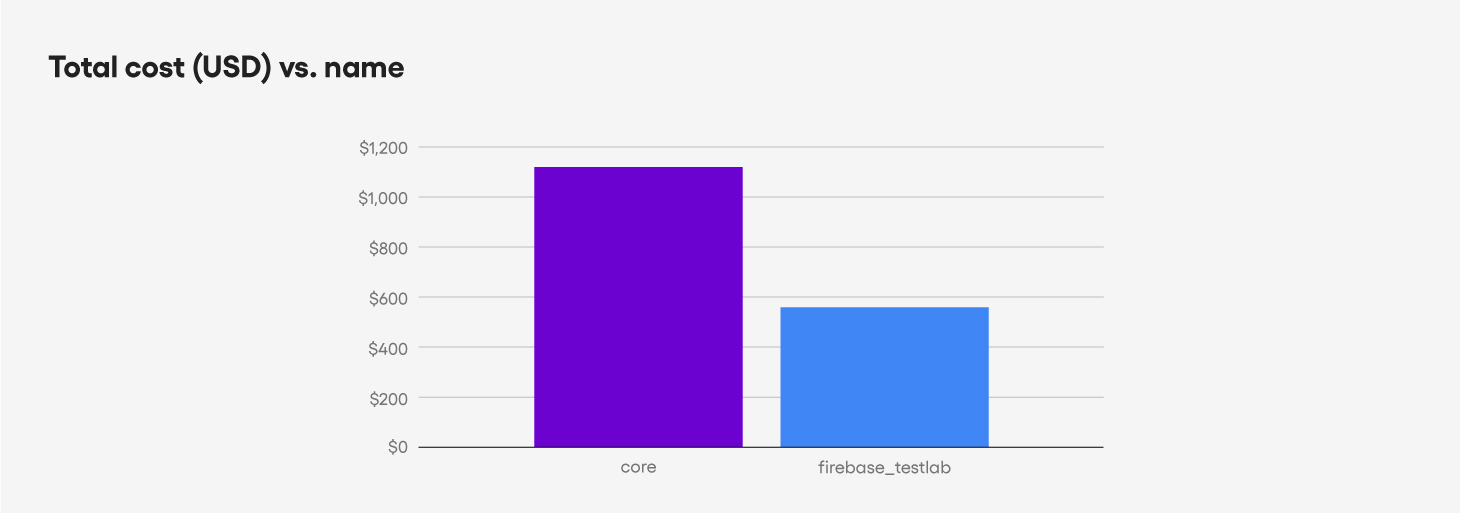
Total cost
Alongside the amazing results of doubled success rate and significantly reduced runtime, for an 8 week run we paid only $554 dollars versus the $1,120 we spent with the old setup.
Conclusion
From this project, we learned the following:
- Running AVD in Docker may dramatically slow down the test execution time since you may not be able to use hardware acceleration
- Firebase Test Lab offers a solid testing environment with a bonus feature: retrial upon failure (flaky-test-attempts)
- Developers can benefit from using a pre-setup solution – at Sendbird, we saved time and money using Firebase Test Lab
And, we are hiring!