
How to build an iOS video chat app with screen sharing

Introduction
This tutorial will help you implement screen sharing with Sendbird Calls. We will build an iOS app in Swift using Storyboards in XCode.
Please note the following prerequisites:
- You have created a Sendbird application and two users on the Sendbird Dashboard
- You have your app ID and user ID ready to use
For more details on how to set these up, check out this Sendbird Calls video tutorial.
Let’s get started!
Step 1. Create a new Xcode app, configure and import Sendbird Calls
1. Create a new App in Xcode:
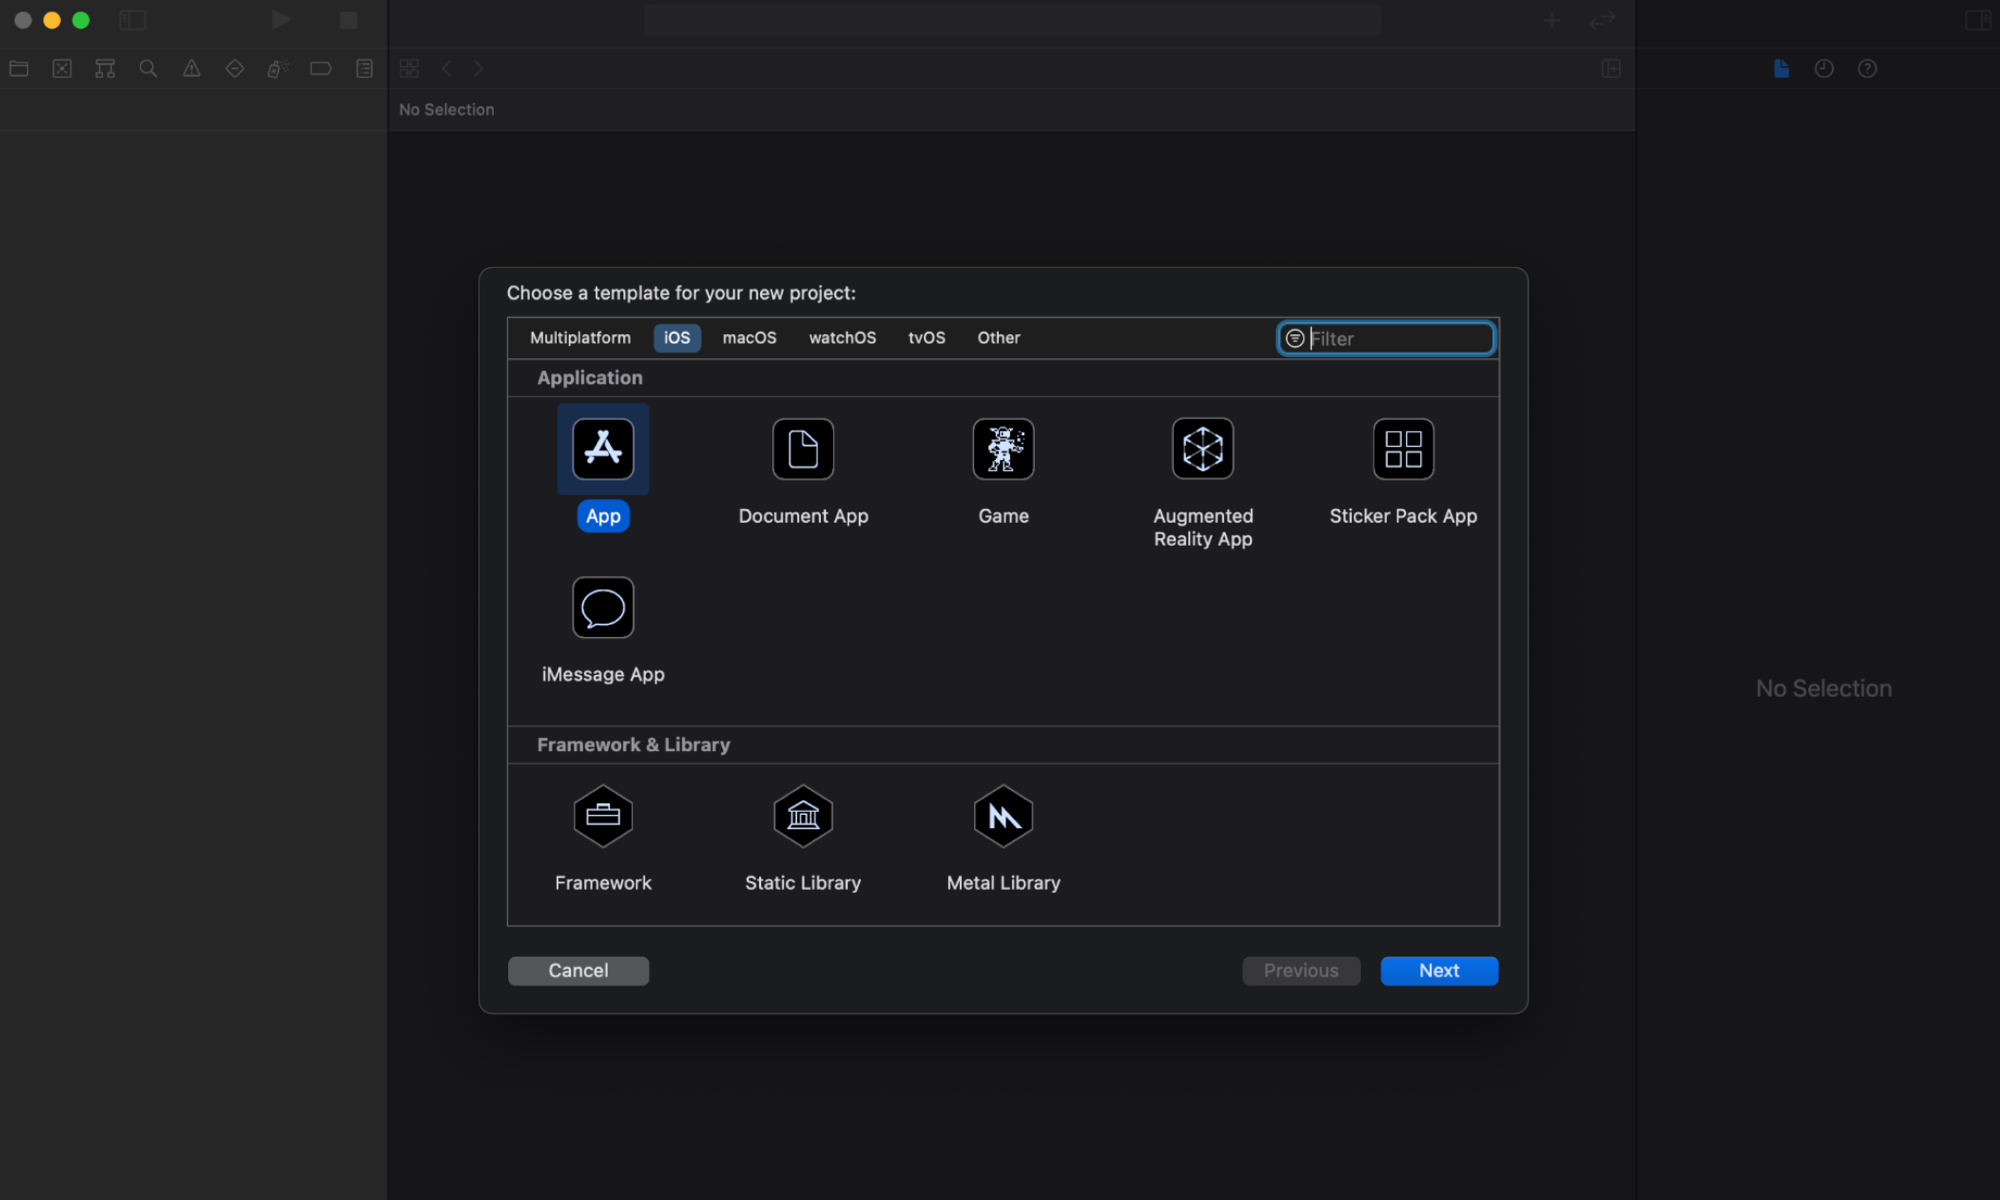
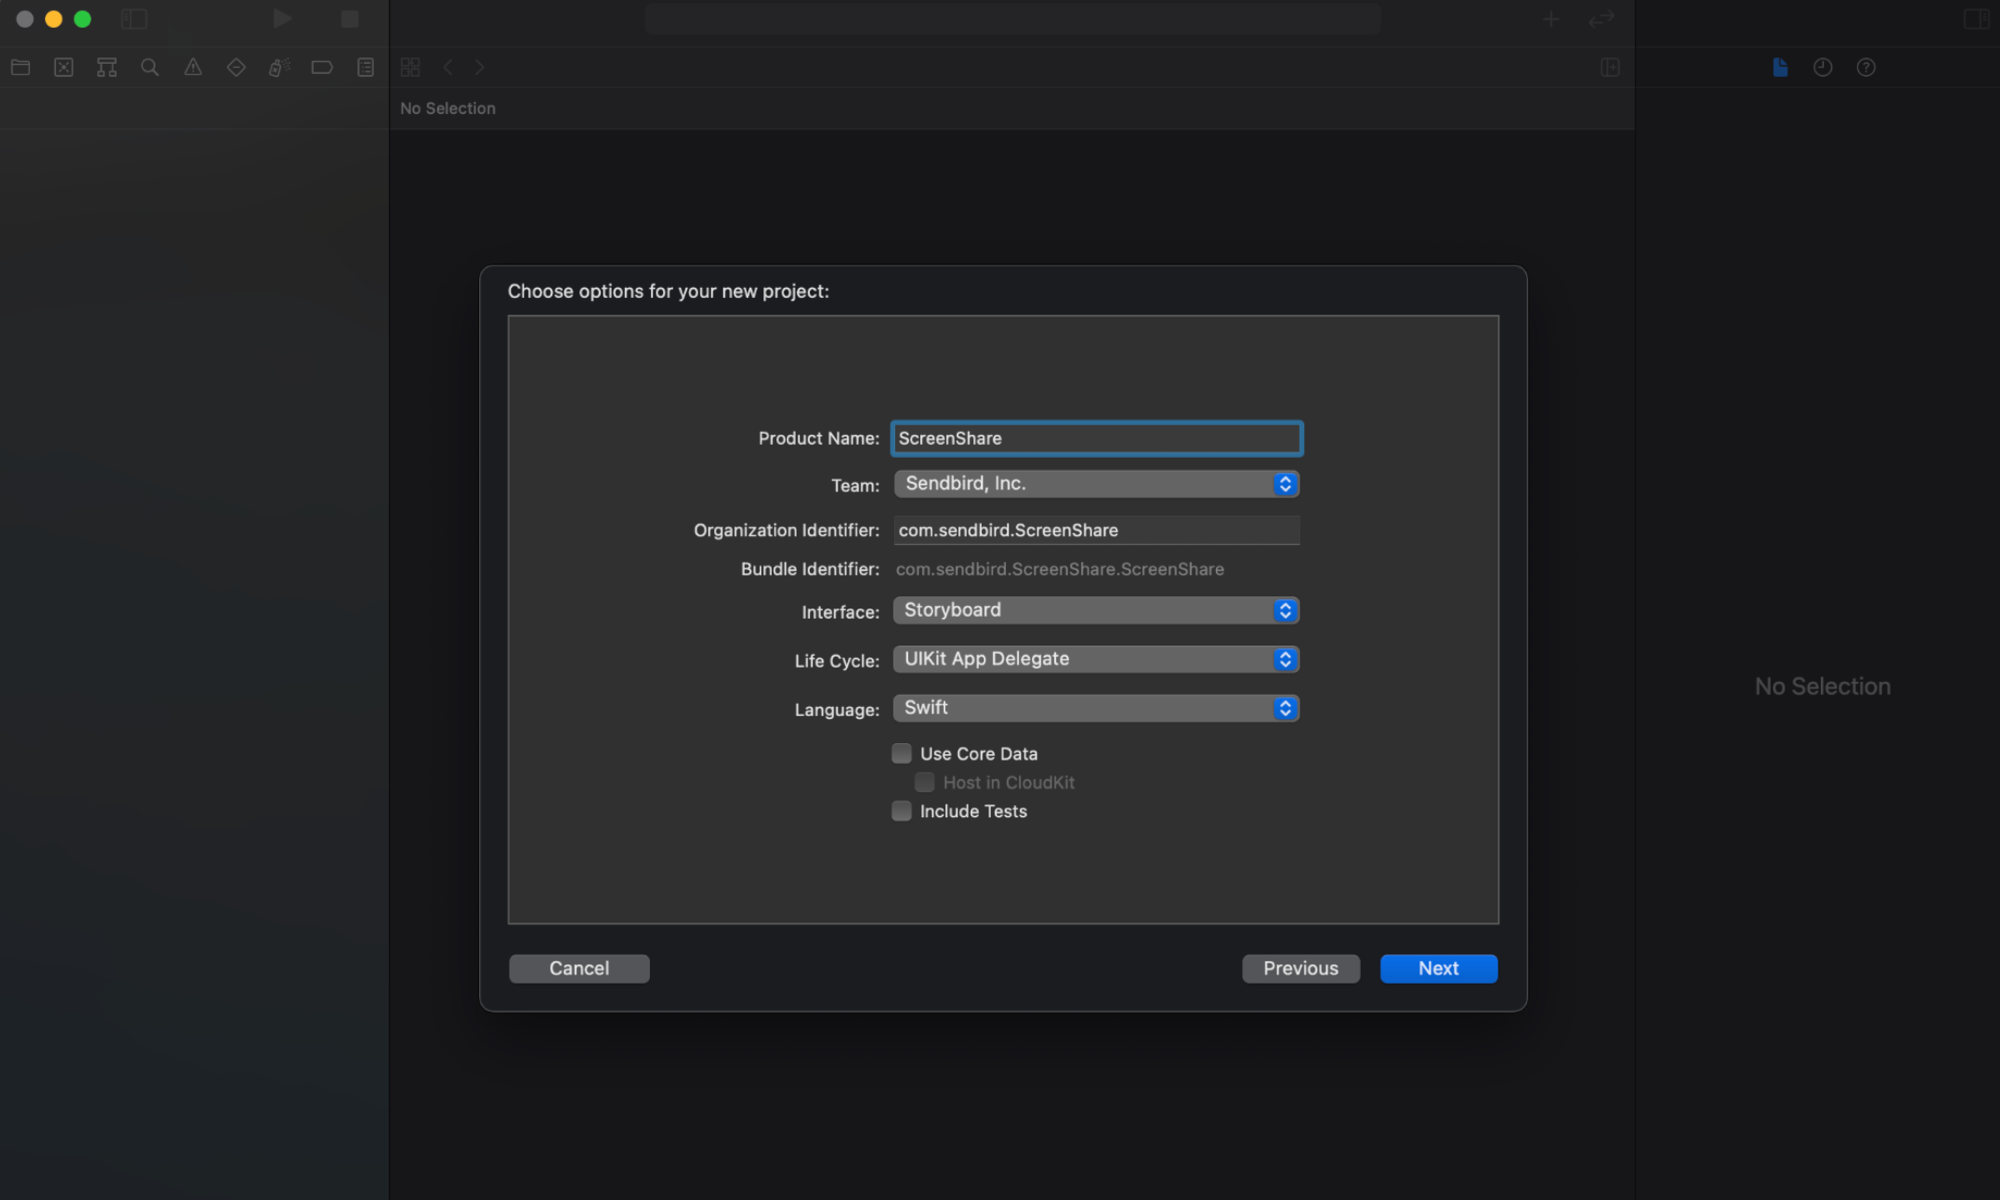
Name your app ScreenShare, set the Interface to Storyboard, and select Swift as the language:
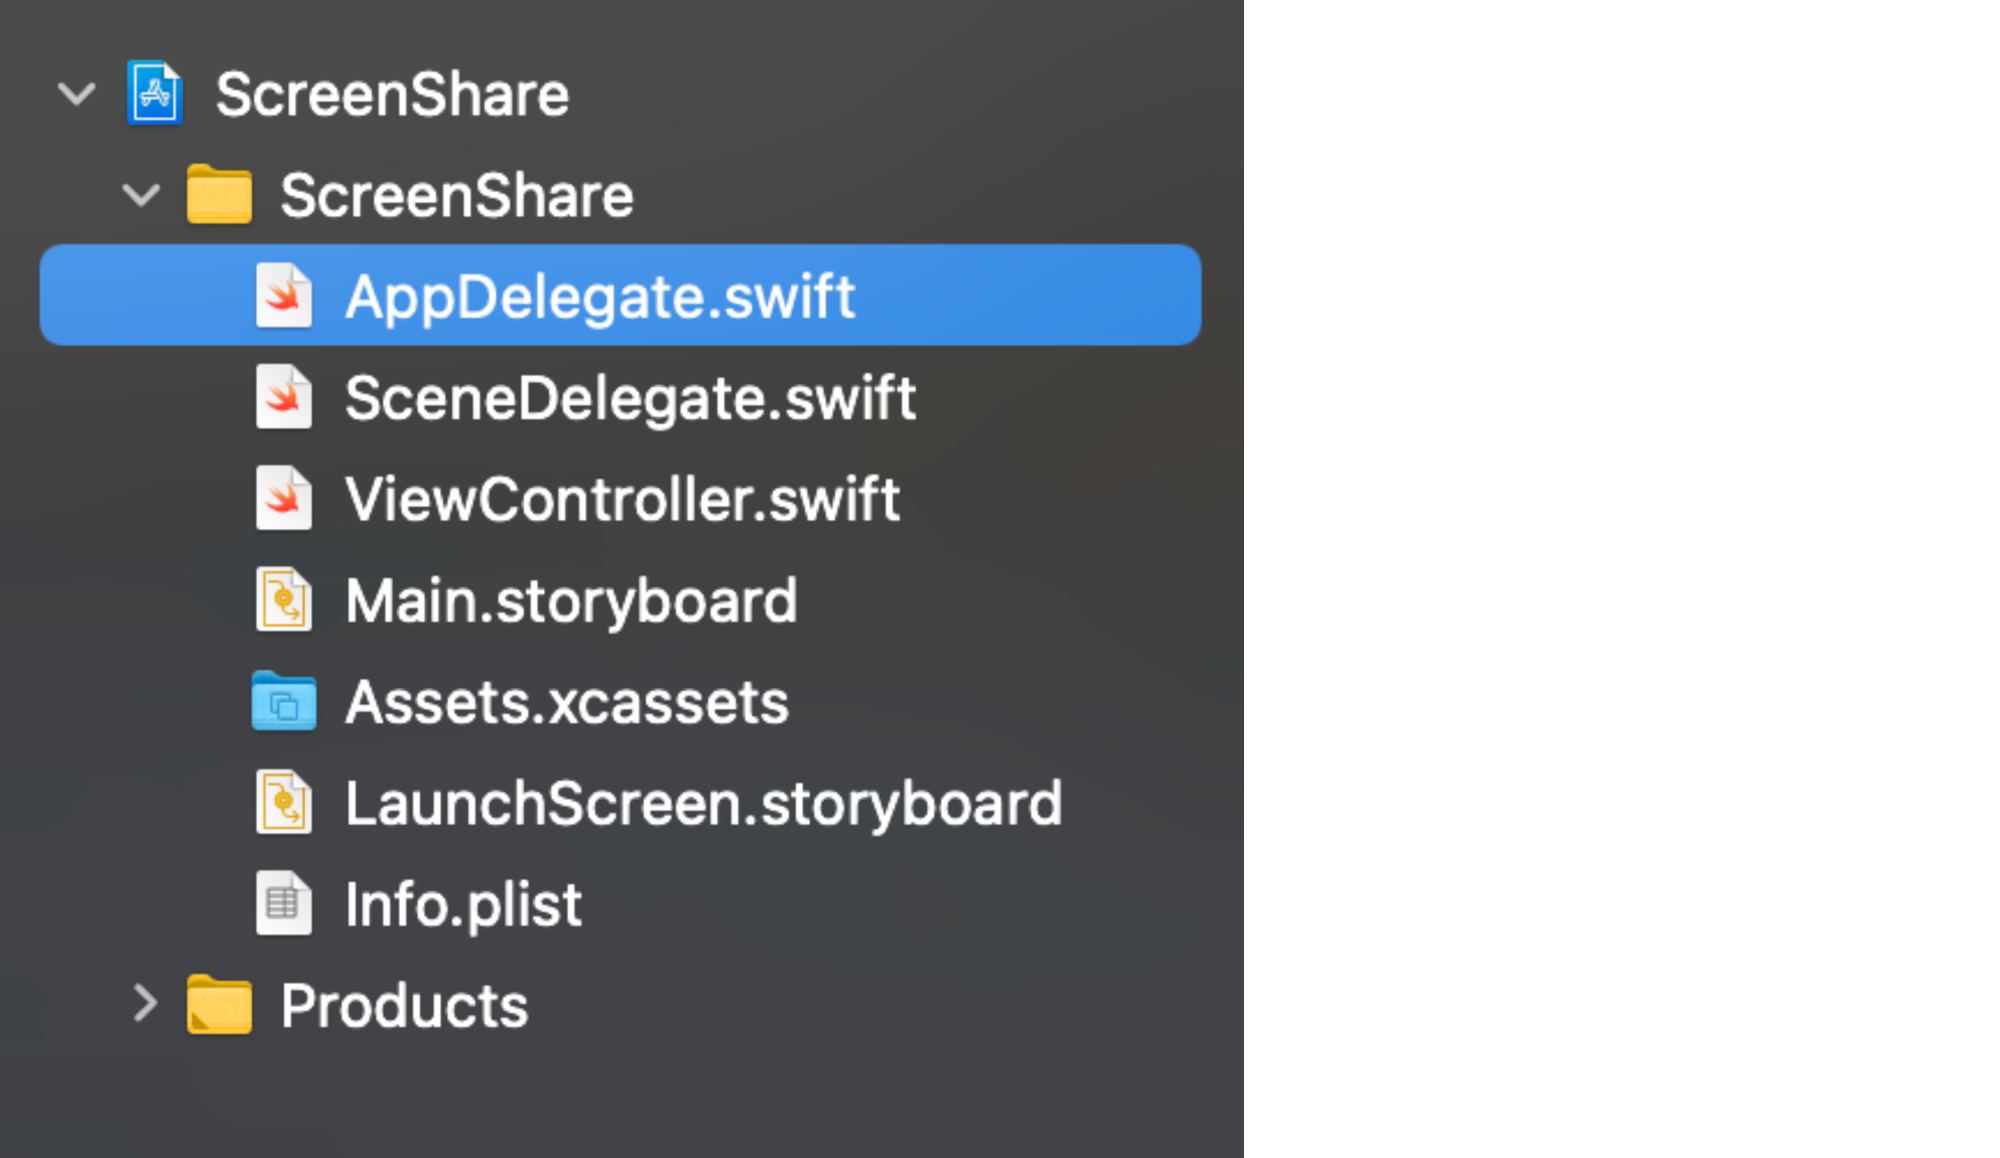
Xcode will automatically create your application with the AppDelegate.swift, ViewController.swift, and the Main.storyboard files that we will be editing in this tutorial.
2. Follow the Getting started and Configuring the application for the SDK sections on the Sendbird Calls iOS SDK Readme.md page on GitHub. This will walk you through all of the SDK installation and Info.plist file configuration necessary for this application to enable the microphone and camera. For this tutorial, you can skip adding any background mode operations.
After installation and SDK configuration, be sure to close any current Xcode sessions and use the `ScreenShare.xcworkspace` file for this project from now on. This will make it possible to build and run the app later.
3. It’s time to update the code. In the AppDelegate.swift file, import Sendbird Calls and update the didFinishLaunchingWithOptions method. Do this by adding your Sendbird application ID and configuring Sendbird Calls for your app.

Xcode may show you a warning that Argument type ‘AppDelegate’ does not conform to expected type ‘SendBirdCallDelegate’, followed by a ‘Fix’ option. Select Fix to automatically add the SendBirdCallDelegate protocol to the AppDelegate that implements the didStartRinging(_ call: DirectCall) function. Comment out the placeholder text ‘code’ since we will implement this function a bit later.
Step 2. Authenticate
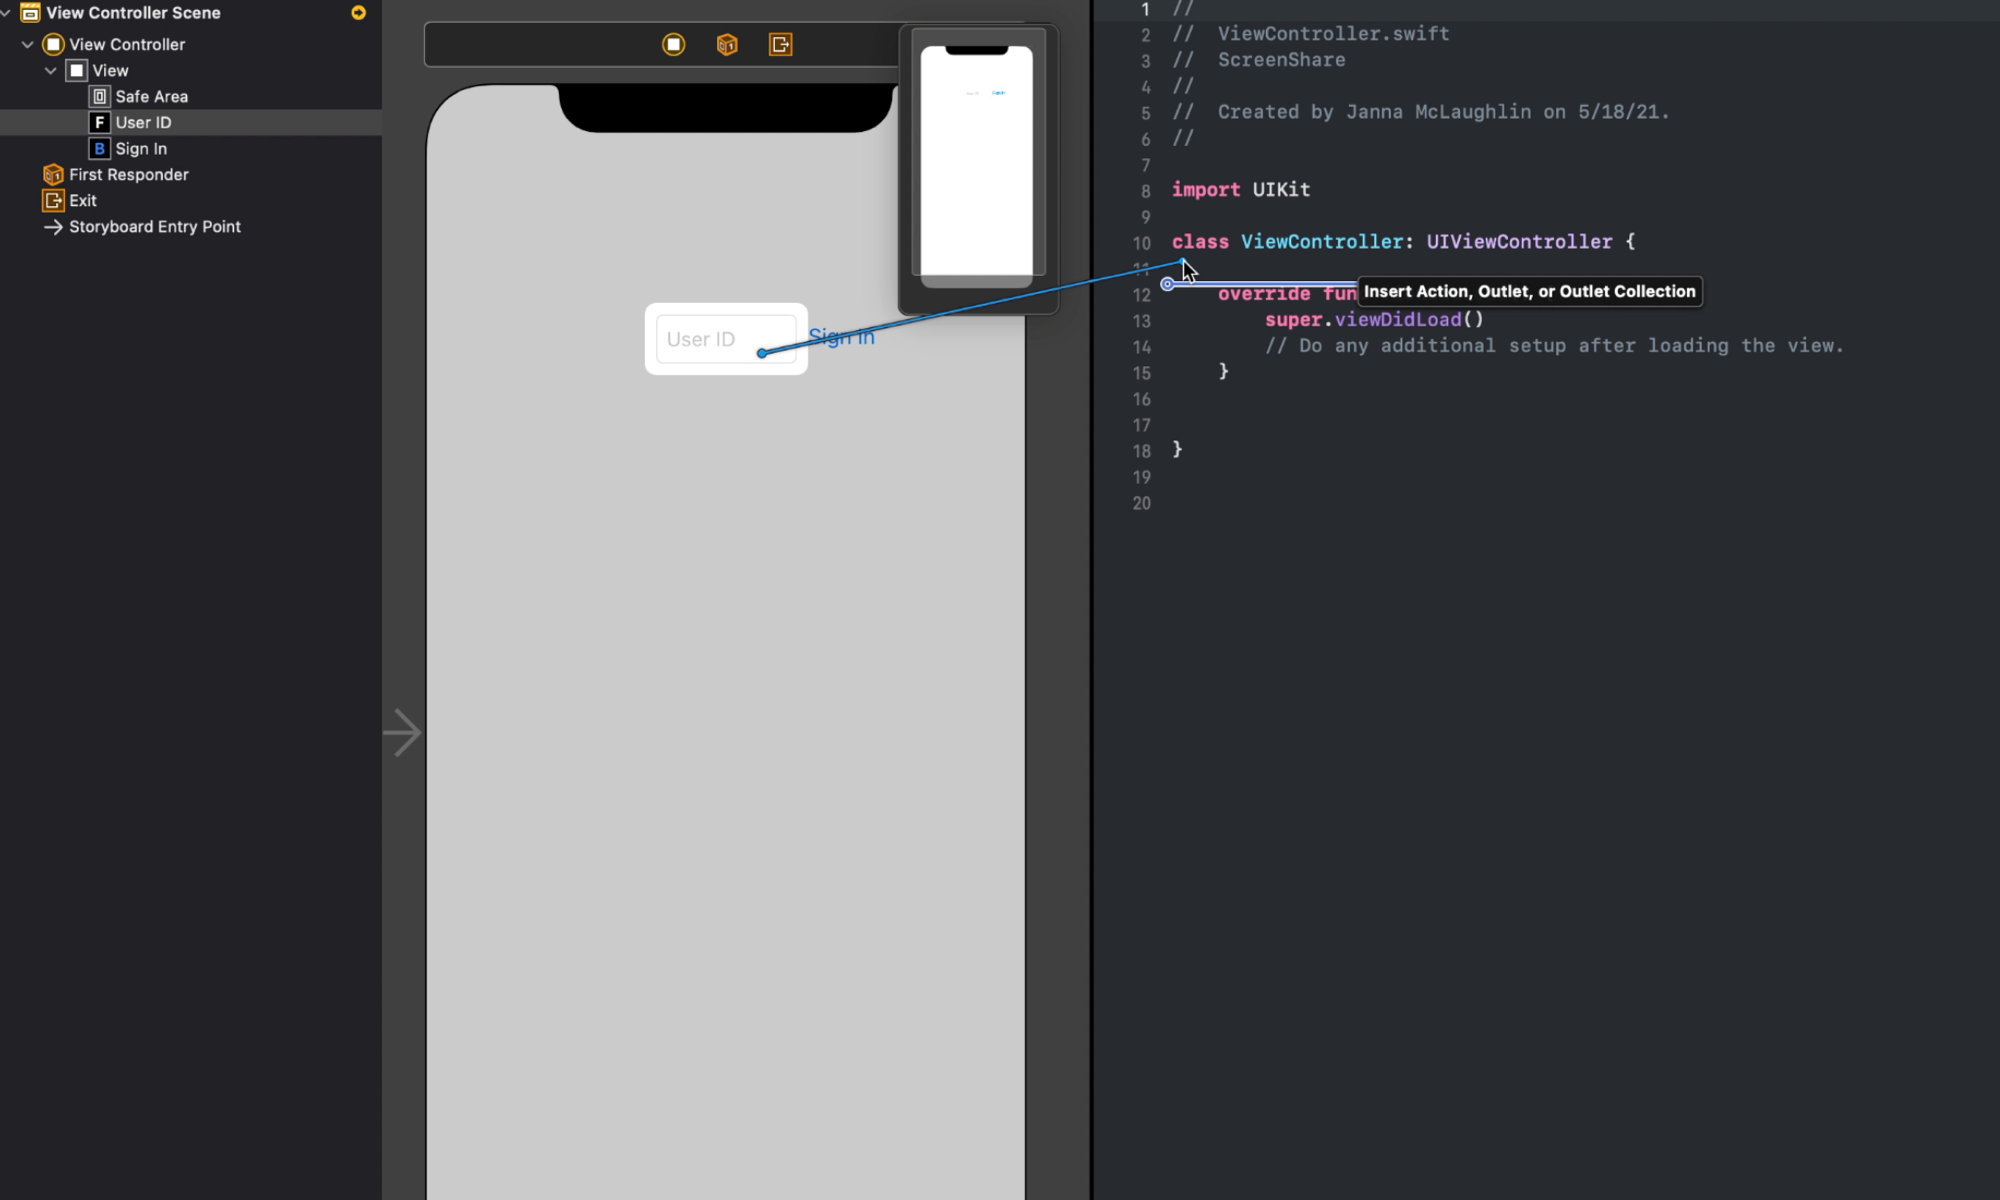
In Main.storyboard, add a text field for entering the user id and a sign-in button.
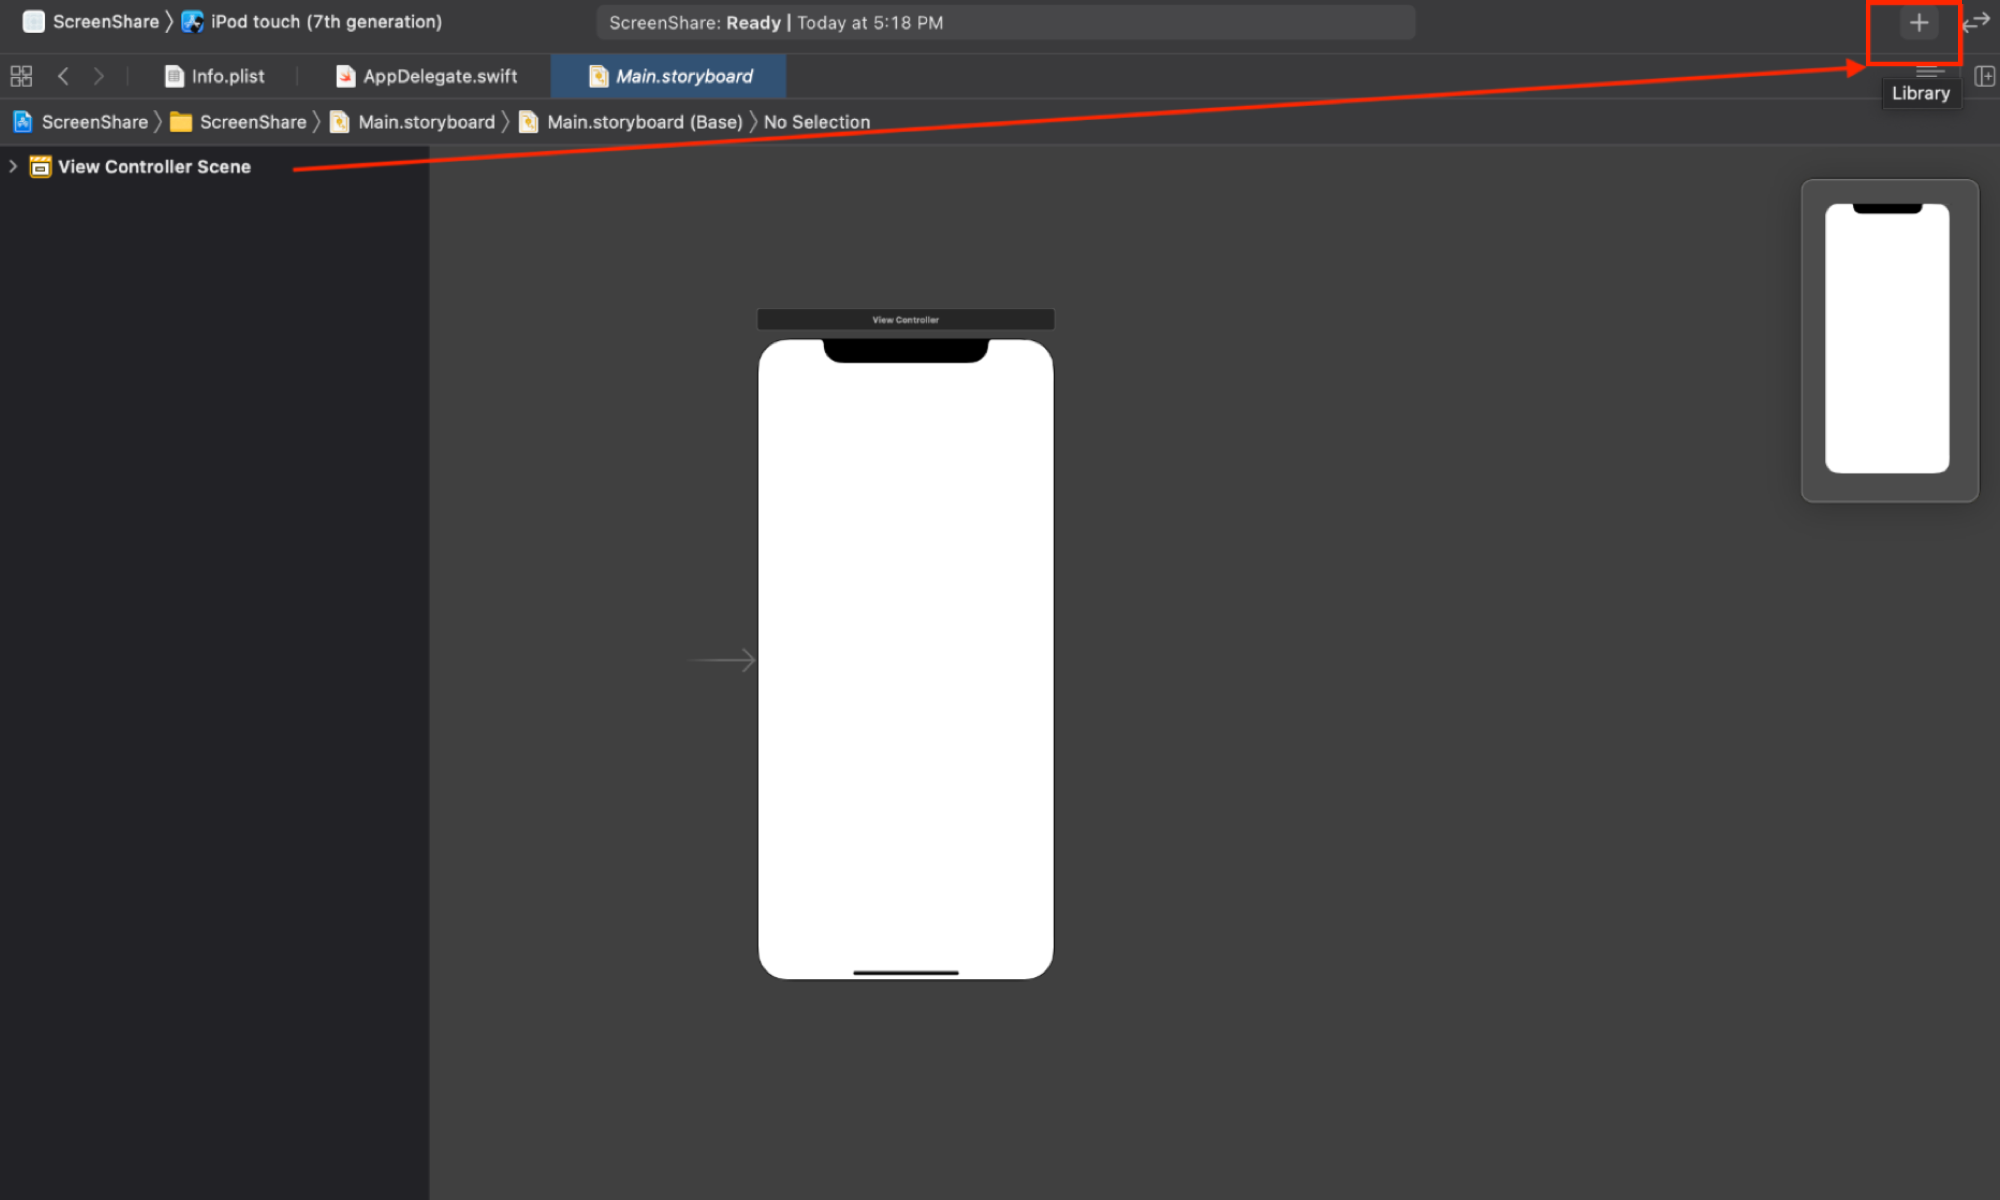
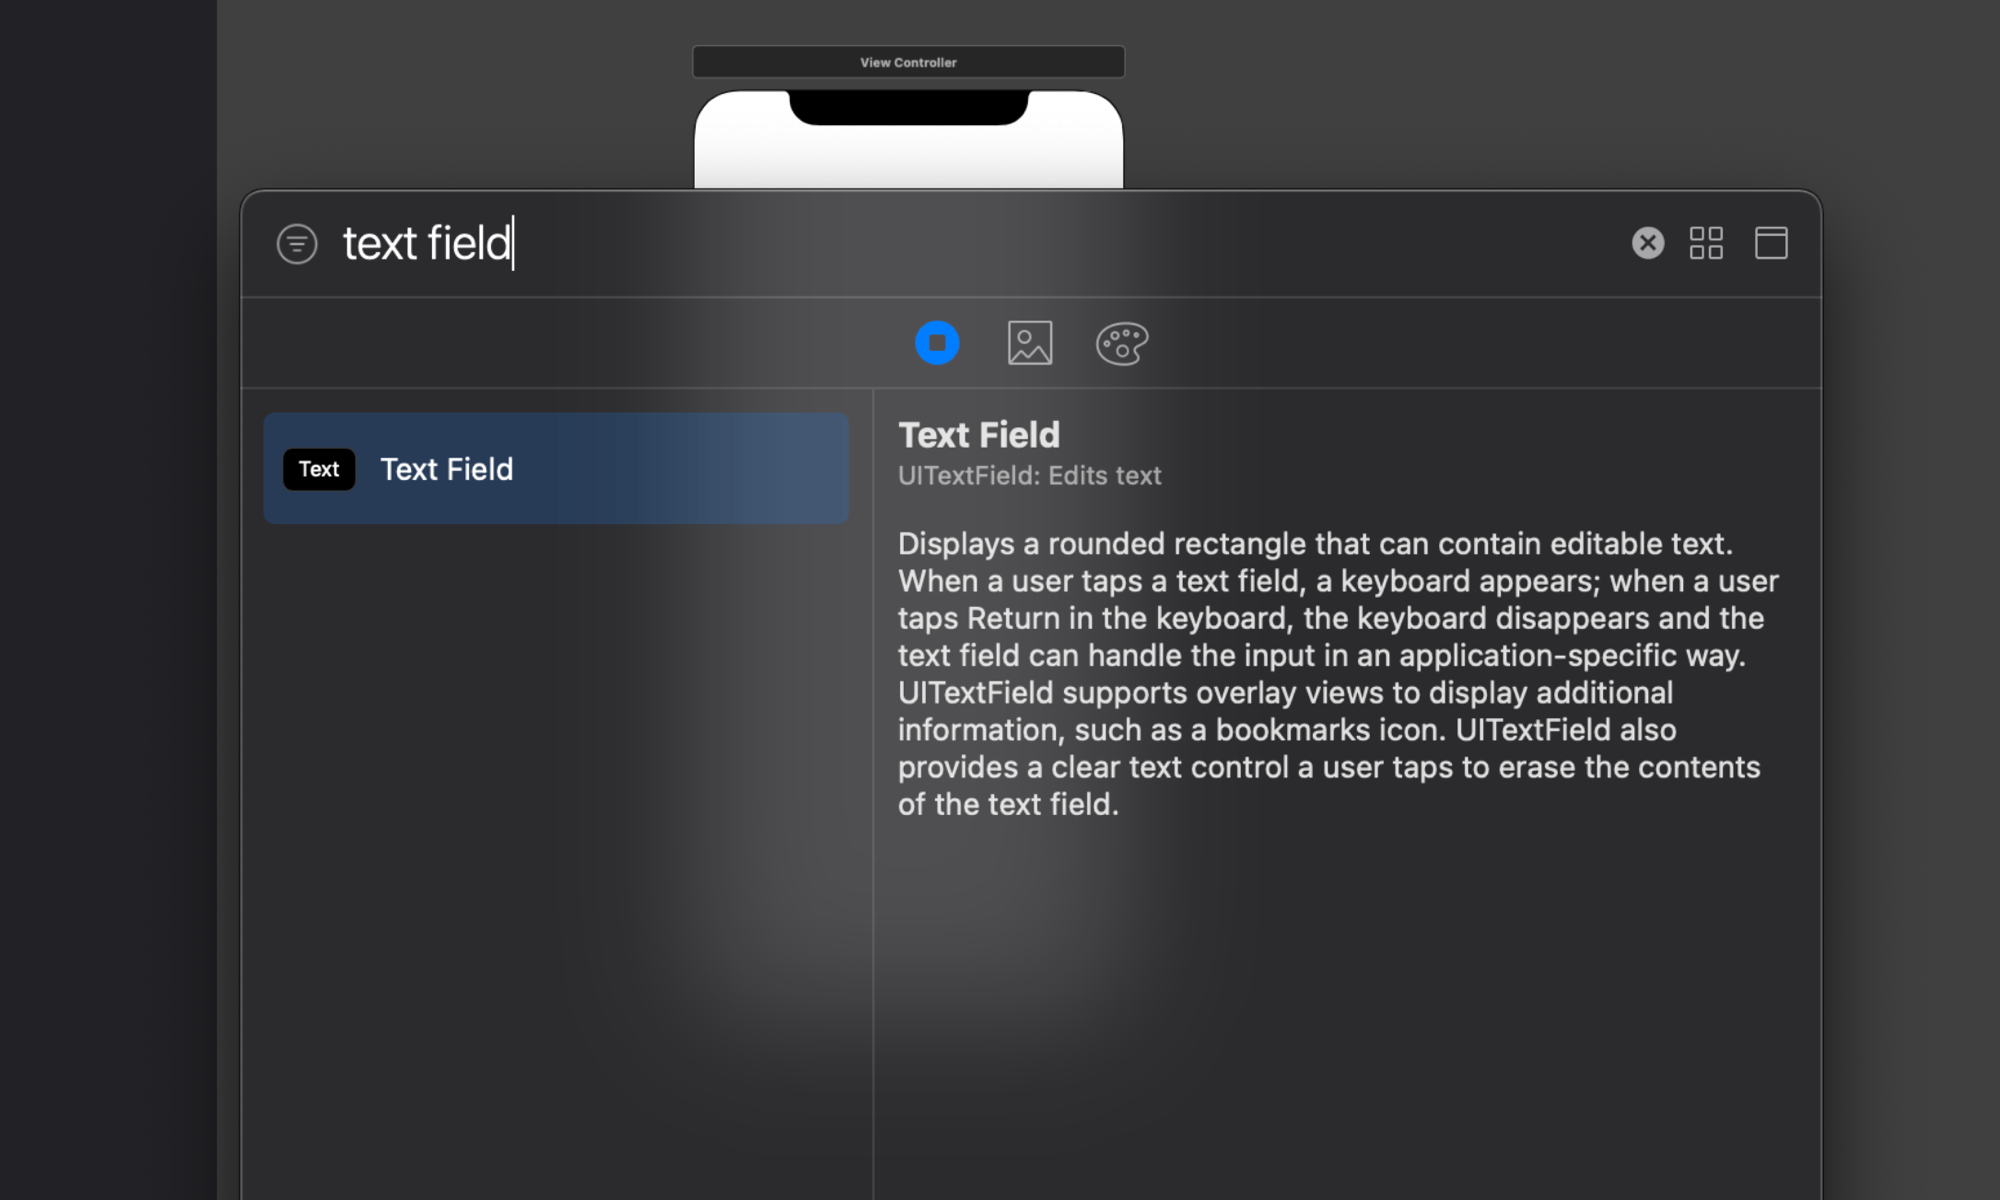
1. When you select the Main.storyboard file, you should see the View Controller Scene by default. Select the + icon in the top right and search for a Text Field. Drag it into the top center half of the view.
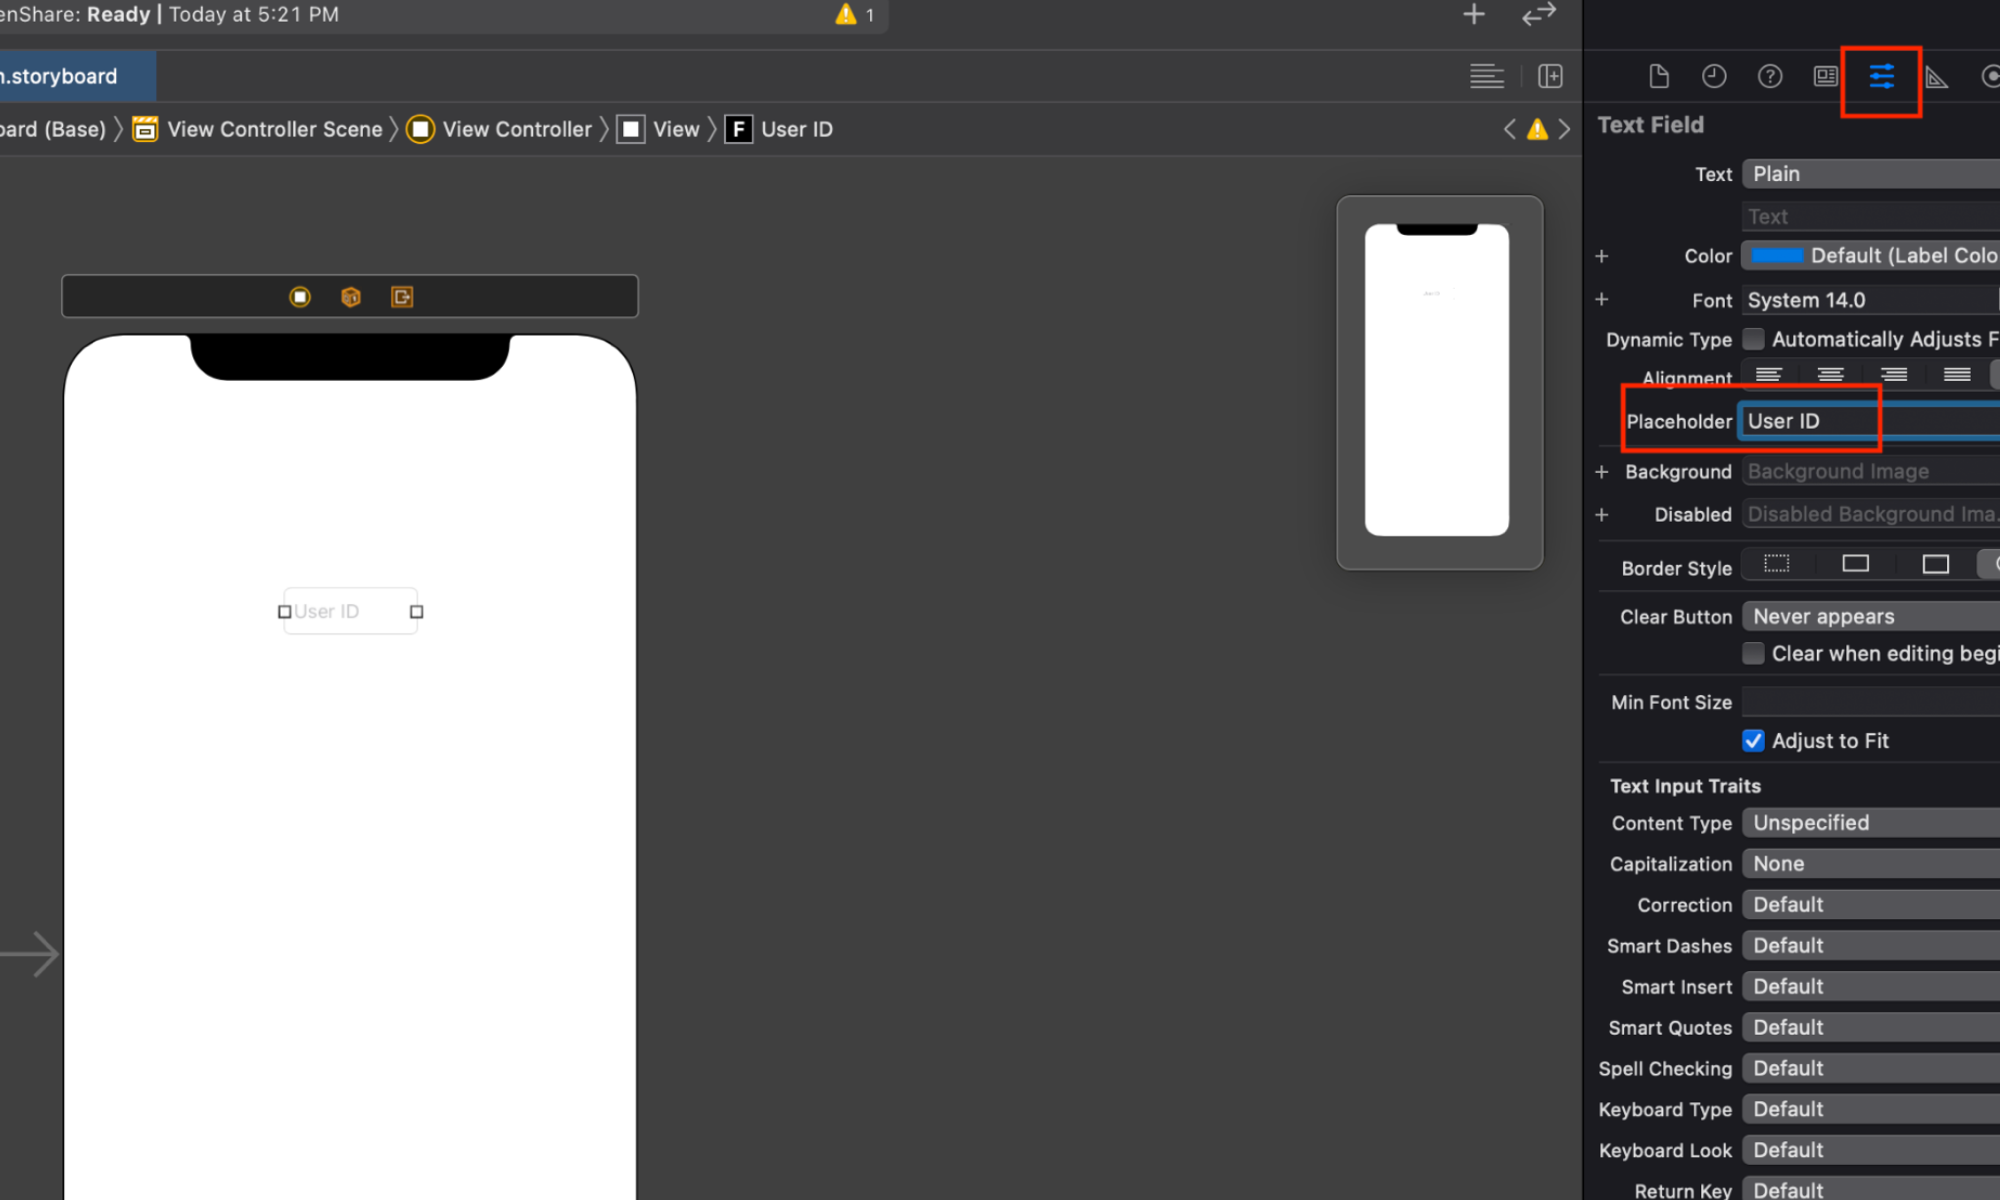
Open the Inspector to make an edit.

Show the Attributes inspector and edit the Placeholder to say ‘User ID’.
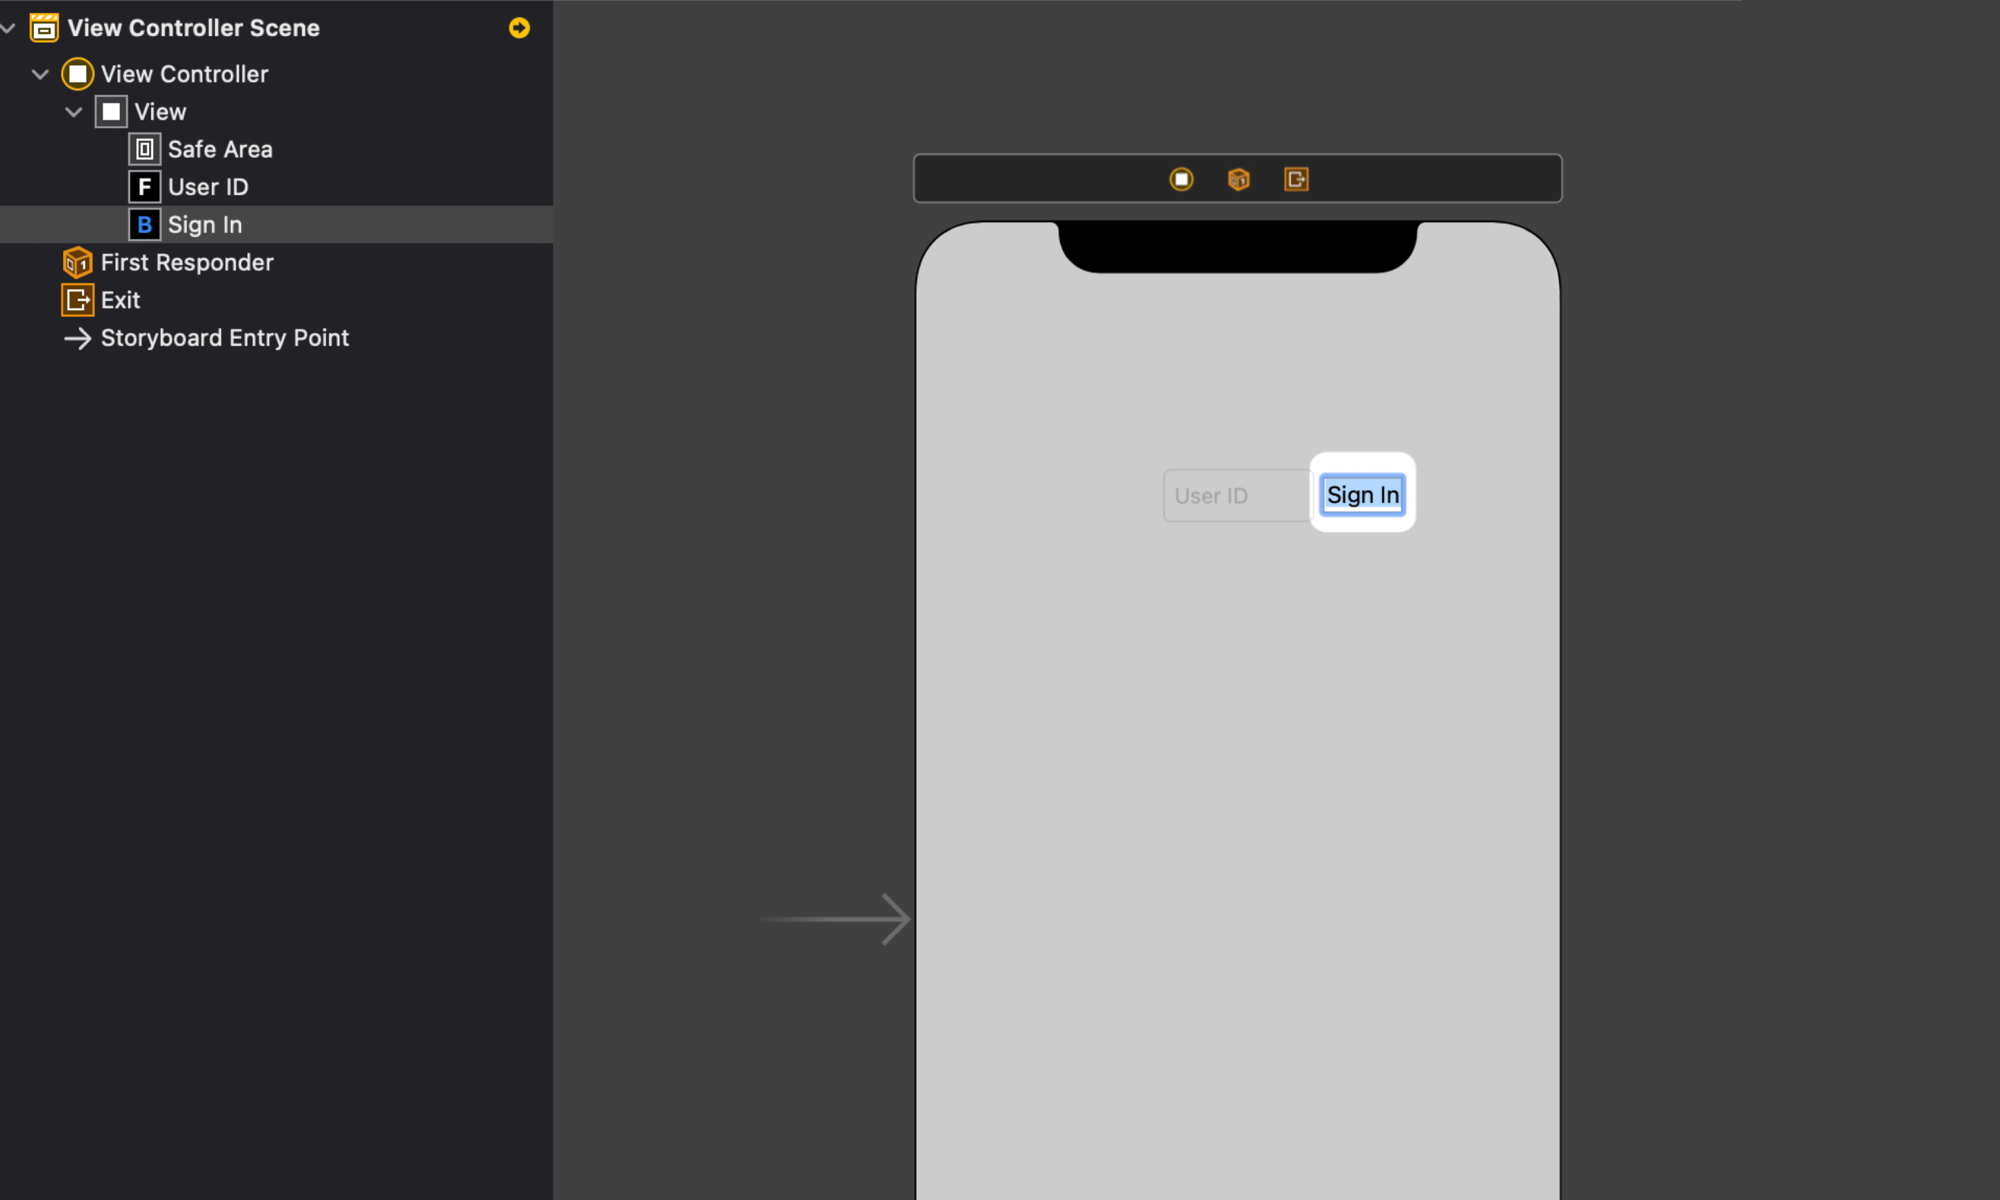
Select the + icon in the top right again and search for a Button. Drag the button onto the view, next to the text field. Double click the button to edit the text to say ‘Sign In’.
2. Next, we will edit the ViewController.swift class so that when a user ID is entered into the text field and the sign-in button is clicked, the user is authenticated with Sendbird Calls.
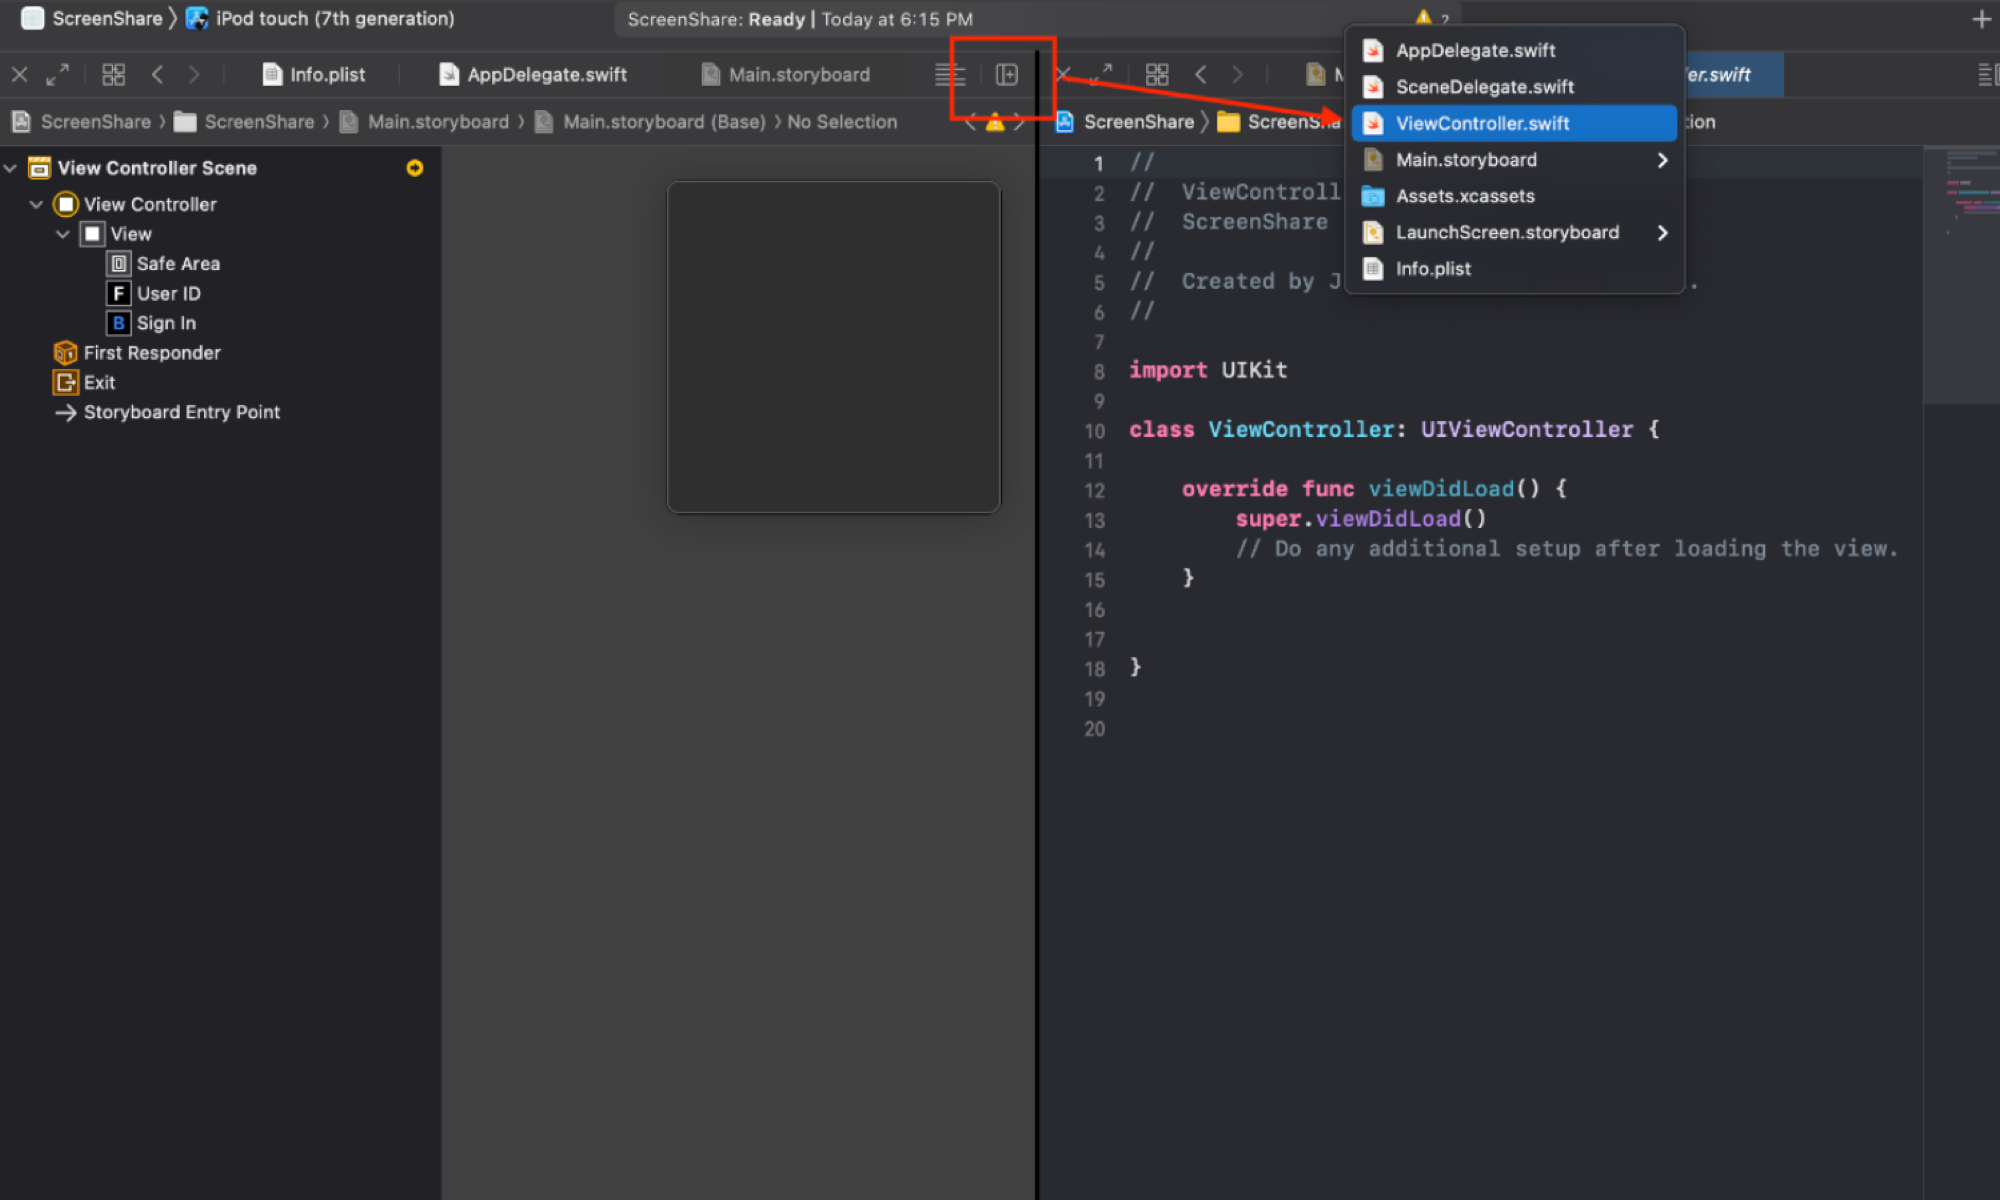
When looking at the Main.storyboard file, open an editor to the right (click on the square icon with the pipe | and plus + symbols). A second Main.storyboard will open. At the top, select the Main.storyboard option and select ViewController.swift to change files.
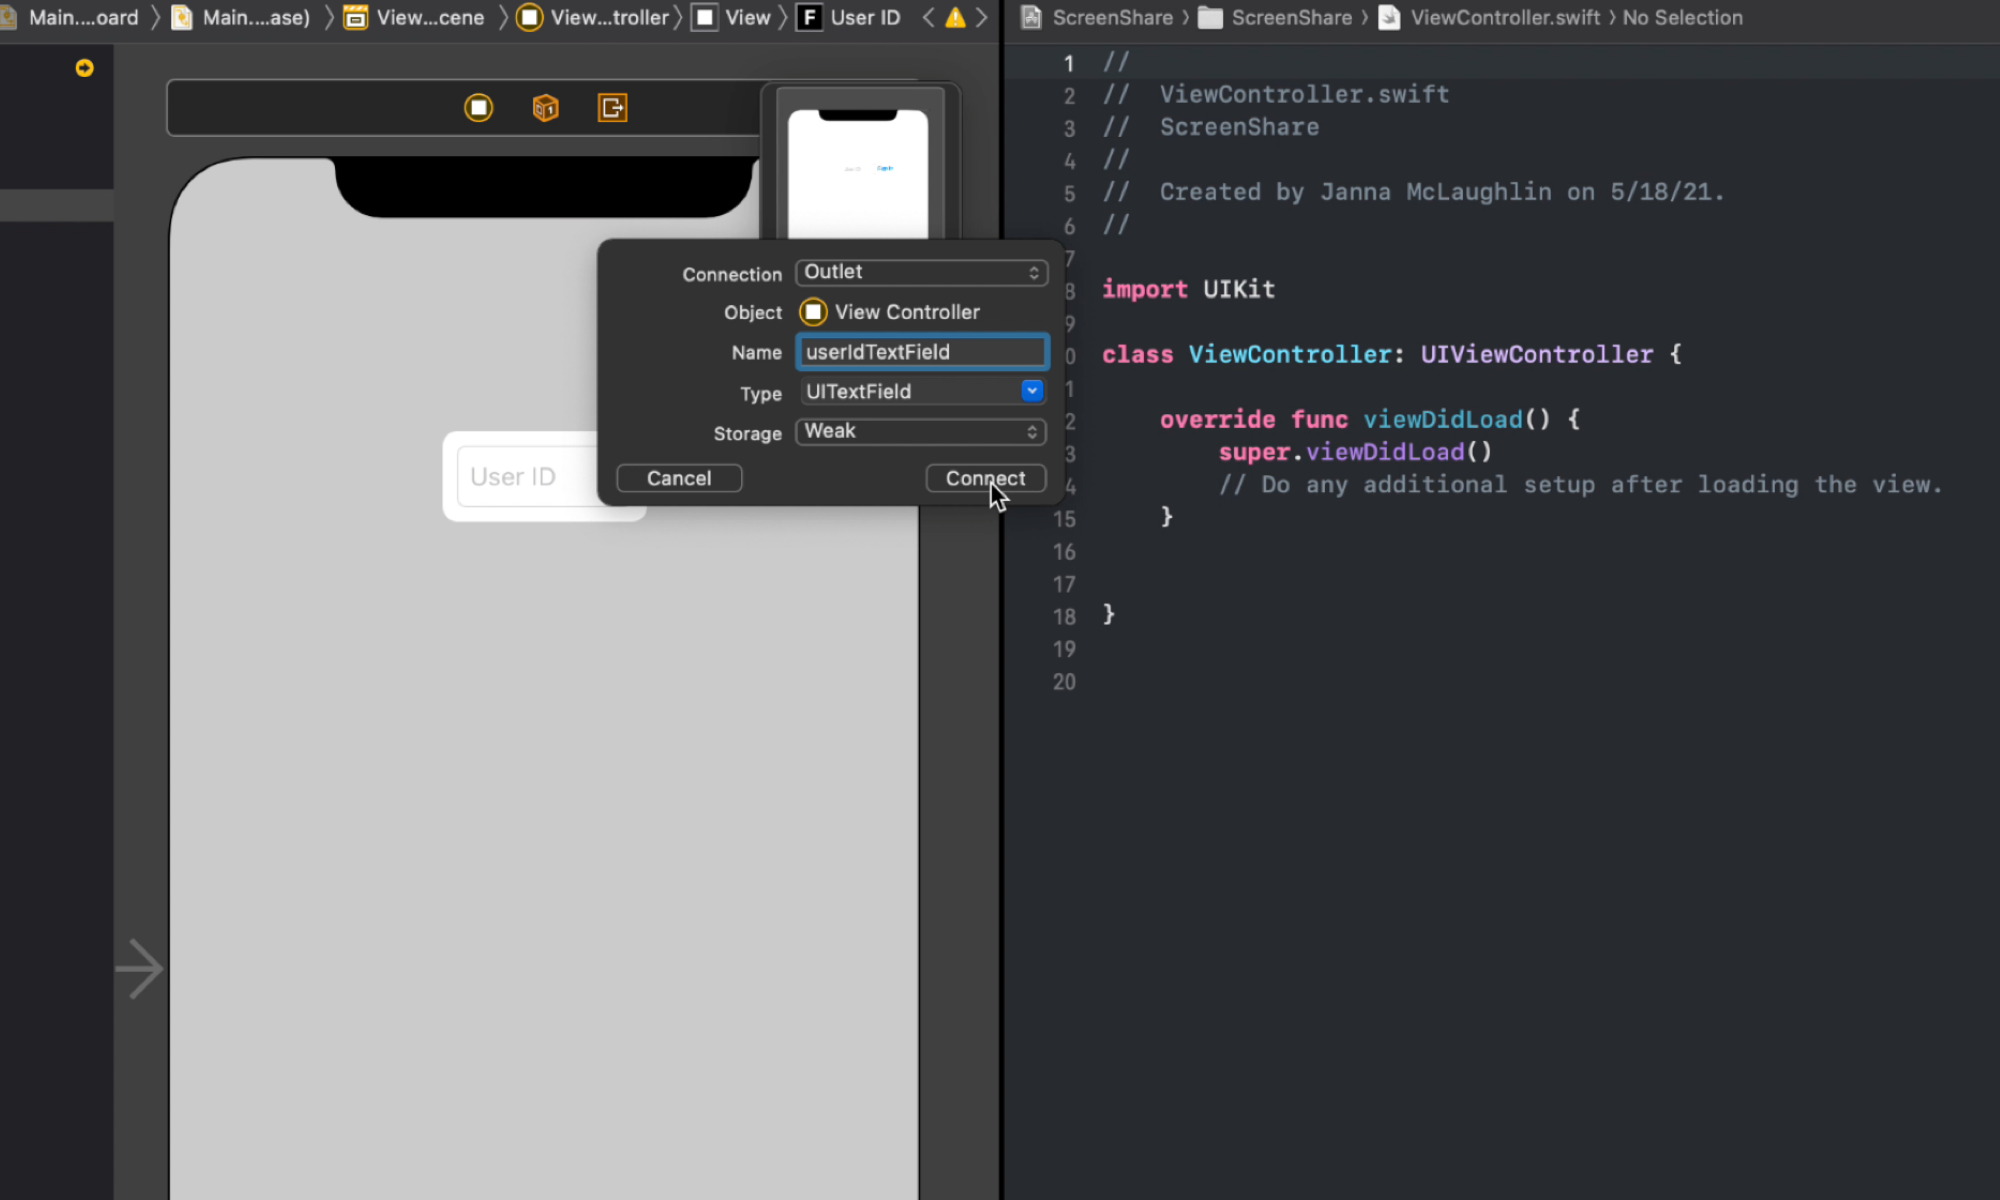
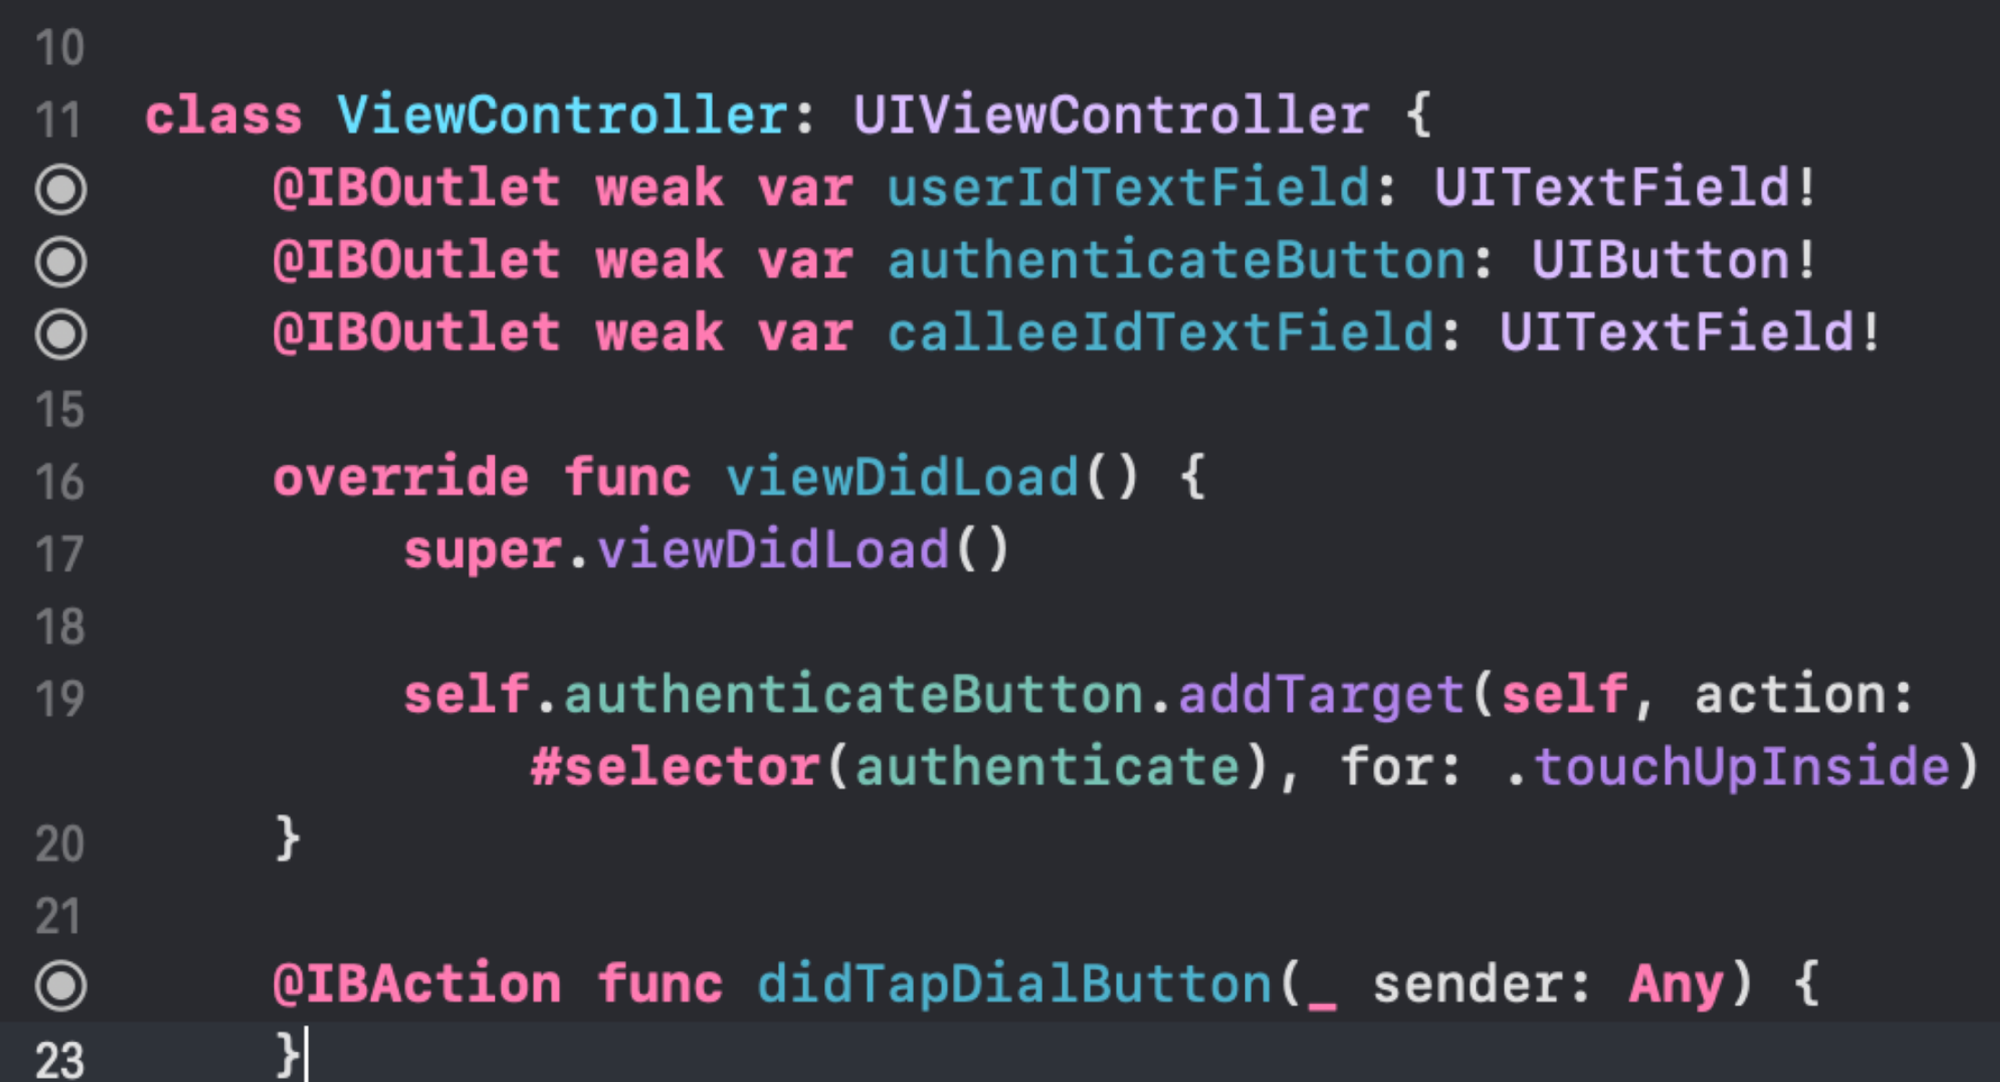
Next, we will add variables for the text field and button that is connected to the view.
- @IBOutlet weak var userIdTextField: UITextField!
- @IBOutlet weak var authenticateButton: UIButton!
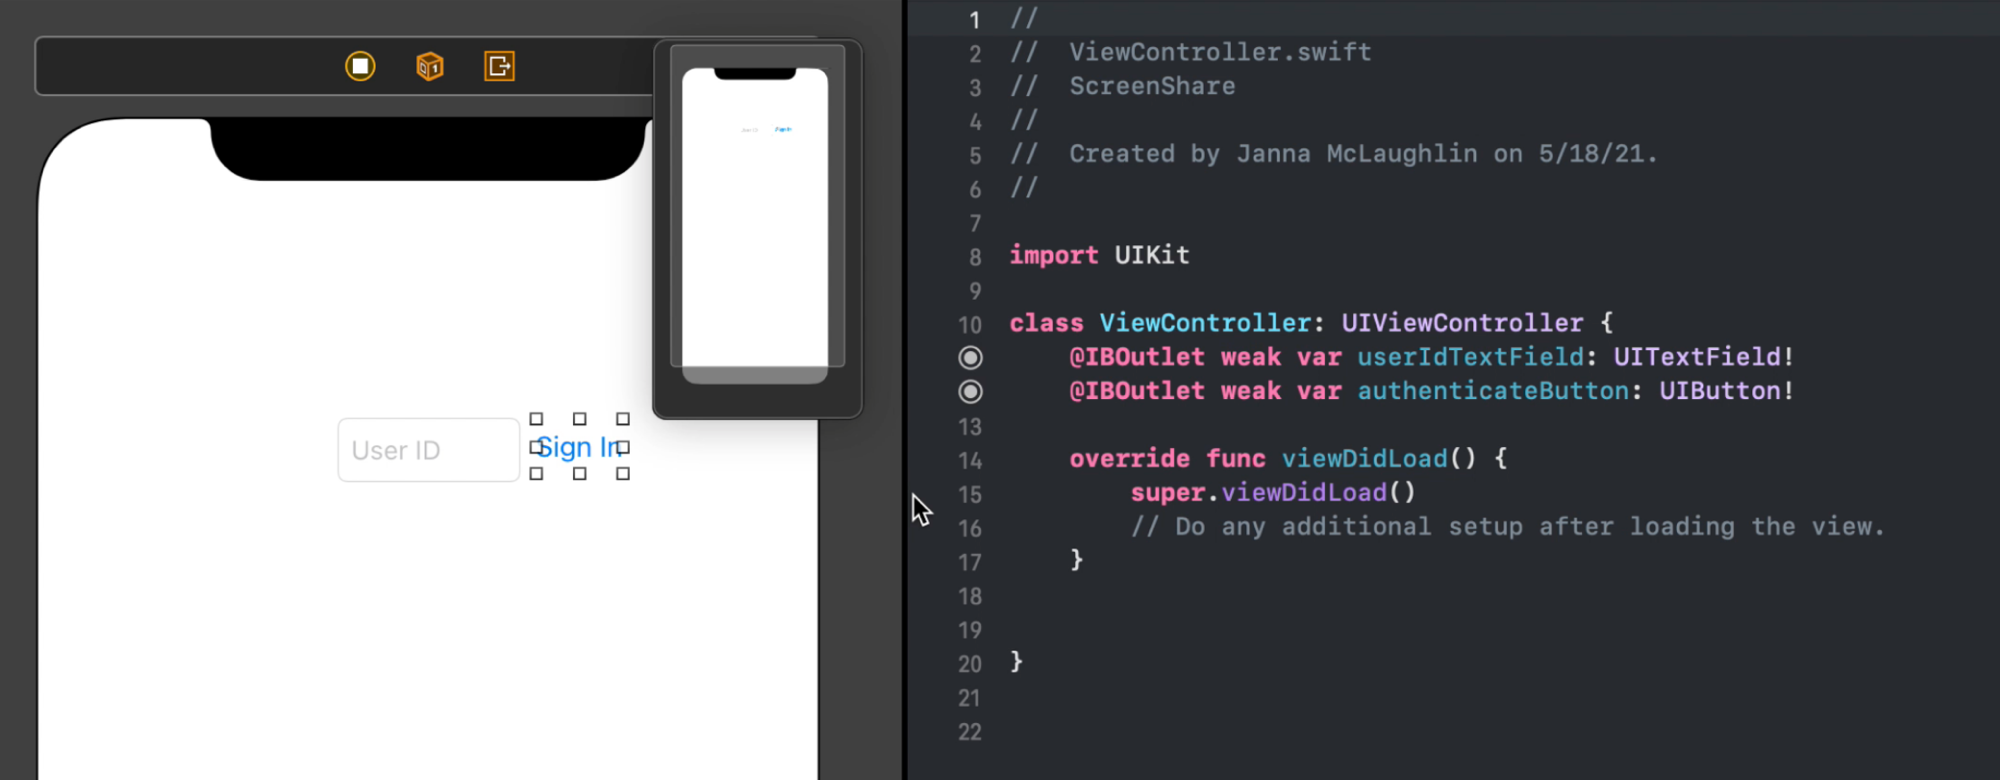
In the Main.storyboard on the left, control+click on the text field and drag your mouse to the ViewController.swift class to insert the IBOutlet variable. Name the text field ‘userIdTextField’ and click Connect.
Repeat the above step for the sign-in button and name it ‘authenticateButton’. You should now see two IBOutlet variables in the code.
In ViewController.swift, add an import to Sendbird Calls, override the viewDidLoad() method, and call a new authenticate() method for the user sign-in button when that button is selected. You can also choose to add a deauthenticate() method for user sign-out.
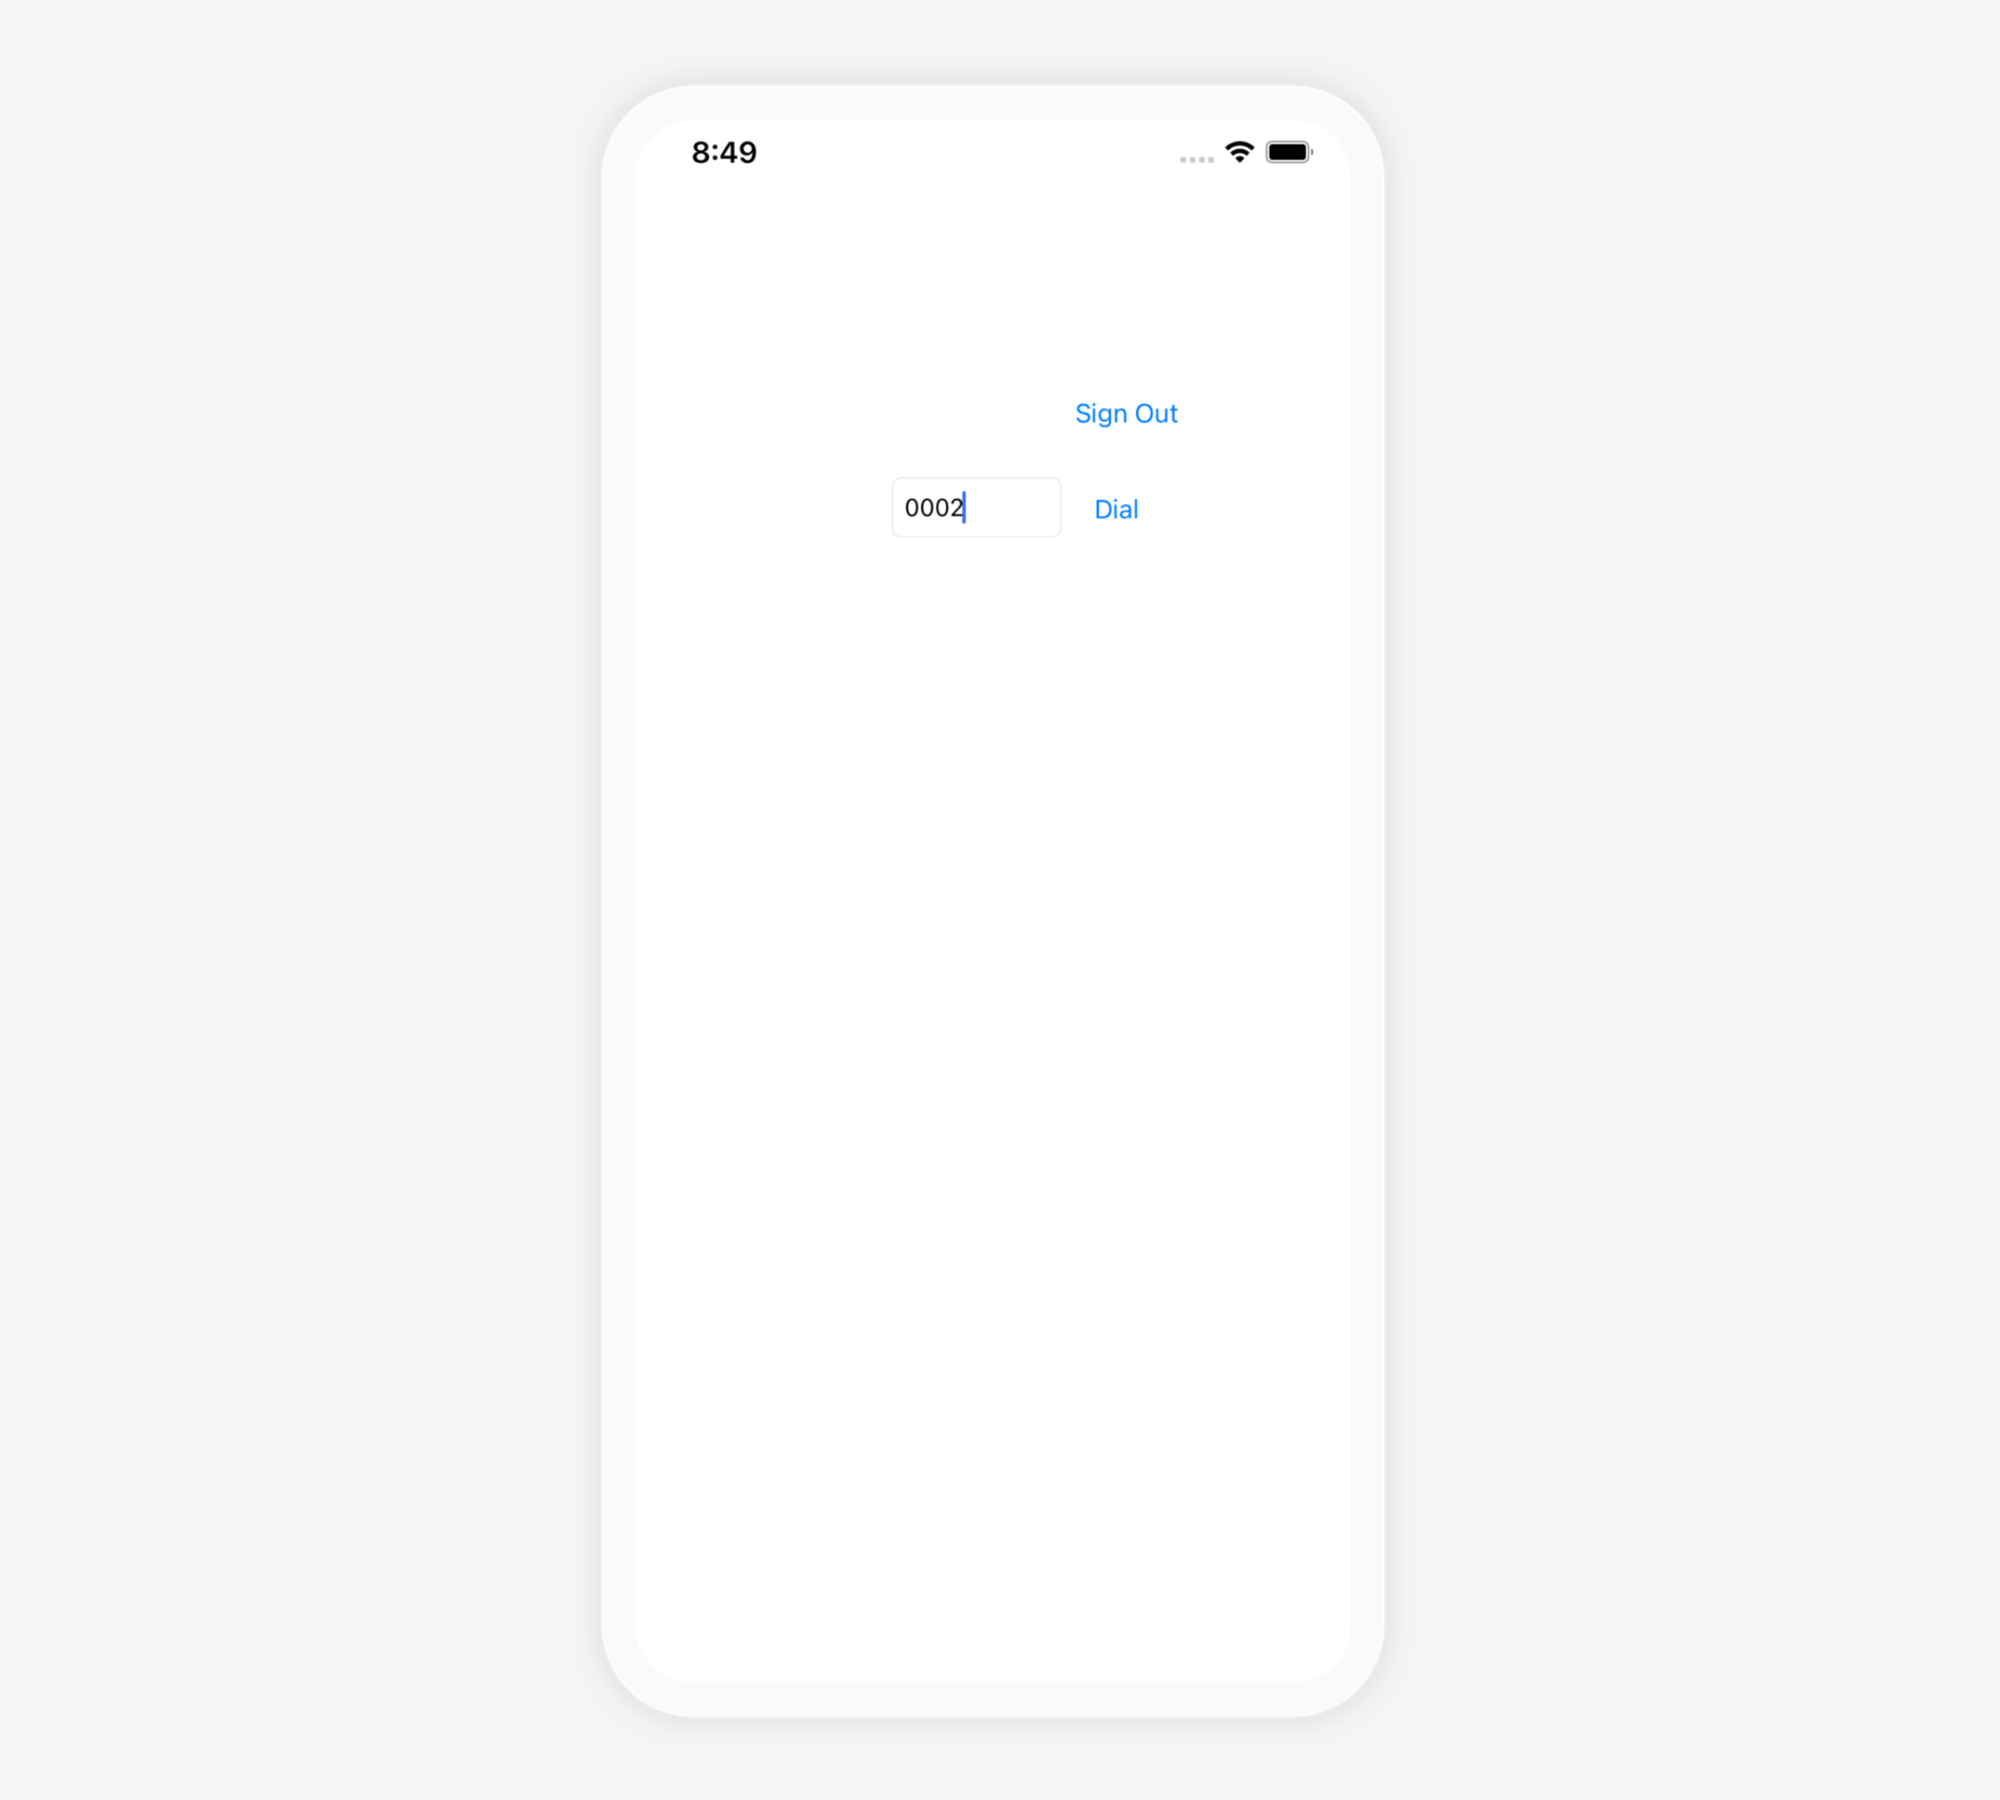
3. You should now be able to run the app and connect as your Sendbird Calls user (click the play button at the top to run). You should see the following screen:
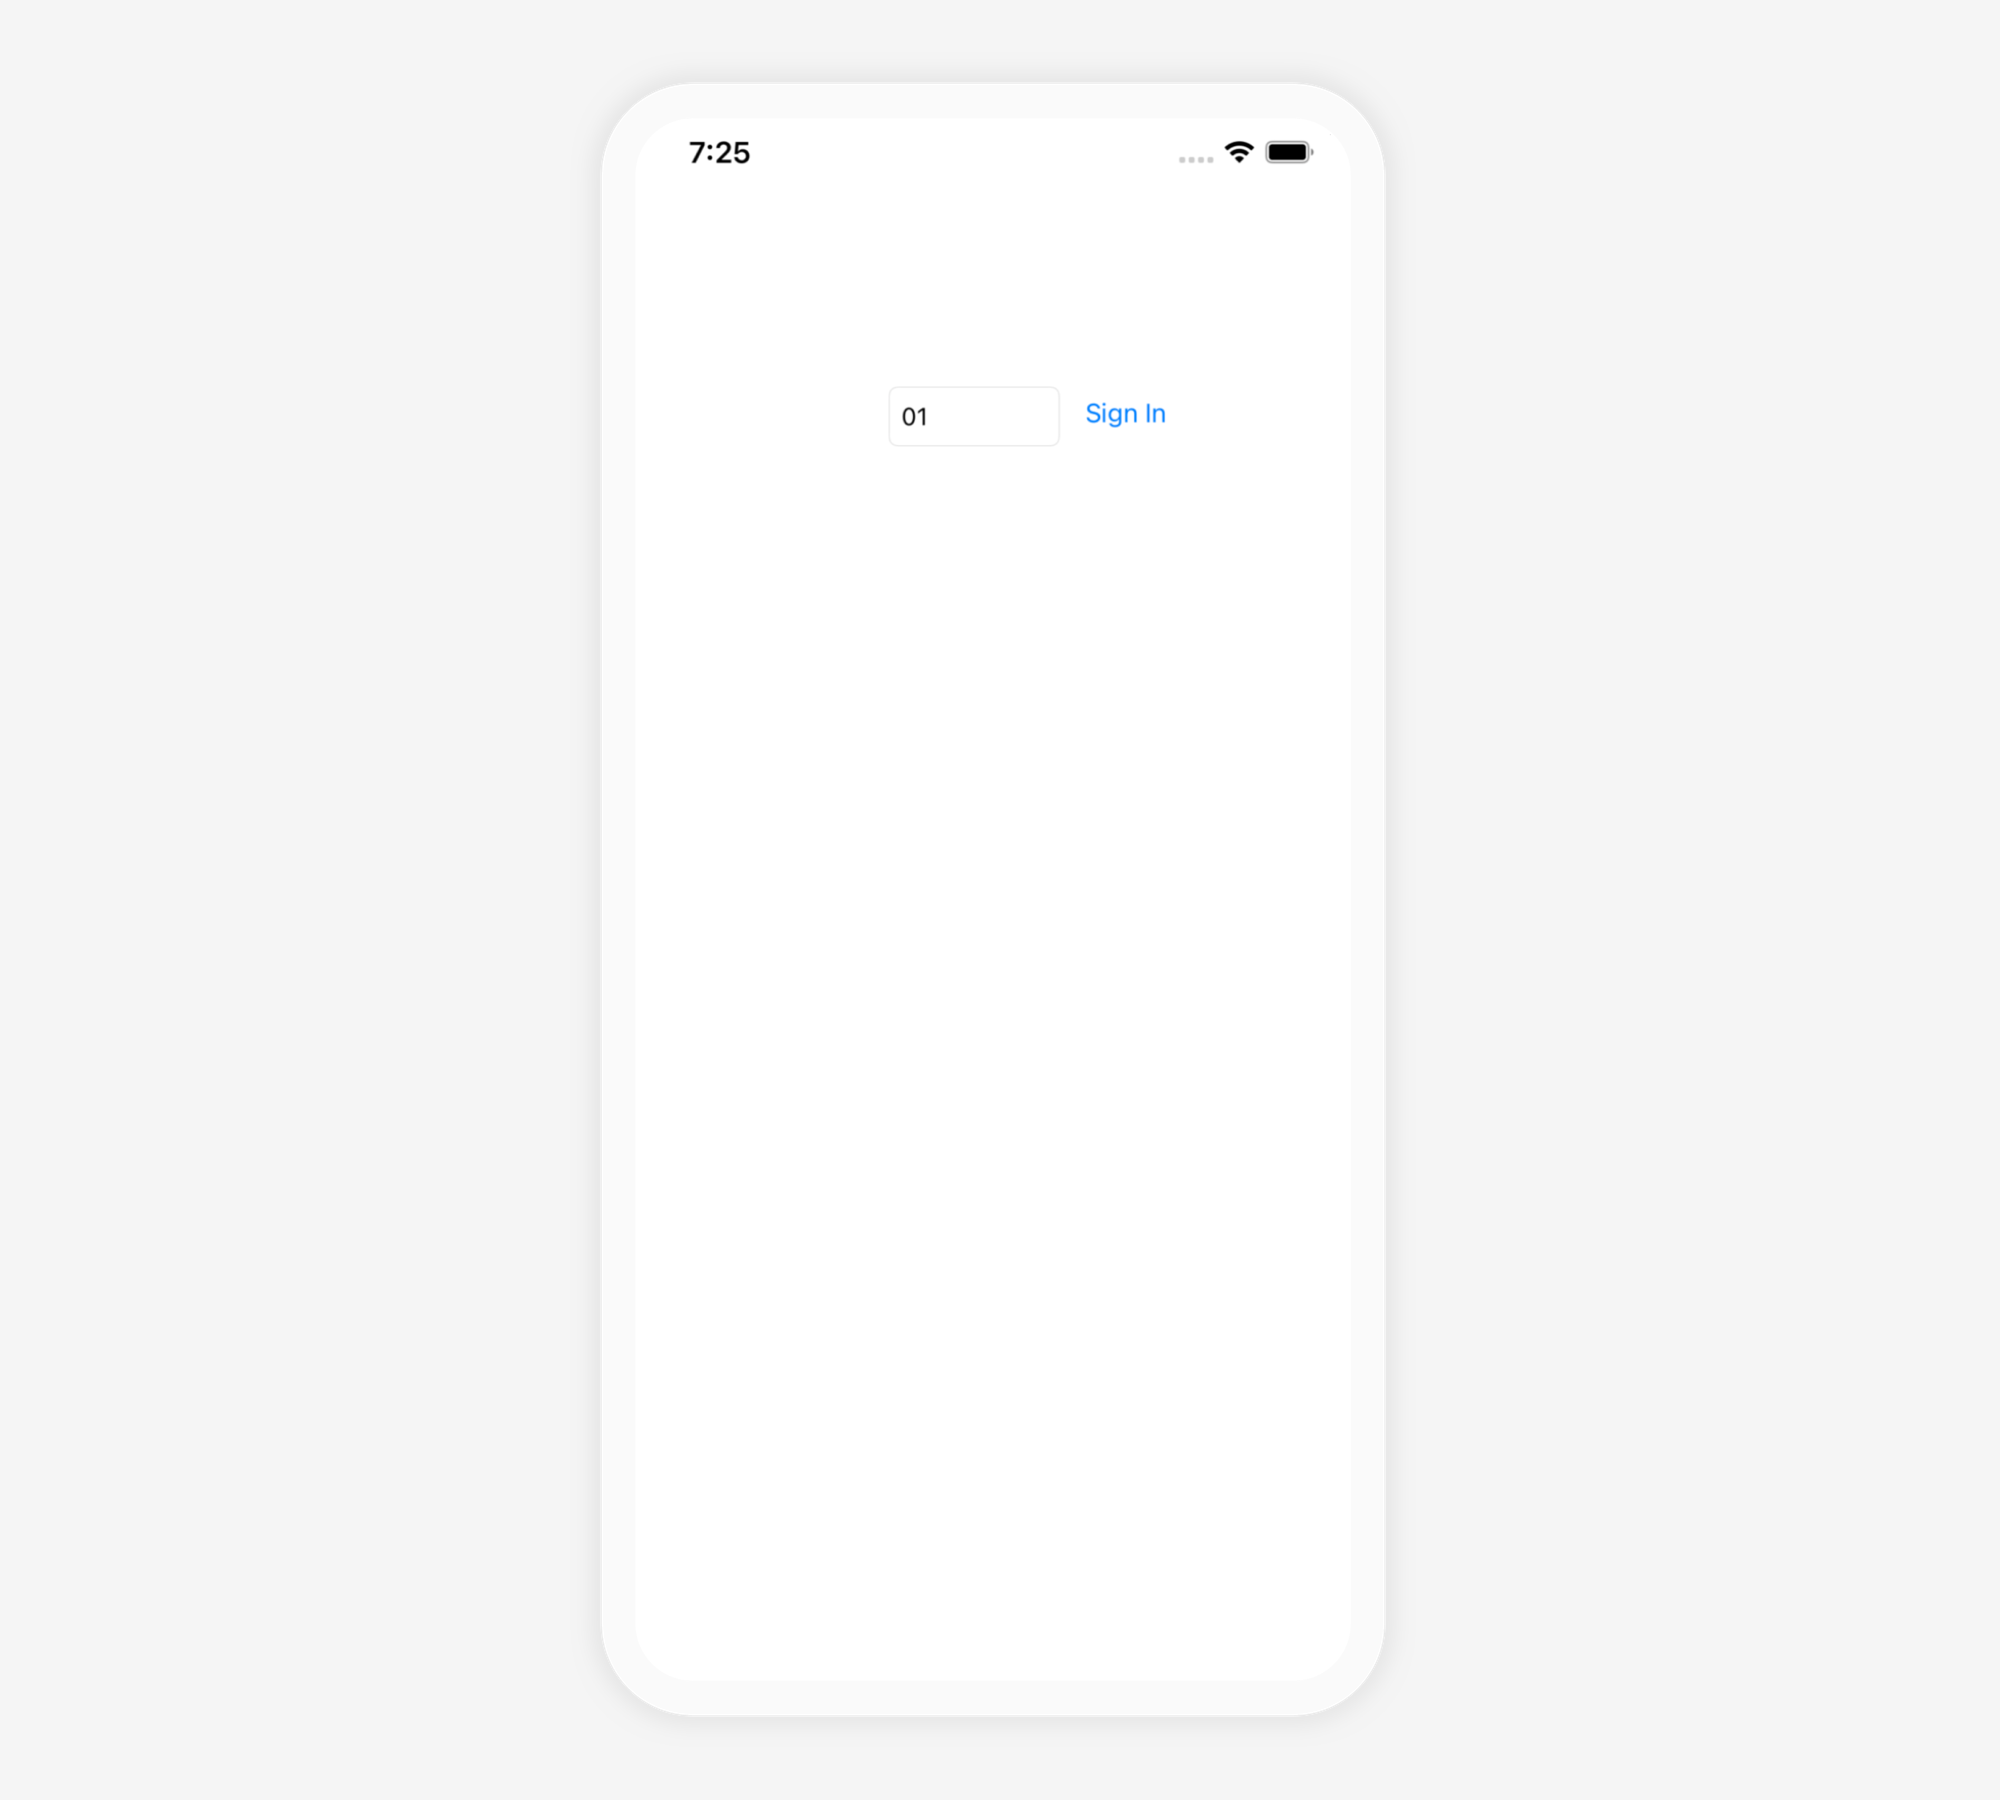
Enter your user ID and select the Sign In button to authenticate with Sendbird Calls for your app.
Step 3. Make a call
Before screen sharing, you need to have a connected call. To do this, we need to enter a callee’s user ID, dial the callee, and create a new CallingViewController.swift class to show the call UI. We also need to set the video view and handle call actions.
1. In Main.storyboard, add a new text field to specify the callee’s user ID as well as a dial button underneath the user ID text field. Use the sign in button that we created earlier.
2. When looking at the Main.storyboard file, open an editor to the right and navigate to ViewController.swift. Like earlier in this tutorial, control+click the callee text field and drag it to the ViewController.swift to create the IBOutlet variable. Name the text field calleeIdTextField.
Control+click the dial button and drag it to the ViewController.swift. This time, change the connection type to Action (instead of Outlet like before) and name it didTapDialButton to create a new function.
You should see the new text field and function in the code:
3. Next, let’s create the new CallingViewController UI. In Main.storyboard, click the + icon at the top right and search for ‘View Controller’. Select the new view controller in the scene, select the ‘Show the Identity Inspector’ icon in the Inspector on the right. Name the class ‘CallingViewController’.
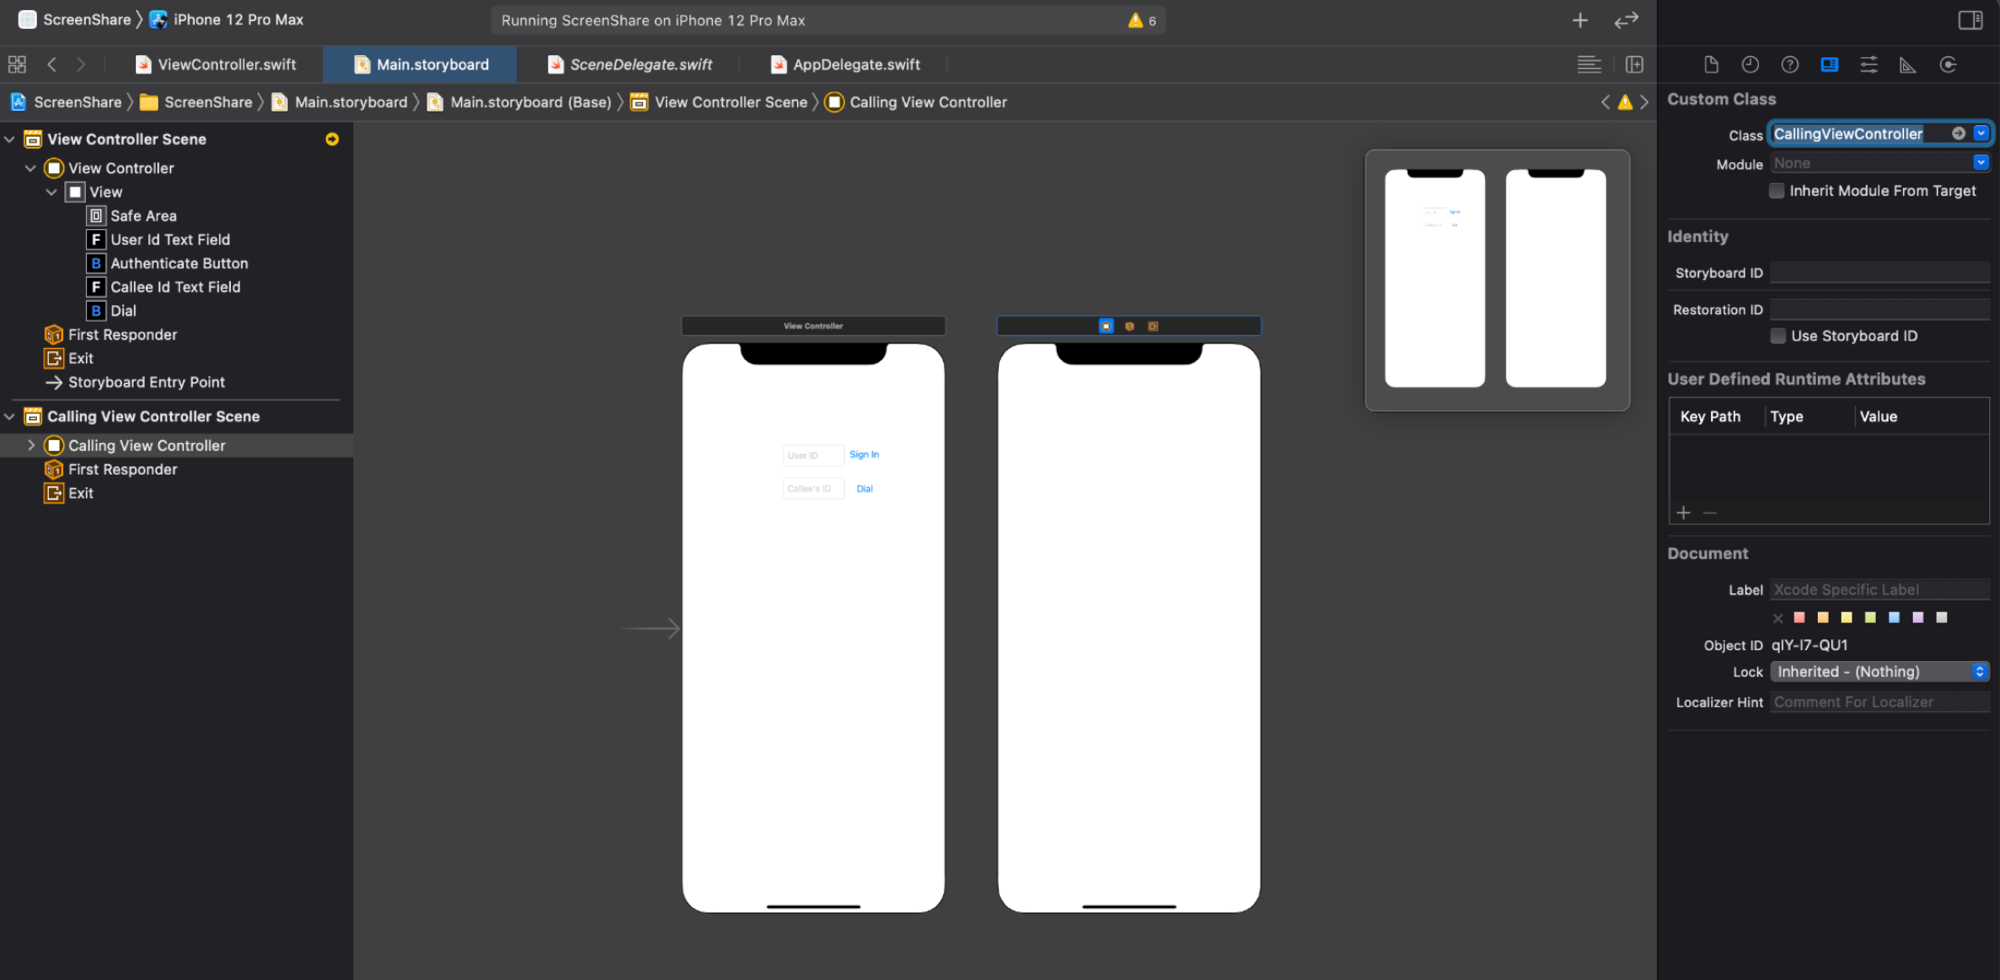
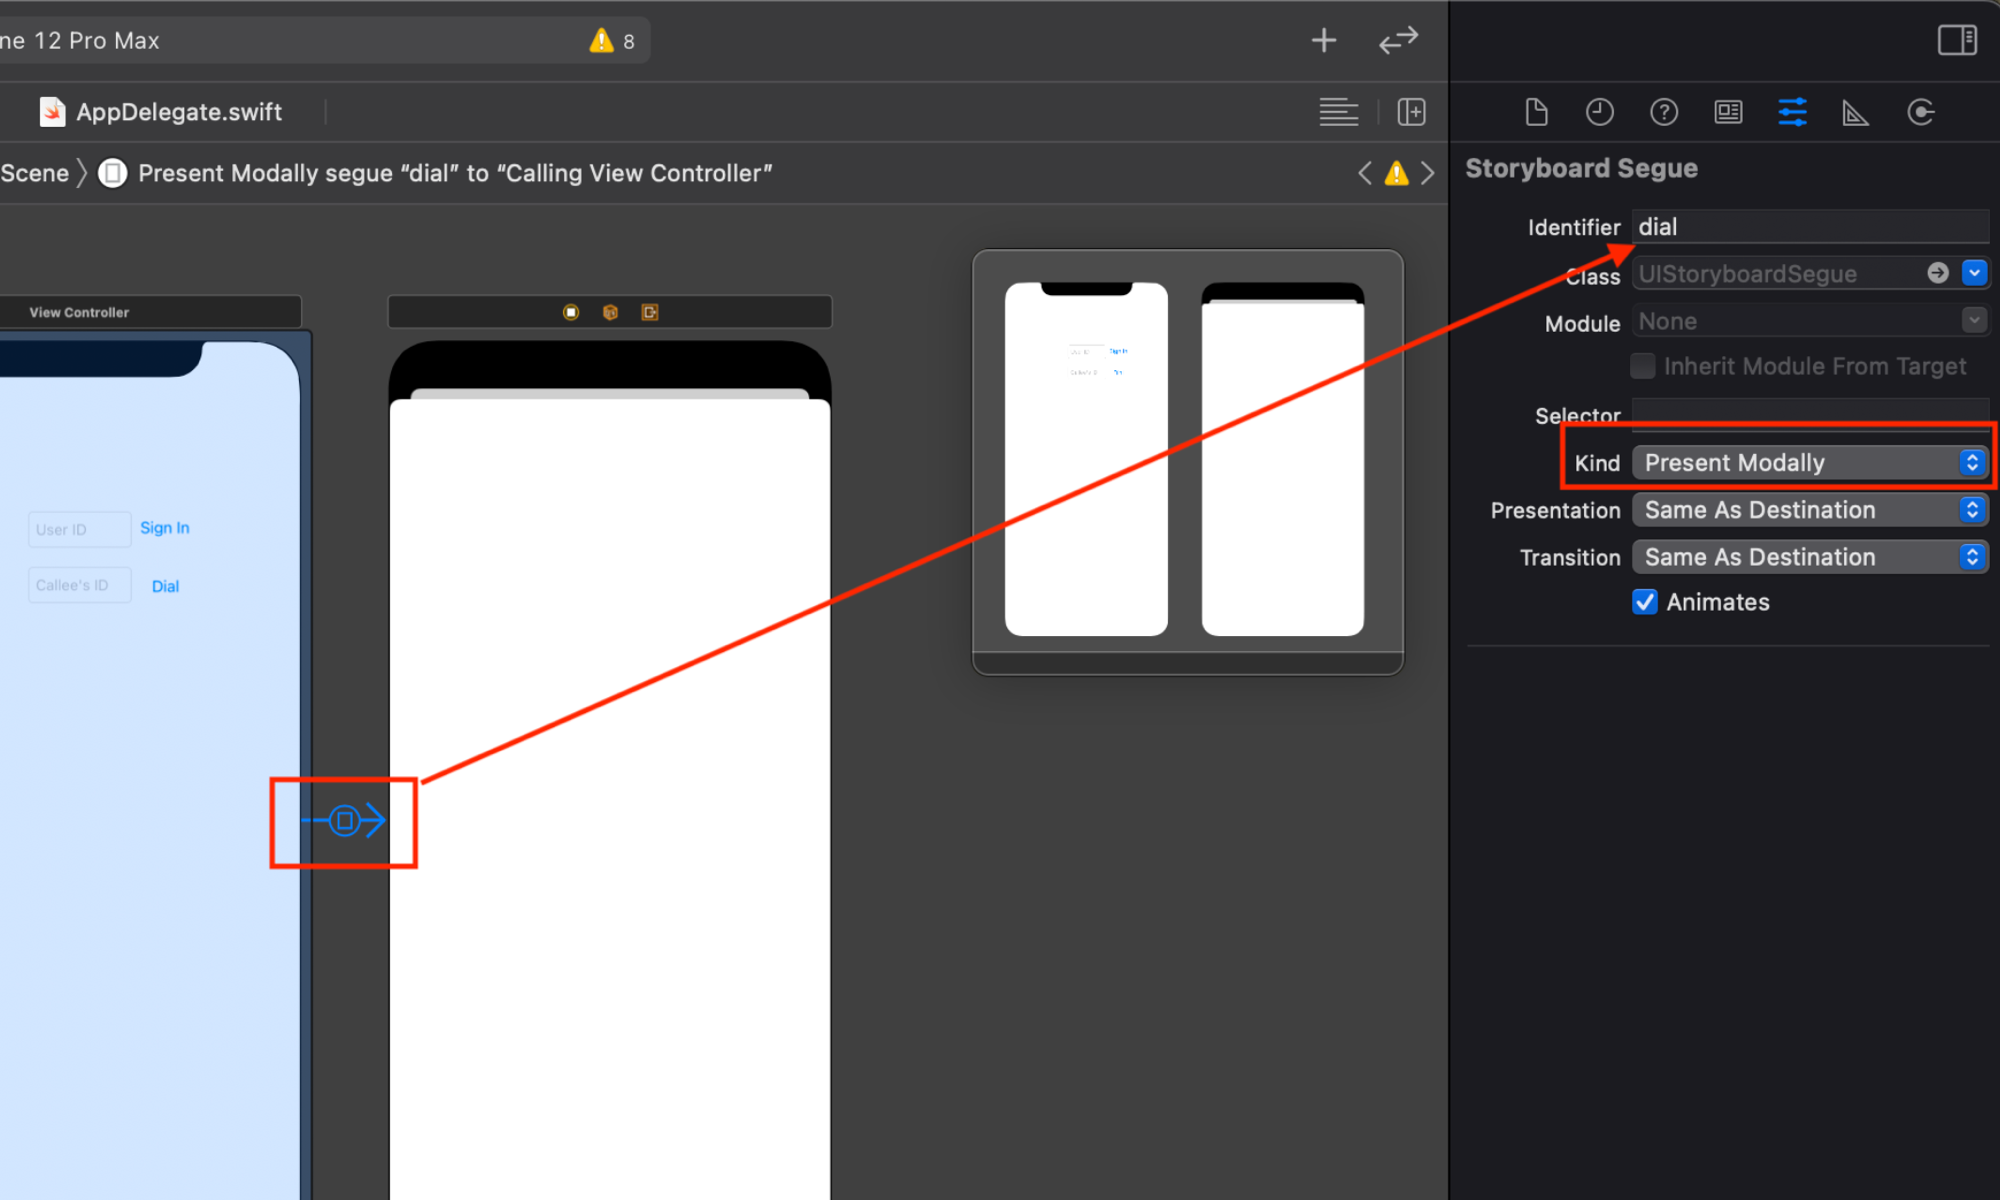
Ctrl+click on the View Controller from the left column and drag your mouse over the Calling View Controller. Under Manuel Segue, select the ‘Present Modally’ option.
Click on the new segue, and then click the ‘Show the Attributes inspector’ icon in the Inspector on the right. Set the Identifier to ‘dial’. The Kind should say ‘Present Modally’.
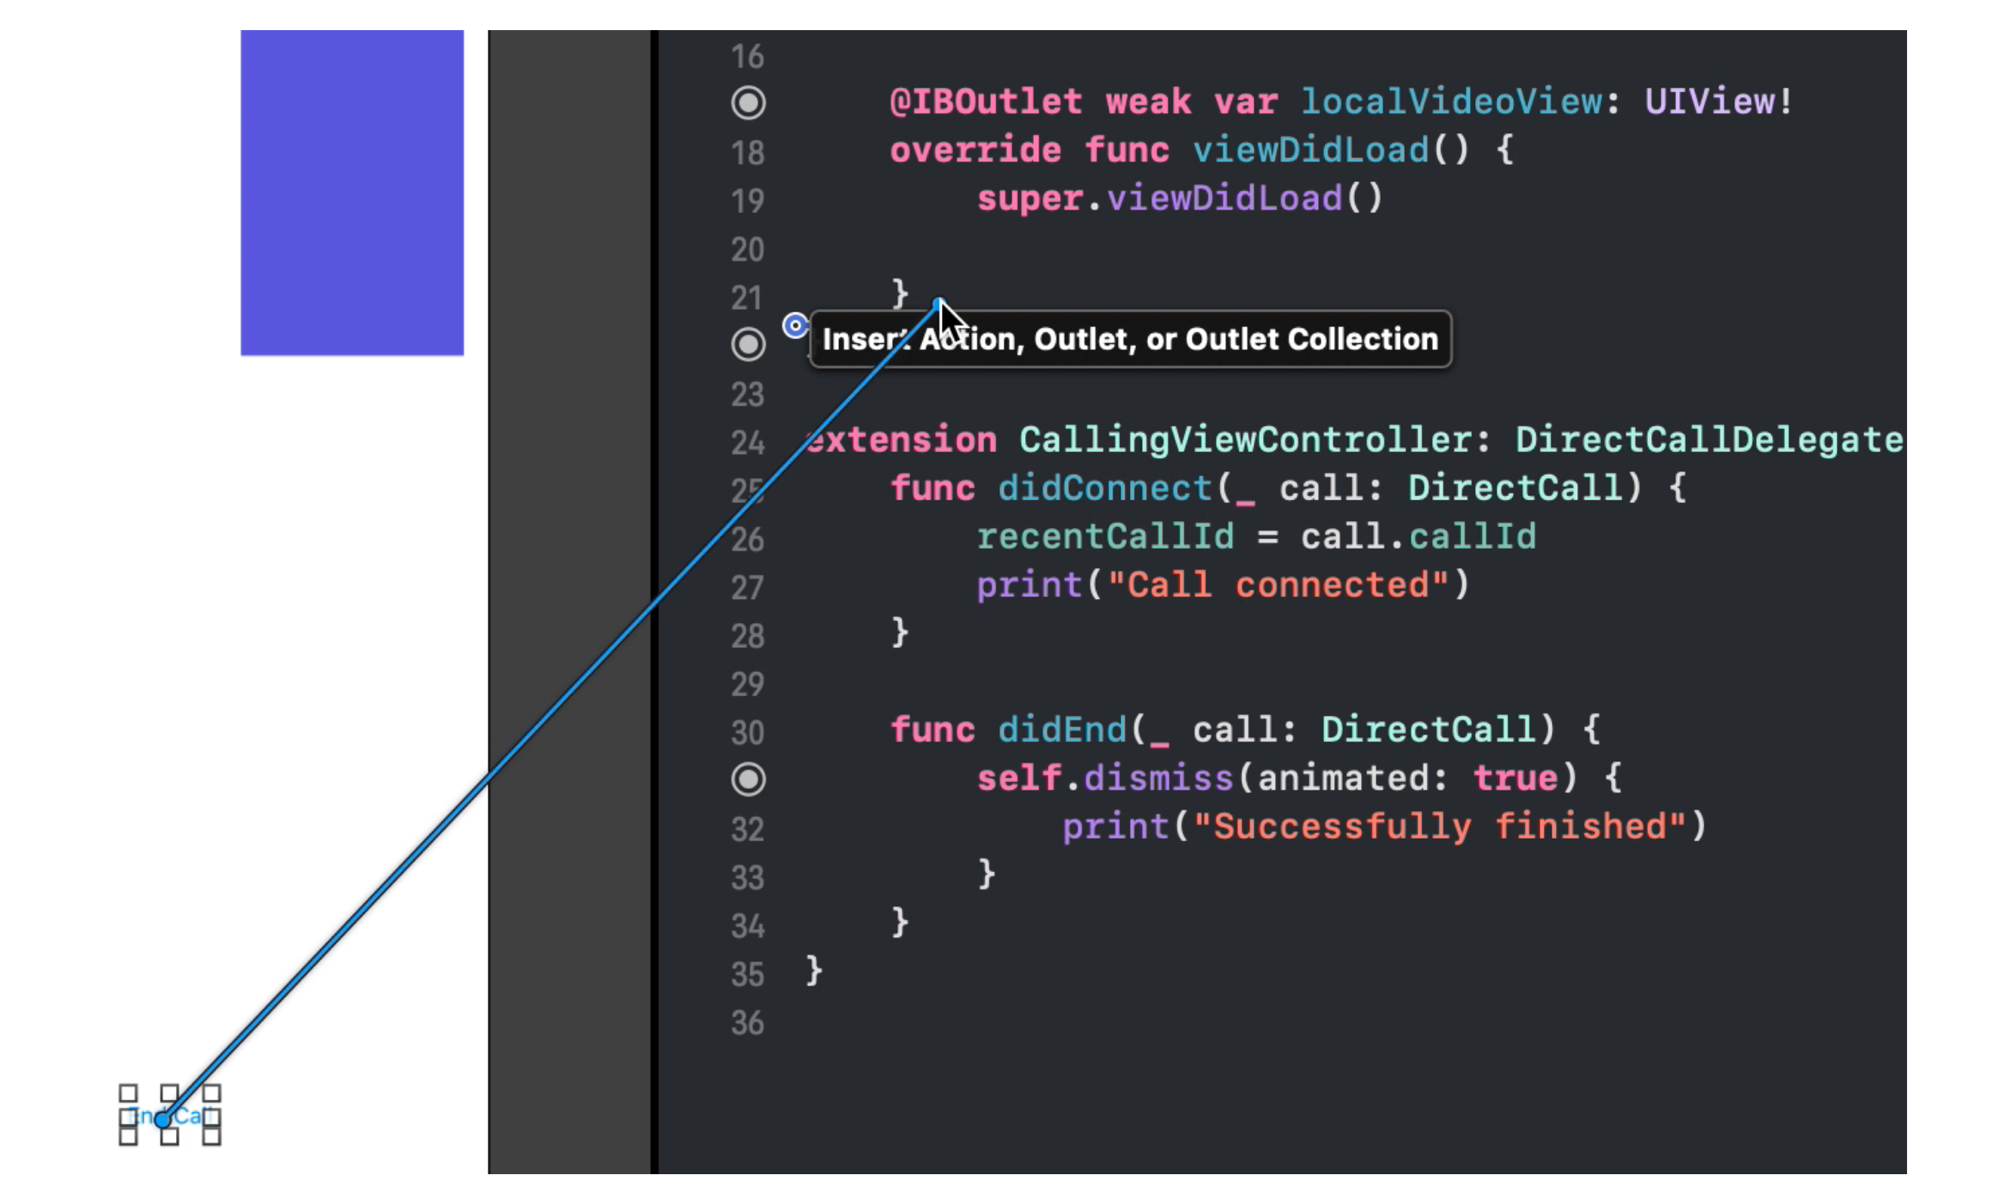
4. Create the CallingViewController.swift class and extend the UIViewController class. You can right-click on the project folder on the left side and select ‘New file…’ to make this new Swift file. Import Sendbird Calls and add a recentCallId empty string variable to track the call later. Now add a call variable that is of type DirectCall and override the viewDidLoad() method.
5. Next, add an extension to the CallingViewController. This implements the DirectCallDelegate, didConnect(_ call: DirectCall),and didEnd(_ call: DirectCall) methods. In the didConnect method, add set recentCallId = call.callId. In the didEnd method, add a call to self.dismiss(animated: true) { }.
Use this code as a reference for the CallingViewController.swift:
6. Open ViewController.swift. We will add the prepare(for segue: UIStoryboardSegue, sender: Any?) method. We will also update the didTapDialButton(_ sender: Any) method so that when the Dial button is clicked in the View Controller, the UI will transition to the Calling View Controller. We will also add code to dial the call and pass the call object from the View Controller to the Calling View Controller.
Your code should now look like this:
7. Now, you can run the app again. This time, sign in as a different user. Enter the first user’s user ID in the callee’s ID text field and select the Dial button. This will open up the new Calling View Controller and place a call to that user.
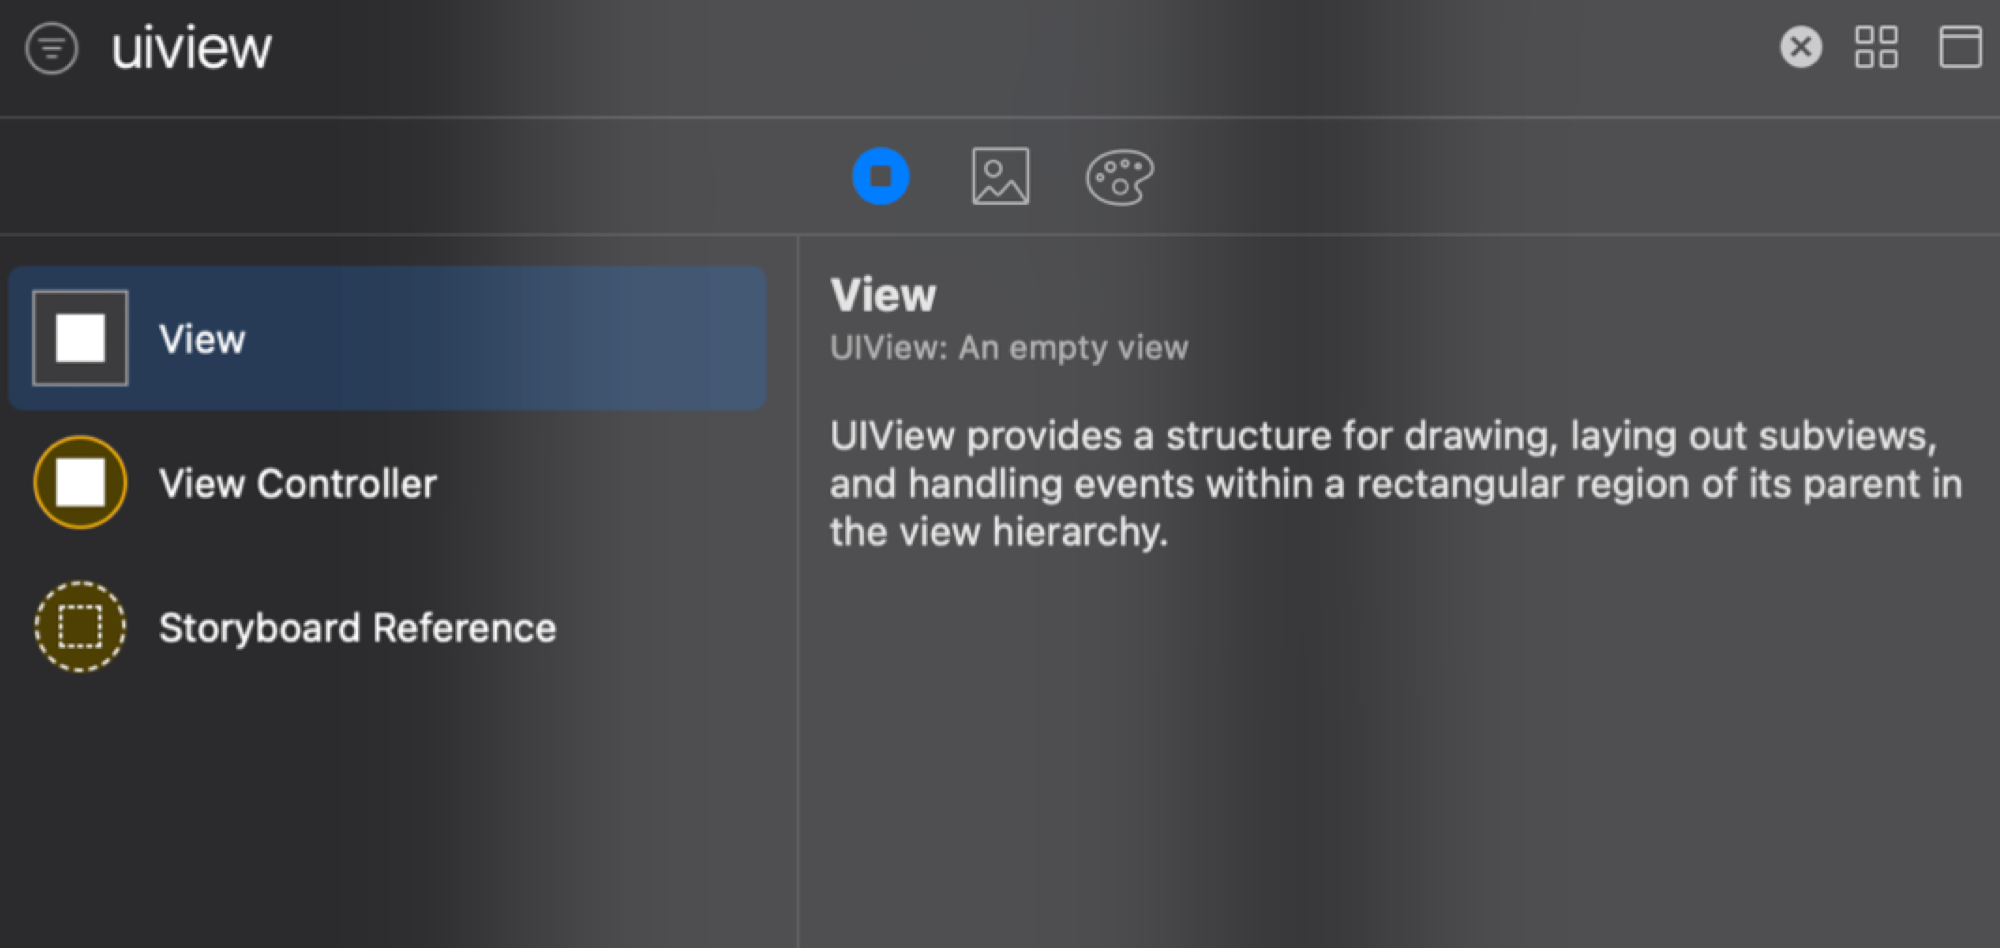
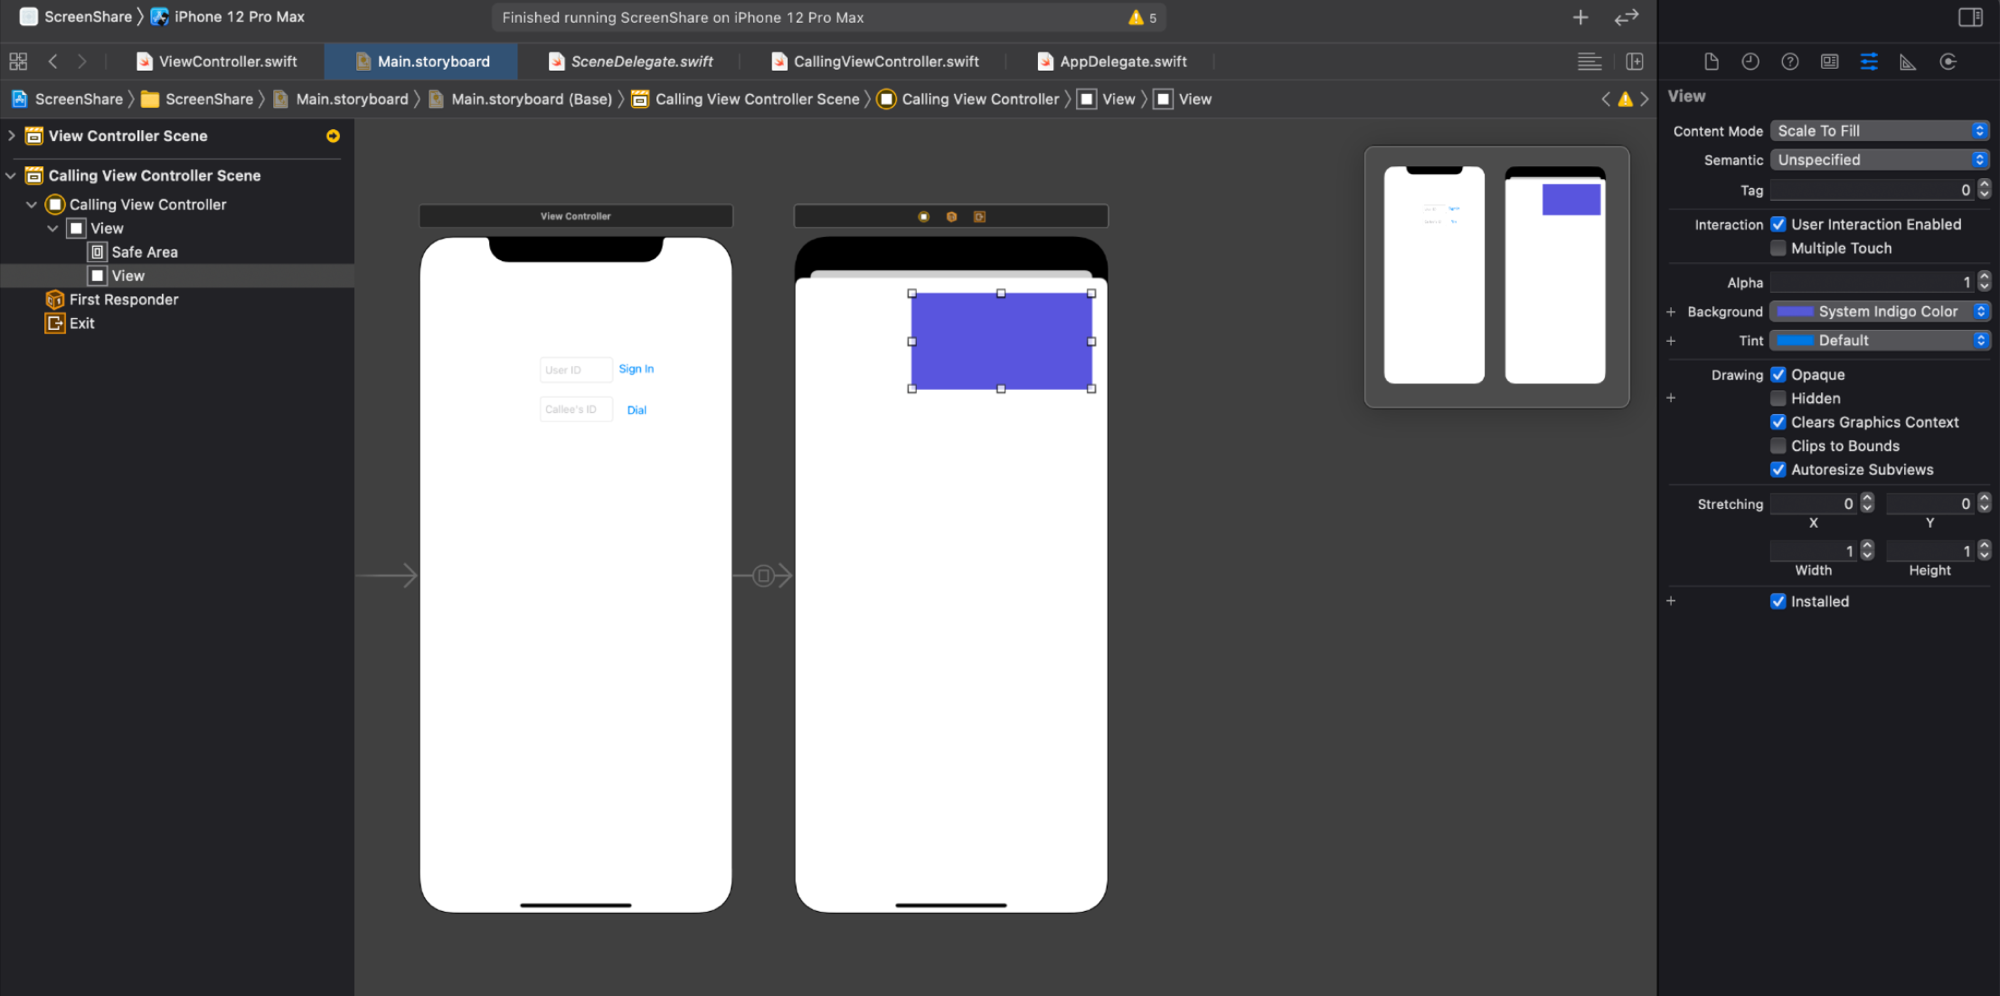
8. Finally, let’s update our Calling View Controller UI to support video and ending the call. In Main.storyboard, click the + icon to search for ‘uiview’ to find the ‘View’ object.
Drag and drop the View onto the Calling View Controller in the top right corner. Rename the view to ‘Local Video View’.'
In the Attributes inspector to the right, you can adjust the Background color to see the view more easily when editing.
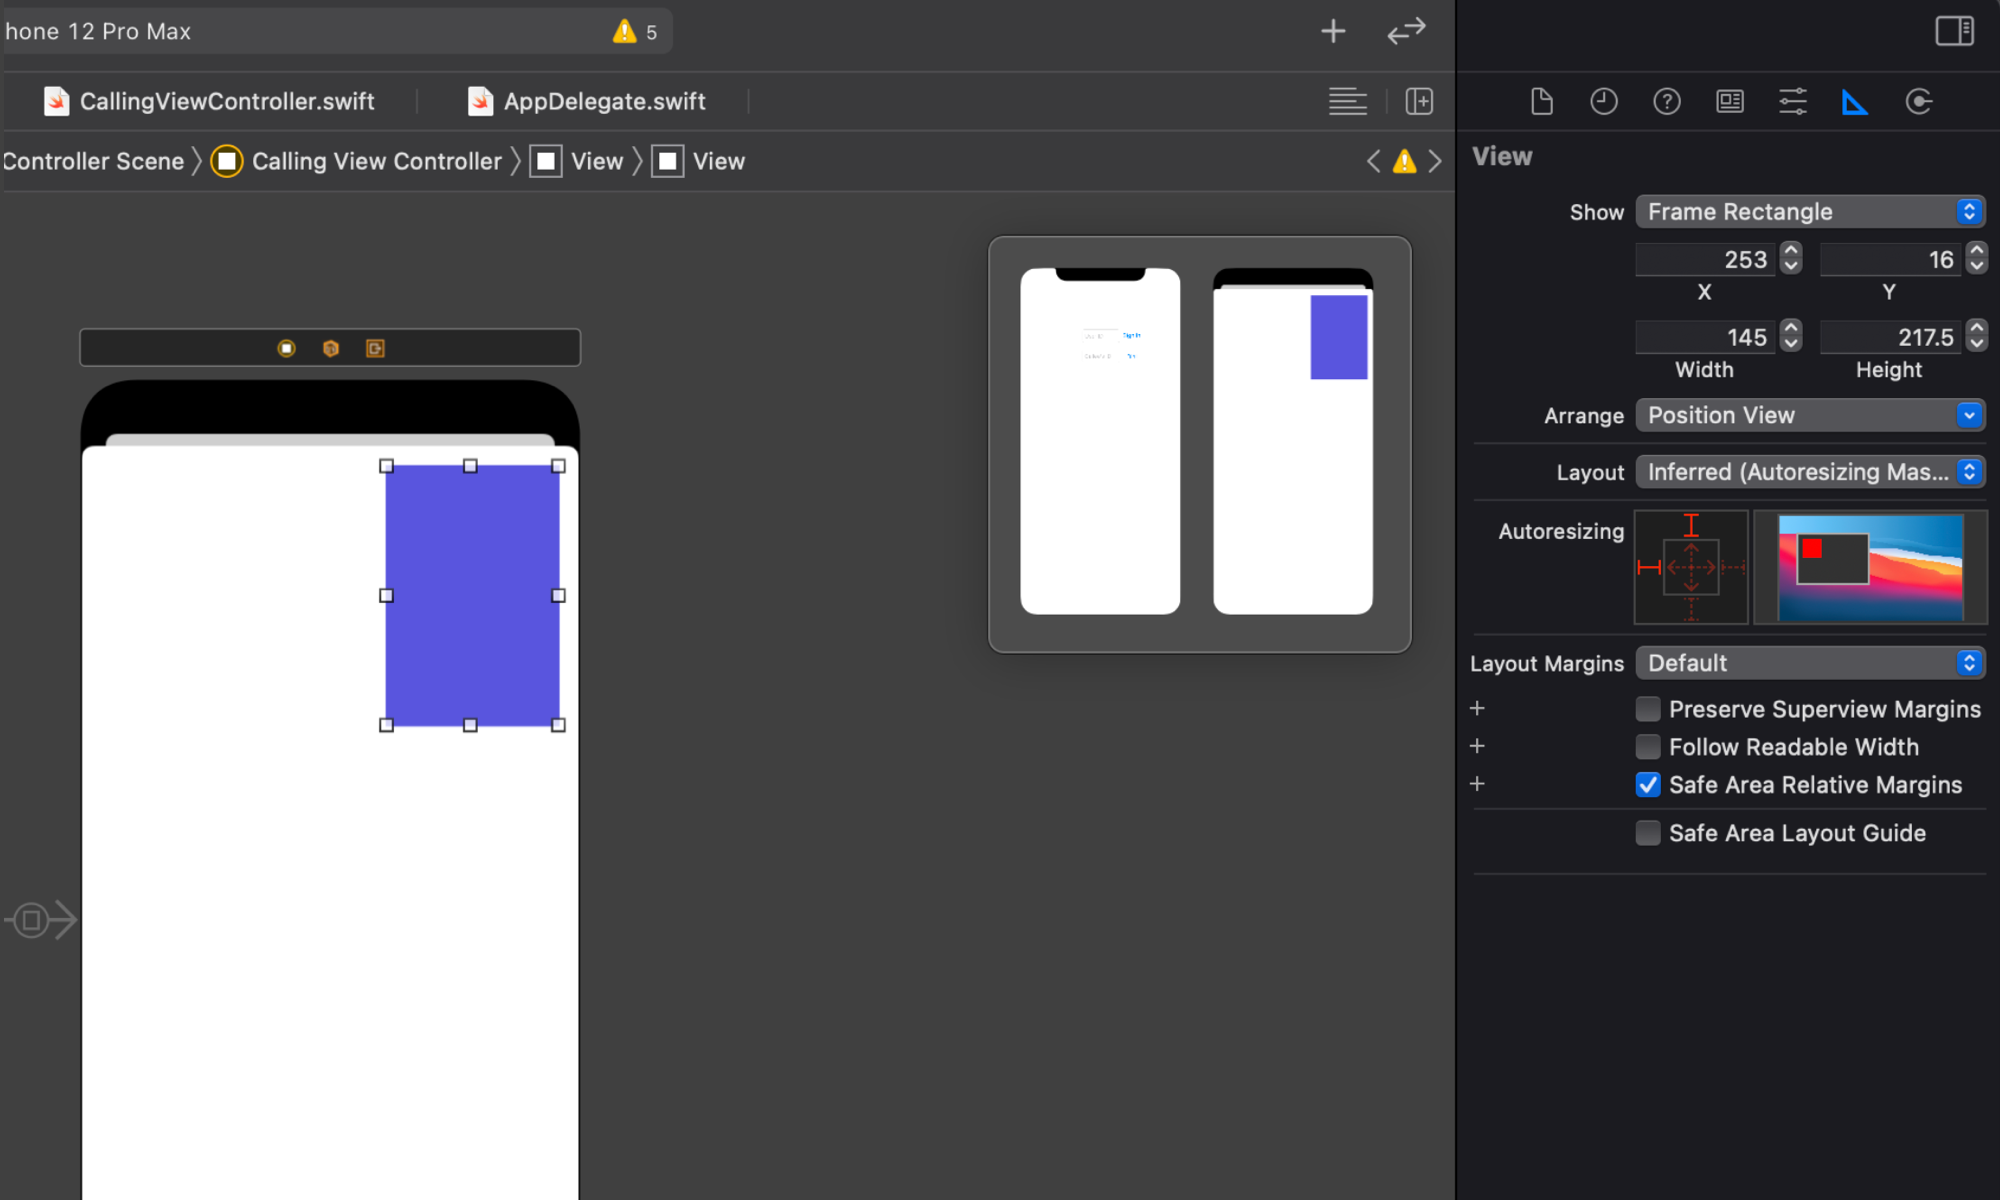
Reposition and resize the view in the Size inspector: X=253, Y=16, Width=145, Height=217.5. Your view should now look like this:
Select the ‘Add New Constraints’ icon at the bottom of Xcode. Set the constraints Top=16 and Trailing=16. Select Aspect Ratio.
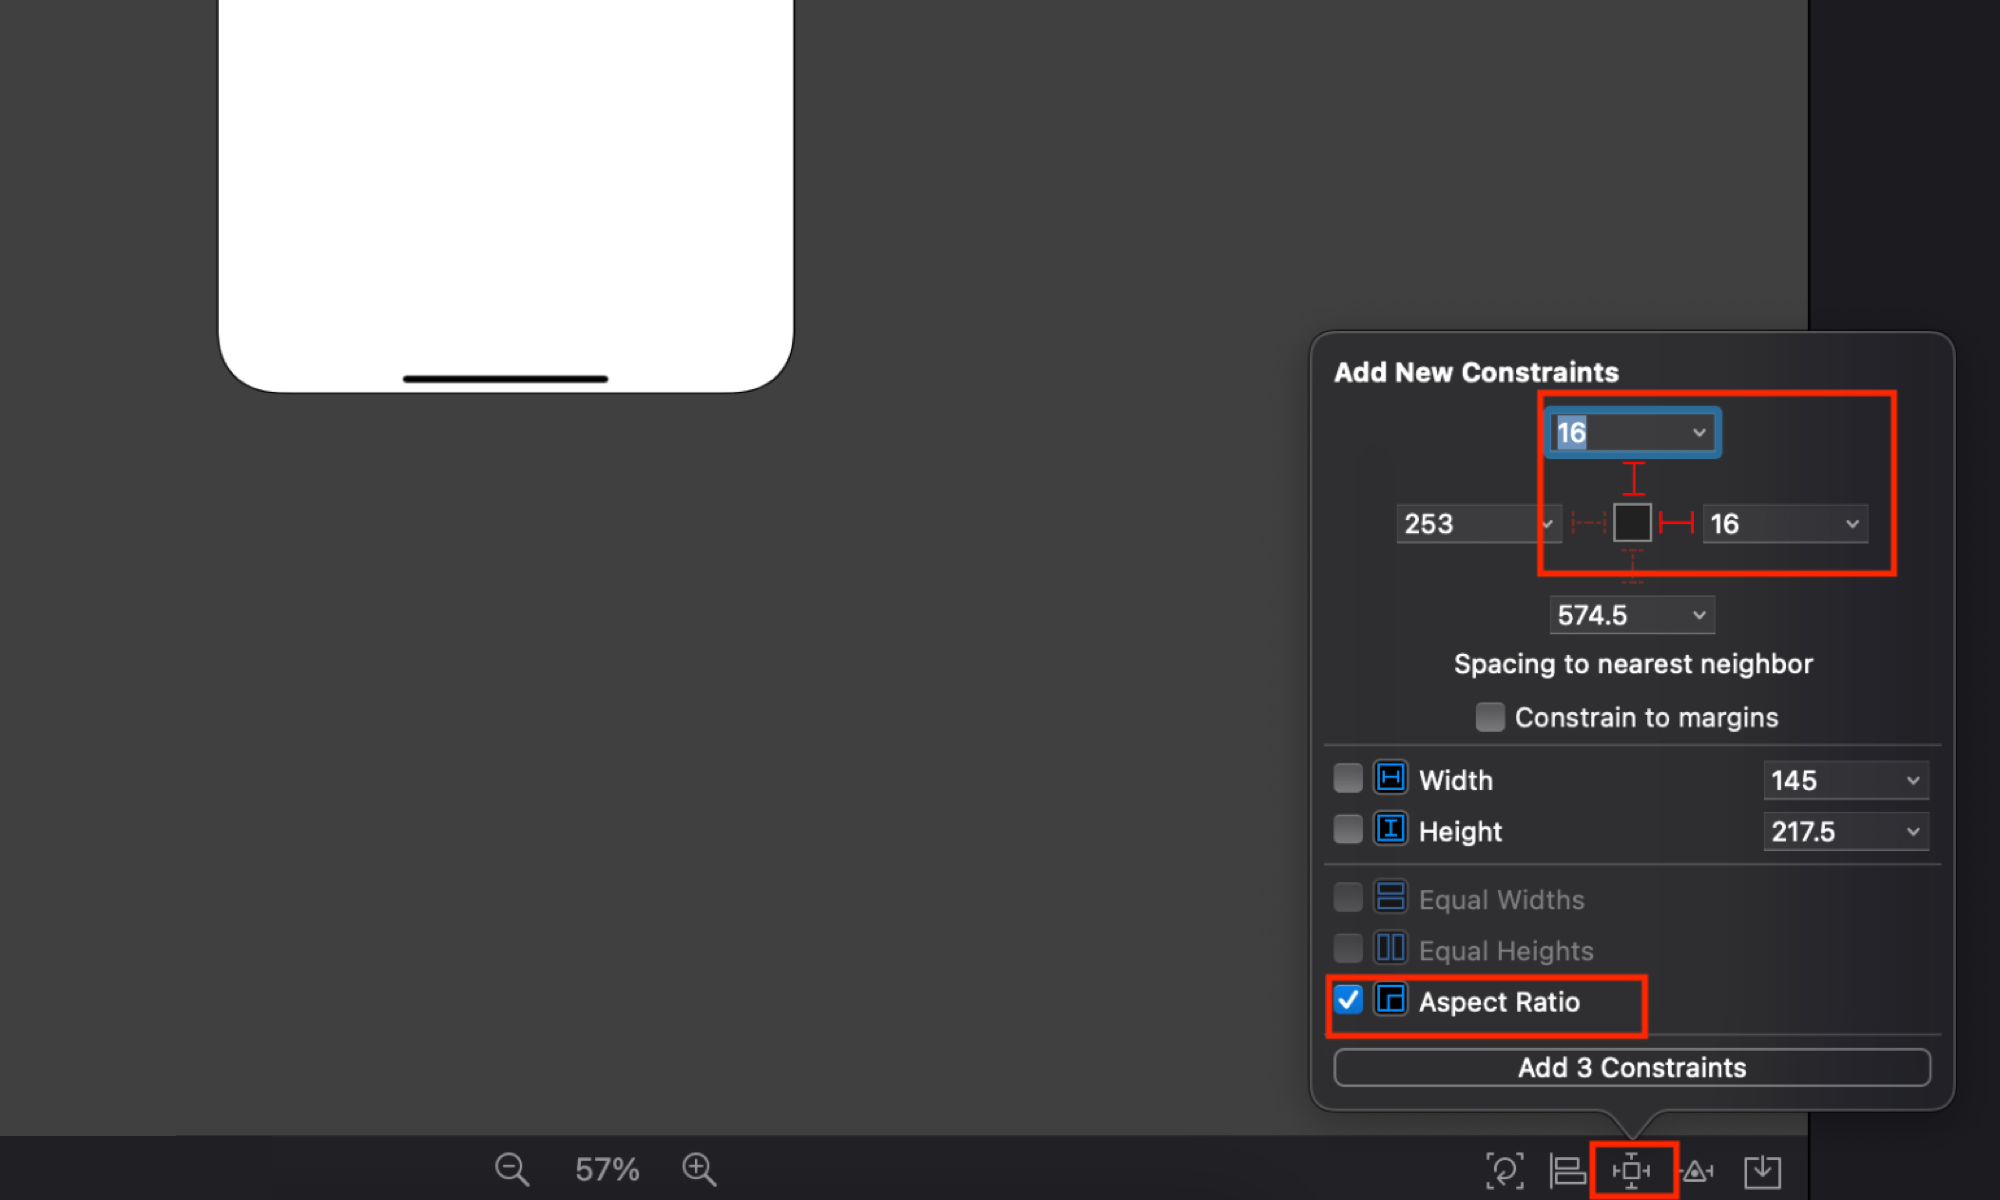
These new constraints should show up in the Size inspector on the right. Adjust the Aspect Ratio Multiplier=720:1080
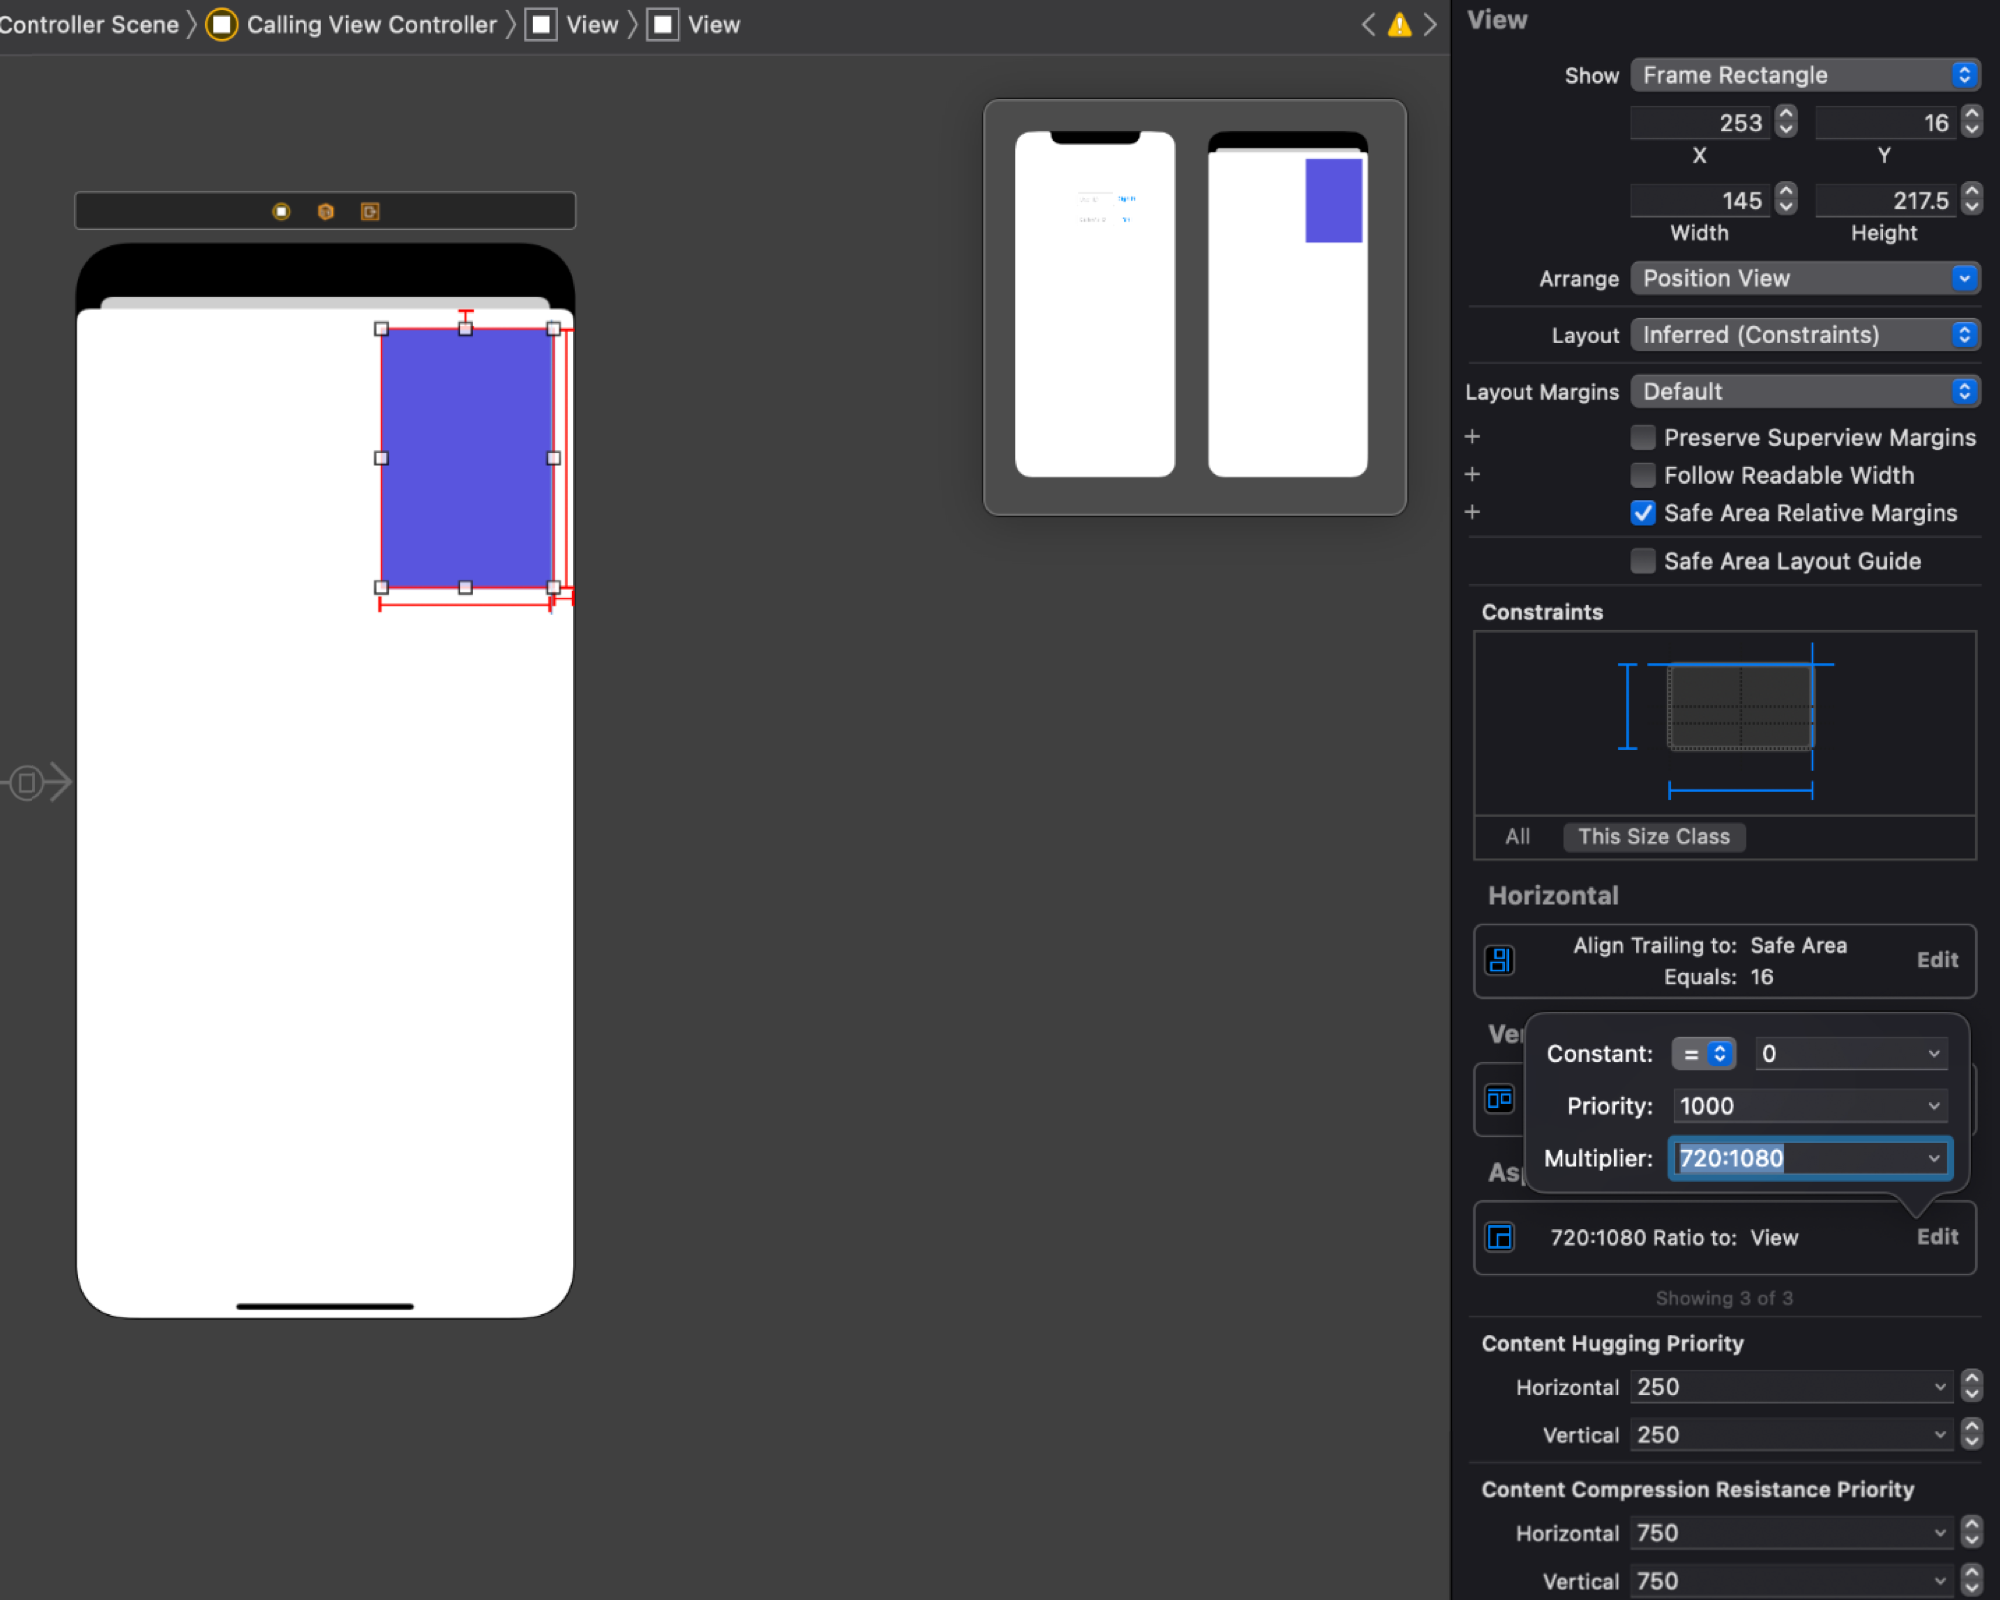
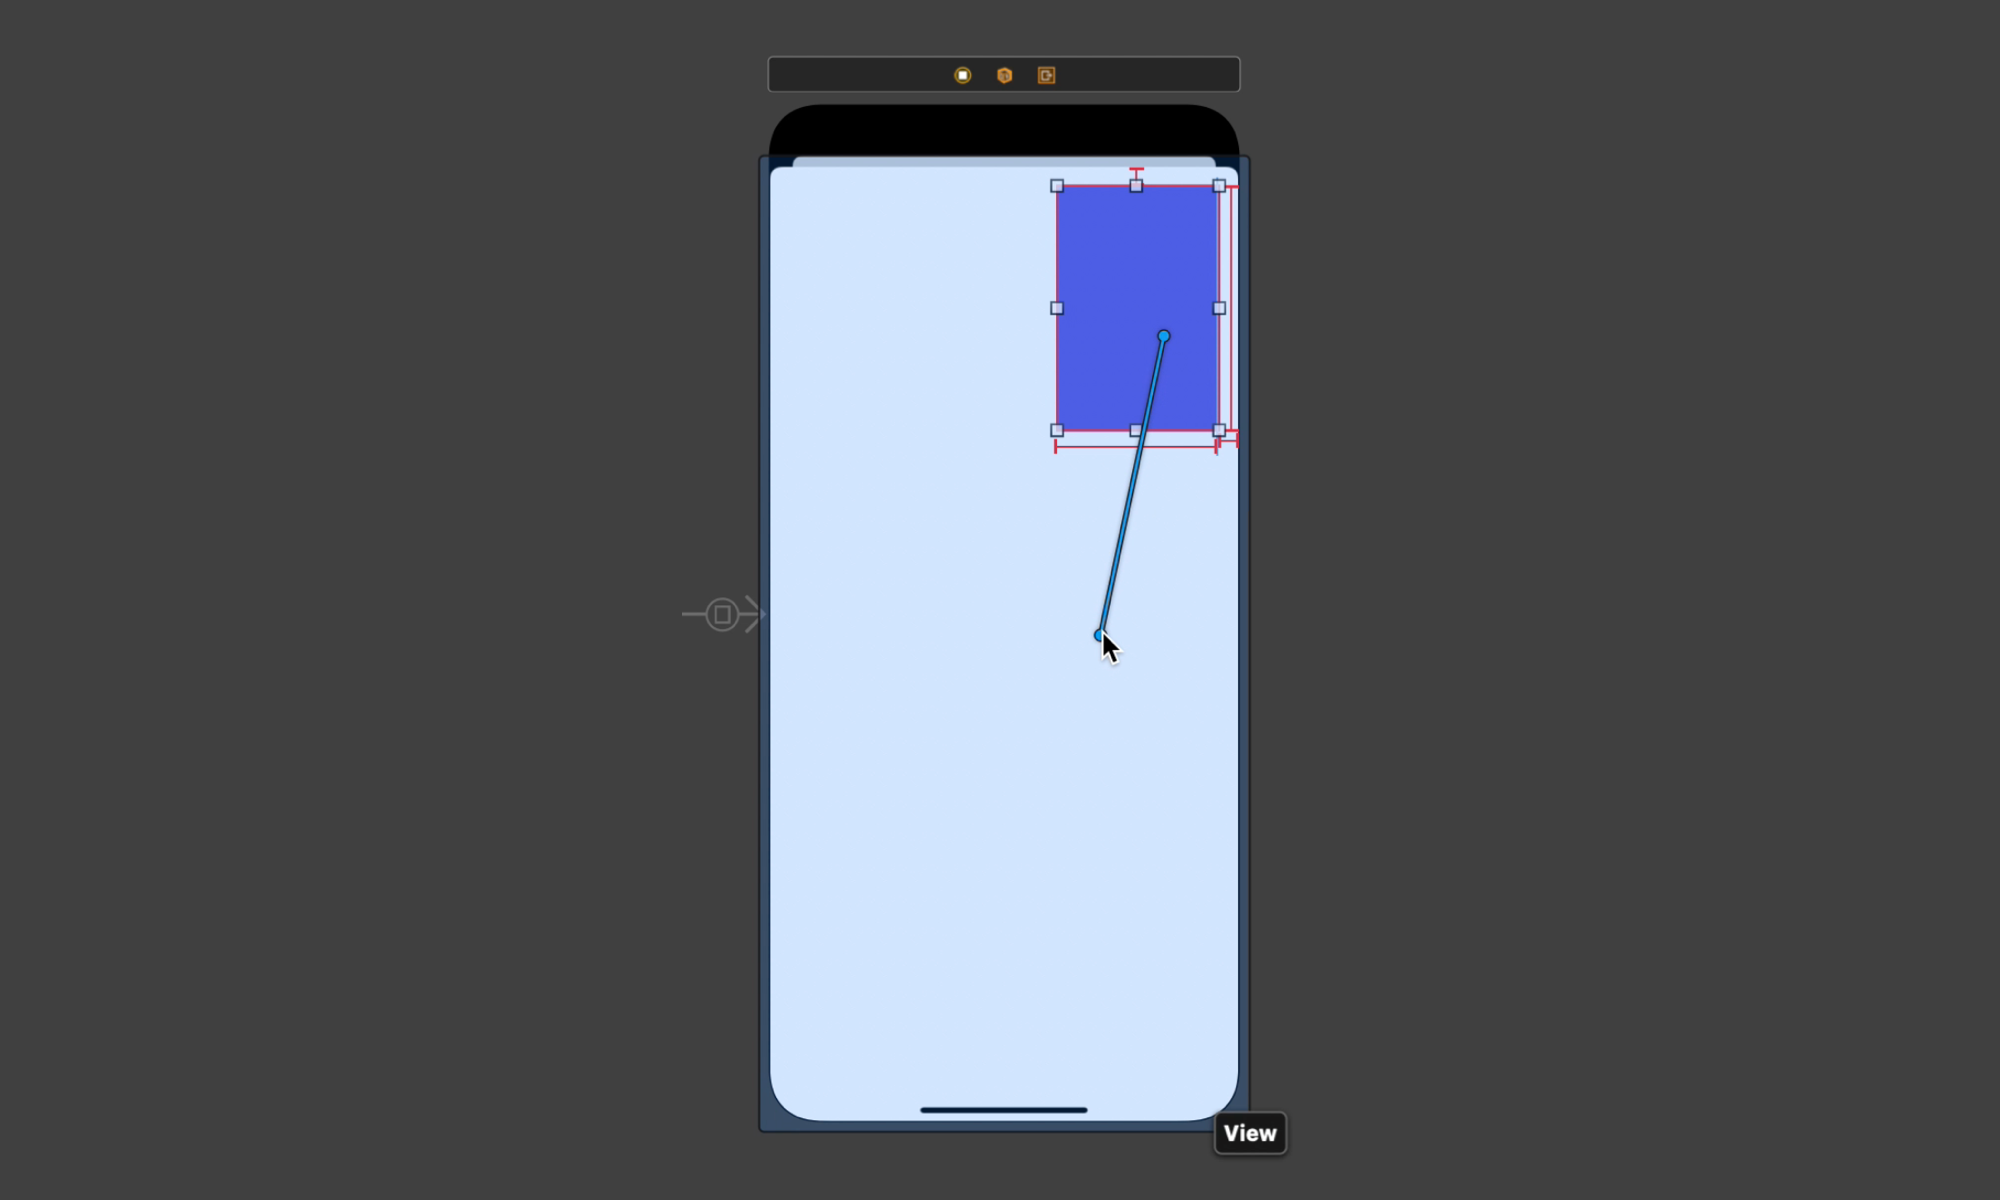
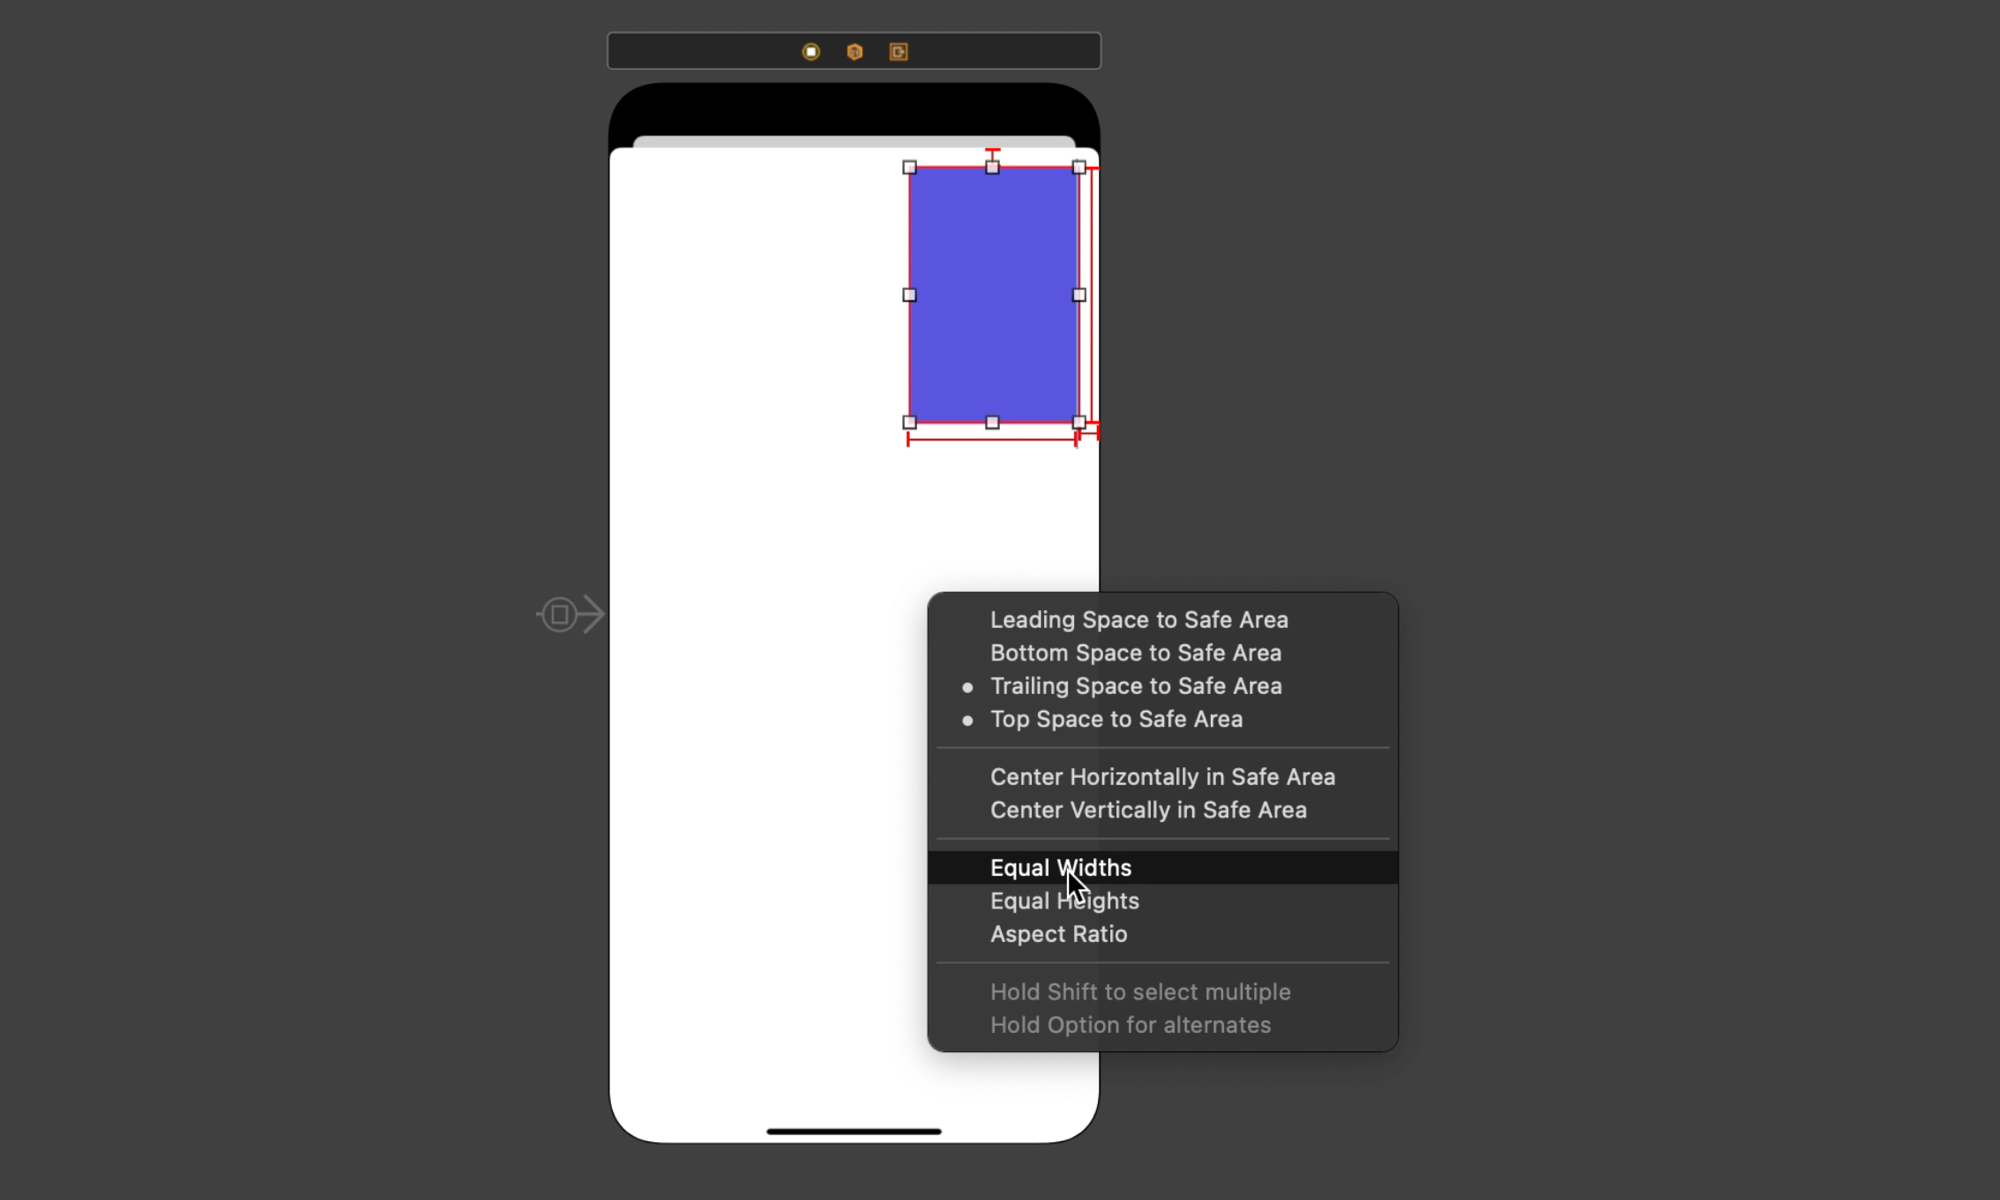
Lastly, control+click in the Local Video View and drag the line onto the Calling View Controller Safe Area. Select the ‘Equal Widths’ constraint.
Click the + again to add a Button towards the bottom of the Calling View Controller and rename it to ‘End Call’.
9. Add the code so Sendbird Calls knows about the local and remote video views. From Main.storyboard, add the editor to the right again and open CallingViewController.swift.
Control+click on the Local Video View and drag the line into the CallingViewController class. Create the IBOutlet named ‘localVideoView’. Control+click on the End Call Button and create the IBAction named didTapEndCallButton. Add call.end() inside the new method.
Lastly, add code into the viewDidLoad() method to create and update a local SendBirdVideoView and remote SendBirdVideoView. Embed these views into our UI Views. Set call.delegate = self and call.startVideo(). See the source code below:
10. Now, if you run the app again on a physical iOS device (not the simulator), you should be able to see your video (local) and the callee’s video (remote) when a dialed call is accepted. You can tap the End Call button to hang up.
Step 4. Test a call with the Sendbird dashboard
To test a call, use your Sendbird Dashboard when looking at your Sendbird app. From your Calls studio, you have the chance to open your Phonebooth and call a moderator user. The user ID for phonebooth users is usually a number. For my example, my phonebooth user ID is 679697.
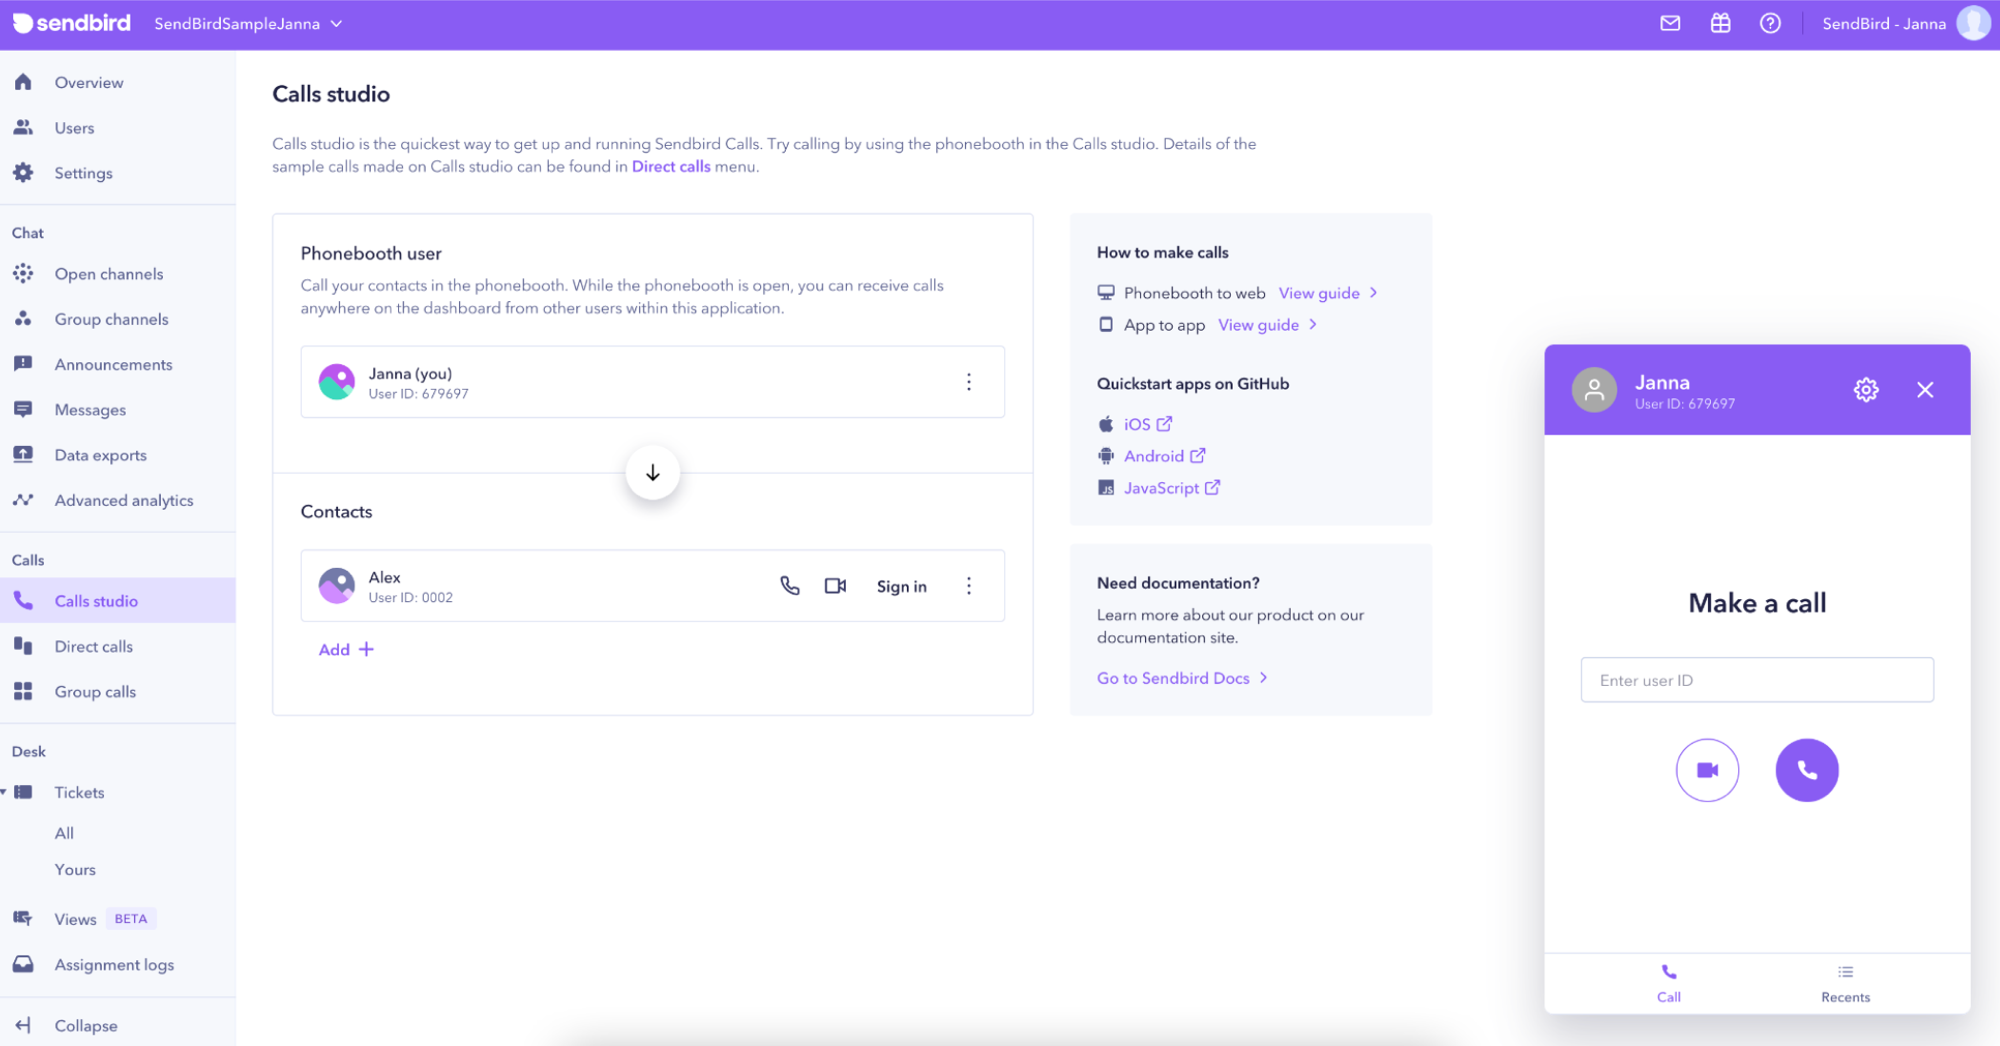
Navigate to Sendbird Dashboard with Calls Studio and open Phonebooth.
Now, call your dashboard user from the app by entering the phonebooth user ID in the callee ID field. Did you receive the call on the incoming dashboard? If yes, you just successfully dialed a call! From the dashboard, you can accept or reject the call.
Step 5. Receive a call from an authenticated user
If you want to test this using a client application instead of using your Sendbird dashboard, you need to implement the functionality for receiving a call.
To quickly add this functionality into your app and receive a call when the callee has the app open on the View Controller screen, we will add the didStartRinging(_ call: DirectCall) method to the AppDelegate class or to a new AppDelegate extension. The AppDelegate will implement the SendBirdCallDelegate protocol for this method. The method will retrieve call information, set the caller id, and share the caller in an alert. The callee can choose to accept or reject the call. As helper functionality, we will add a new UIViewController.swift class extension to determine and present a top view controller.
See the code here:
Note: Most calls may occur when the user does not have the app open. To implement a solution even if the application is closed, check out the tutorials mentioned in the conclusion.
Step 6. Start and stop screen sharing
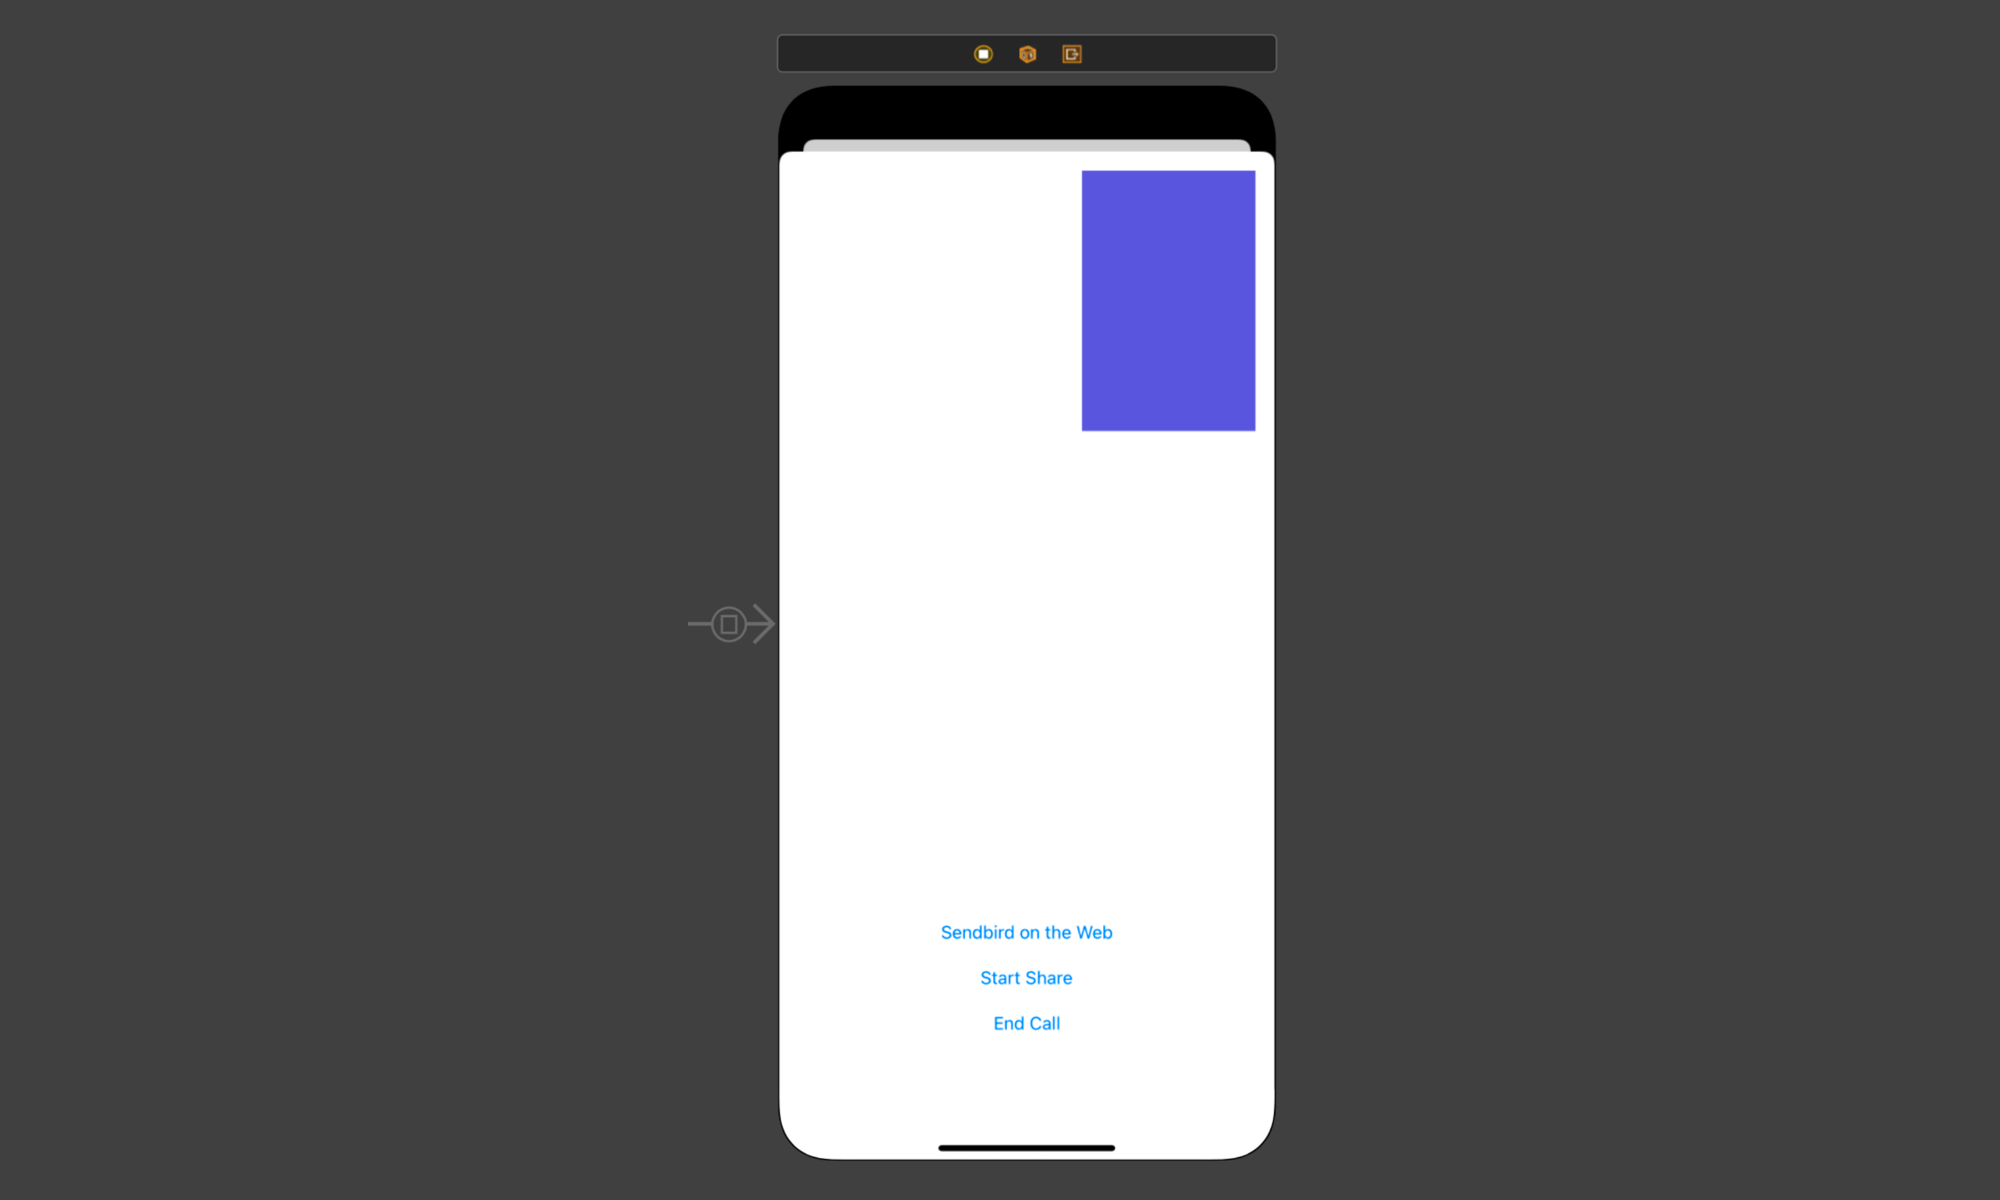
Once you have an active call, you can start sharing your screen. To do this, let’s implement a new function that shows the Start share button.
Optional: We can show a second button named ‘Sendbird on the Web’ to show a website while screen sharing by connecting it to a WebViewController.
Let’s implement the button functionality.
1. Like creating the End Call button before, open Main.storyboard, select the + at the top right, and create a button in the Calling View Controller. Rename it to ‘Start Share’.
2. Optional: Create another Button and rename it ‘Sendbird on the Web’. Create a new View Controller named ‘WebViewController’. Create a new WebViewController.swift class and add the following code:
In Main.storyboard, select the Web View Controller and show the Identity Inspector in the Inspector at the right. Set the Class to ‘WebViewController’ and select the ‘Inherit Module From Target’ checkbox.
Control+click on the Sendbird on the Web button and drag the line onto the new Web View Controller. Create an Action Segue set to ‘Show Detail’. When this button is clicked, a new web browser window will appear and share some images of Sendbird online.
3. When in Main.storyboard, add an Editor to the right to open the CallingViewController.swift file. Control+click on the Start Share button and create a new IBAction called ‘didTapScreenShareButton’. We will fill out this new method shortly.
Optional: Control+click on your Sendbird on the Web button and create an IBAction called didTapWebButton.
4. Control+click the Start Share button again and create a new IBOutlet named ‘screenShareButton’. In the code, add import ReplayKit and let rpScreenRecorder = RPScreenRecorder.shared(). This is needed to screen share.
5. In the new didTapScreenShareButton(_ sender: Any) method, we will call self.call.startScreenShare that calls self.rpScreenRecorder.startCapture to begin screen sharing.
6. In the same method didTapScreenShareButton(_ sender: Any), we will also call self.rpScreenRecorder.stopCapture that calls self.call.stopScreenShare to end our screen share.
See the code below:
Now, run the app. Dial a call to the other user. When that user accepts, tap on the ‘Start Share’ button to screen share. The app will prompt you to allow screen capture. Select the ‘Record Screen’ button to start.
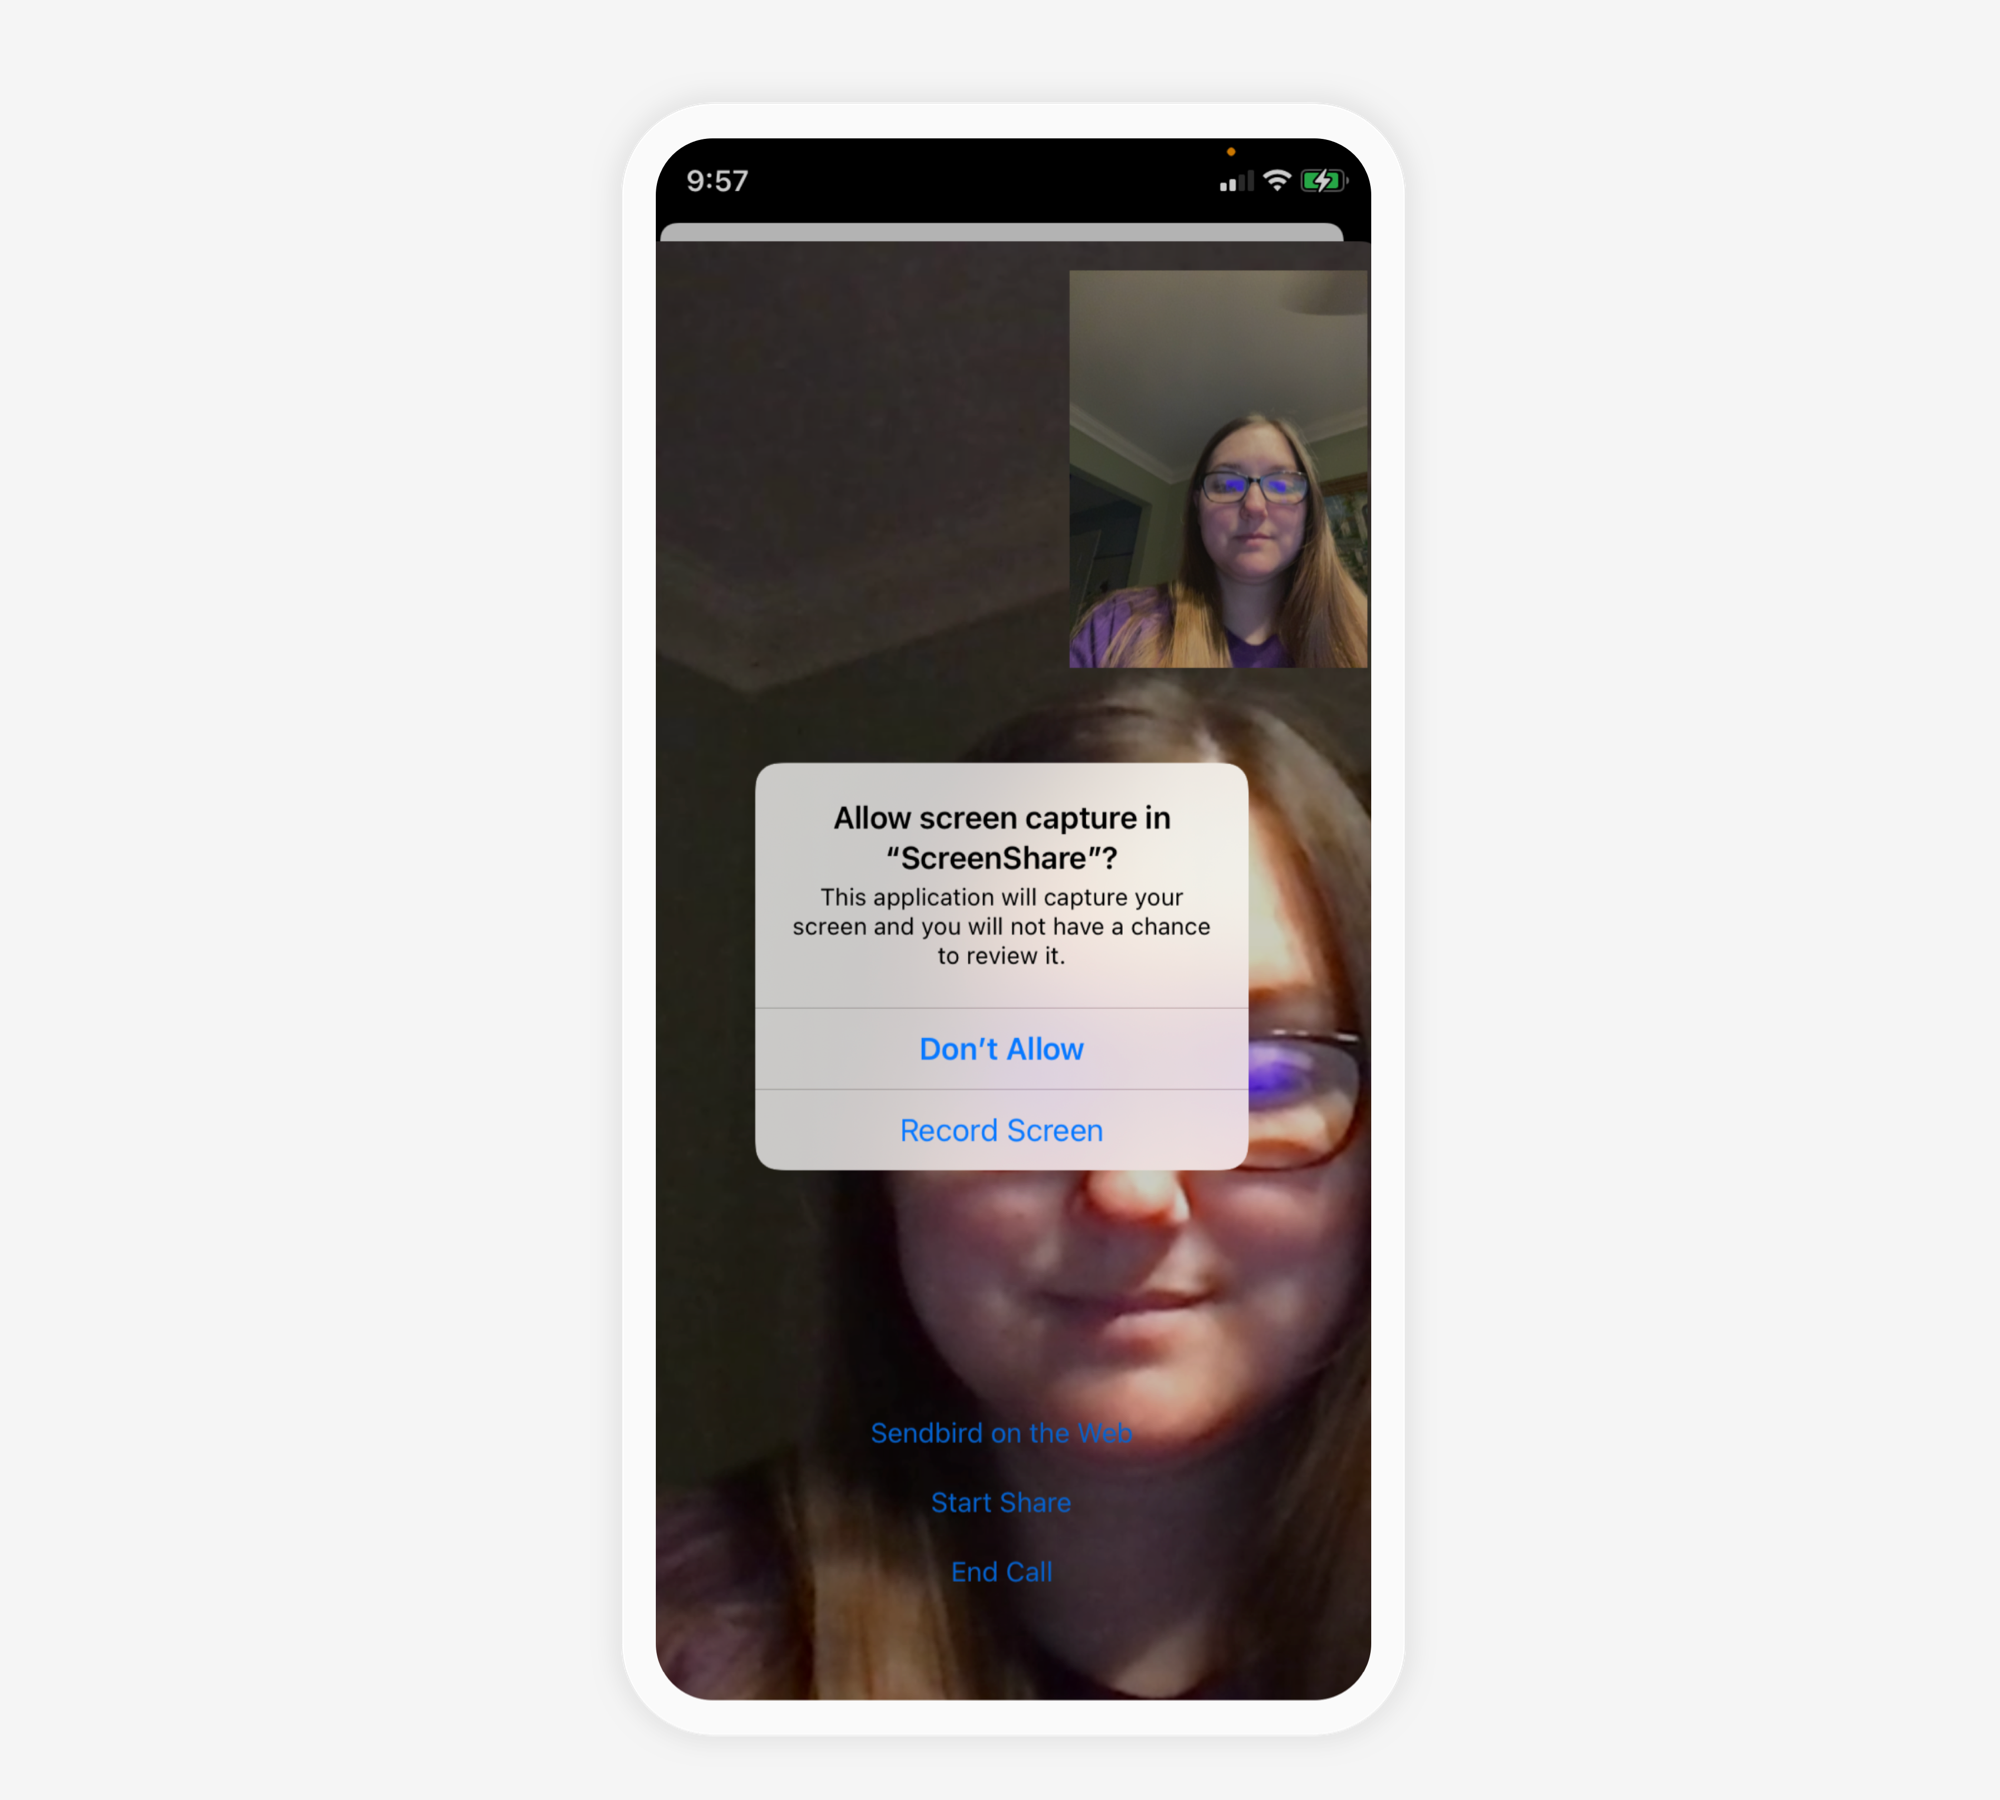
When successfully screen sharing, you will be able to share what’s currently on the screen. In this tutorial, the callee sees my screen with my face and the buttons on it.
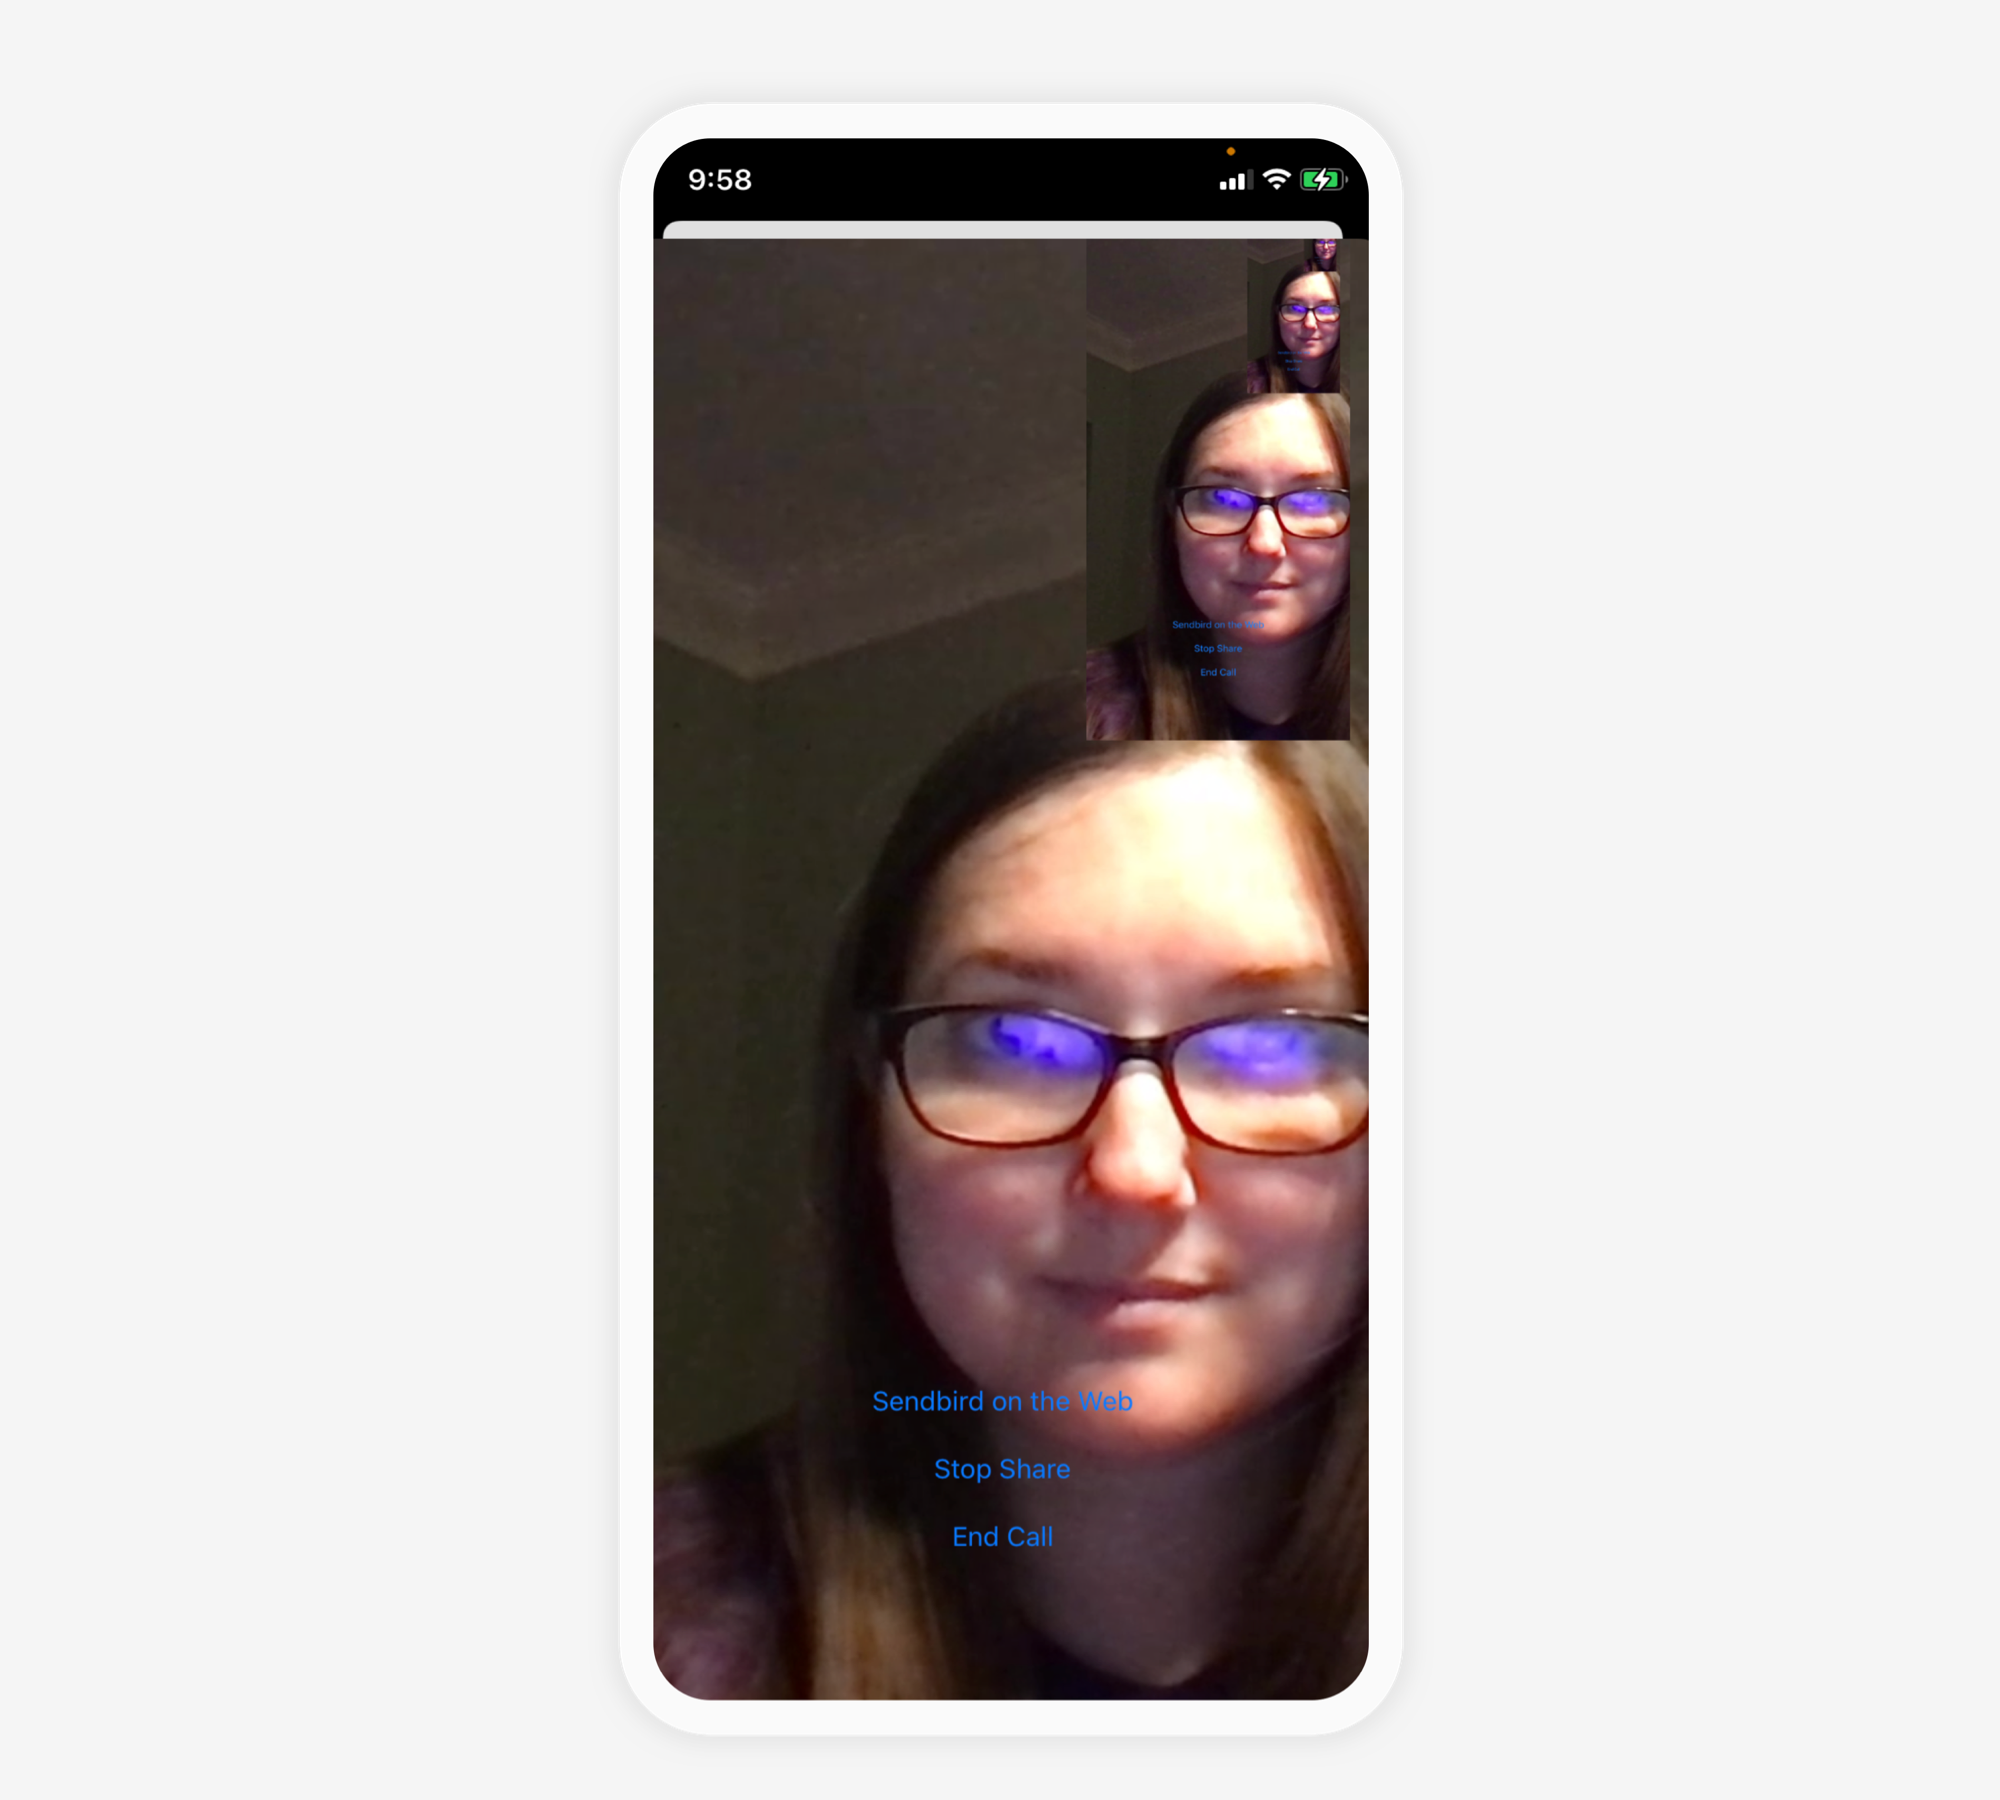
If you implemented the optional Sendbird on the Web button, you can show a webpage on your screen in the call. Tap on that button to open the page. Swipe downward to close the page. Select the Stop Share button to quit.
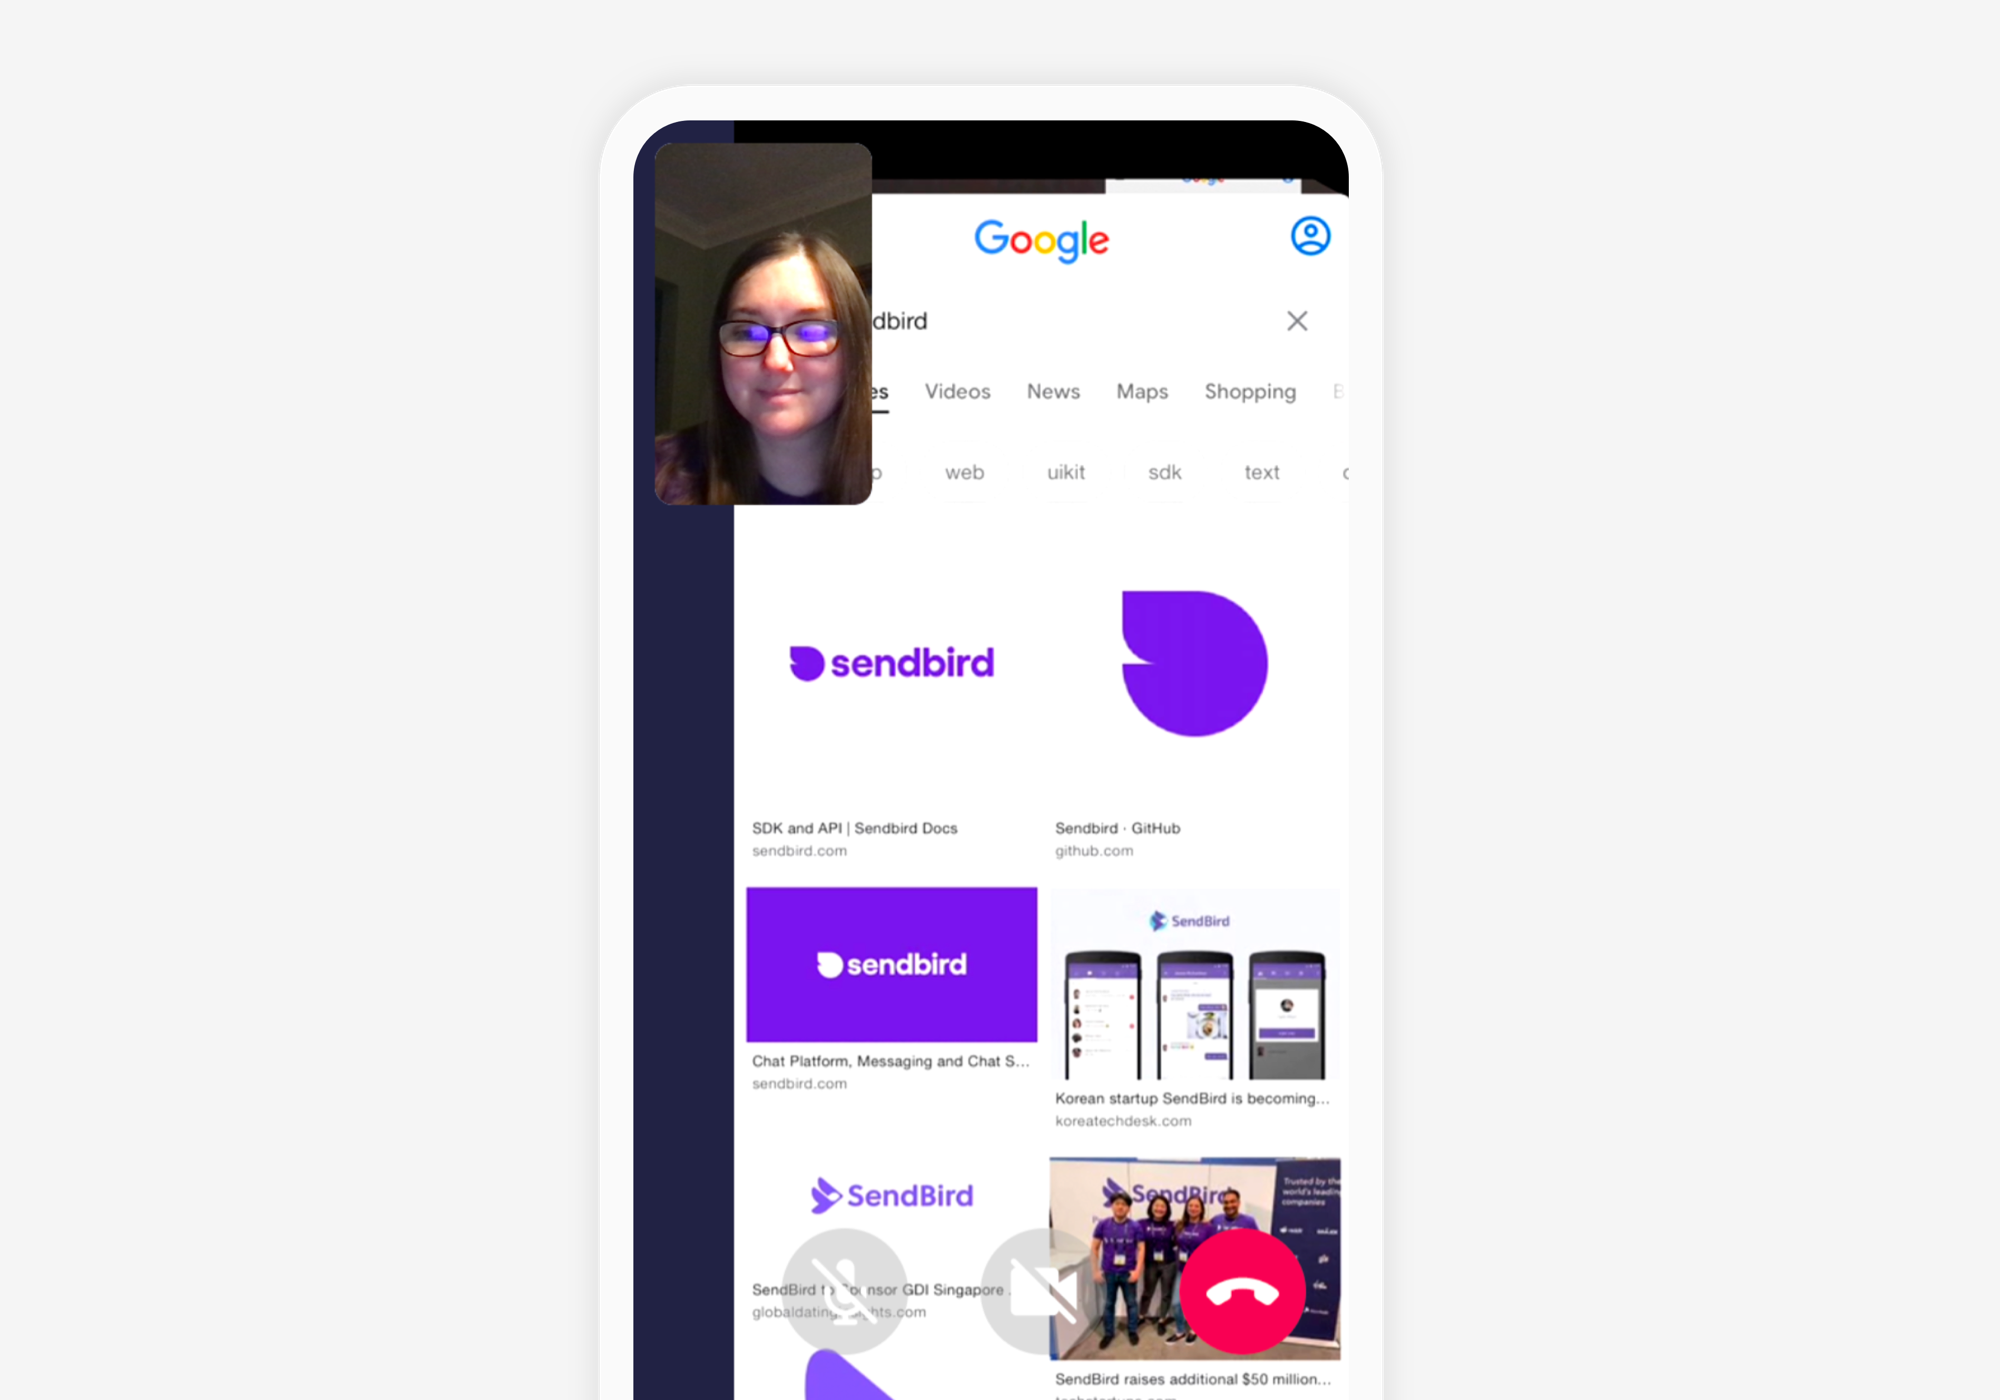
The above image depicts the callee’s view on the Sendbird Dashboard of the webpage screenshare.
Conclusion
Congratulations, you’re done! Today, you have:
- Created a new Xcode app, configured and imported Sendbird Calls
- Received a call with an Authenticated User
- Shared your screen with a callee
Next, if you want to receive a call when the app is closed, you’ll need to implement iOS CallKit. We recommend using VoIP notifications with Sendbird Calls. The tutorial How to make a video call app with iOS CallKit and Sendbird Calls will help you achieve this. For more information on how to receive a call, you can view the Sendbird Docs.
Happy screen sharing! ✌


