
How to integrate Sendbird chat with Zendesk

🚨 Before we dive in, if you are considering AI customer service, check us out as a Zendesk alternative?
Enabling chat customer support within Zendesk
Customer service is an essential part of every business, from travel bookings and airlines to on-demand services. Zendesk is a comprehensive customer support solution. Chat messaging is a valuable way to have efficient customer service conversations and, if built well, can ensure a positive experience for both the customer and the support agent. In this guide, we’ll create a globally available chat within the Zendesk ecosystem using Sendbird's chat API.
First, we’ll introduce the three essential components of chat support. Then, we’ll discuss ticket routing and assignment basics before moving on to the system flows for creating and updating Zendesk tickets. The complete Zendesk integration project described here leverages three visible Zendesk objects and one hidden object, which we’ll discuss below!
Note that you’ll get the maximum benefit from this guide if you have a basic understanding of JavaScript.
Let’s get started! 💻
Zendesk integration components
First, let’s discuss the components we’ll use in this guide. The implementation described here leverages three Zendesk objects: background, top bar, and ticket sidebar.
Background
The background is an invisible object; nothing is displayed in the UI. It triggers the initialization of the top bar object, which automatically opens and closes each time the Zendesk agent logs in to establish a Sendbird connection. The connection to Sendbird collects the latest data for the agent, including unread message counts and current chat data.
Top bar
The top bar makes Sendbird chat globally available in Zendesk. The top bar icon opens a popover chat modal.
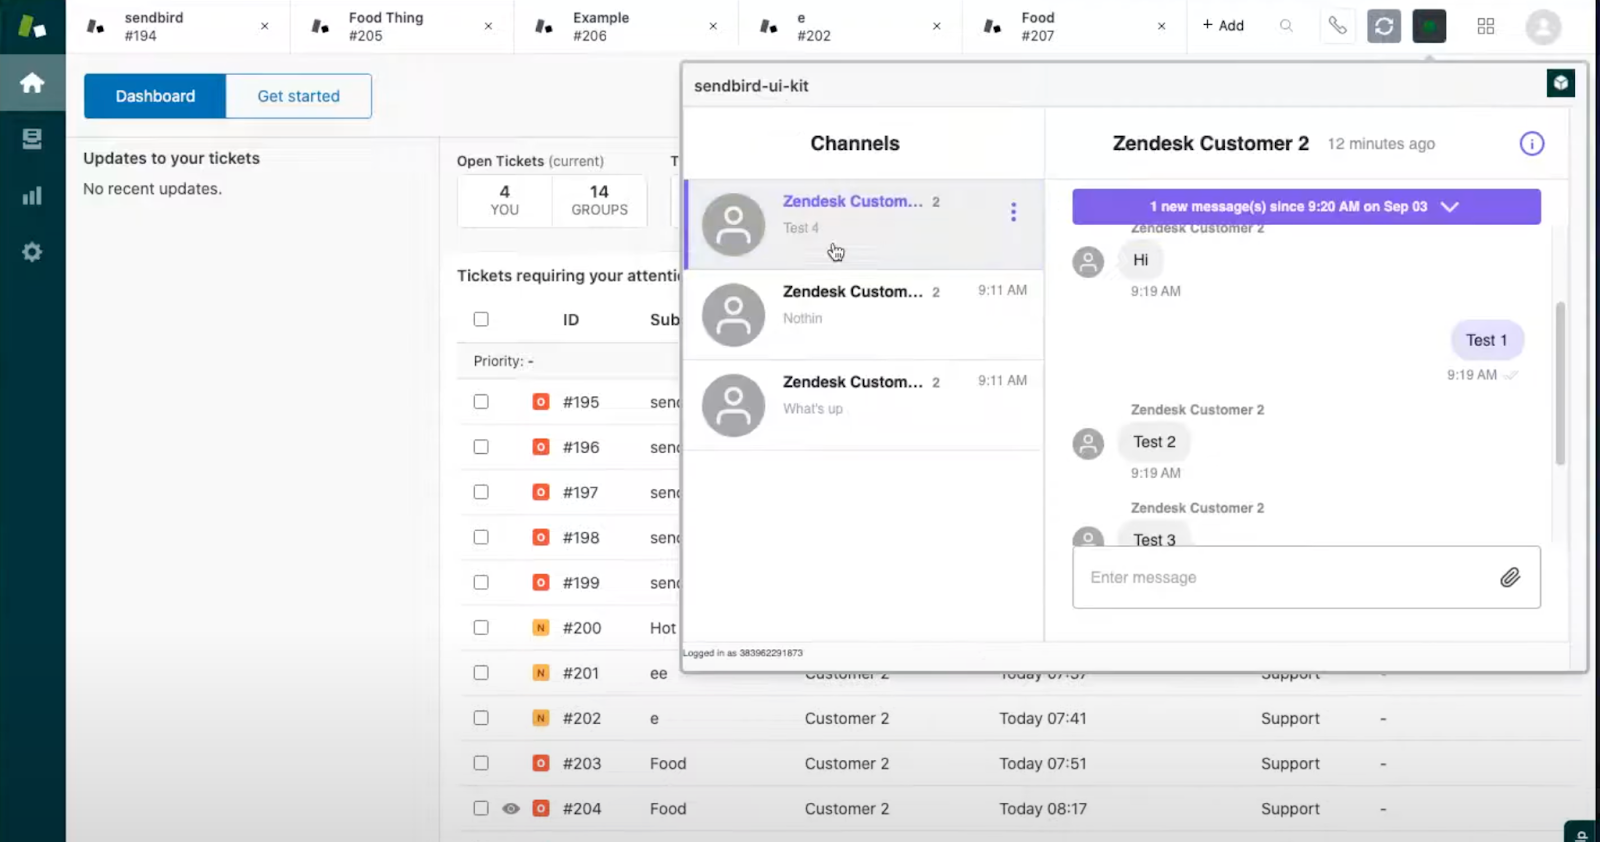
The top bar's functionality includes displaying a list of the current agent’s Sendbird channels, which correspond to Zendesk tickets the agent is assigned. The agent can see a messaging UI and unread message badges. The top bar icon can also change color to indicate new or unread messages. Unread message counts are updated in real-time while connected to Sendbird.
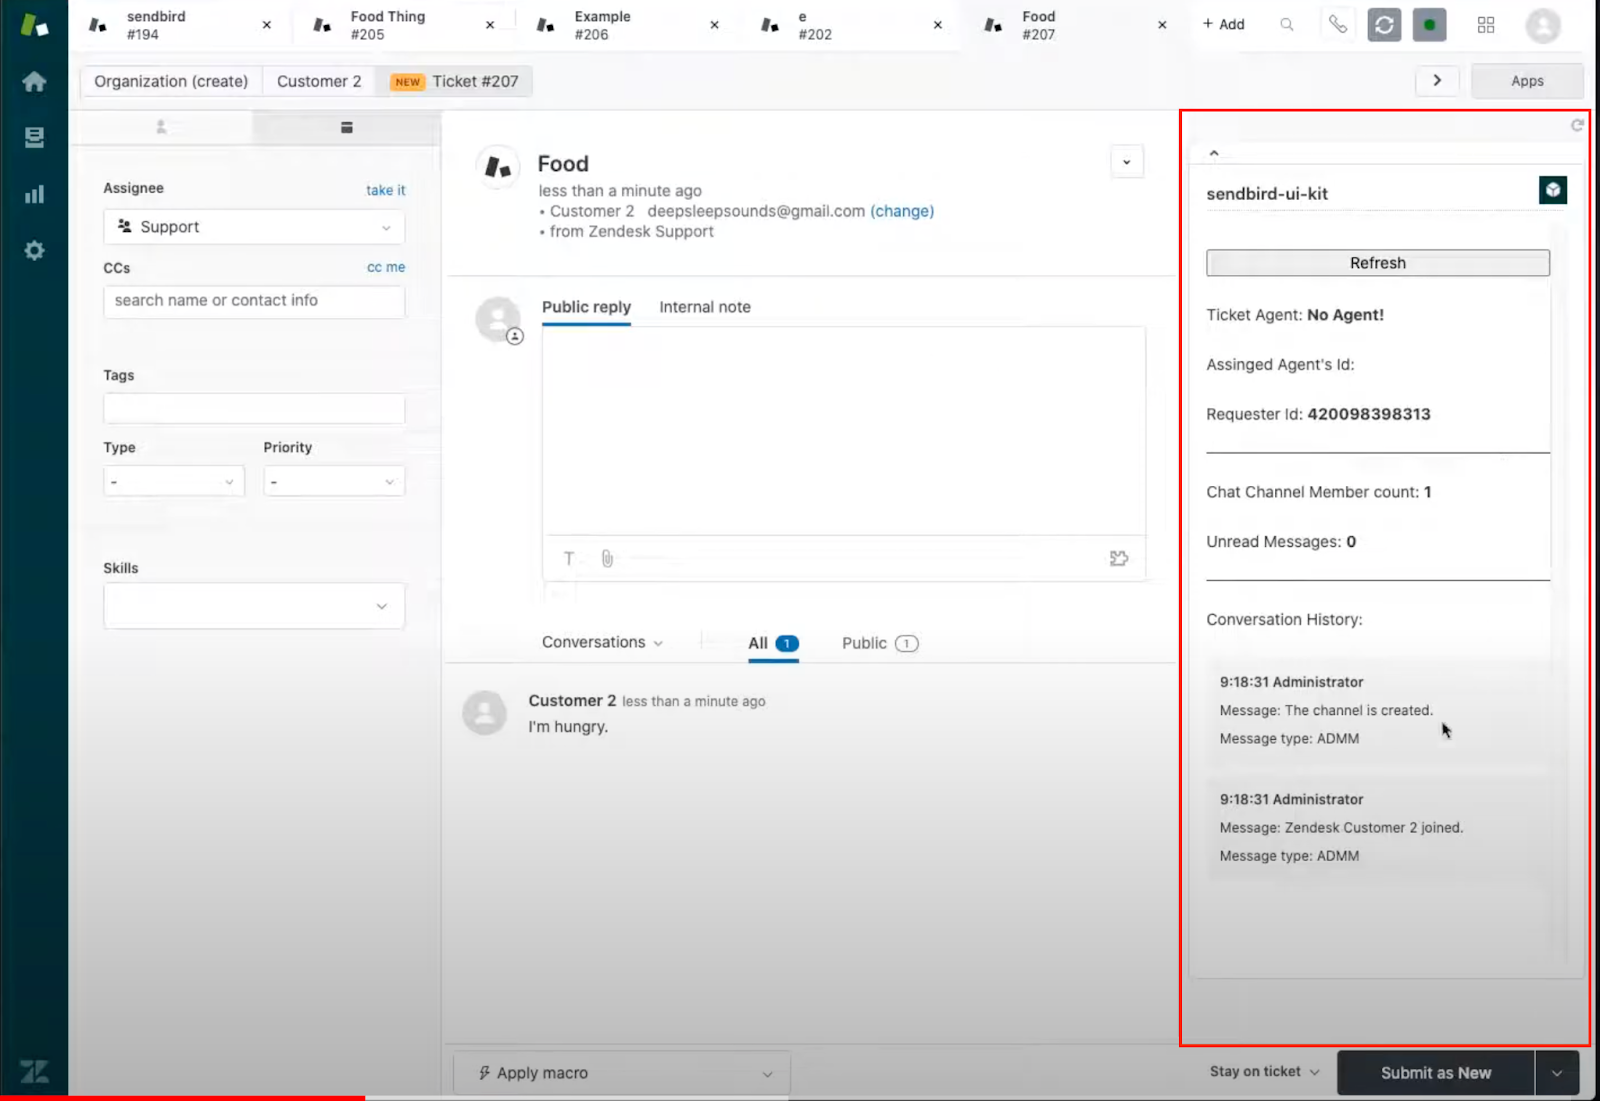
Ticket sidebar
The ticket sidebar appears only when a Zendesk ticket is open. The sidebar securely connects to Sendbird via the Zendesk REST API call-out service and collects the latest data about the Sendbird group channel associated with the open Zendesk Ticket.
Triggers, webhooks, and webhook server
The Zendesk integration is based on one ticket associated with one Sendbird channel.
Zendesk triggers and webhooks are used to create Sendbird channels, add customers and agents into Sendbird channels, and move agents in and out of channels.
Ticket routing and ticket assignment
Now that we’ve covered the basics, let’s talk about ticket routing and assignment.
Zendesk’s automated skills-based ticket routing does not provide an API to assign a ticket to a particular agent. Instead, it assigns new tickets to groups. For example, a new ticket can appear in the “New tickets” menu item, among other categories.
In ticket routing, this implementation listens for when an agent is assigned to a ticket in one of two ways. First, agents can change themselves to be the owners of the UI and then save the ticket. Alternatively, a supervisor or agent can assign the ticket to a different UI agent and save the ticket. Therefore, the project’s ticket sidebar and background objects listen for that save event and change who is a member of the ticket’s corresponding Sendbird Channel.
Creating tickets: Development flow
So what would the ticket creation flow look like? The diagram below represents one possible system flow. An explanation follows the diagram.
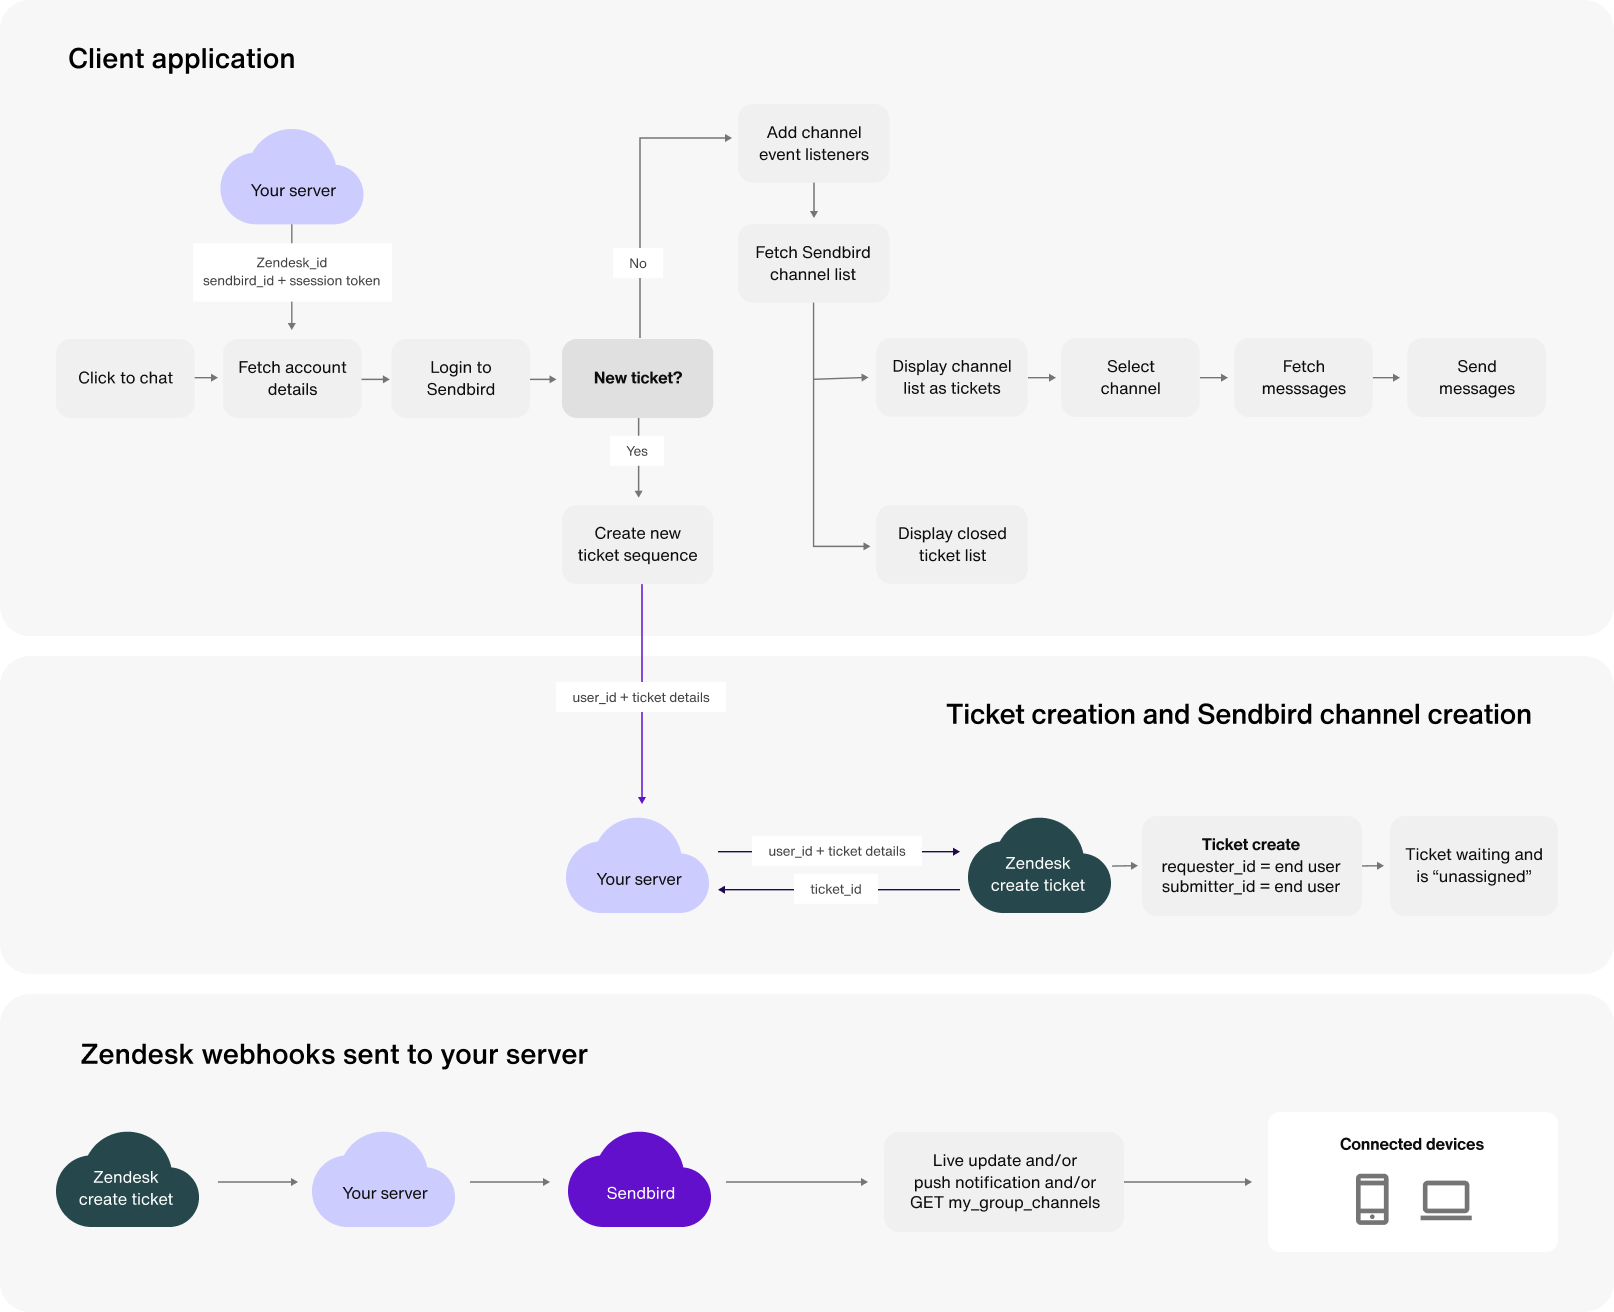
First, a user creates a new Zendesk ticket using their own web server (an example server is provided later in this guide). A Zendesk trigger and a Zendesk webhook are fired. Then your server accepts the webhook, which contains user details and the ticket ID. Next, your server creates a Sendbird channel using the ticket ID and adds a requesting user to the channel. The end user automatically becomes aware of the newly created channel via websocket and/or a callback from your server.
Note: If you are concerned about using the Zendesk trigger and webhook approach, consider creating the ticket with your server and then creating the Sendbird channel inside the callback from the ticket creation.
Updating tickets
Flow
Now that we know how tickets are created, let’s talk about how tickets are updated. The diagram below represents one possible system flow. Please scroll for an explanation.

Note: We recommend that you use the trigger webhook approach described above. Note that changes to ticket ownership are captured from all locations, including Zendesk bulk update functions.
After a Zendesk agent/supervisor changes the owner of a Zendesk ticket, a Zendesk trigger and a Zendesk webhook are fired. Then your server accepts the webhook which contains agent and user details, as well as the ticket ID. Next, your server fetches the ticket’s corresponding Sendbird channel which includes its current members. Finally, your server updates the channel membership according to the newly assigned agent.
Ownership change logic
The diagram below represents one possible logic based on ownership change and what is provided in the Zendesk webhook’s body:

Keep an eye out for our upcoming guide, which has other details you may find useful!
Zendesk agent top bar flow
Now let’s move on to the flow of the agent top bar. The top bar has a clickable icon that opens a modal. The top bar modal, open or closed, contains a Sendbird instance. The Sendbird instance maintains a WebSocket connection to Sendbird. The WebSocket connection listens for real time events. The Sendbird instance uses Sendbird’s built in connectionManager (see the connectionManager code for iOS and Android) to maintain a connection between Sendbird and the Zendesk user interface.
The diagram below summarizes the top bar flow.

Zendesk ticket sidebar
Lastly, it is up to the implementation what to display in the Zendesk ticket sidebar. In this project, the sidebar’s primary functions are to fetch and display details of a ticket’s associated channel, including channel membership and message history. The sidebar in this project uses Zendesk’s secure callout functionality for secure Platform API calls to Sendbird.
The below diagram shows the associated flow.

You've completed your integration of Sendbird Chat into Zendesk
And that’s it for the Zendesk integration! You now know the system flows of creating a background module, top bar, and ticket sidebar with Sendbird and Zendesk. Watch our upcoming guide, in which we’ll show you more code samples!
If you need help with the material in the guide, check out our docs, contact us, or look at the community forums, where you may find an answer to your question. Happy building with Sendbird's chat API! ⭐️
For a proactive, omnichannel AI customer service, check our AI agent platform + helpdesk as a Zendesk alternative!


