كيفية إنشاء رسائل مجدولة باستخدام Sendbird UIKit لـ React

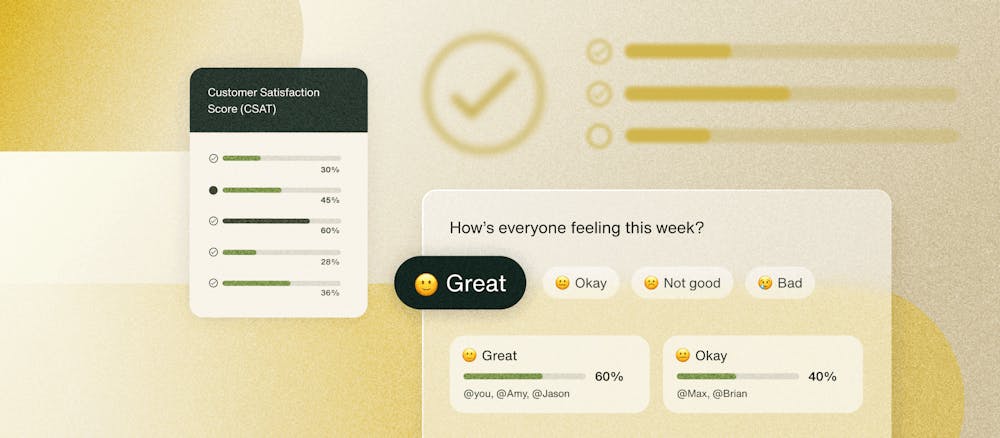
تتيح الرسائل المجدولة ، وهي أداة قوية للدردشة داخل التطبيق ، للمرسلين الوصول إلى المستلمين في أنسب وقت وتوفير المرونة الأساسية. تعد جدولة رسالة ملائمة للمرسل ومحترمة للمتلقي ، خاصة عندما يكون كلاهما في مناطق زمنية مختلفة. الرسائل المجدولة مفيدة لمؤسسات الرعاية الصحية لإرسال تذكيرات بالمواعيد ، والتكنولوجيا المالية لإرسال الإشعارات المصرفية الأساسية ، والأسواق لإرسال رسائل ترويجية ، والمزيد.
في هذا البرنامج التعليمي ، سنتعرف على كيفية استخدام الرسائل المجدولة مع Sendbird Chat SDK لـ JS داخل تطبيق Sendbird UIKit .
من المهم ملاحظة أن الرسائل المجدولة متاحة فقط داخل قنوات المجموعة. أيضًا ، عند إرسال رسالة مجدولة ، يجب جدولتها بعد 5 دقائق من الوقت الحالي.
قد تجد أنه من المفيد مشاهدة الفيديو التعليمي أدناه حول تنفيذ الرسائل المجدولة.
هيا بنا نبدأ!
الشروع في استخدام الرسائل المجدولة
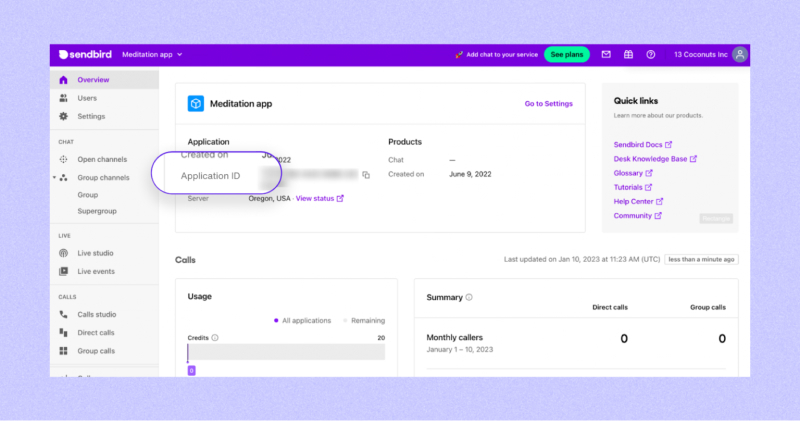
للبدء ، قم بإنشاء حساب Sendbird . ثم قم بإنشاء تطبيق ومستخدم جديد في Sendbird Dashboard . لوحة القيادة هي المكان الذي يمكنك من خلاله الوصول إلى كل شيء في خدمة الدردشة الخاصة بك. بعد الإنشاء ، احفظ معرف التطبيق الذي تم إنشاؤه لتهيئة Chat SDK و UIKit في التطبيق الخاص بك.
Next, create a React application and install the Sendbird Chat SDK and Sendbird UIKit for React with npm:
This sample will be using Material UI so install the following:
Please refer to MUI docs about material UI icons.
Install dayjs to retrieve the date and time within the application:
In your application, create a .env file to store your App ID, user ID, nickname, and access token provided in the Sendbird dashboard. Then, import each variable into the App.js file to initialize the Chat SDK and UIKit.
In App.js, import the Sendbird Provider from UIKit, which will be the wrapper for our application. Create a new file called CustomizedApp.js and import it into App.js. CustomizedApp will be a child component of the SendbirdProvider and contain the ChannelList, Channel and ChannelSettings components.
SendbirdProvider is the context provider for UIKit. Make sure to pass in the appId, userId, nickname, and accessToken to initialize UIKit.
Initialize the Sendbird Chat SDK for JS in the App.js file. Use the SendbirdChat.init function and pass in the appID and modules that will be used. To be able to use the GroupChannelModule in our application, pass the GroupChannelModule in as a module. With the return of SendbirdChat.init, we use it to call .connect and pass in the userID and accessToken.

The only UIKit you need.
Basic UIKit components
In CustomizedApp, import ChannelList, Channel, ChannelSettings from UIKit.
ChannelList
The ChannelList component will render the channel list within the application. We will use the onChannelSelect property to set the channel that is clicked on in the channel list.
Channel
The Channel component will use the channelUrl, onChatHeaderActionClick, and renderMesageInput properties. channelUrl will set the currentChannelUrl and onChatHeaderActionClick renders the settings options to open on click.
The last property the Channel component will use is renderMessageInput, which displays a custom message input component within the conversation window. Create a custom component called CustomizedMessageInput.
ChannelSettings
The ChannelSettings component passes in the channelUrl to update the current channel and onCloseClick to close the settings options menu.
After importing UIKit components, add the following elements to wrap around each component:
- A div with the class name “channel-list” around ChannelList
- A div with the class name “channel-chat” around Channel
- A div with the class name “channel-settings” around ChannelSettings
Now, create a div to wrap around all three components and their div wrappers with the class name “channel-wrap”. These class names have preset styling components from UIKit that we want to apply to our application.
To have the chat display the channel list on the left and the conversation window on the right, apply the following styling to the App.css file:
The application will be displayed as the following:
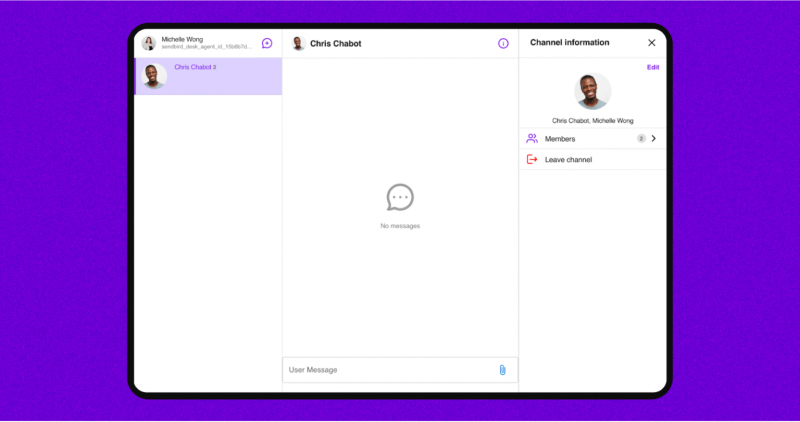
Now that the basis of the chat is complete, we’ll implement customizations.
UIKit customizations
CustomizedMessageInput
As mentioned, the Channel component uses the renderMessageInput property to return the CustomizedMessageInput. CustomizedMessageInput will start with using UIKit’s preset design, which contains an input field to write a message as well as an icon to attach a file.
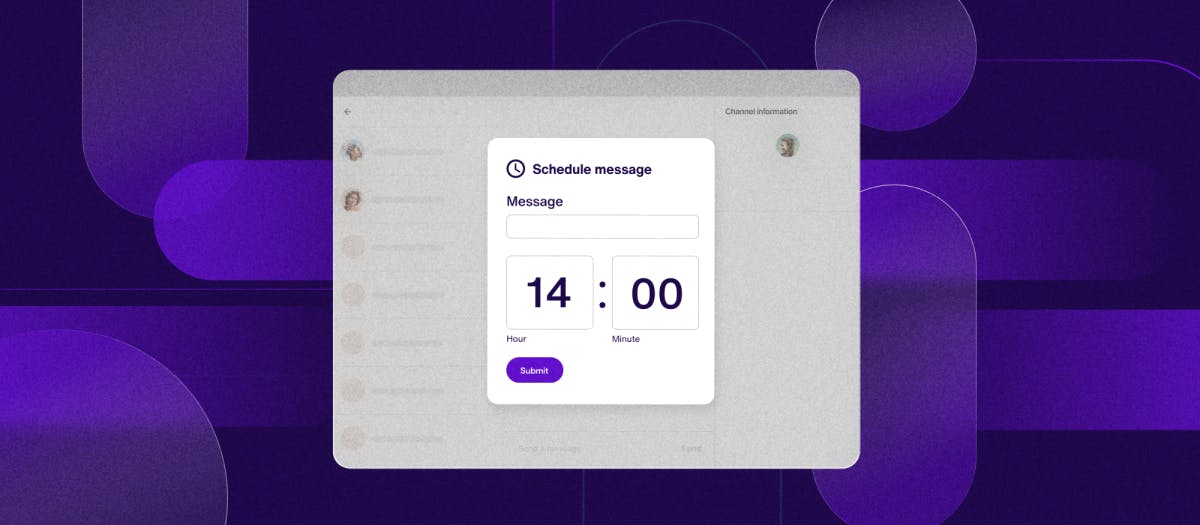
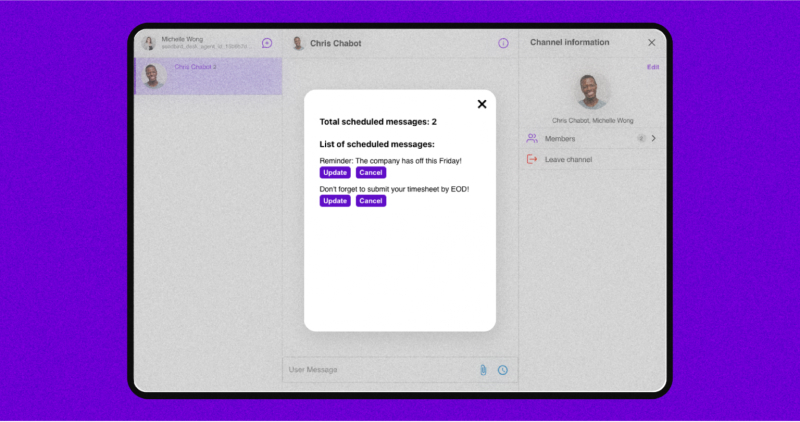
List scheduled messages
When the input box is empty, add in an icon button from Material UI that when clicked will render a list of the user’s scheduled messages in the channel.
First, the loadScheduledMessages function sets the state of showScheduleMessageList to true. Since showScheduleMessageList is true, the return of CustomizedMessageInput will render a custom component, ScheduleMessageList. This is what it looks like within the return:
ScheduleMessageList will render the list of scheduled messages.
Next, loadScheduledMessages will retrieve a list query as well as the total scheduled messages count and pass that information to the ScheduledMessageList to display it.
To list all scheduled messages, create the query params, which require the channelUrl. In our sample, the params will include scheduledStatus to return a list of the scheduled messages that have a pending status. Once the params are set, call createScheduledMessageListQuery and pass in the params. The following will return the list of scheduled messages:
When the list is received, keep track of it within a state variable which we will call scheduledMessgesList.
Then, this variable will be passed into the ScheduleMessageList component and the list will be rendered to the screen.
To retrieve the number of scheduled messages, set the params which will contain scheduledStatus. Then, call getTotalScheduledMessageCount and pass in the params. Once the number of messages pending returns, hold that number in a state, which is setScheduledMessagesCount and pass that variable into ScheduleMessageList to display the count.
With the above steps completed, loadScheduledMessages will look like this:
Update scheduled messages
In the ScheduleMessageList, each message displayed in the list will have an update and cancel button. When a user clicks update, it will call updateScheduledMessage. This will set setShowScheduleMessageList to false and setShowScheduleMessageForm to true in order to remove the ScheduleMessageList from the screen and display the ScheduleMessageForm.
Next, store the state of the message object that was selected, which is done using setMessageToUpdate and store the inputted text, which is the message in setInputText.
Now that setShowScheduleMessageForm is true, the CustomizedMessageInput will return ScheduleMessageForm:
ScheduleMessageForm will look like this:
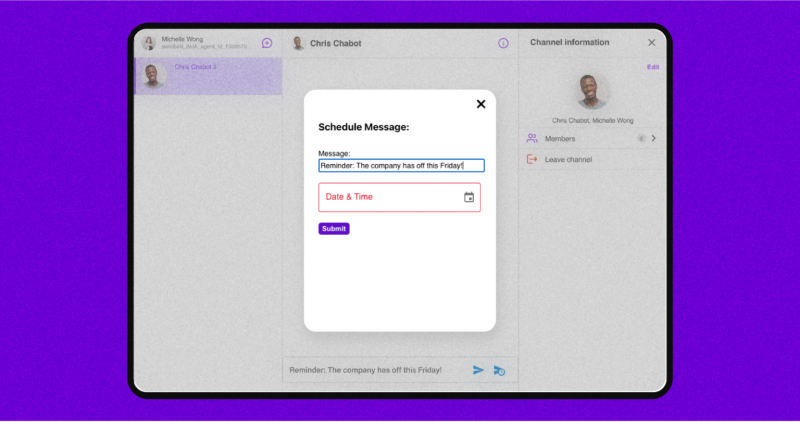
The schedule message form will allow users to change the date and time or update the scheduled message itself. When the user submits the form, it will call scheduleMessage. scheduleMessage will check if the message is being updated from an existing scheduled message or created for the first time.
Since this message came from the scheduled message list by clicking on a scheduled message, it is going to be updated and use the function to update a scheduled message. On the other hand, if the message has not been created yet, it will use the create function to generate a new scheduled message:
Sending a new scheduled message
In CustomizedMessageInput, when a user types in the input bar, add an icon button from Material UI that will appear and allow the user to schedule the message.
When the icon is clicked, setShowScheduleMessageForm will equal true and the ScheduleMessageForm previously mentioned will appear.
When the form is submitted, it calls scheduleMessage. In this case, it is creating a new scheduled message so it will use the create method instead of the update method. The params object requires a message and scheduledAt property. The params are passed into the createScheduledUserMessage function.
Cancel scheduled messages
In CustomizedMessageInput, the ScheduleMessageList displays each message with the update and cancel button. When a user clicks on the cancel button, it will trigger the cancelScheduledMessage function.
Within this function, use the cancelScheduledMessage function from the chat SDK to cancel a scheduled message. It requires the scheduled message’s ID to be passed in. Then, once that message is canceled, call loadScheduledMessages to reload the list of pending scheduled messages. This will update the UI to no longer display the message that was just canceled.
The canceledScheduledMessage will look like this:
Conclusion
You did it! Now you have a functioning chat application using UIKit that leverages the Sendbird Chat SDK’s scheduled messages feature! You’ve taken the steps to help users get ahead of the game and schedule messages that they want to be sent in the future.
We recommend that you check out the full github repository of this sample. If you need help with Sendbird Chat or the UIKit, please see our docs for Chat and docs for UIKit! You’ll find guidance about how to get chat up and running in your app with rich pre-built UI components. You can also find answers in the Sendbird Community, a forum where you can ask and answer questions related to all things Sendbird. Please don’t hesitate to contact us if you need help – our experts are happy to assist.
Happy scheduled messages building! 💬