
How to integrate Zapier with Sendbird's Chatbot API | Send email with Sendbird AI chatbot

How to integrate Zapier with Sendbird's Chatbot API | Send email with Sendbird AI chatbot
Integrating Zapier with Sendbird's AI chatbot through the powerful chatbot API facilitates a seamless connection that revolutionizes how businesses automate email communication. This advanced integration leverages the capabilities of the chatbot API to trigger email actions based on specific interactions within the chatbot UI, illustrating the dynamic potential of combining these technologies. The chatbot UI's design is pivotal, as it dictates the ease with which users can navigate and utilize the chatbot's features, directly influencing the effectiveness of the Zapier chatbot integration.
The tutorial emphasizes the critical role of the chatbot API in enabling developers to customize and extend the functionality of AI chatbots. By tapping into the chatbot API, developers can program the chatbot to perform complex tasks, such as sending personalized emails via Zapier based on the conversation's context. This capability showcases the chatbot API's versatility and its importance in creating sophisticated, automated workflows that enhance operational efficiency.
Moreover, the chatbot UI is not just about aesthetics; it's about creating an intuitive and engaging user experience. A well-designed chatbot UI ensures that users can easily interact with the chatbot, making requests or providing information that the chatbot, powered by the chatbot API, can use to execute precise actions through Zapier. The synergy between the chatbot API and chatbot UI is what makes this integration not only possible but also highly user-friendly and effective.
Throughout the tutorial, the focus on optimizing both the chatbot API and chatbot UI highlights the importance of these components in developing AI chatbots that can automate tasks with reliability and precision. The chatbot API offers the technical foundation necessary for integrating with services like Zapier, while the chatbot UI plays a crucial role in ensuring that end-users find the chatbot accessible and easy to use.
By the end, developers are equipped with the knowledge to harness the chatbot API for building advanced integrations and to appreciate the significance of the chatbot UI in facilitating smooth interactions. The goal is to empower developers to utilize the chatbot API and chatbot UI to their full potential, enabling businesses to automate their email communication processes efficiently and to provide users with an exceptional conversational experience.
This guide aims not just to instruct but also to inspire developers to explore the full potential of the chatbot API and chatbot UI in transforming business operations. With the chatbot API's flexibility and the chatbot UI's user-centric design, the possibilities for innovation in automating email communications and beyond are limitless.
This guide explores the integration of Sendbird's Zapier chatbot, focusing on automating email tasks.
A Sendbird chatbot automatically recognizes a task to complete based natural language Function trigger.
The Function listens for the user’s naturally written intent/request to send an email. The email details are created by the bot and are sent to Zapier
Zapier processes the details and sends an email.

Use Case
This integration is ideal for industries that rely on immediate communication and task automation within chat environments. Examples include customer support in retail, real-time event coordination, and community management. Specifically, this module will be beneficial for requesting to send email notifications based on AI detected chat triggers.
Implementation
Here is a video of the end to end implementation and below, we laid out as written step by step!
Step 1 - Create a Zap with a Webhook Trigger
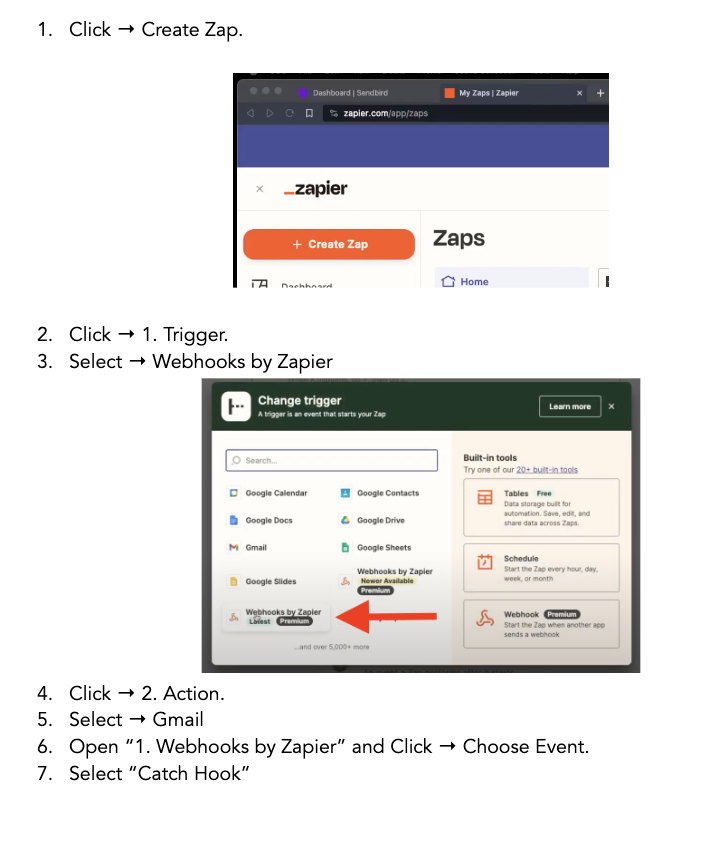
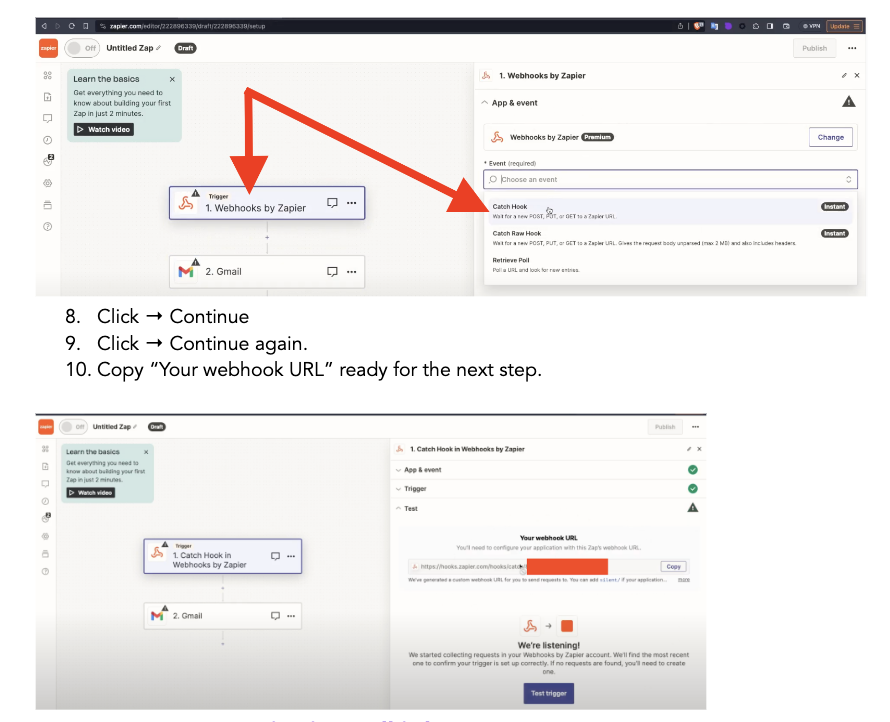
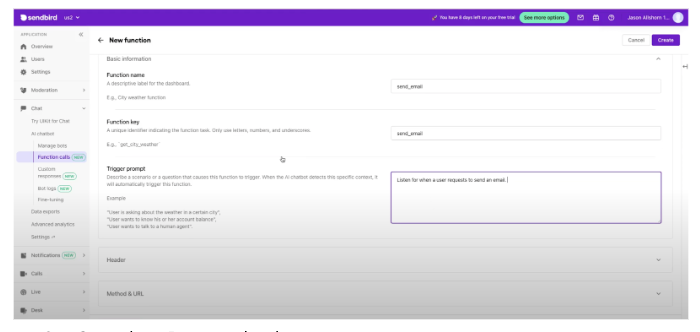
Step 2 - Create a Function in Sendbird:
A Function is essentially a trigger that happens based on natural language indent recognized by a Sendbird bot. Here we create the function and before moving on to create the bot.
Open Sendbird Dashboard left side menu.
Click → Chat → AI Chatbot → Function calls
Click → Create function (Top right)
Fill in Function name
Fill in Function Key
- Fill in Trigger Prompt
“Listen for when a user requests to send an email”
- Open Method & URL
POST + you zapier webhook url from above.
- Complete Request body.
- Add
- Parameter type = Dynamic
- Key = “email”
- Type = String
- Prompt describing data to be gathered or generated = “The email address to send to”
- Add
- Parameter type = Dynamic
- Key = “subject”
- Type = String
- Prompt describing data to be gathered or generated = “Choose a suitable email subject based on the conversation.”
- Add
- Parameter type = Dynamic
- Key = ”body”
- Type = String
- Prompt describing data to be gathered or generated = “Create a suitable body based on the request from the user.”
- Click → Create (Top right)
Step 3 - Create and Configure a Bot in Sendbird:
Open Sendbird Dashboard left side menu.
Click → Chat → AI Chatbot → Manage bots
Click → Create bot
Fill in bot name → “emailer”
Fill in bot id → “emailer”
Fill in System prompt → “Listens for instructions from the user and perform those tasks.”
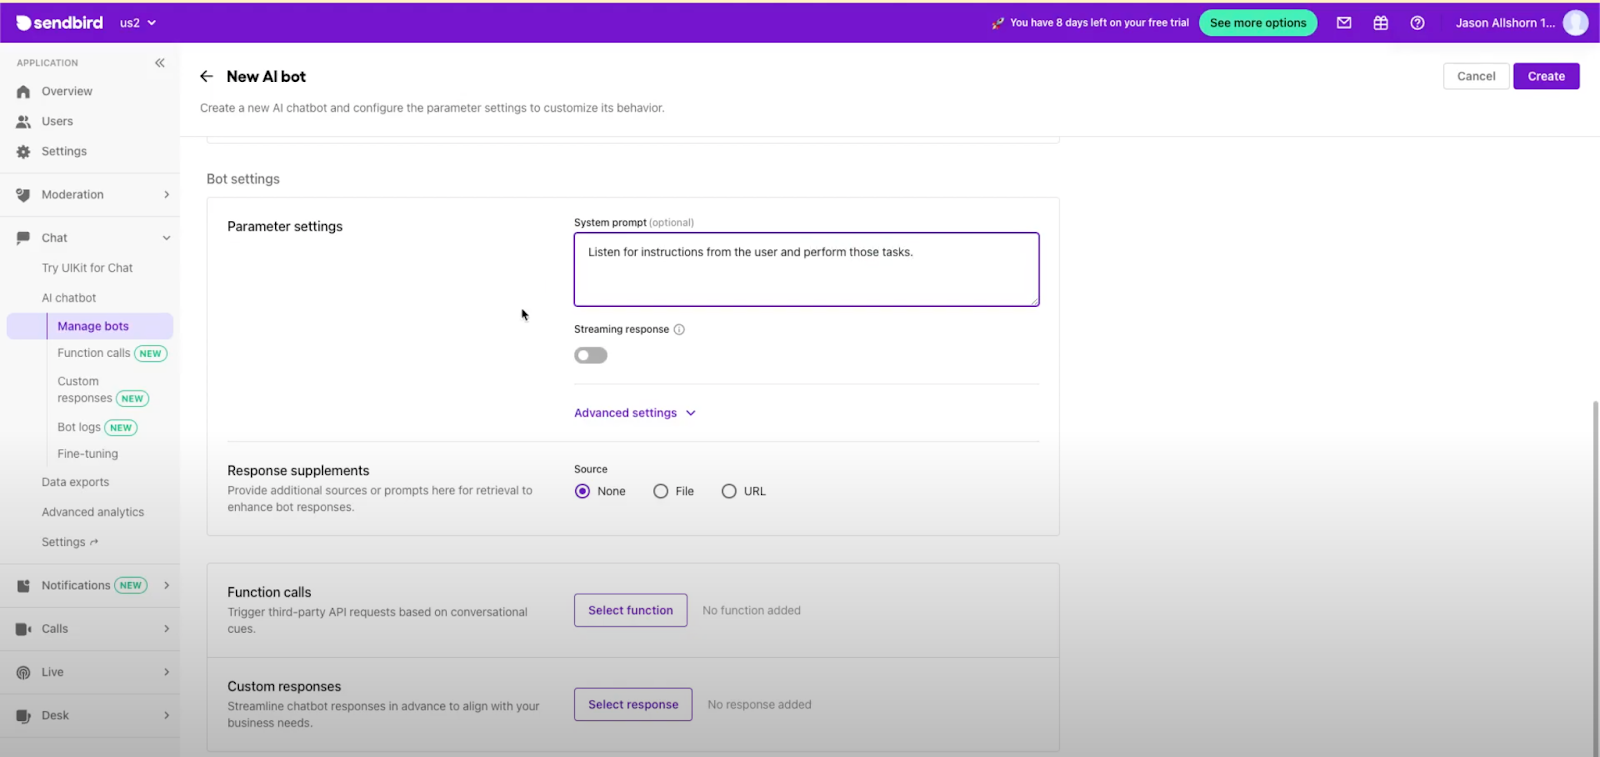
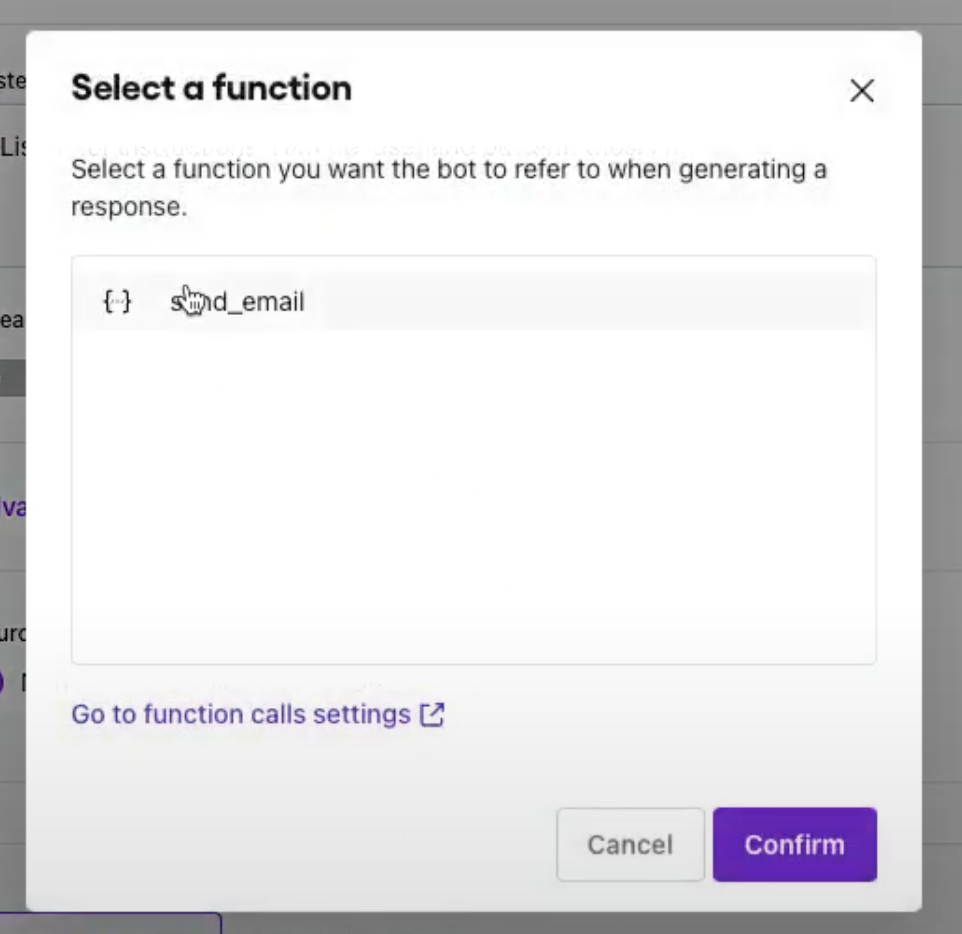
Click → Select function
Click → “send_email” (Function we made in Step 2 above)
Click → Confirm
Click → Create (Top right)
Step 4 - Test the Webhook:
Zapier is waiting for a call from the Sendbird bot. Remember we added the url into the Function call in Step 2.
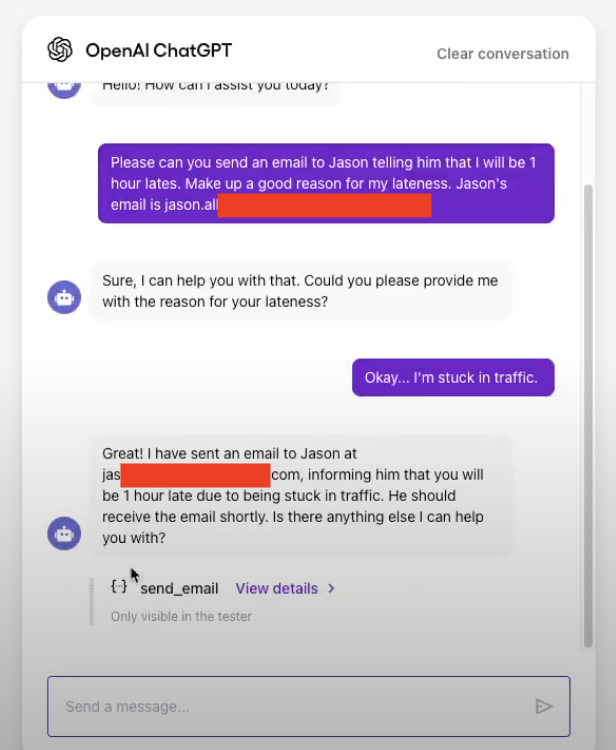
In the Sendbird Dashboard open testing bot → Left side menu → Manage bots → Click → “emailer” bot.
Converse with the testing bot and request for it to send an email. Be sure to include something along the lines of Please send this information to this person and include an email address.
Return to Zapier.
Click → Test trigger
Notice service has filled in with details from the Sendbird bot.
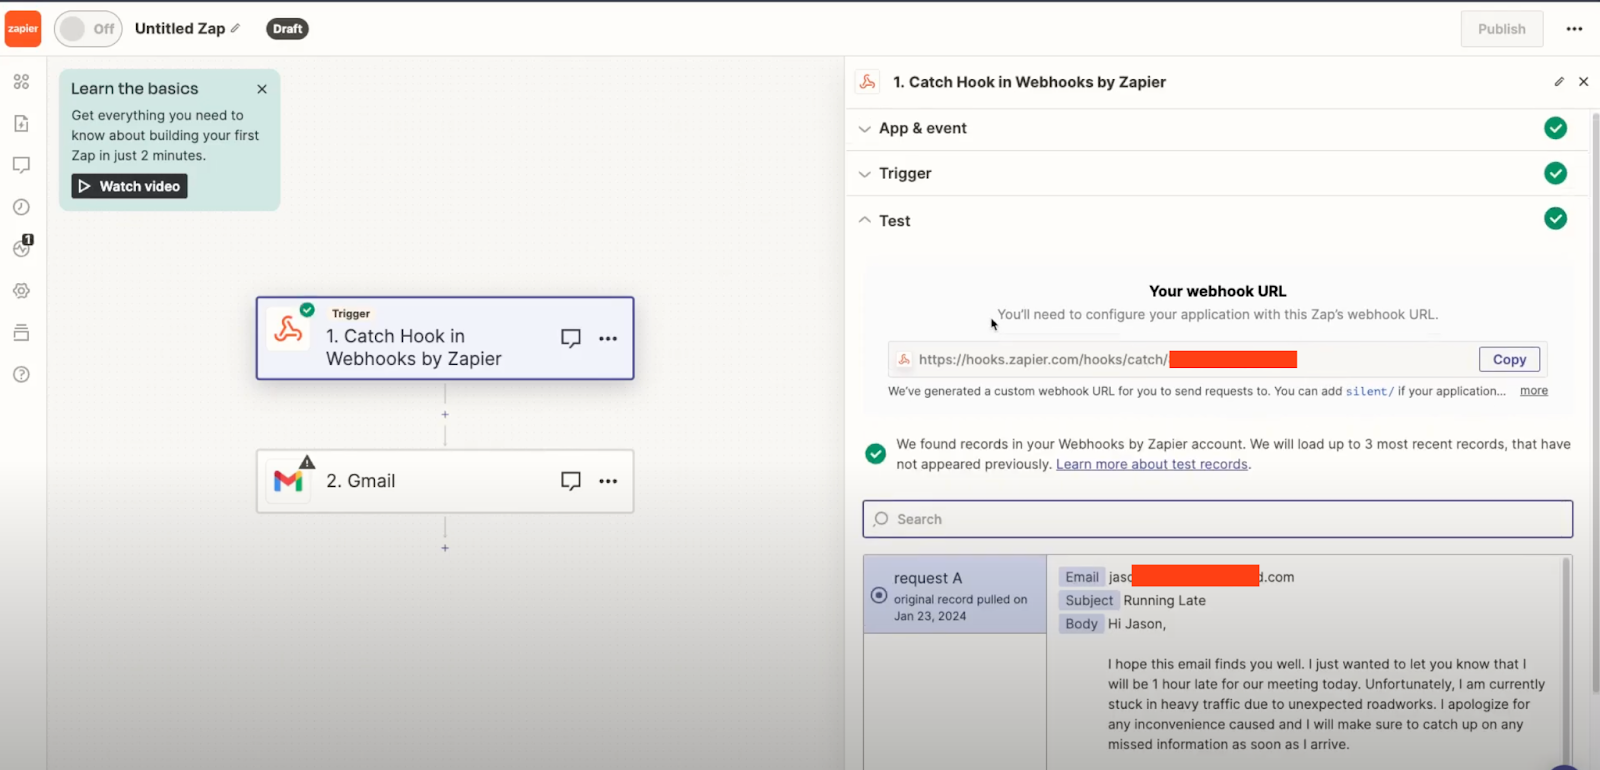
4. Click → Continue with selected record
Step 5 - Build and Test Email Service + Publish:
In Zapier under the 2. Gmail click → Choose an event
Select “Send Email”.
Click → Continue
In the To box select the Email field from the webhook example populated from above.
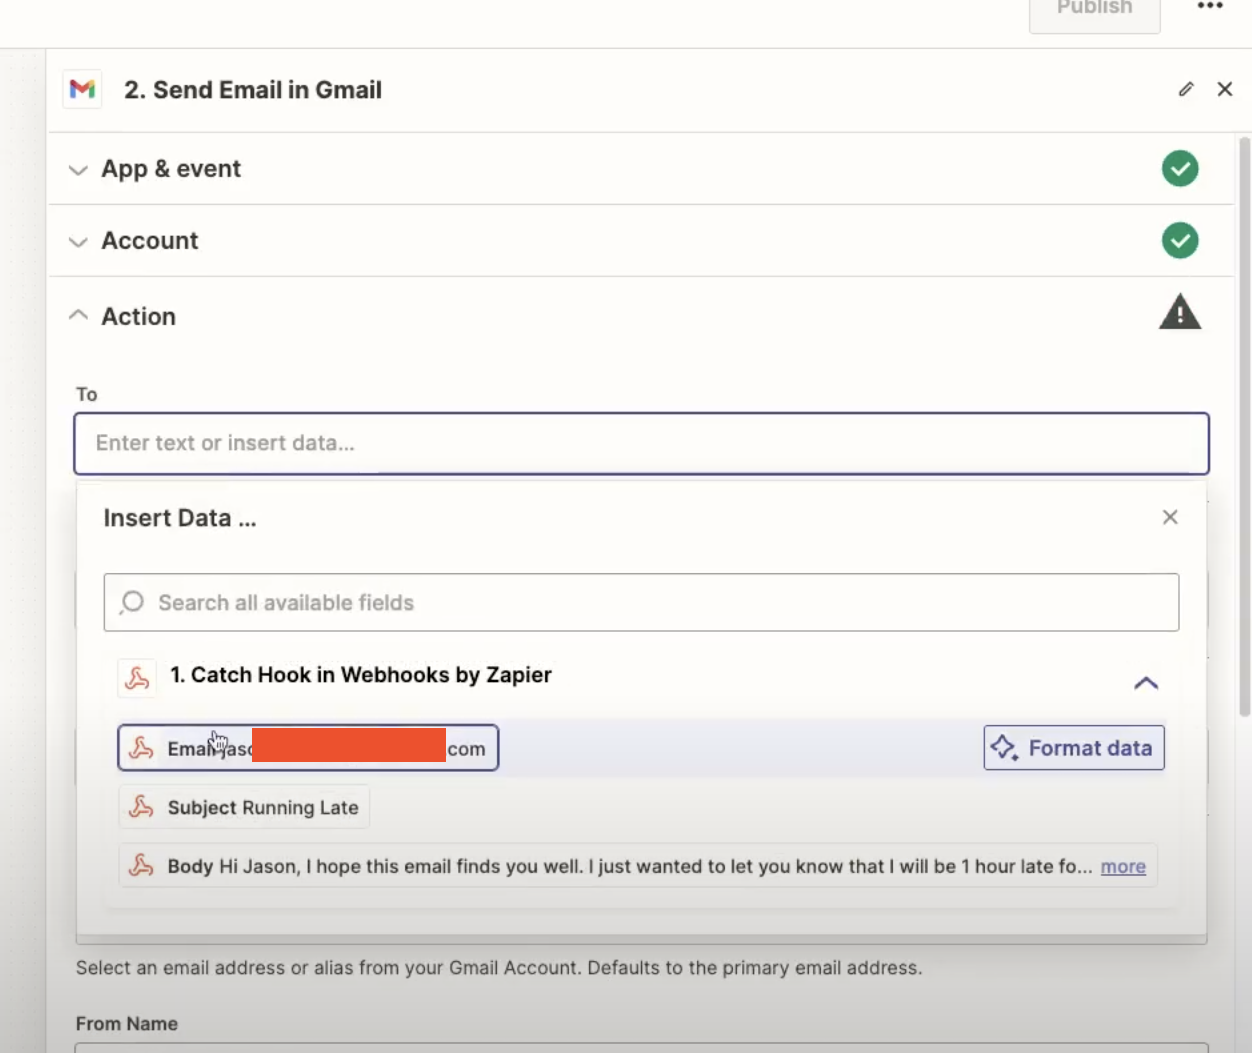
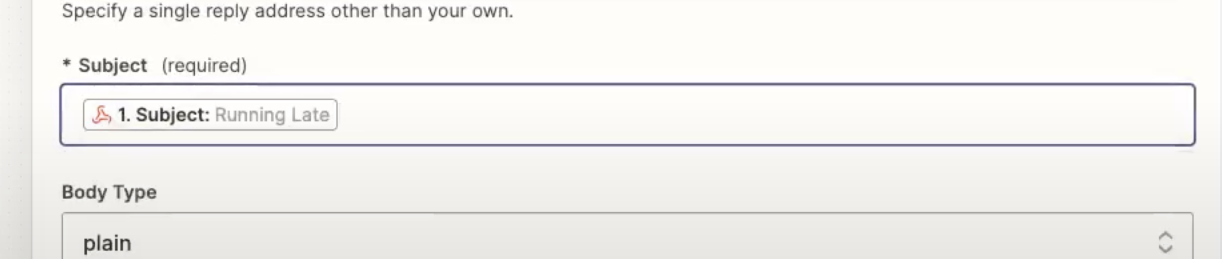
5. Fill in *Subject
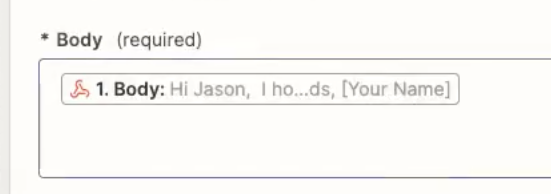
6. Fill in *Body
7. Click → Continue
8. Click → Test step
9. Click → Publish
Step 7 - Test:
Go back to your bot’s testing service and make similar requests to send emails as seen in Step 4. Also visit your target email to observe if the emails are being delivered as intended.
Conclusion
This module covered the step-by-step process of integrating Sendbird with Zapier to automate email tasks. This integration opens up numerous possibilities for enhancing communication and task automation within chat applications


