
How to implement push notifications in a React Native app using Sendbird Chat

Introduction: What are push notifications, and why are they important?
A push notification is an automated, clickable popup message sent by an application to its users. The message is immediately delivered to a device when the device is idle or running the app in the background. Push notifications are essential because they:
- Deliver critical information, reminders, and news relating to the user’s activity or interests
- Boost mobile app engagement metrics
- Showcase featured content
- Drive targeted, relevant traffic that increases conversion rates
- Create a seamless user experience with personalized, well-timed, relevant content
Our guide to mobile push notifications has everything you need to know about push notifications, their benefits, and how they can be used.
It’s worth noting that the average smartphone user in the US receives 45 push notifications daily! According to RubyGarage, organizations implementing push notifications have 3x higher customer retention and 88% higher engagement than businesses without. While there are variations in push notification opt-in and click rates based on industry, location, type, and many other factors, the case for implementing push notifications is clear.
This tutorial provides step-by-step instructions for implementing React Native push notifications. But first, let’s review some prerequisites.
Prerequisites
- Create a Sendbird account.
- Ensure that Sendbird Chat works well in your React Native app.
Remember that when a message is sent to the Sendbird server from an app (through the Chat SDK for JavaScript), the server communicates with FCM. FCM then delivers a push notification to the Android device or communicates with APNs to deliver the push notification to the iOS device.
Push notifications for React Native applications
Push notifications can be sent to hybrid mobile application users (Android and iOS) using the Sendbird Chat SDK for JavaScript. Currently, the push notification functionality of the JavaScript SDK is compatible with React Native only. This tutorial provides details for enabling push notifications in a React Native app by using Firebase Cloud Messaging (FCM) and the Sendbird Chat SDK.
Before diving into the implementation details, let’s talk about FCM messages. There are two types of FCM messages: notification messages and data messages. According to the Firebase documentation, “Notification messages have a predefined set of user-visible keys and an optional data payload of custom key-value pairs.” Data messages contain only user-defined key-value pairs. Sendbird uses data messages, allowing client apps to create the custom message payload consisting of these custom key-value pairs.
Push notifications are not supported for web applications. If you need to implement push notifications for web apps, we recommend using the webhook events to implement push notifications for web applications.
Before you start, ensure that you have access to the Firebase console. Let’s dive in! 💻
Step 1: Register FCM credentials and APNs certificate to the Sendbird dashboard
The Sendbird server requires an FCM server key for Android and APNs certificate for iOS to deliver the push notifications.
Follow steps 1 and 2 of this tutorial to register the FCM credentials and follow the instructions in the docs to register the APNs certificate to the Sendbird dashboard.
Step 2: Install the React Native Firebase module and add the config files
React Native Firebase is the officially recommended collection of packages that brings React Native support to all Firebase services on both Android and iOS apps. Configure FCM for Android and APNs for iOS in your React Native project by following the instructions in the official documentation. By the end of this step, you should have Android and iOS apps added to the Firebase project, and respective config files added to the React Native project.
Refer to the React Native Firebase notifications page to learn more about displaying and handling notifications from FCM.
Step 3: Register a push token to the Sendbird server
To send notification messages to a specific client app, FCM requires an FCM registration token for Android devices and an APNs device token for iOS devices, issued by the client app instance. Therefore, the Sendbird server also needs the registration token of every client app instance to send notification requests to FCM on your behalf. The Chat SDK provides an interface to register and unregister these two types of tokens to the Sendbird server.
The below code snippet shows the device token registration.
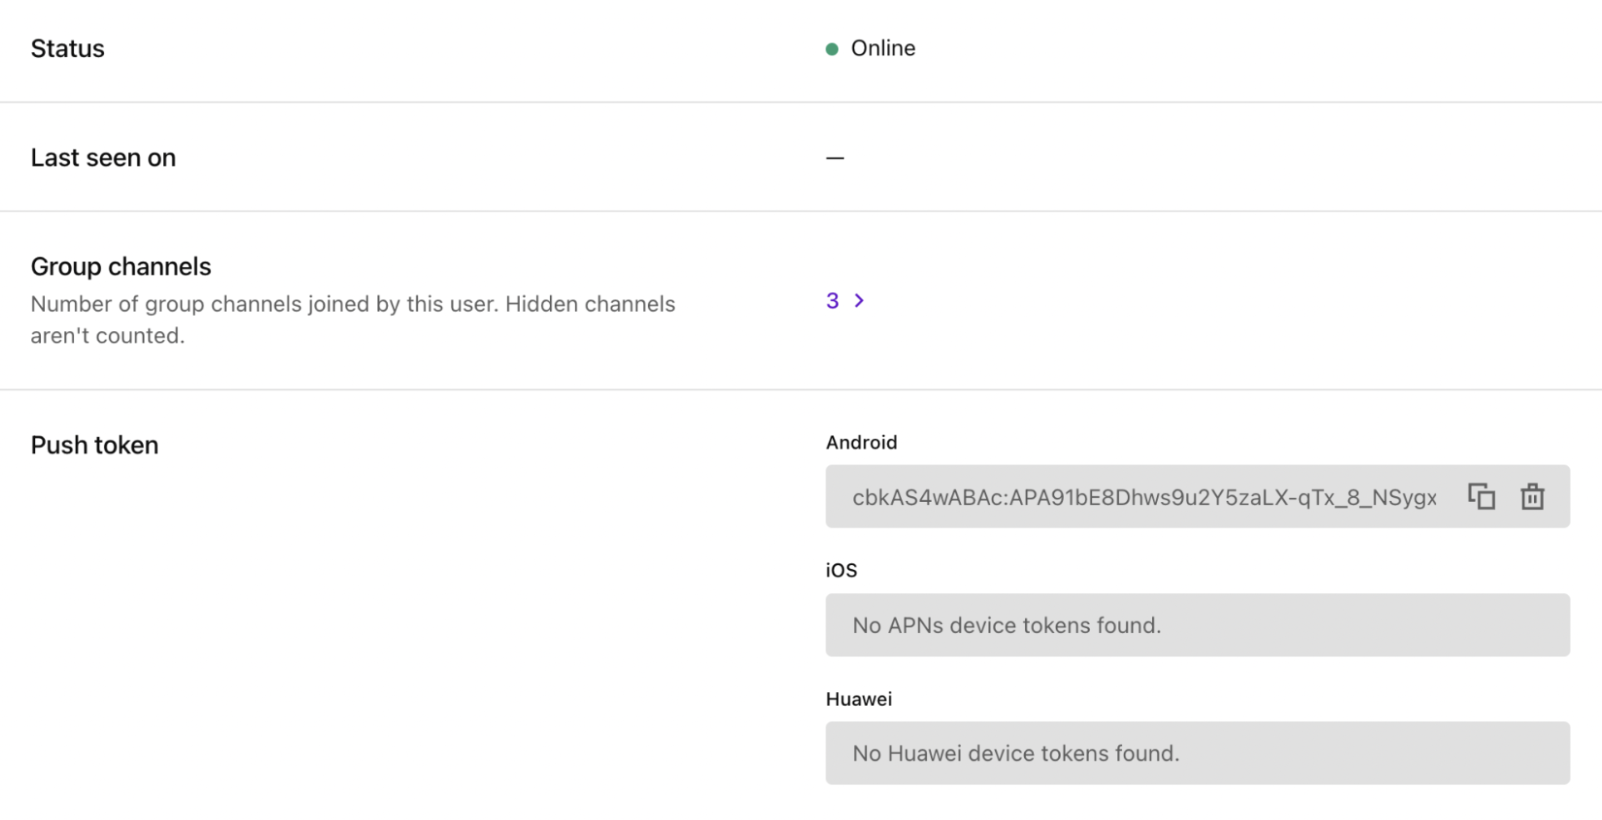
The registered push token appears in the dashboard under ‘Users > user_id > Chat’:
Step 4: Receive push notification messages
Once the device token has been registered, the client app instance can receive and handle the FCM notification messages regardless of the iOS or Android platform. Refer to the React Native Firebase documentation’s usage page to learn more about the implementation.
The Sendbird Chat SDK for JavaScript doesn’t automatically detect the state of your application, so the setForegroundState() and setBackgroundState() methods provided by the Sendbird SDK need to be called explicitly.
Review the React Native Firebase documentation to understand the available event handlers for receiving messages. The below code snippet shows the parsing of received FCM messages.
Note: Channels are an Android-only concept used to categorize and allow users to control how notifications are handled on their devices.
The data object parsed from an FCM data message contains a set of key-value items, as shown in the below JSON code.
Tips for troubleshooting push notifications
Troubleshooting push notifications can be complex; here are some tips on doing this.
- To make it easier for developers to debug and troubleshoot push notifications, we have built a tester tool that you may find useful. Please see this tutorial to understand how to use the tool, which you can access via the Sendbird dashboard.
- Check out this comprehensive guide to troubleshooting Android chat push notifications.
- If you want to debug failure conditions, please refer to the FCM error codes.
Conclusion
And that’s a wrap! You now know how to send push notifications for React Native apps with Sendbird Chat. With the guidance in this tutorial and the docs, you’ll be on your way to sending timely, relevant, and engaging push notifications in no time!
We’re always here to help; contact us if you have any questions, comments, or concerns. Also, to extend your notifications capabilities, check our omnichannel business messaging solution for 1-way communication. You'll be able to reach customers more effectively, reduce costs, and improve their experience across SMS, WhatsApp, and in-app notifications.
Happy push notifications building! 💻


