
Supercharge your customer support tool: An easy guide to setting up the Salesforce Connector

Take your customer support tool to the next level with Sendbird’s Salesforce Connector
Sendbird’s Salesforce Connector for Salesforce Service Cloud empowers organizations to provide effective customer support by equipping support agents to engage in real-time chat conversations with customers through a dedicated chat window seamlessly integrated within the Salesforce Service Console. Agents can use this integrated customer support tool to increase the efficiency of customer support.
In this tutorial, you’ll learn how to install the Salesforce Connector package in your Salesforce instance and configure it. We’ll also look at two ways to get the chat UI up and running in the Salesforce Service Cloud.
But first, let’s take a look at prerequisites and find out why you should set up the Salesforce Connector in the first place. Or if you want to quickly start building, skip to the implementation!
Prerequisites to setting up an integrated customer support tool
To get the most out of this tutorial, we recommend that you have:
A Salesforce account
Why should you use an integrated customer support tool? Benefits for agents and customers
Compared to traditional support channels like phone or email, the Salesforce Connector delivers many benefits that enhance agent efficiency, optimize customer support performance, and ultimately improve CSAT. We recommend that you use this customer support tool to get:
Instantaneous communication: With the real-time chat window, customers can receive immediate assistance from agents without waiting on hold or for a response to an email. This instant communication streamlines the support process and significantly reduces customer frustration.
Contextual conversations: The Salesforce Connector empowers agents to view relevant customer information and interactions within the Service Console. This contextual awareness enables agents to provide personalized and tailored support.
Agent efficiency: By centralizing the chat functionality within the Salesforce Service Console, agents can seamlessly handle customer inquiries without switching between different platforms. This consolidation eliminates the need for severely time-consuming context switching and boosts agent productivity.
Comprehensive support history: The Salesforce Connector automatically logs and synchronizes the entire chat history with customer records in Salesforce. This comprehensive support history gives agents a complete overview of previous interactions, allowing them to deliver more informed and effective support.
Advanced reporting and analytics: The Salesforce Connector captures valuable data on chat interactions, enabling you to gain insights into customer behavior, agent performance, and support trends. These analytics empower your organization to make data-driven decisions to optimize support operations and enhance the customer experience.
Salesforce Connector implementation: High-level architecture
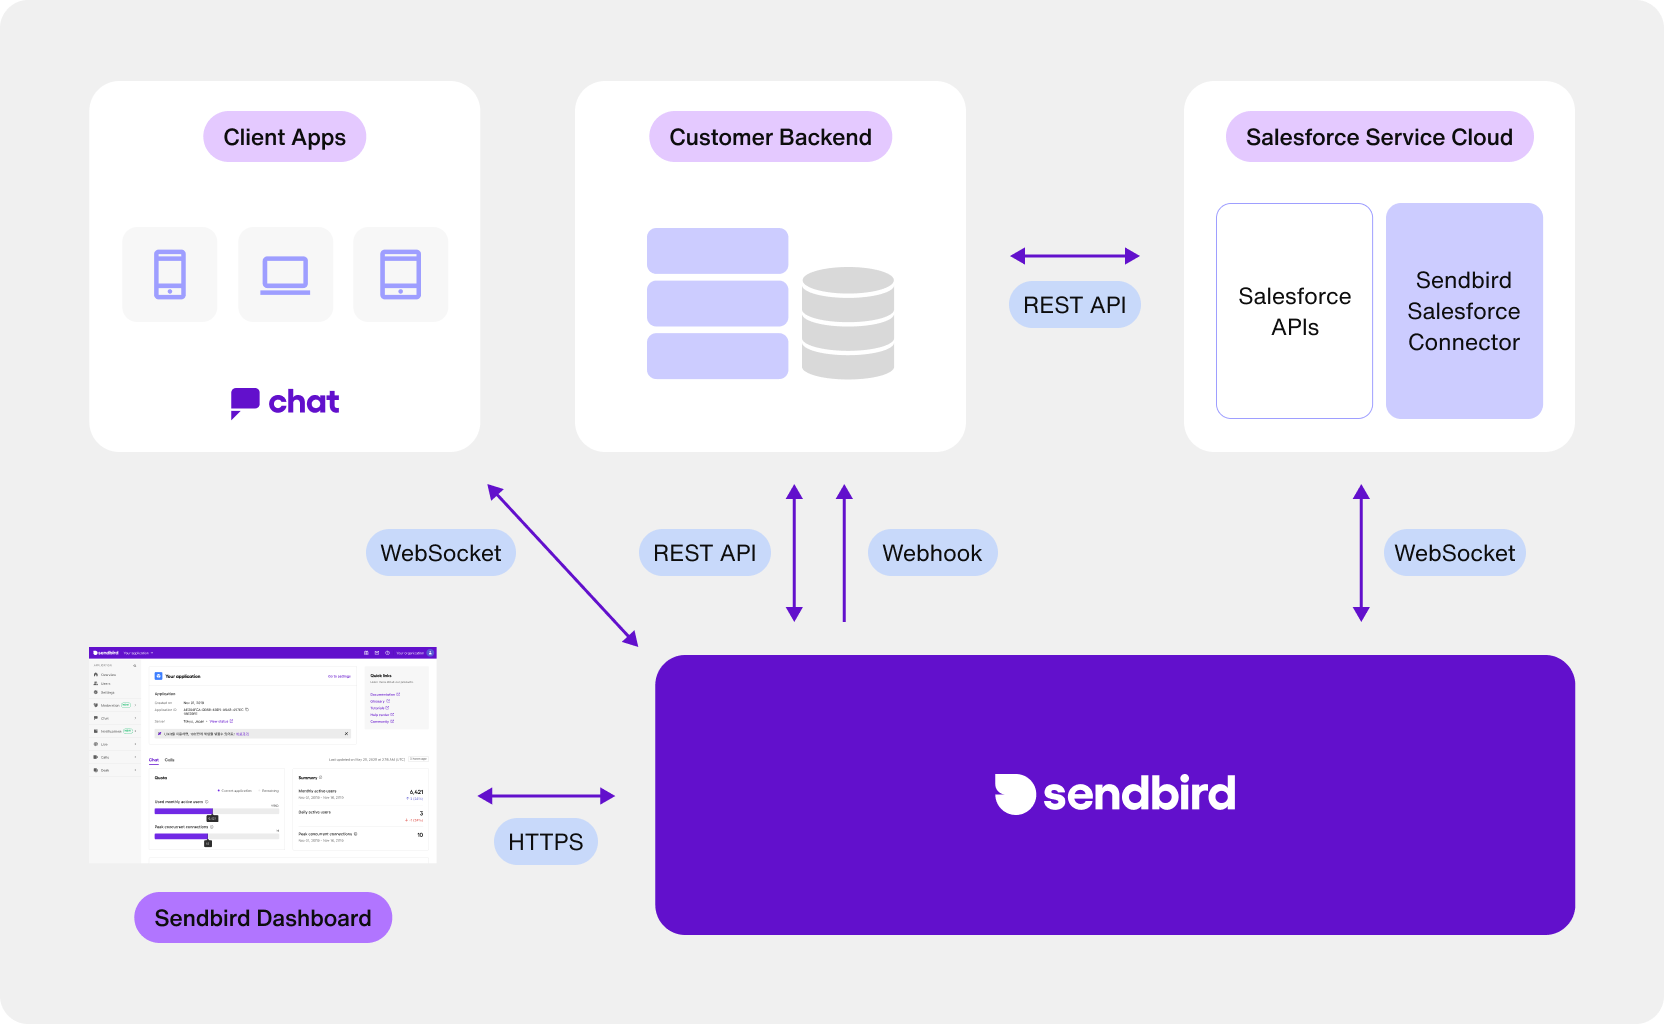
There are four components involved in this integration.
Sendbird: The Sendbird chat server is the core of this integration. Users and channels are the key elements of any conversation in Sendbird – the group channels are used for support chat. Sendbird provides a range of APIs, SDKs for various platforms, and webhooks for integration.
Salesforce Service Cloud: The Salesforce Service Cloud is the system used by your agents to manage support cases. The Salesforce Connector is a package that adds a chat UI to the Service Console to enable agents to chat with customers. The channel membership for agents is managed by the Salesforce Connector when cases are created or transferred.
Apps for end users: The chat client for Sendbird needs to be added to your web and/or mobile apps for customers to chat with agents. You can use either Sendbird Chat SDKs or Sendbird UIKit to power your apps with the chat experience. The SDK provides a customizable chat client that developers can integrate directly into their applications – this is the best option when customization is a high priority. The UIKit offers pre-built chat UI components that can be easily customized to match your application's design – this is the best fit for rapid integration with a pre-built UI.
Please refer to the documentation to understand the technical details of implementing chat in client apps. You can also refer to the UIKit sample apps for Android, iOS, and React to kickstart your development. For a more general overview, check out this guide.
Custom backend on your side: When a customer initiates a support chat, you need to create a Salesforce case and a Sendbird channel. Similarly, the users for customers need to be created. These operations must be done as part of your customer implementation. You can make these operations from the apps directly using the Sendbird SDKs or centralize them in your backend using the Platform APIs.
Now let’s talk about the details of the setup.
How to set up Sendbird’s Salesforce Connector
This section walks you through installing the Salesforce Connector package in your Salesforce instance and required configurations to get the chat UI up and running in the Service Cloud.
Install the Salesforce Connector package
1. Login to your Salesforce account as an administrator.
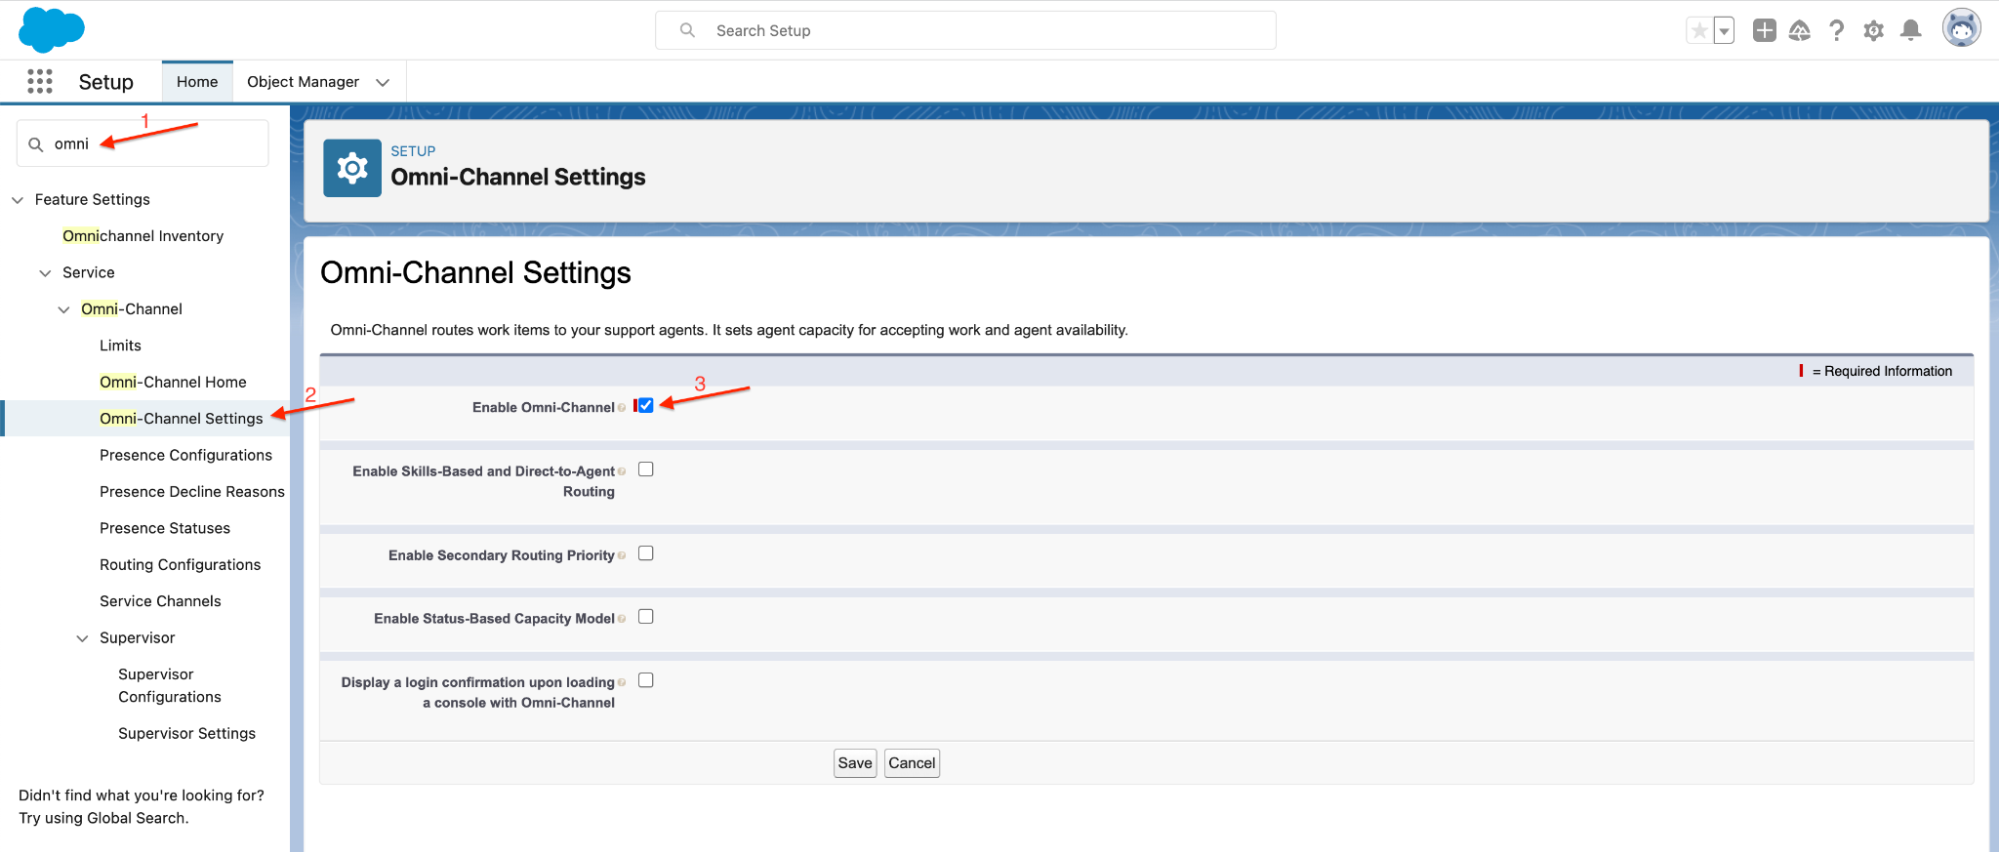
2. Go to 'Setup > Omni-Channel > Omni-Channel Settings' and make sure that 'Enable Omni-Channel' is checked. Errors with installation if this is disabled.
3. Please refer to Step 1 in the docs to get the latest package details.
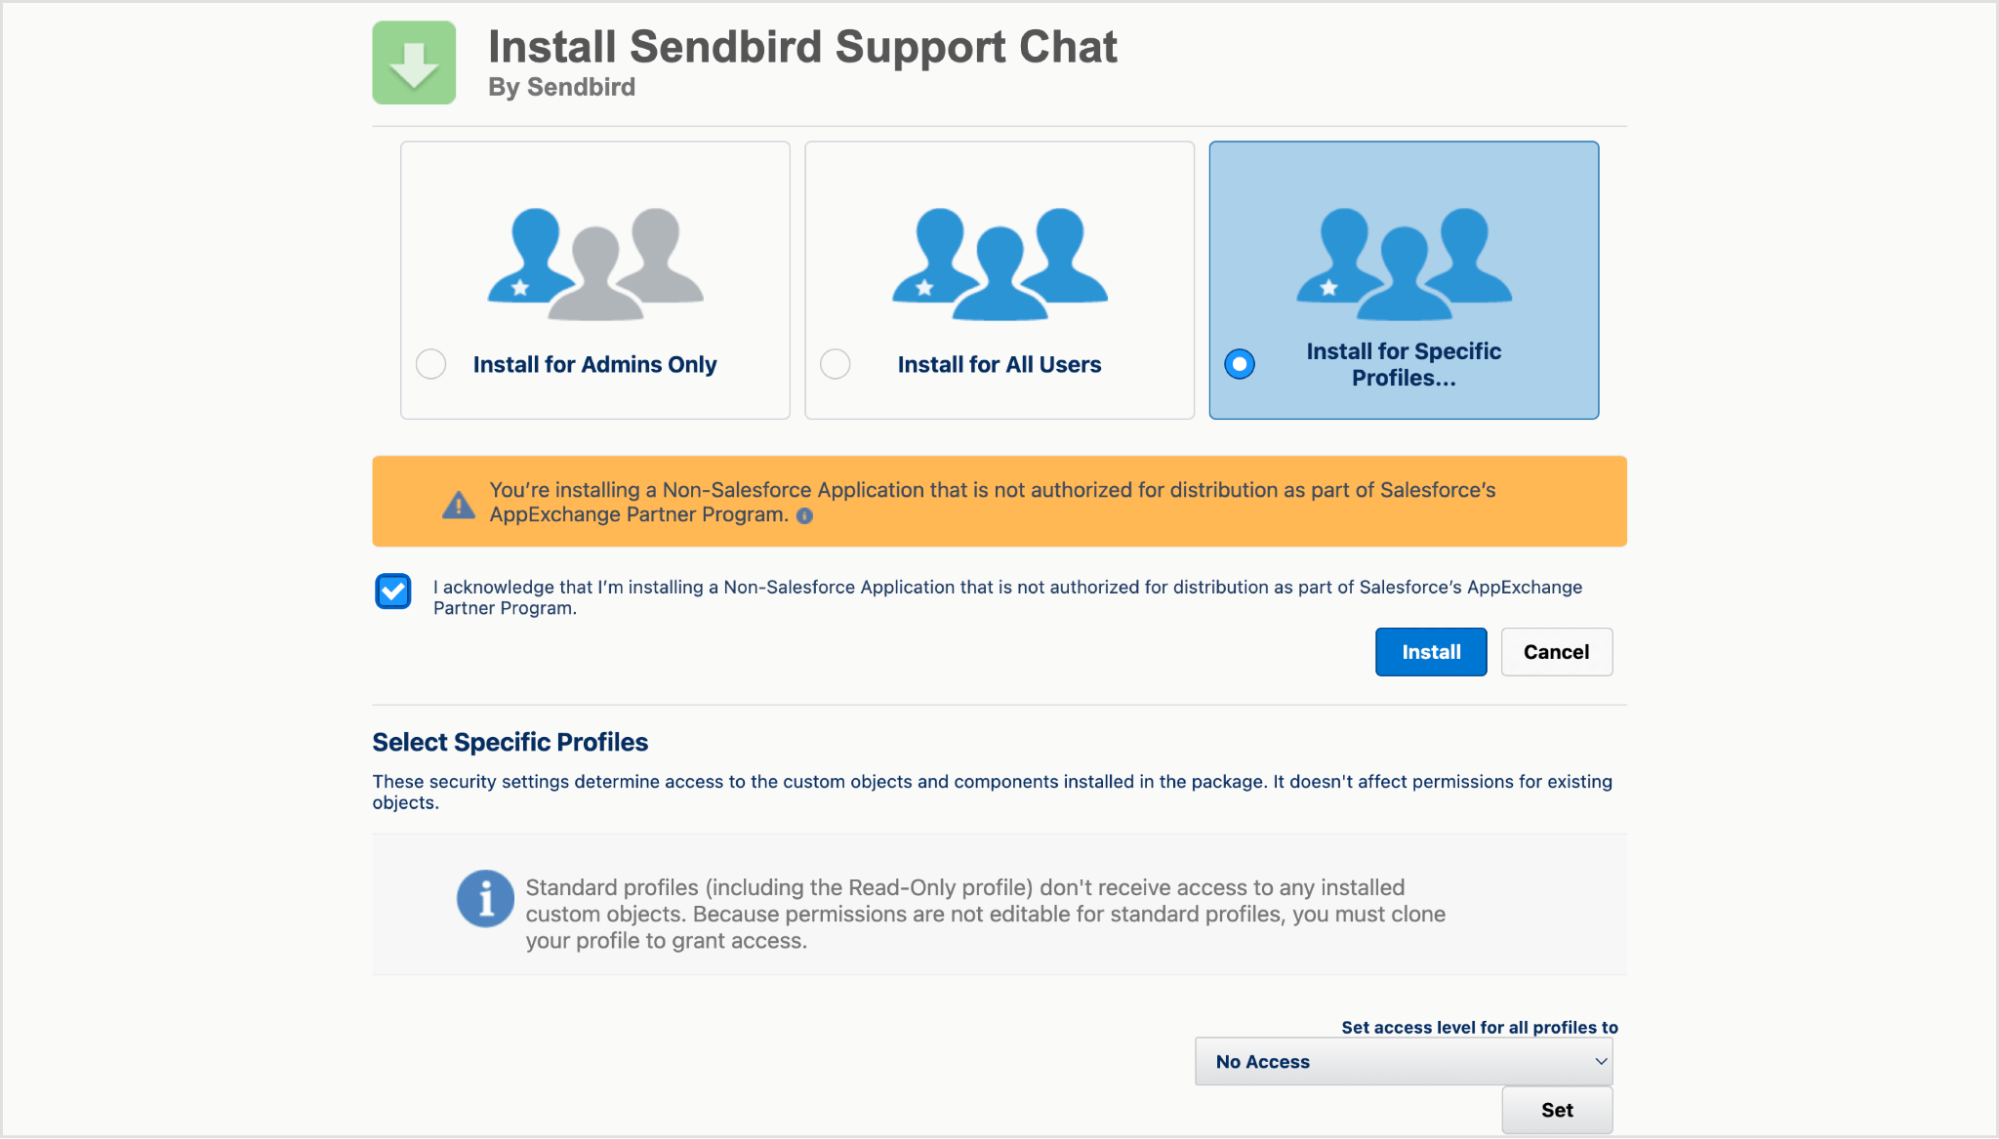
4. Select 'Install for Specific Profiles…' as shown below, and click Install.
Note: We are currently applying to be a member of the Salesforce AppExchange Partner program. Therefore, please mark the acknowledgment checkbox to install the package.
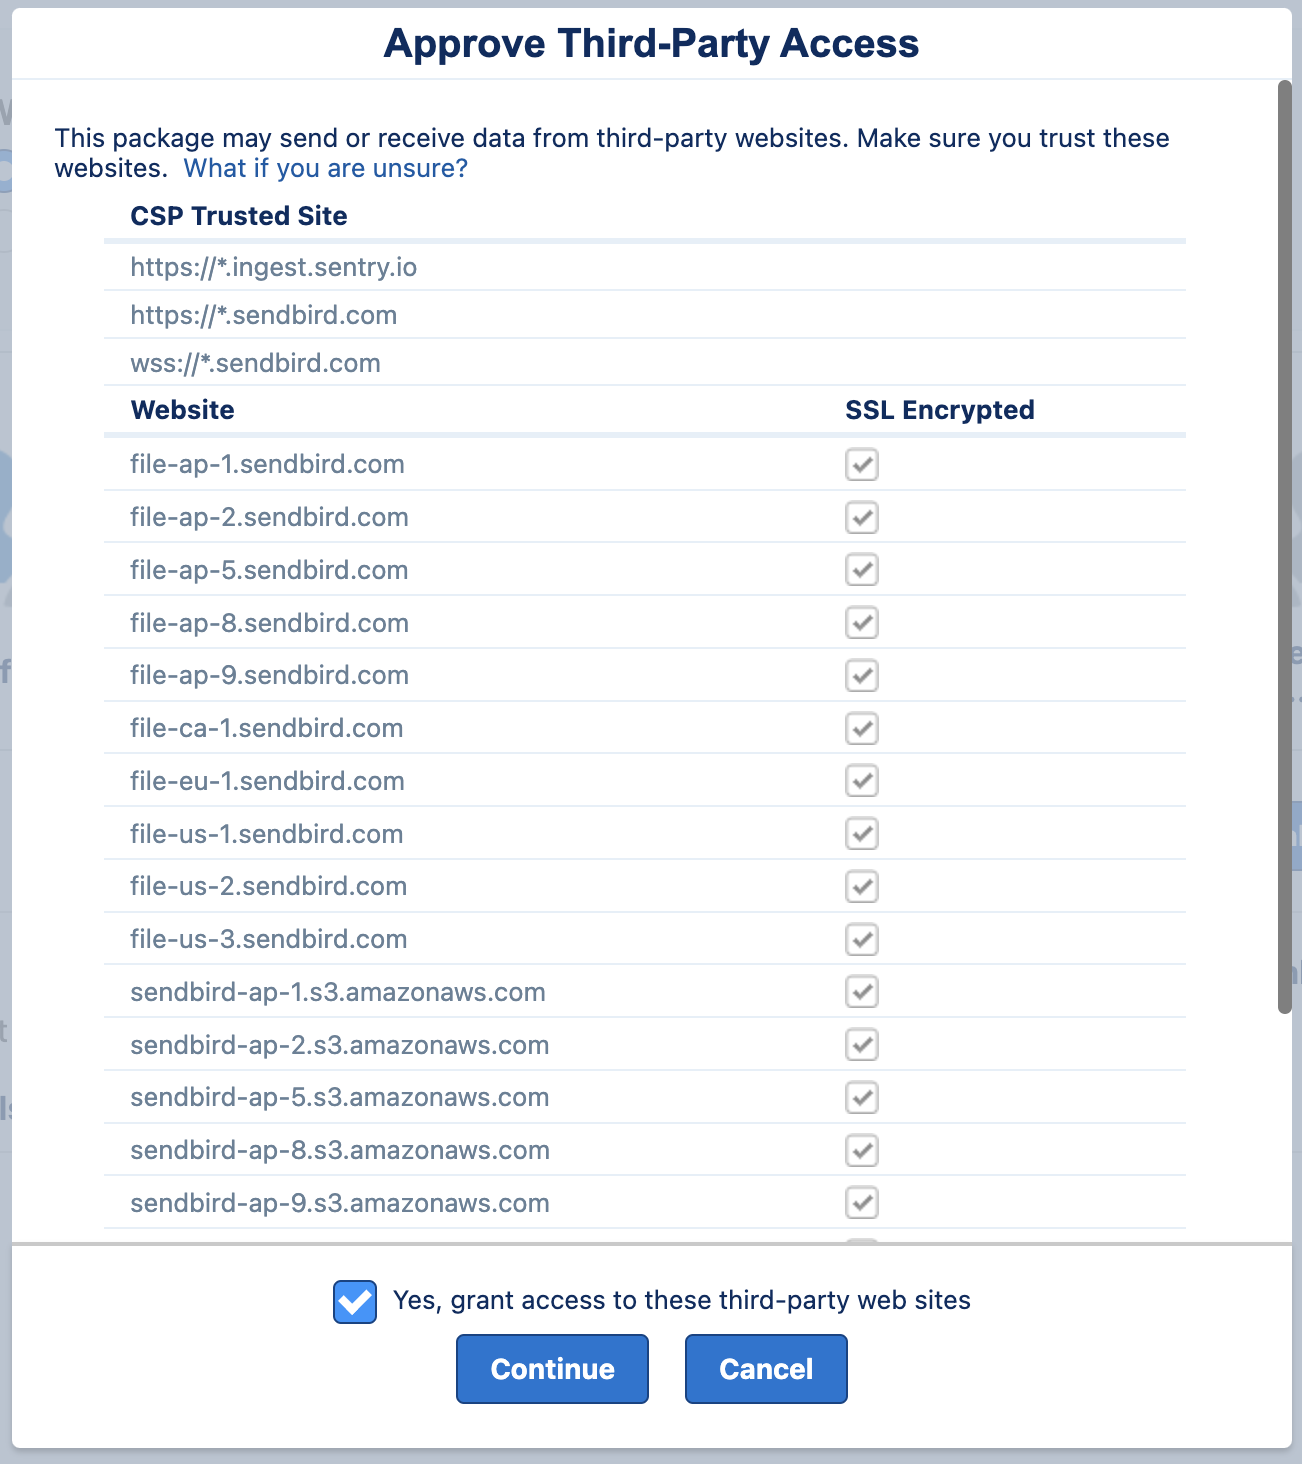
5. Select 'Yes, grant access to these third party web sites' in the popup, and click Continue. This is required for Salesforce to connect with the Sendbird APIs.
6. When the installation is completed, you will see the completion message and receive a confirmation email.
Configure settings in Sendbird Dashboard
Follow the below steps to enable Salesforce integration.
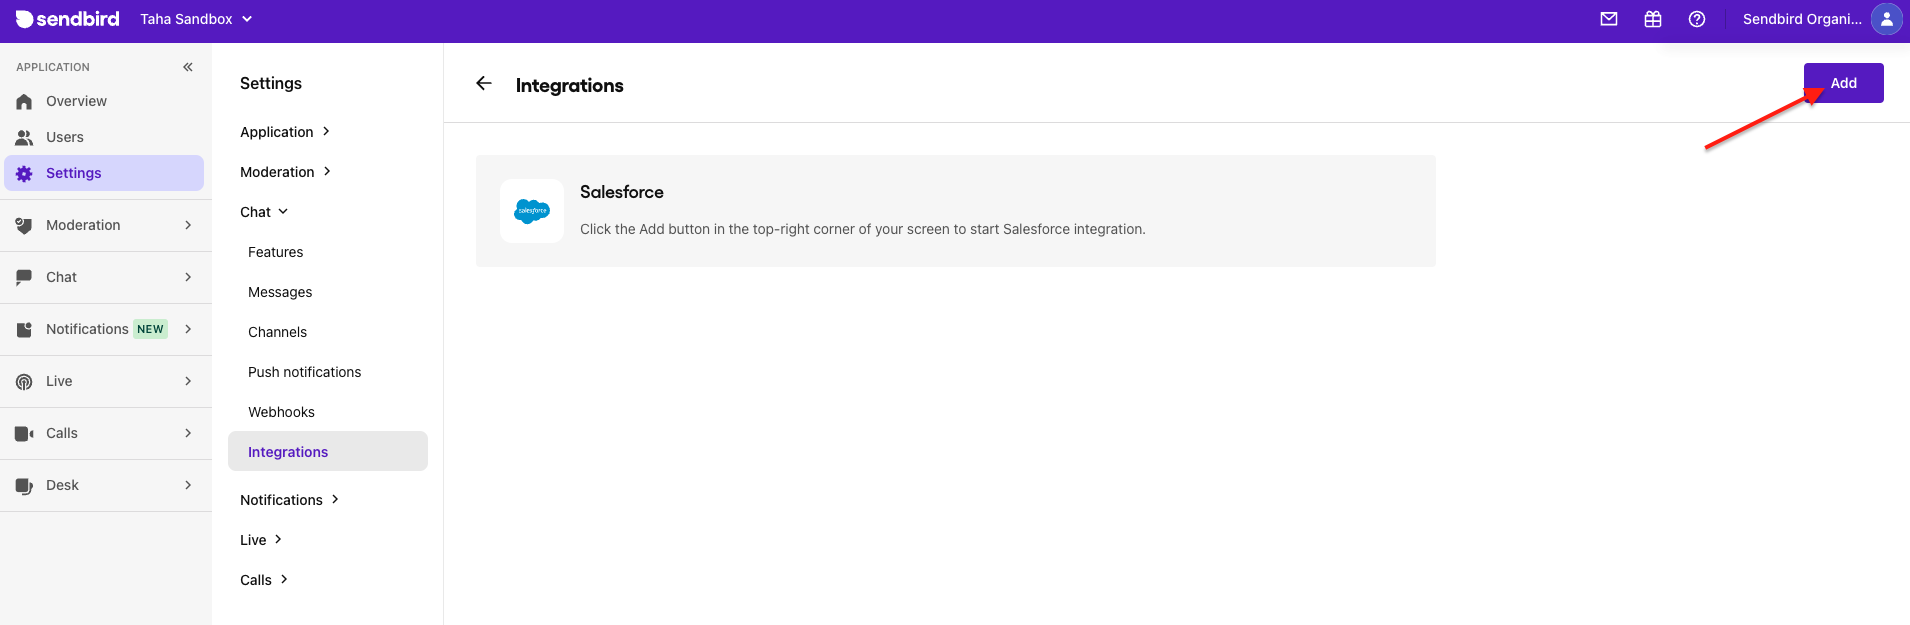
1. Login to the Sendbird Dashboard. Go to 'Settings > Chat > Integrations' and select Salesforce.

2. Click 'Add' button in the top-right corner; it will enable the integration and generate an API token.
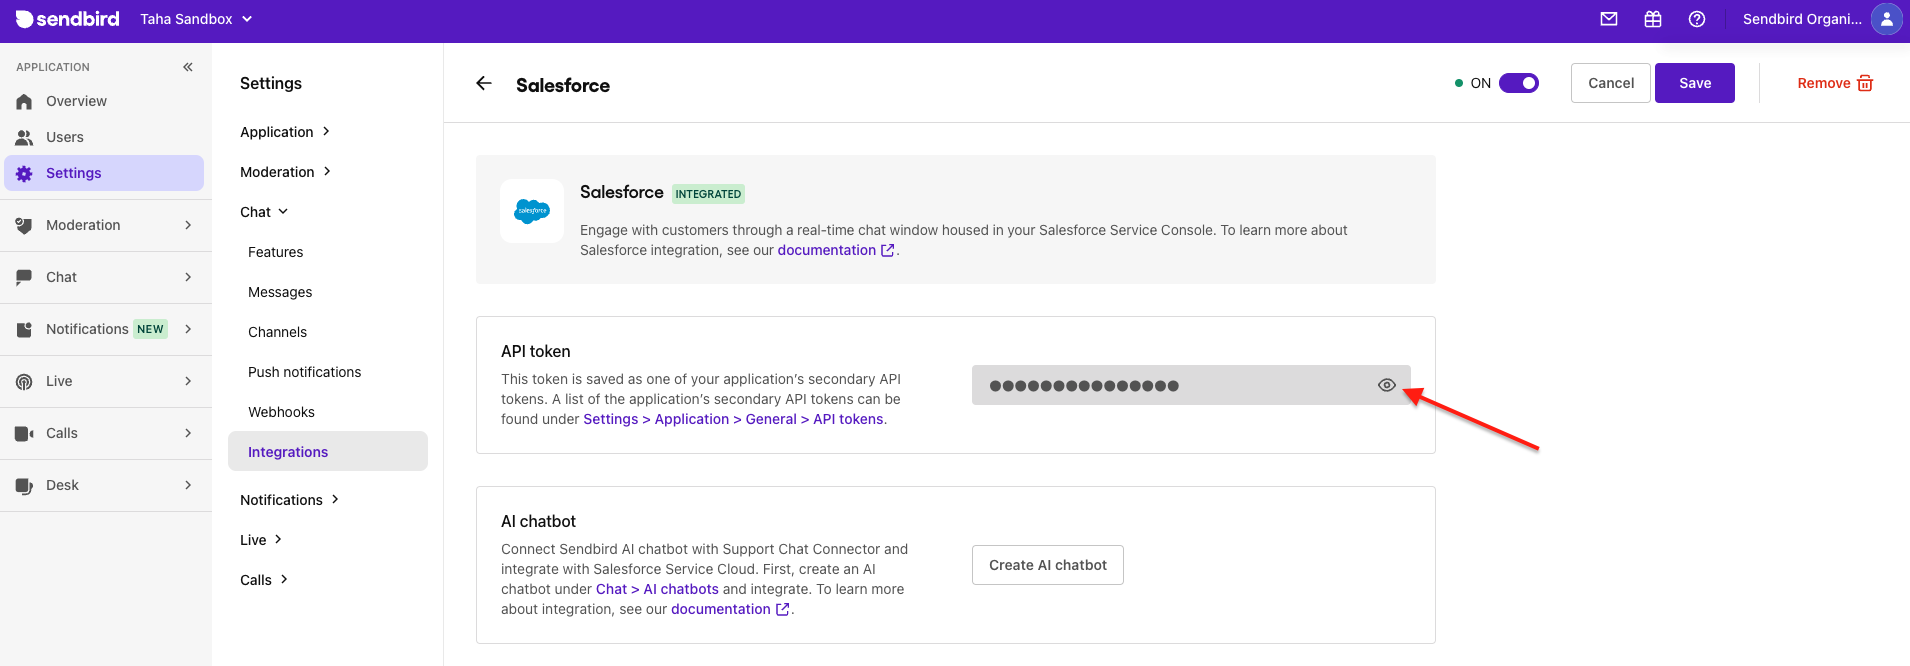
3. Copy the generated token; it will be required in the later steps to connect Salesforce with Sendbird.
Refer to the following steps to configure group channel settings.
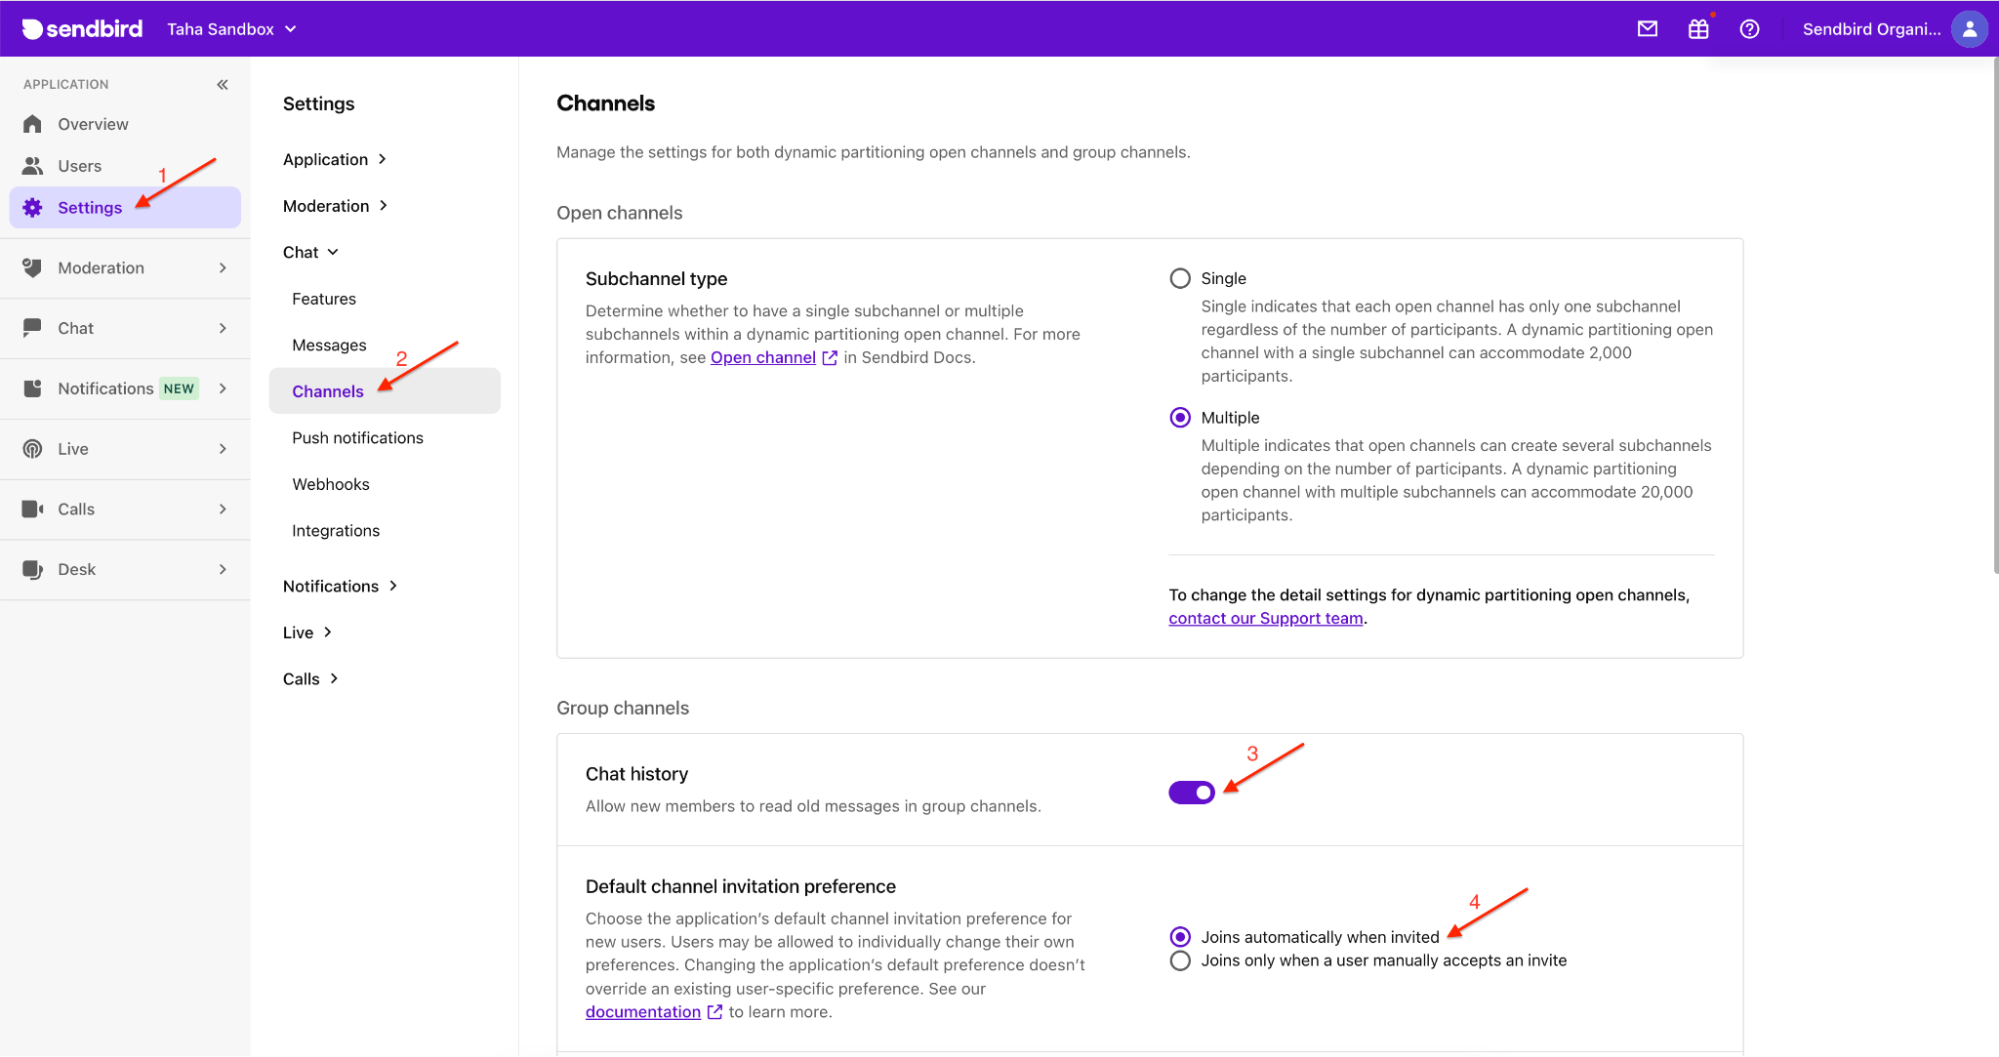
- Go to 'Settings > Chat > Channels > Group channels'.
- Turn on 'Chat history'. This keeps the chat history when transferring a case between agents.
- Select 'Joins automatically when invited'. This ensure that customers and agents can be added to the channels directly without having to accept the invitation.
Configure the settings for Salesforce Service Cloud
1. Login to your Salesforce account as an administrator.
2. Create a 'Sendbird__Setting__c' object.
- Click the ‘Setup’ icon in the top right and select ‘Developer Console’.

- In the Developer Console window, open 'Debug > Open Execute Anonymus Window' from the menu bar. Enter the following Apex code and click 'Execute'.
- Execute the following query in the Query Editor tab and make sure that the object is created with the name `SB-000`. If it has a different name, edit and save the object.

3. The Sendbird endpoint needs to be added as a Remote Site to call the Sendbird APIs from Salesforce.
- Open ‘Setup > Remote Site Settings’ and click ‘New Remote Site’
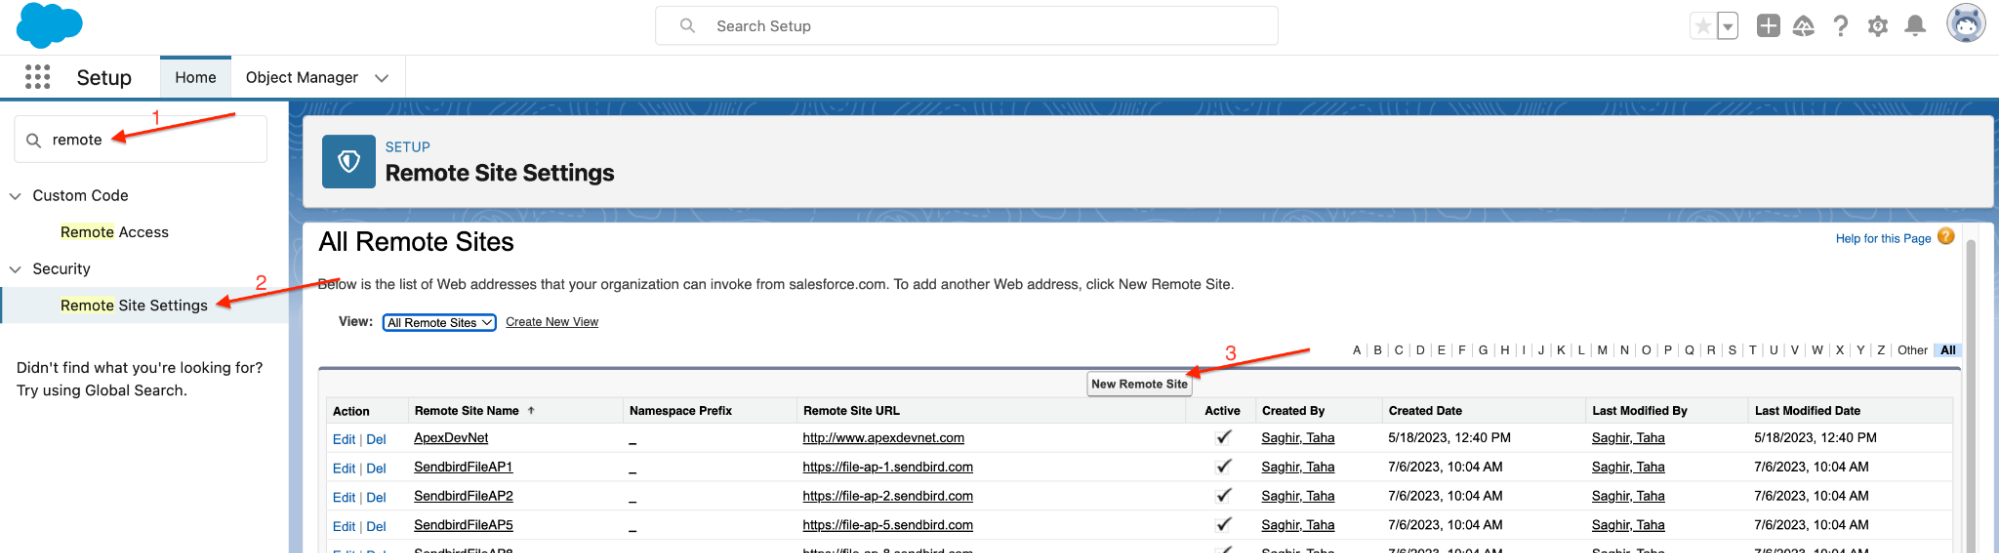
- Fill the Remote Site details as follows and click ‘Save’
- Remote Site Name: Sendbird
- Remote Site URL: https://api-[YOUR_SENDBIRD_APPLICATION_ID].sendbird.com
- Check ‘Active’
4. Sendbird Salesforce Connector leverages the Omni-Channel feature of Salesforce to add or remove the agents to the group channels as per the routing of cases.
- All of the configurations in this step will be performed under ‘Setup > Omni-Channel’

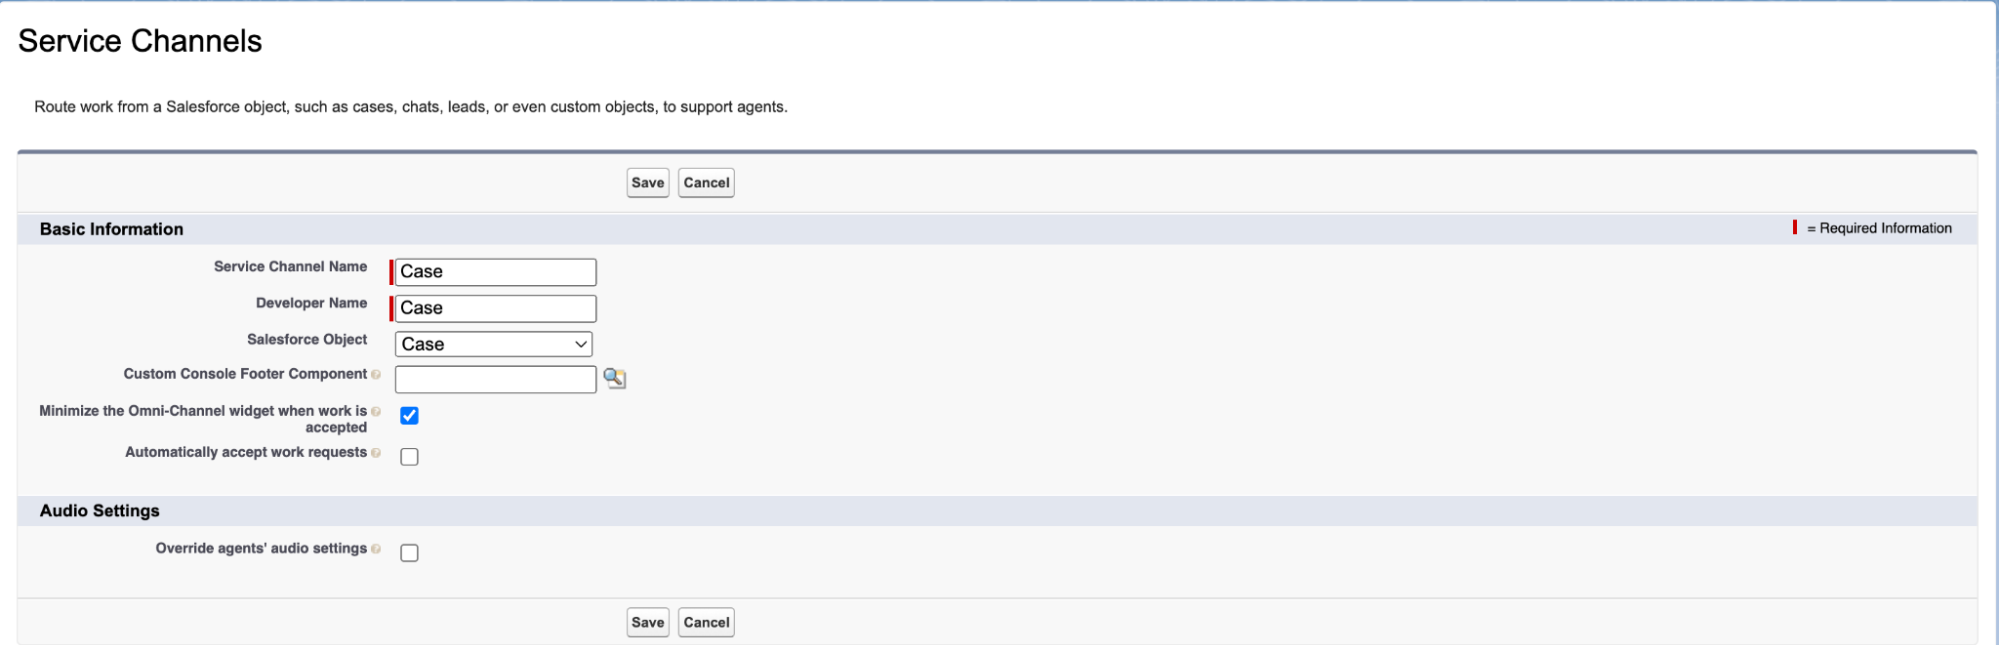
- Go to ‘Omni-Channel > Service Channels’ and click the ‘New’ button. Fill in the details as follows and save.
- Service Channel Name: Enter any value
- Developer Name: Enter any value
- Salesforce Object: Select ‘Case’
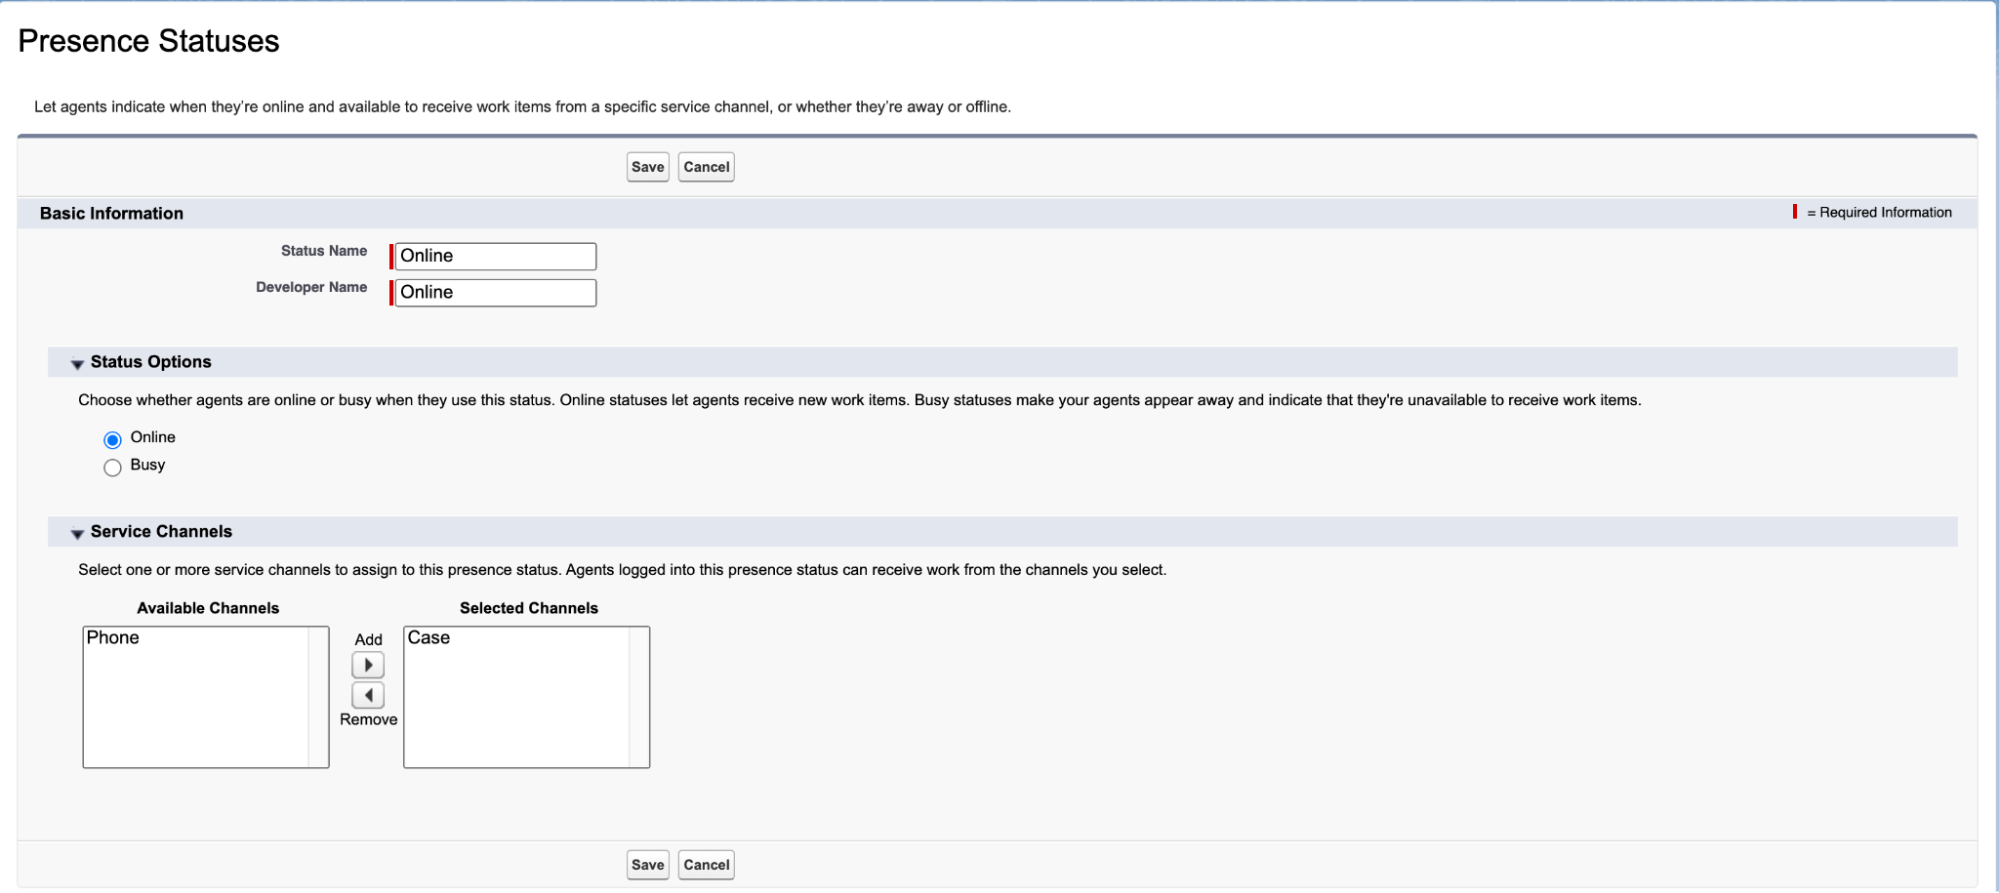
- Go to ‘Omni-Channel > Presence Statuses’ and click the ‘New’ button. Fill in the details as follows and save.
- Status Name: Enter any value
- Developer Name: Enter any value
- Status Options: Select ‘Online’
- Add the service channel created in the previous step
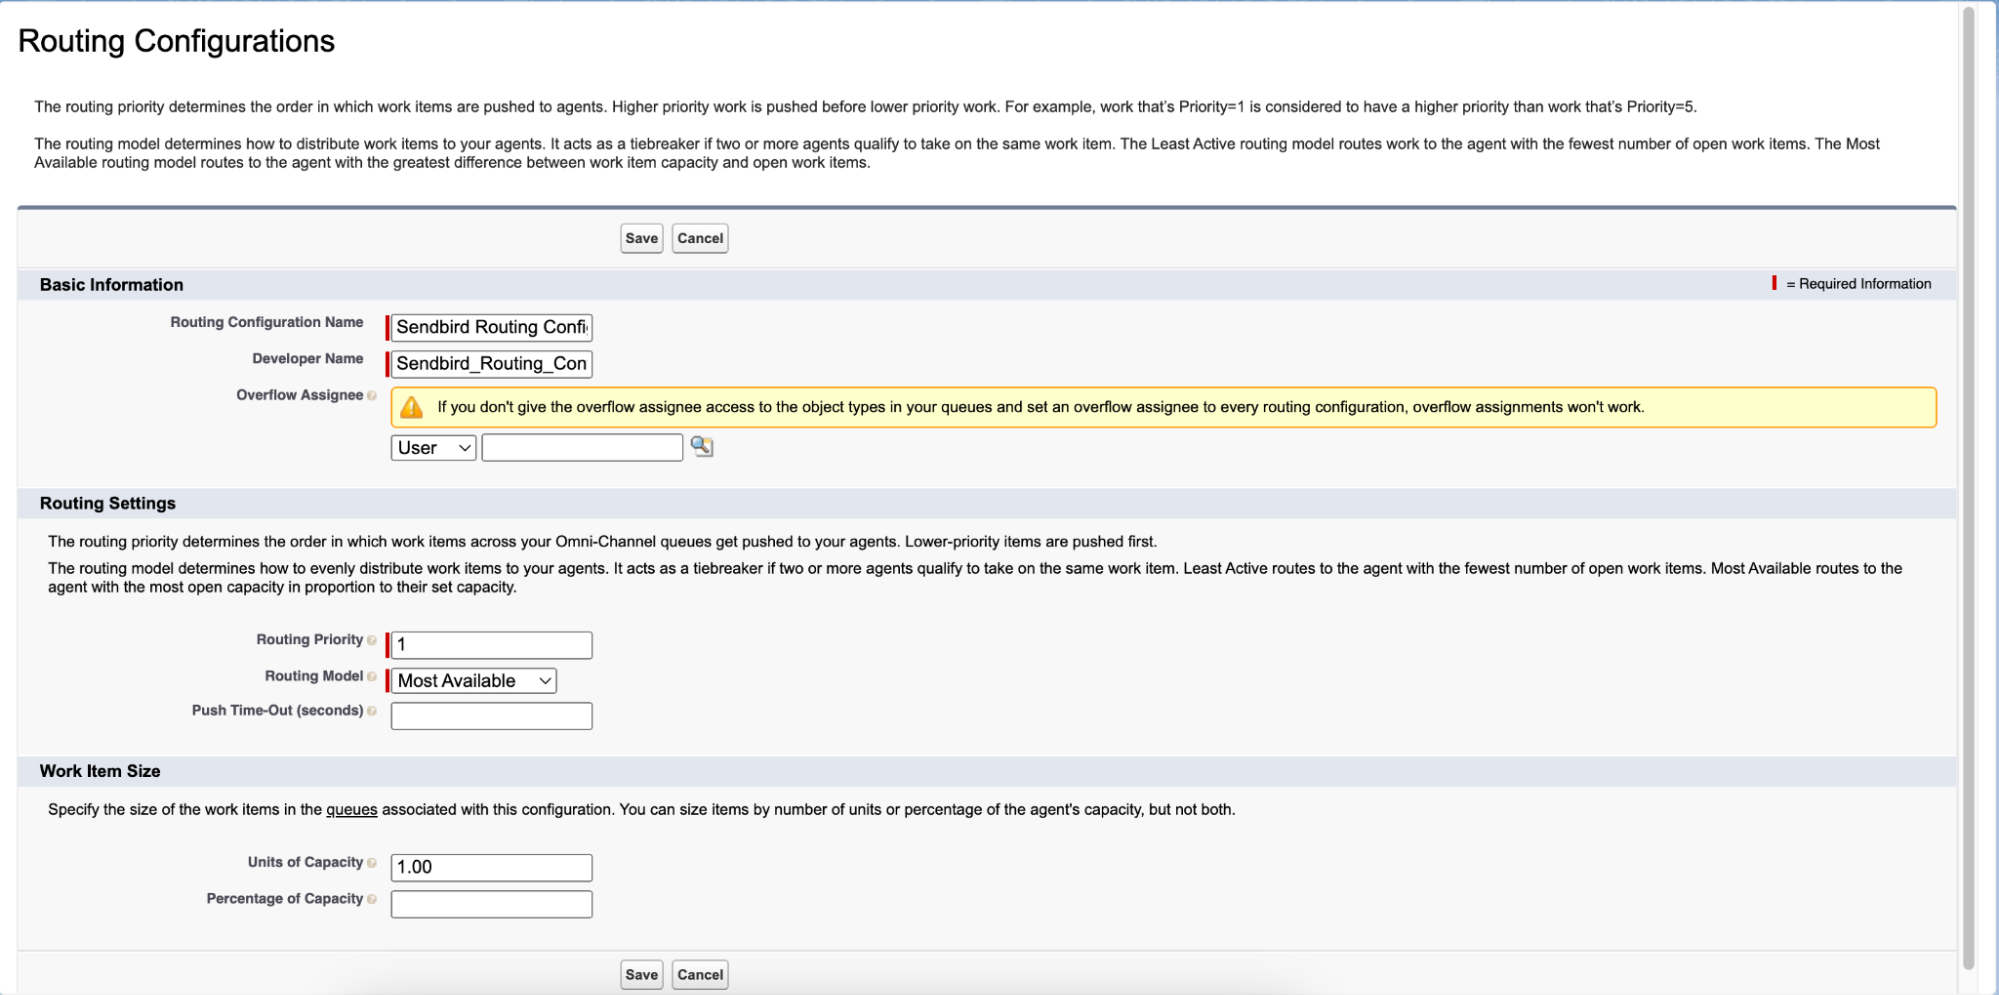
- Go to ‘Omni-Channel > Routing Configurations’ and click the ‘New’ button. Fill in the details as follows and save.
- Routing Configuration Name: Enter any value
- Developer Name: Enter any value
- Routing Priority: Enter any value (Refer to Salesforce guide for Routing Priority)
- Routing Model: Enter any value (Refer to Salesforce guide for Routing Model)
- Units of Capacity or Percentage of Capacity: Enter a value for either one
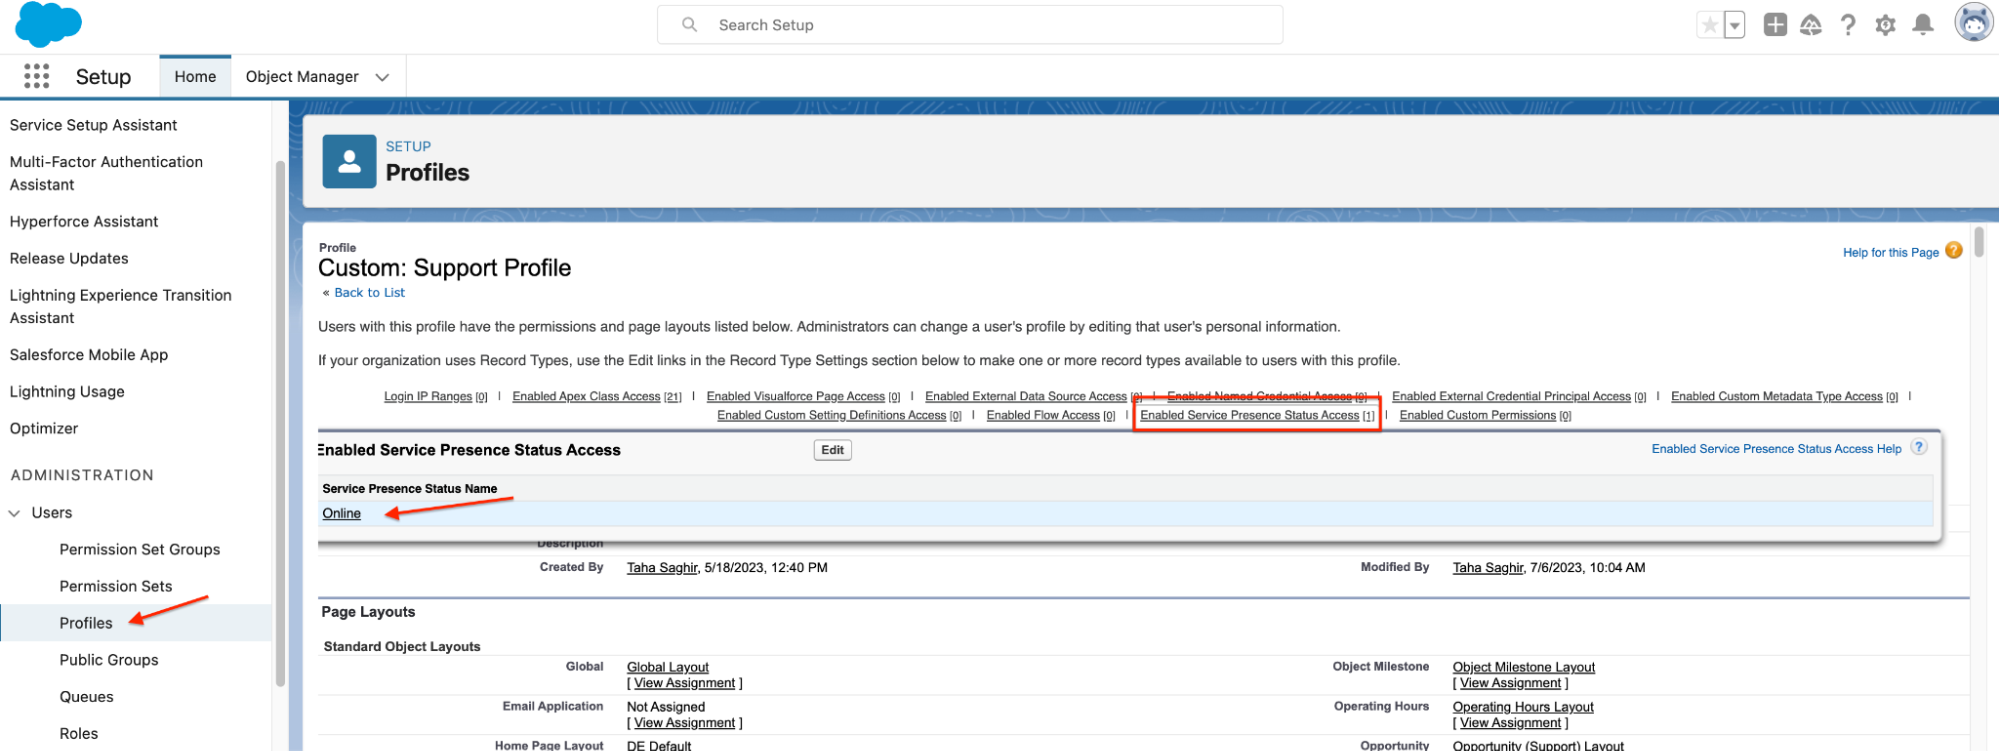
5. Perform the following steps to set up access to Omni-Channel.
Go to ‘Setup > Users > Profiles’.
Select the profile that will be using the Omni-Channel feature (e.g. Support Profile).
Scroll down to the ‘Enabled Service Presence Status Access’ section and add the presence status created in the previous section.
You can repeat this step for multiple profiles based on the requirements.
6. Perform the following steps to create Queue and Assignment Rules to assign cases to agents.
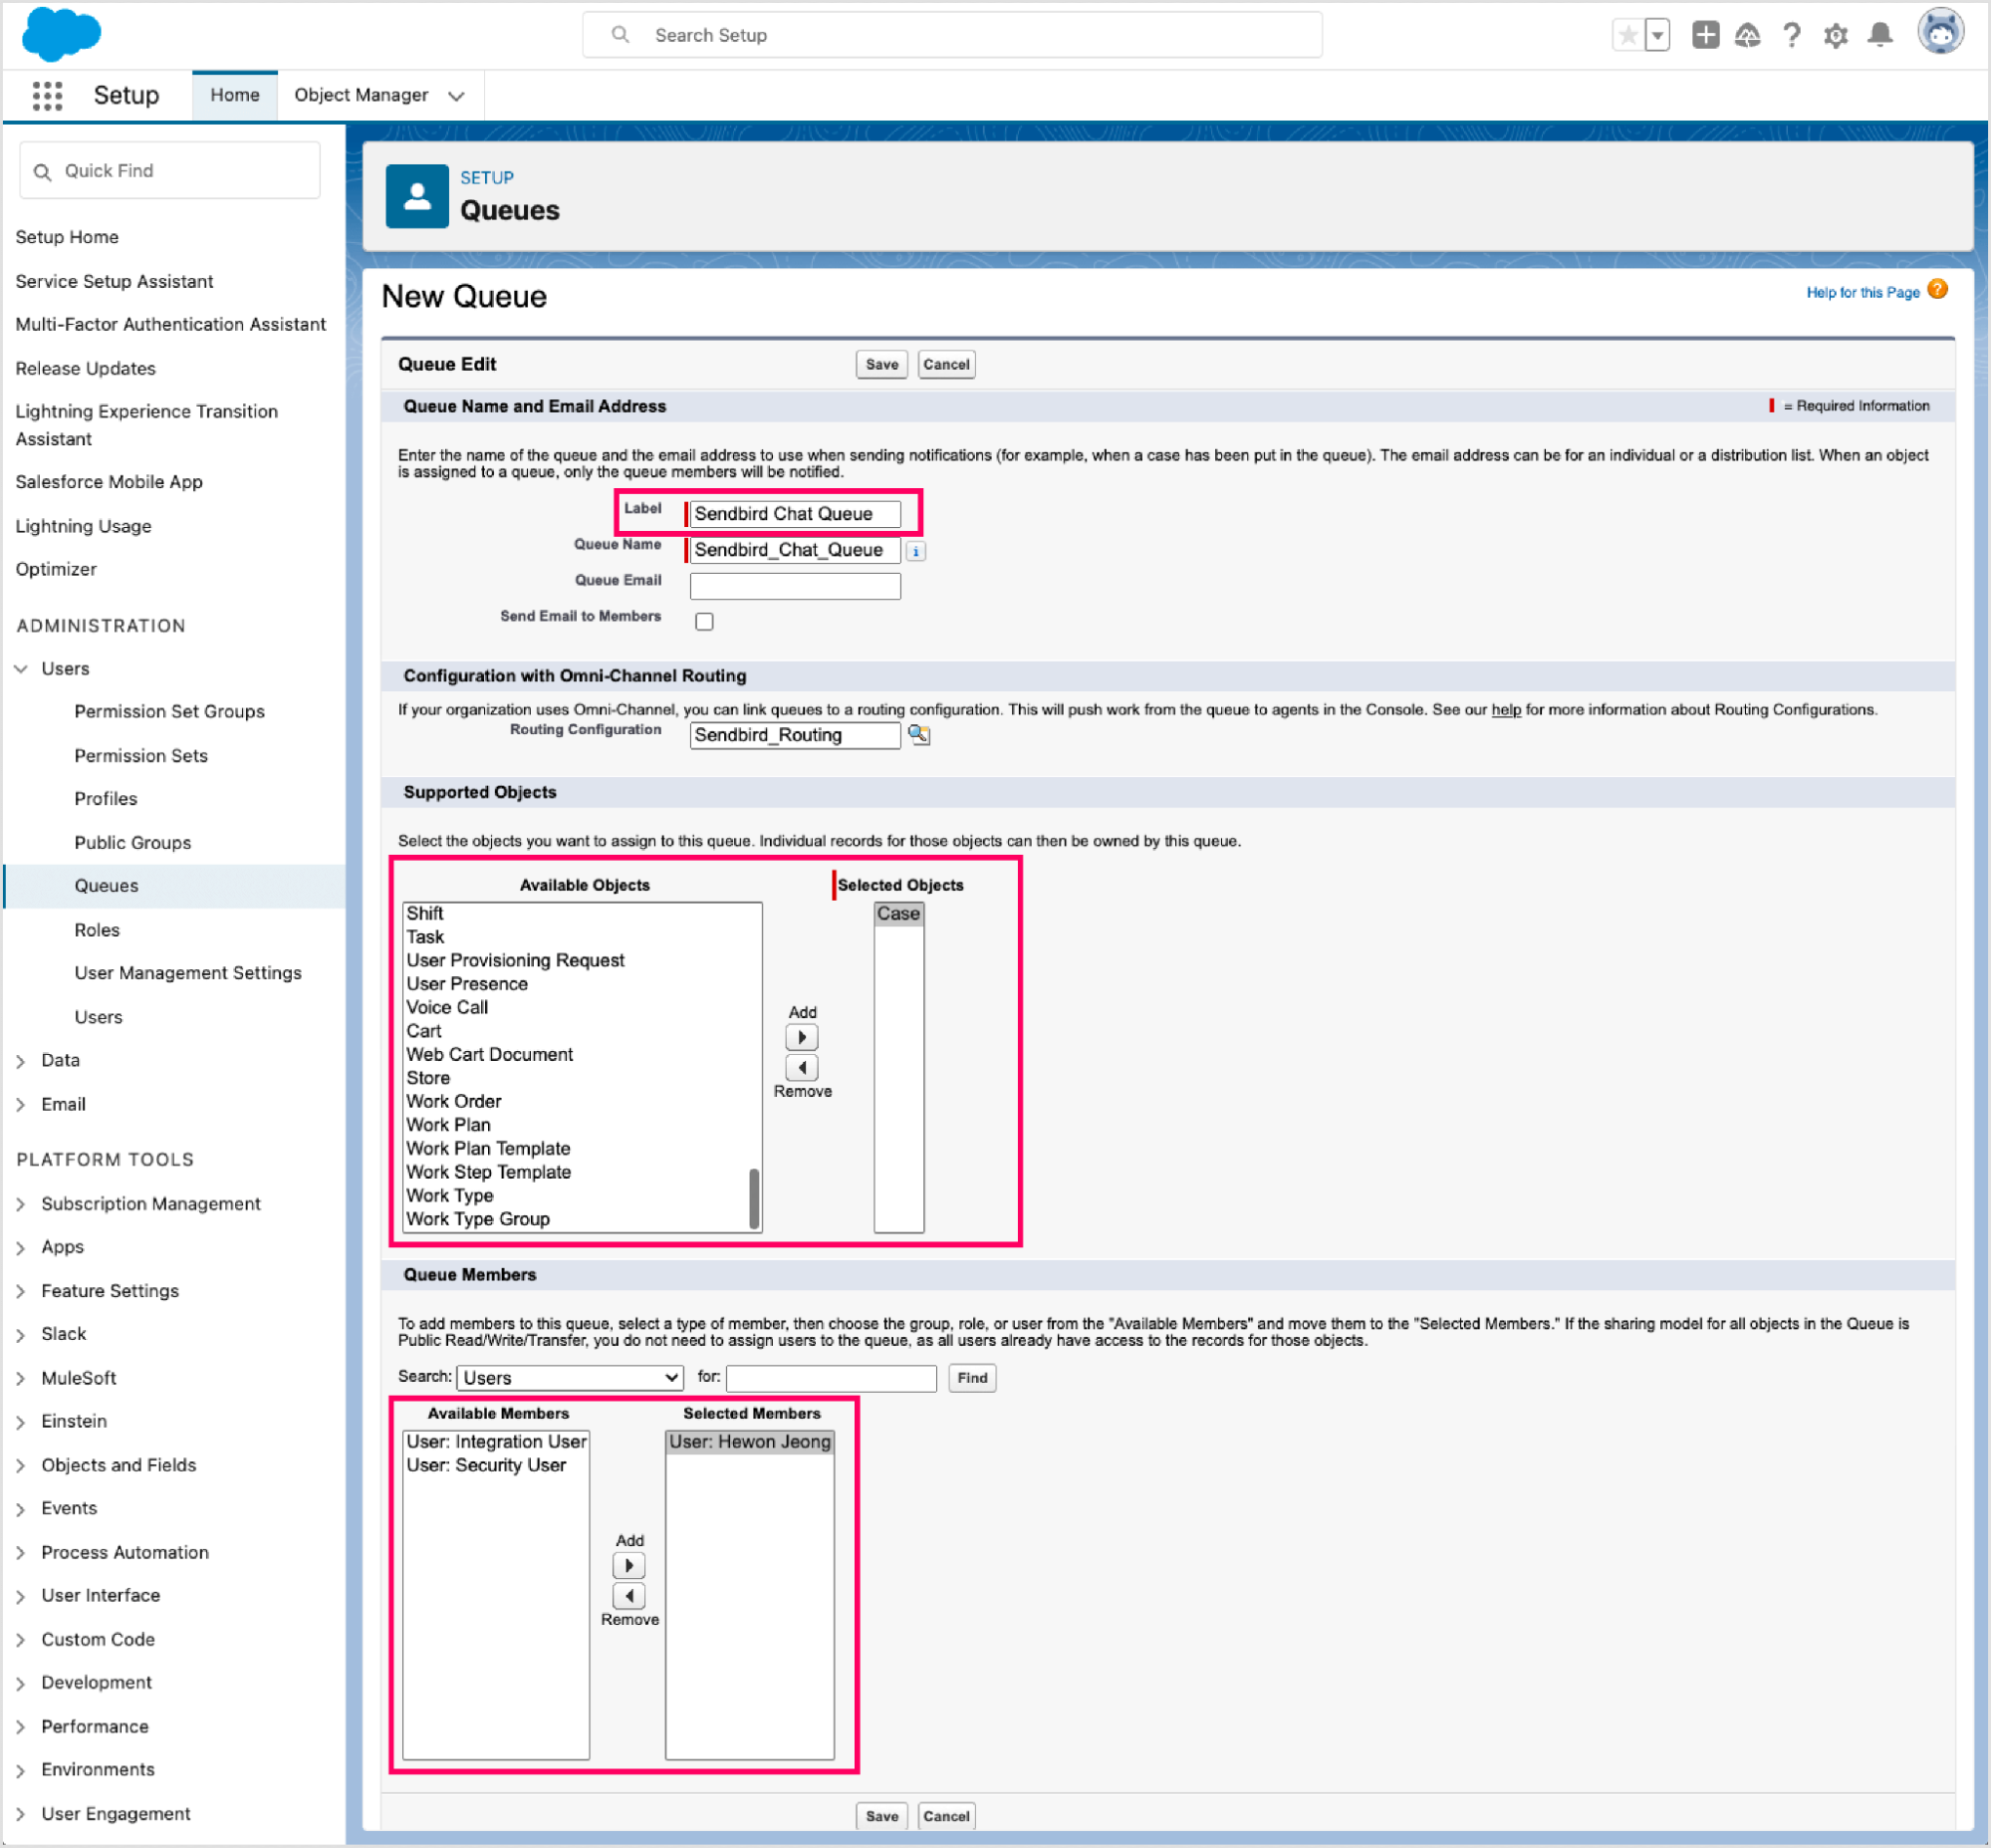
Go to ‘Setup > Users > Queues’ and click the ‘New’ button.
- Fill in the details as follows and click ‘Save’.
- Label: Sendbird Chat Queue
- Queue Name: Auto-generated
- Routing Configuration: Select the Routing Rule created in the earlier step
- Supported Objects: Add ‘Case’ to Selected Objects
- Queue Members: Add members to Selected Members so that they can be assigned to the cases through this queue.
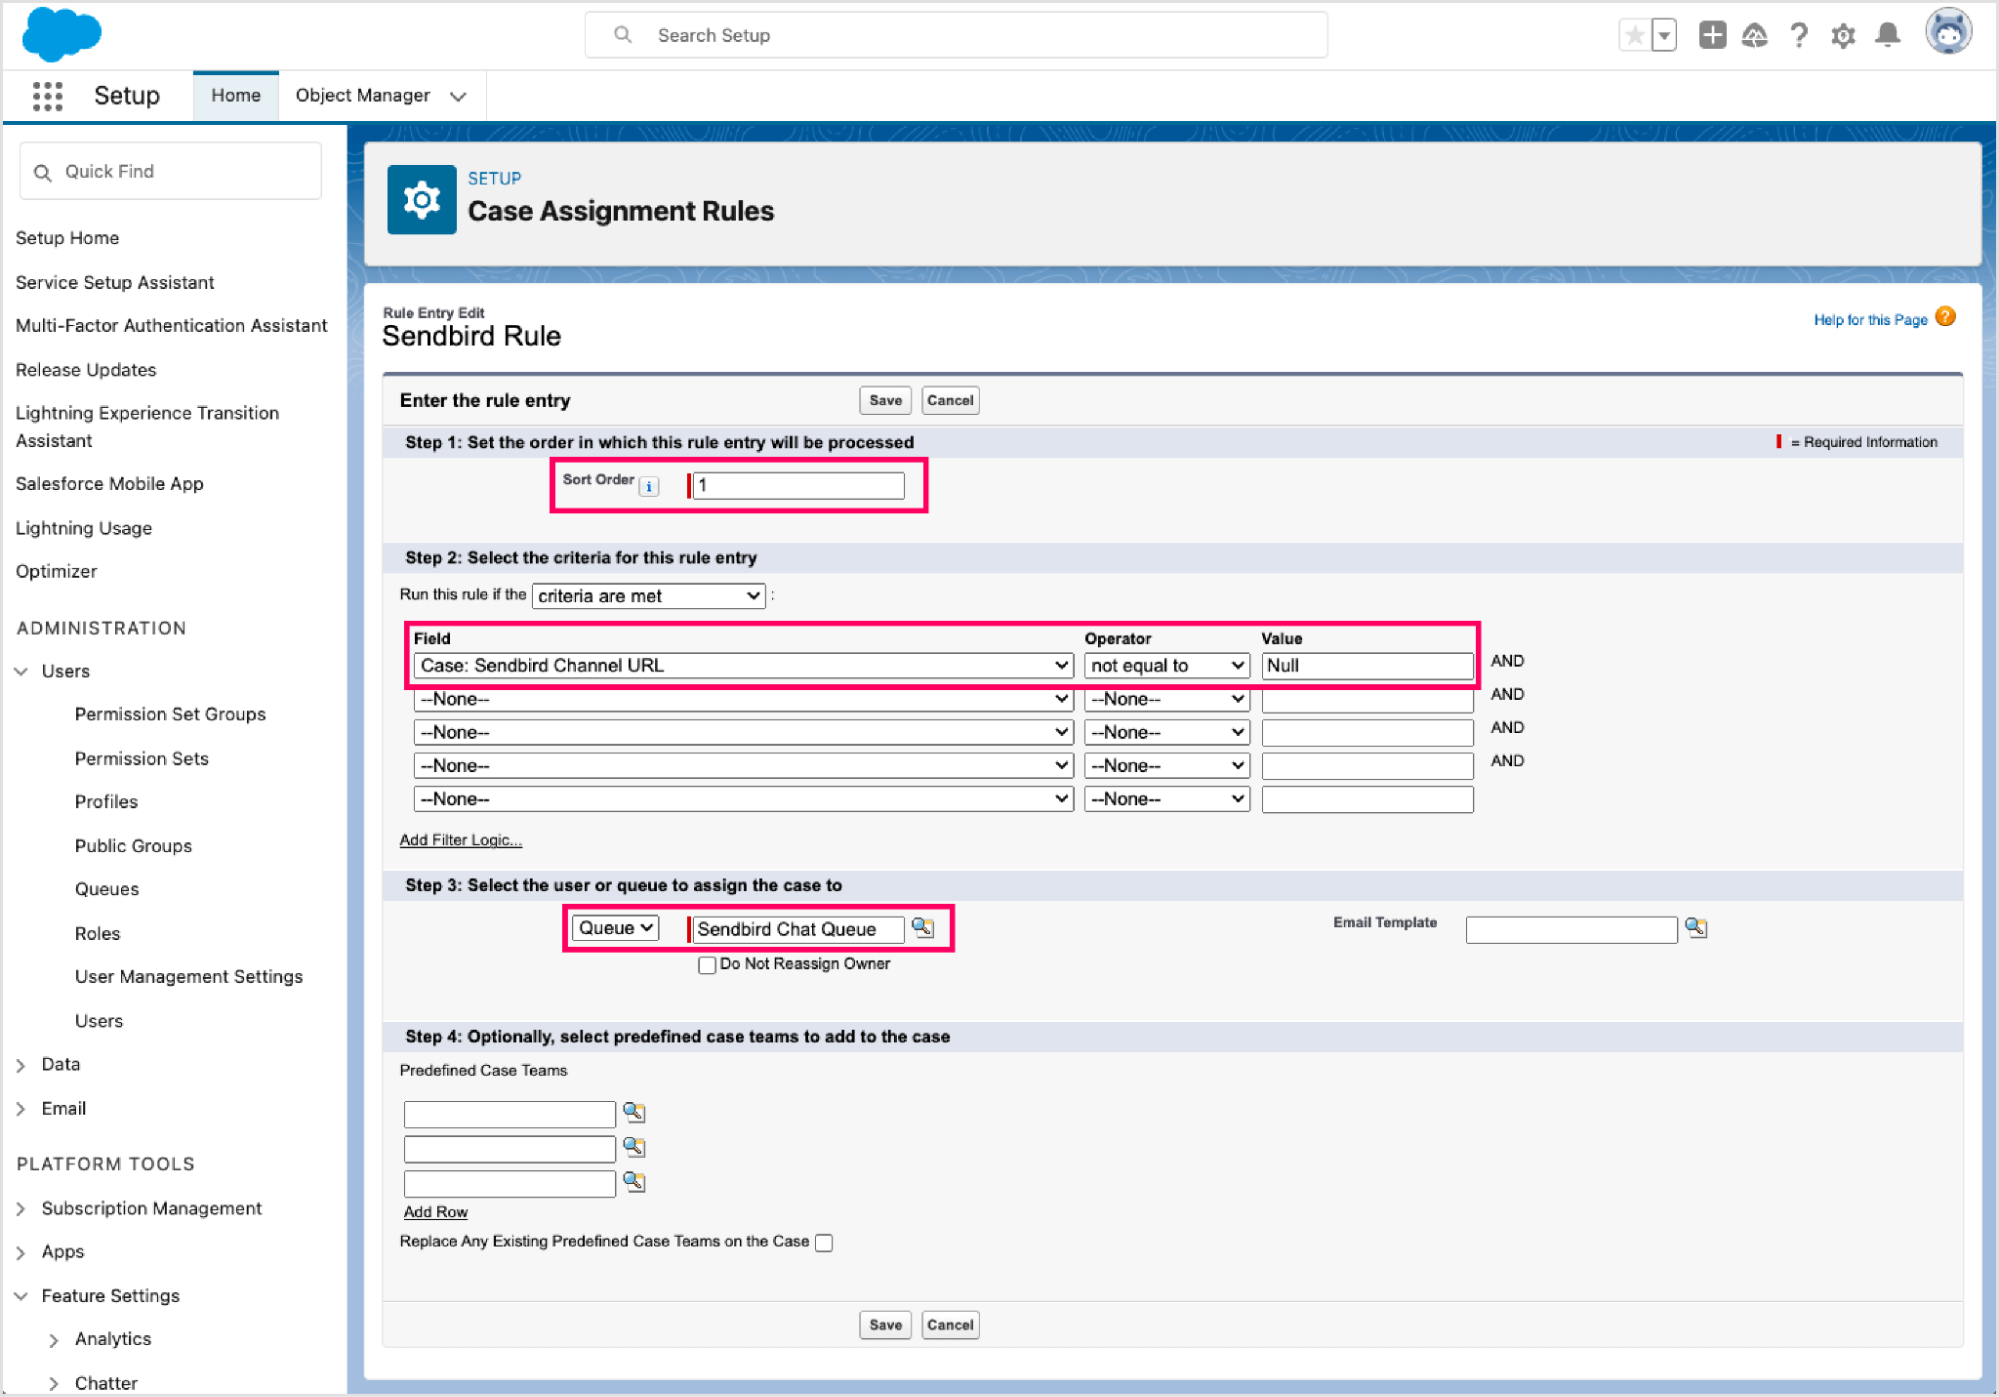
Go to ‘Setup > Feature Settings > Service > Case Assignment Rules’ and click the ‘New’ button.
Enter a name for the new assignment rule (e.g. Sendbird), check ‘Active’, and save.
Open the rule that you just created and click ‘New’ in the Rule Entries table.
Fill the details as follows and save.
Step 1: Sort Order: 1
Step 2: Make sure Run this rule if the ‘criteria are met’ is selected
Step 3: Add the criteria:
Field: ‘Case: Sendbird Channel URL’
Operator: not equal to
Value: NullStep 4: Make these selections:
Select ‘Queue’
Search and select ‘Sendbird Chat Queue’
Add Sendbird Chat UI components to cases
The Salesforce Connector provides two types of user interfaces: A utility widget UI and a case-embedded UI. Let’s talk about how to add these.
Utility widget UI
1. Go to ‘Setup > Apps > App Manager’
2. Locate Service Console in the list and click ‘Edit’ from the dropdown menu
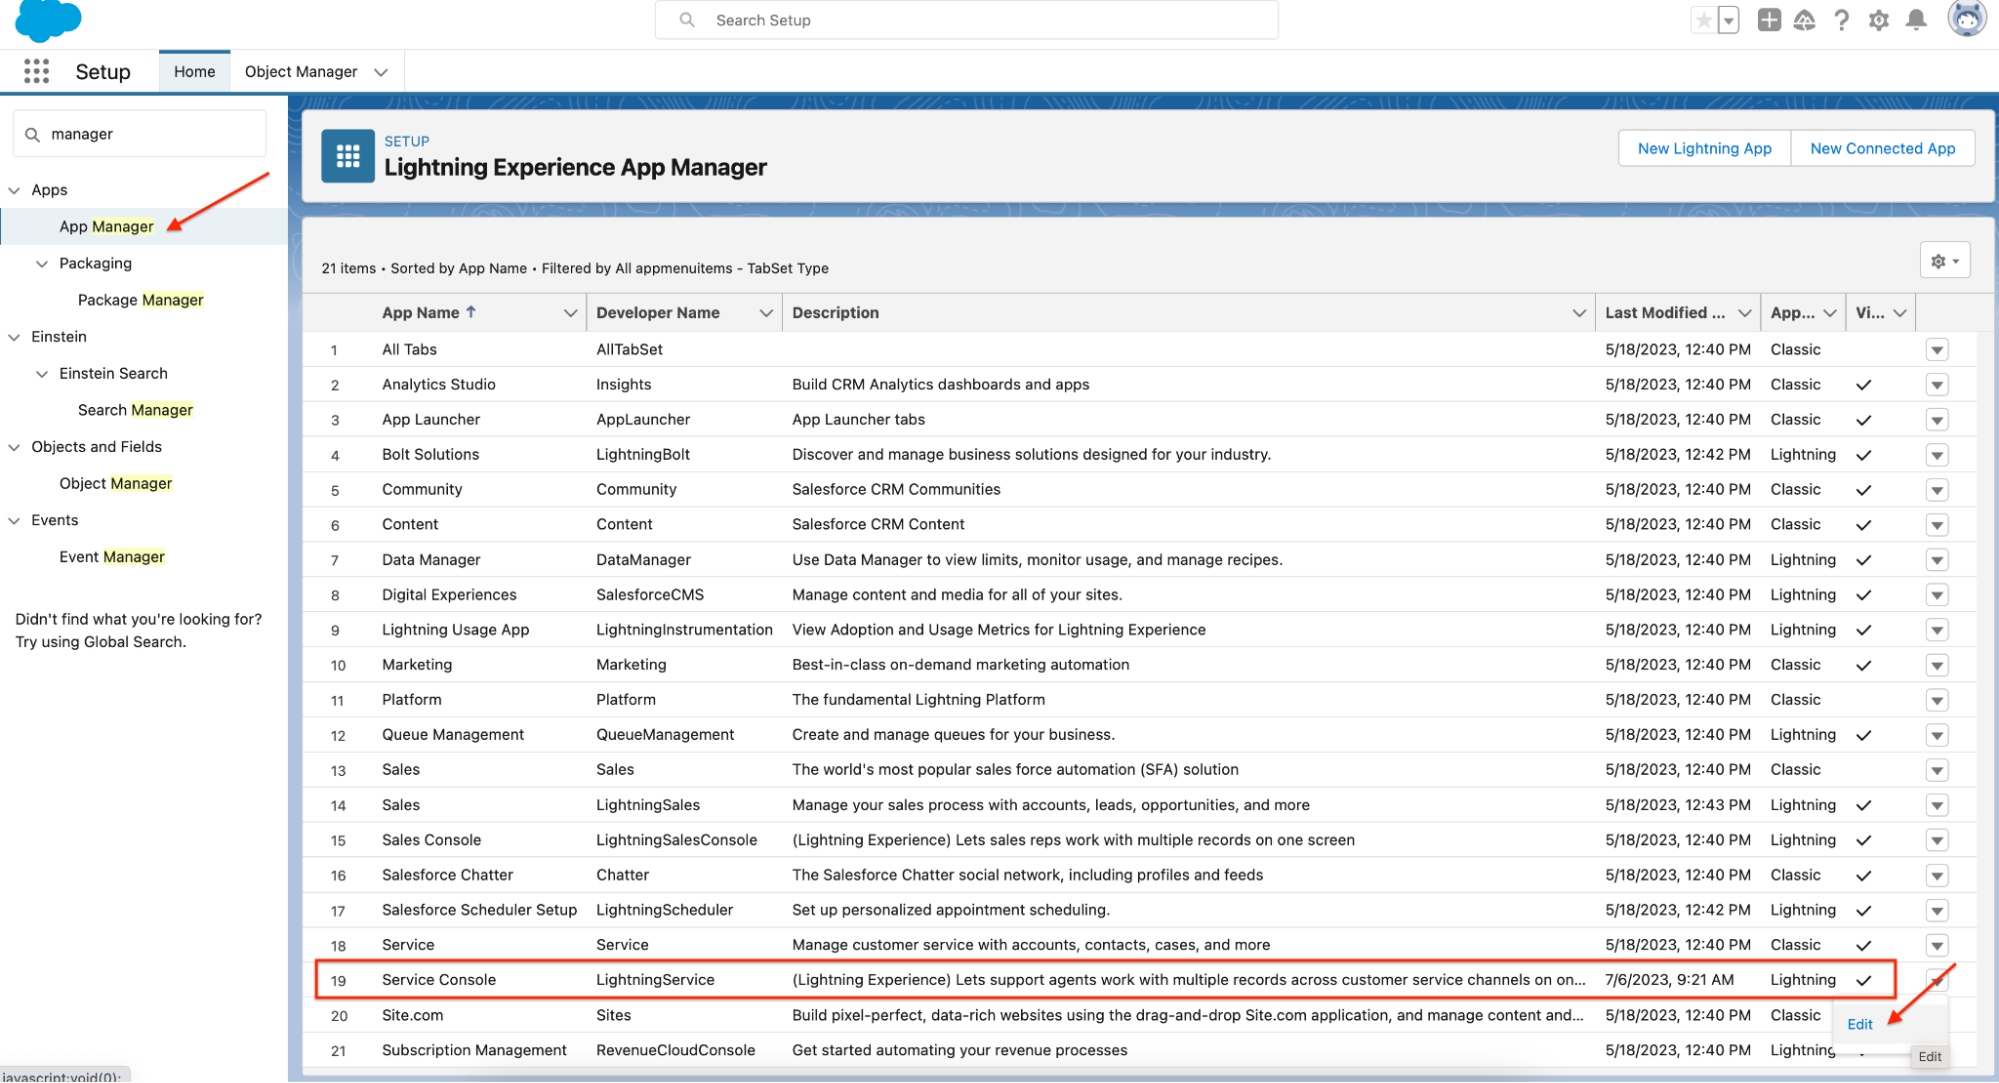
3. Go to ‘Utility Items (Desktop Only)’ from the left menu and click ‘Add Utility Item’.
4. Search and select ‘Sendbird Support Chat’. Move it up and down the items list as required.
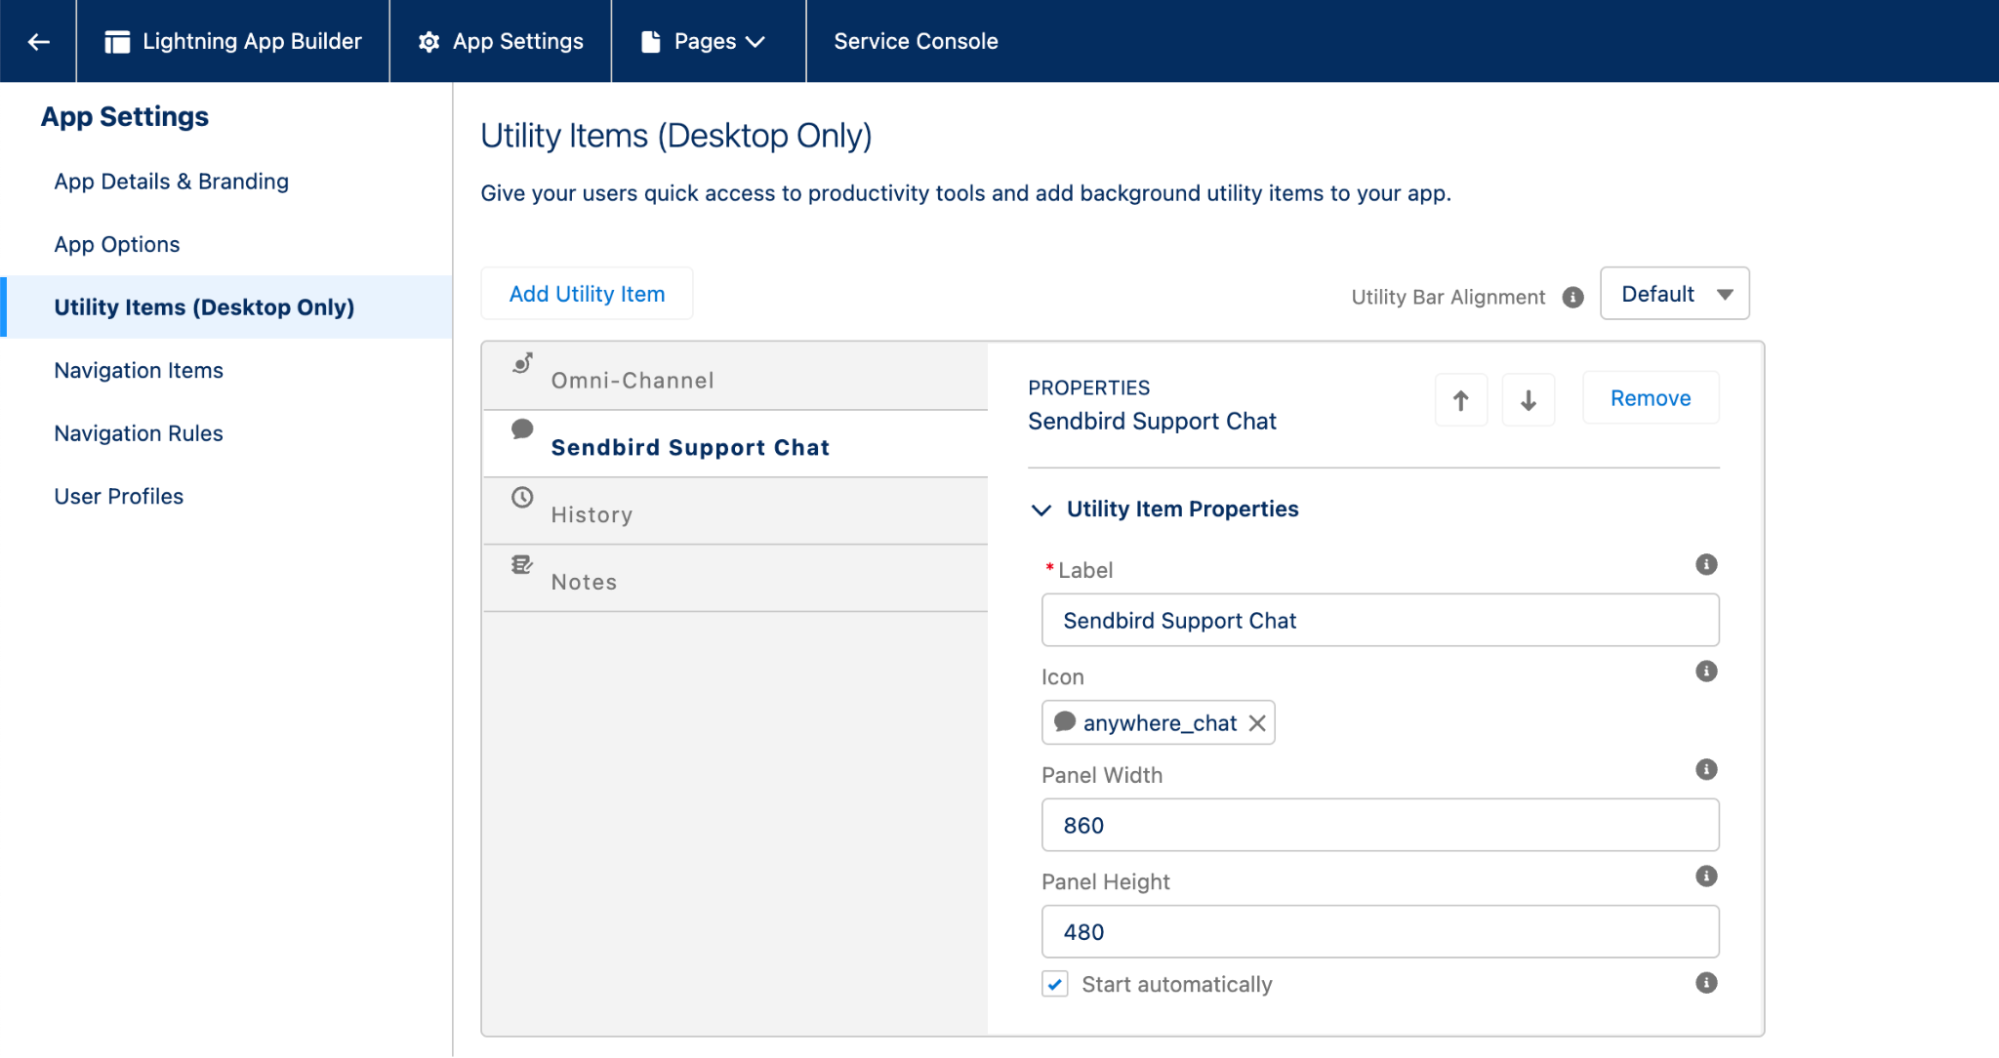
5. Enter the following details in the Utility Item Properties and click ‘Save’.
Icon: anywhere_chat
Panel Width: Enter any value; recommended: ‘860’
Panel Height: Enter any value; recommended: ‘480’
Select the ‘Start automatically’ checkbox
Case-embedded UI
Note: You need at least one Case available to insert the case-embedded UI component to as the view.
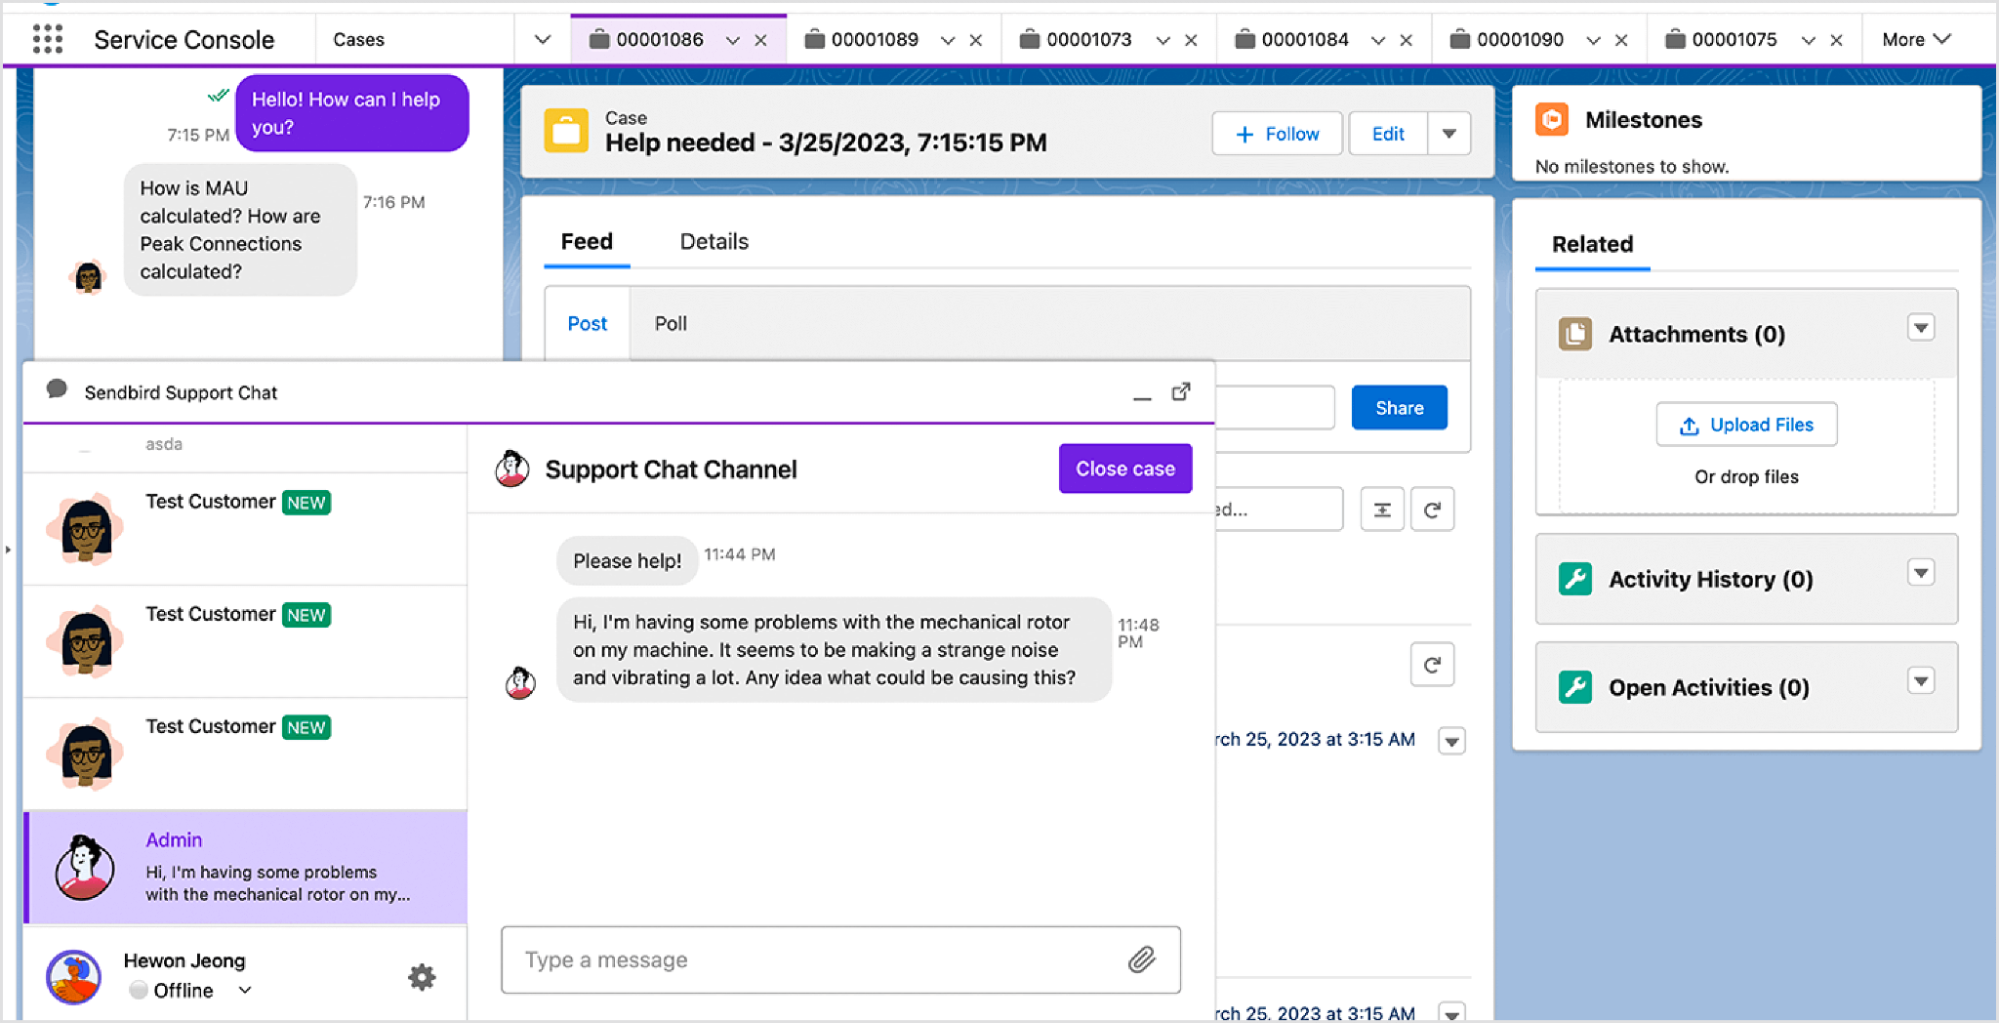
1. Go to the Service Console and open any case.
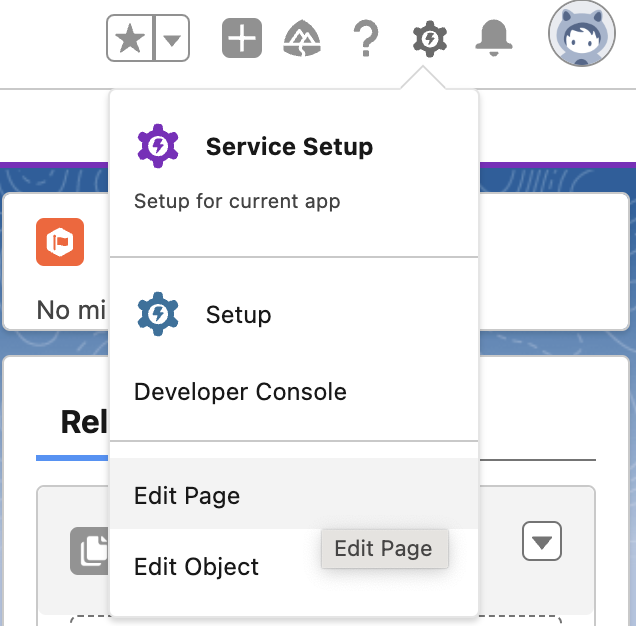
2. Click the ‘Setup’ icon in the top-right and select ‘Edit Page’.
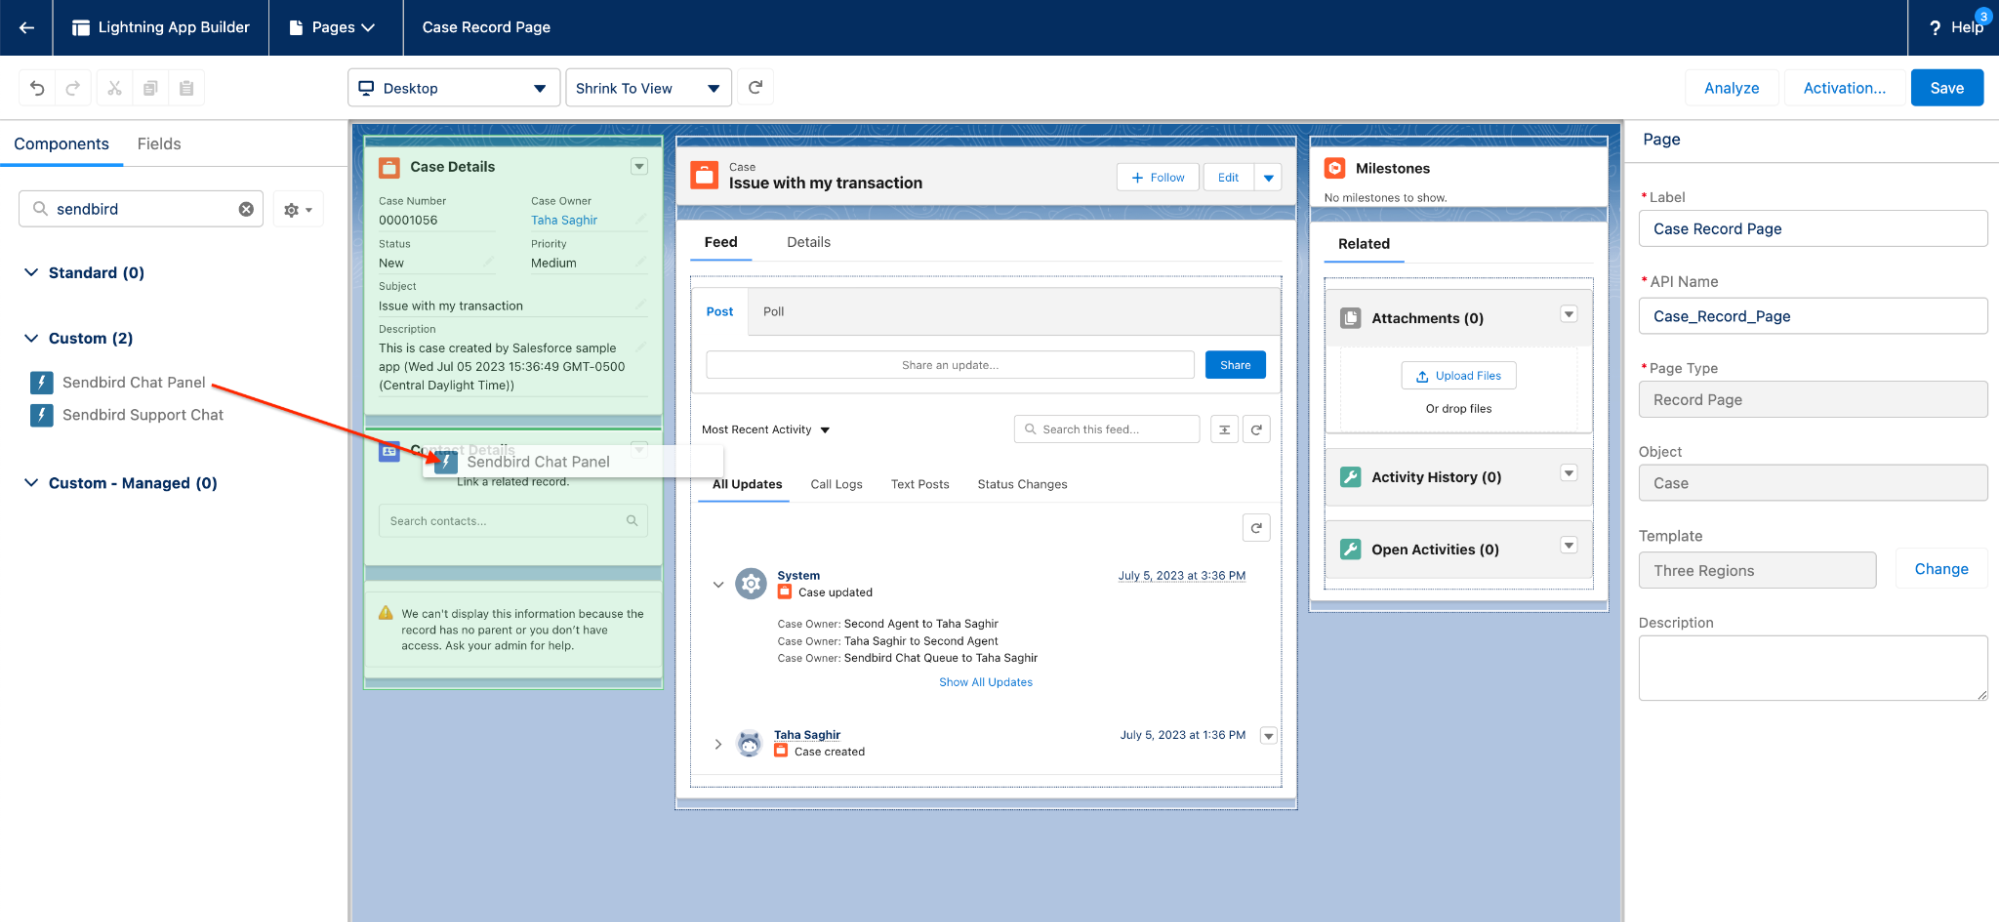
3. Type ‘Sendbird Chat panel’ in the search bar in the left menu bar.
4. Drag and drop the ‘Sendbird Chat panel’ to the case view and adjust the position as desired.
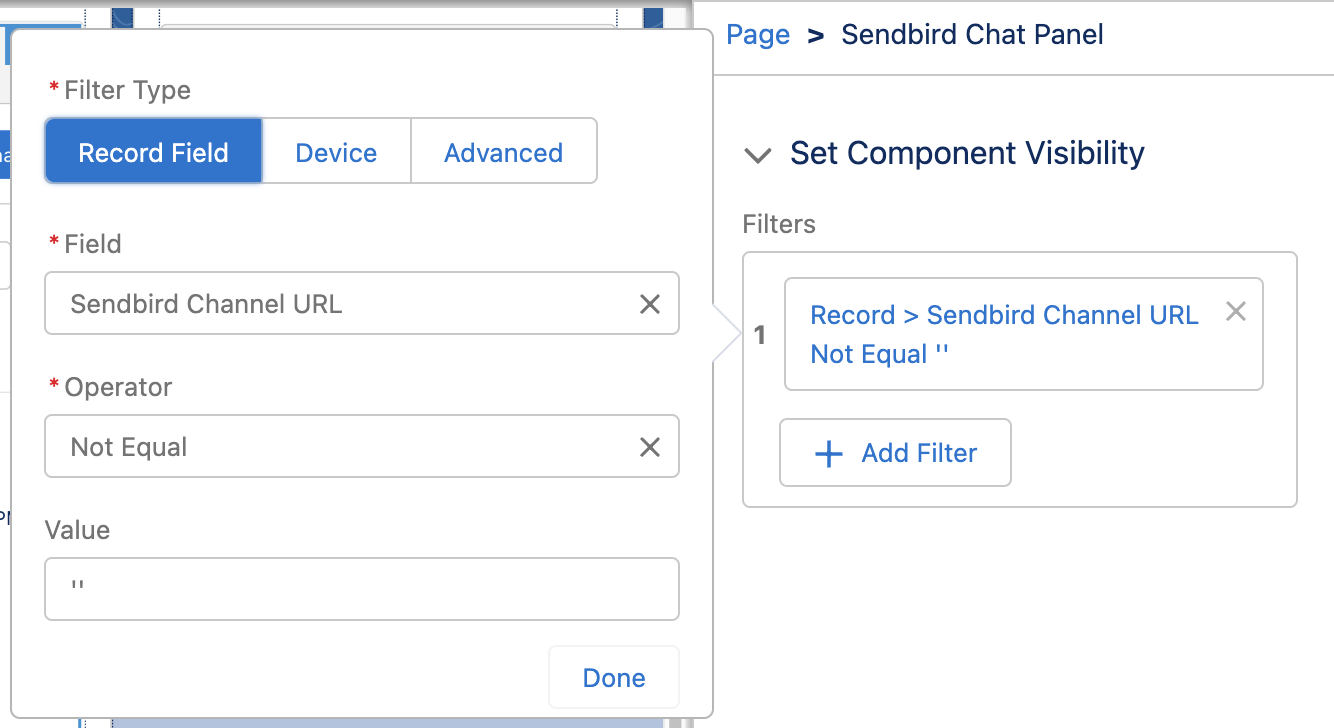
5. If you see an error in the Sendbird Chat panel, that is expected as a group channel isn’t linked to the case. You can add a visibility filter to hide the error.
Select the Sendbird Chat panel that is added to the UI and click on ‘Add Filter’ from the right bar.
Add the filter details as follows:
Field: Sendbird Channel URL
Operator: Not Equal
Value: ‘’
6. Click on ‘Activation’ button in the top right to apply the changes to all the cases.
7. In the Activation popup, go to ‘APP DEFAULT’ tab, and click on ‘Assign as App Default’.
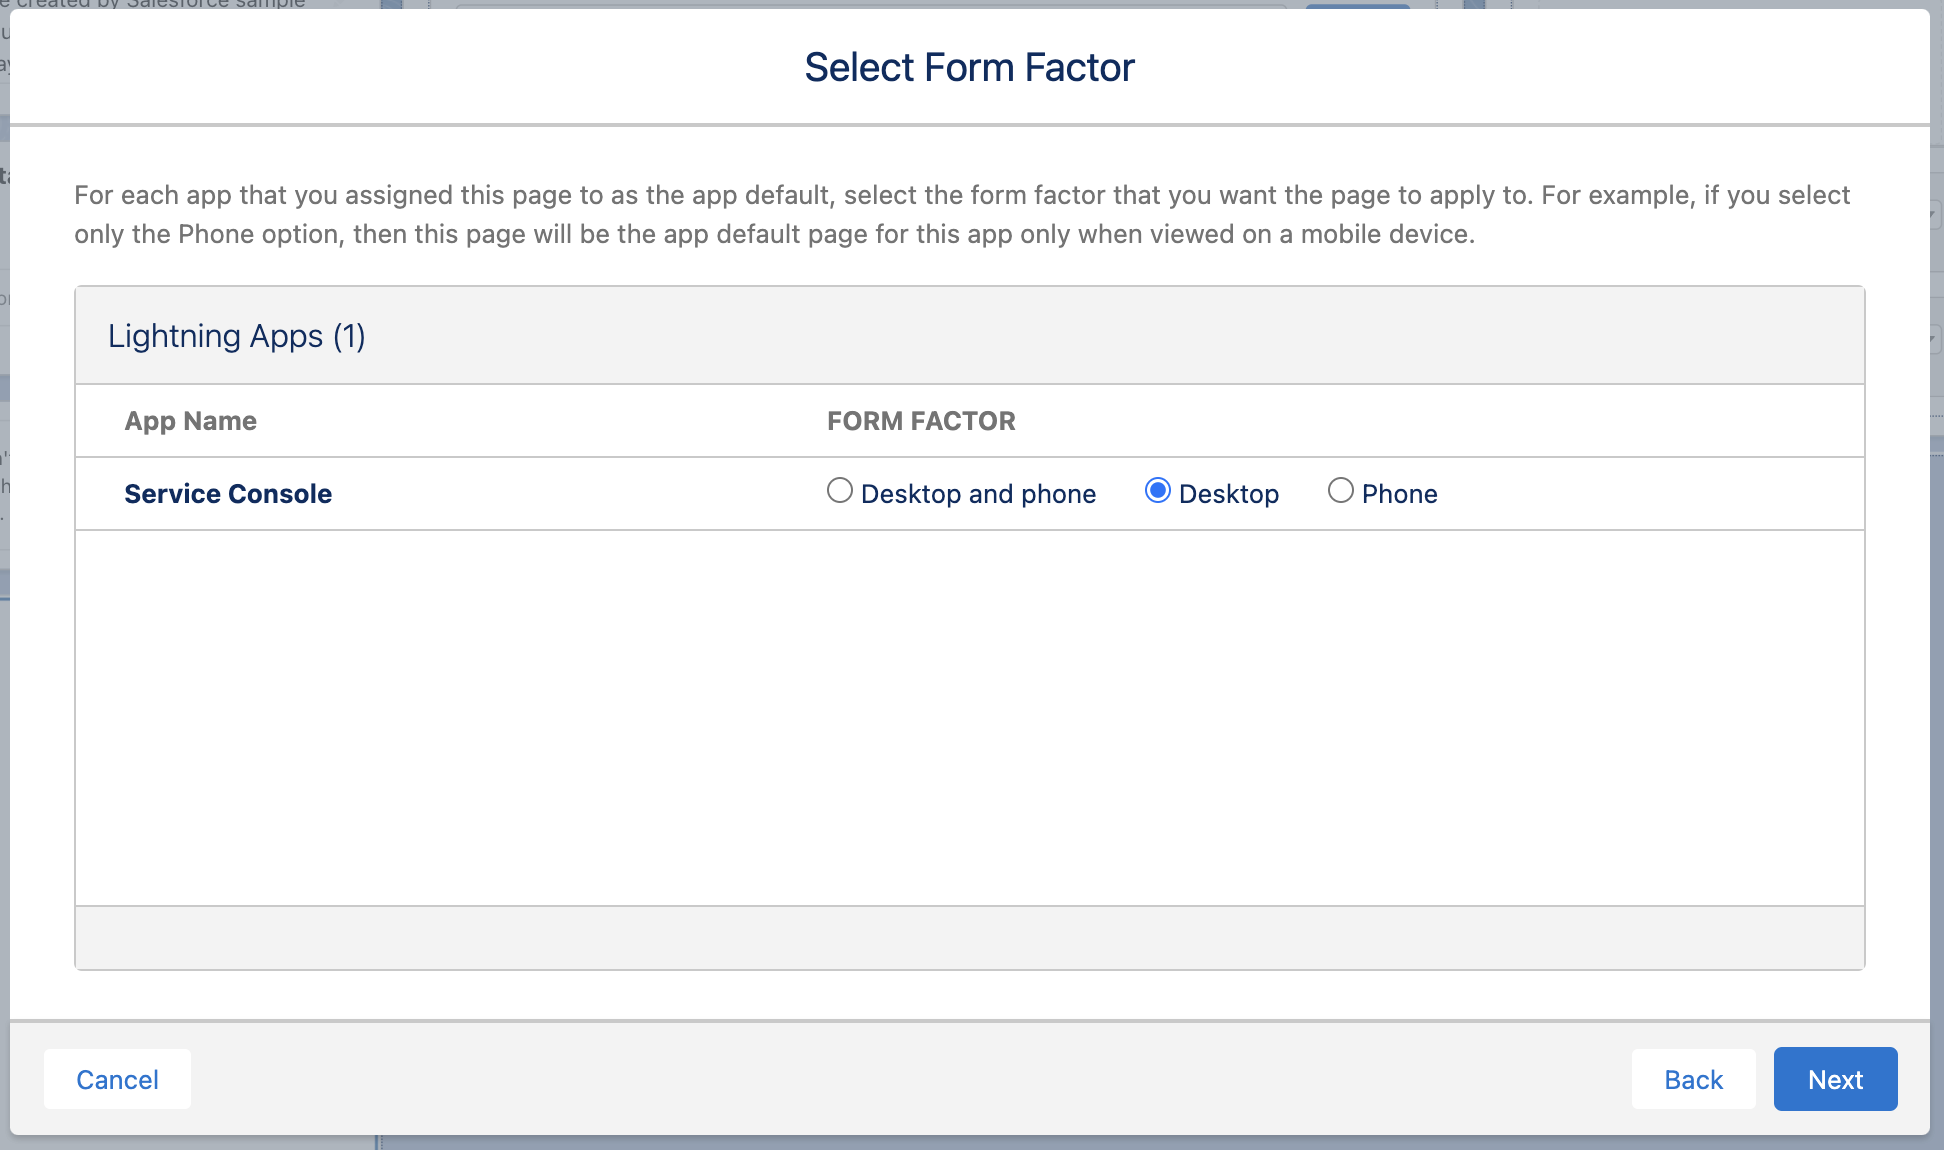
8. Select ‘Service Console’ from the apps list and click ‘Next’.
9. On the next screen, select ‘Desktop’ as the form factor, click ‘Next’ and ‘Save.
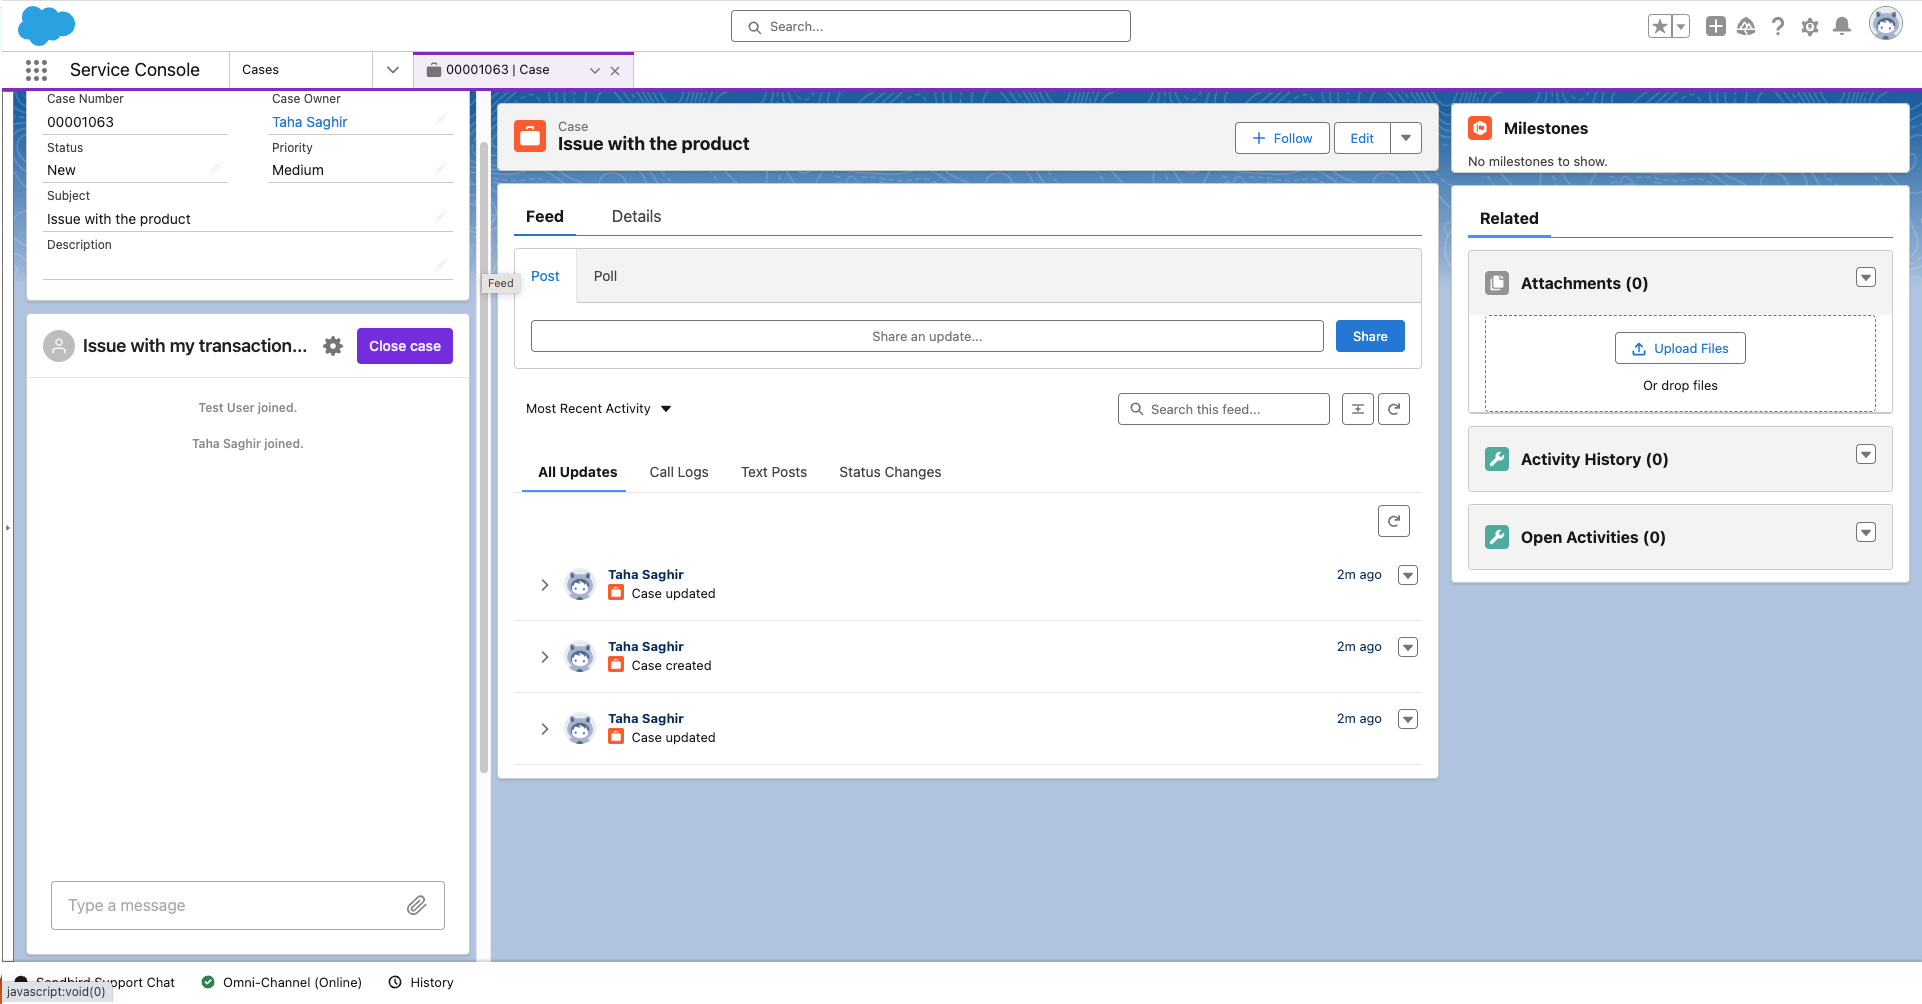
10. When the changes are saved, go back to the Case view to test the chat UI.
Troubleshooting common issues during setup of the Salesforce Connector
Here are some common problems you may face while setting up your integrated customer support tool and ways to resolve them. If you need additional help, please see the docs or contact us.
1. The 'No channelURL' error in the Sendbird Chat panel or the Sendbird Chat panel component is not visible.
This can happen when the Channel URL (SendbirdChannelURL__c) is not populated on the case. You can validate it by adding the channel URL to the case view for debugging purposes. Go to ‘Setup > Object Manager > Case > Case Page Layouts’ and select the the layout you are using in your custom service app. Add the Sendbird Channel URL and Sendbird User ID by dragging and dropping.
Refer to step 5 in the case-embedded UI section to hide the error.
2. The agent can see the Sendbird Chat panel but the chat box is not visible to type the messages.
This can happen for the following reasons:
A different agent user is added to the channel than the one currently logged in.
The agent hasn’t accepted the work request in the omnichannel queue.
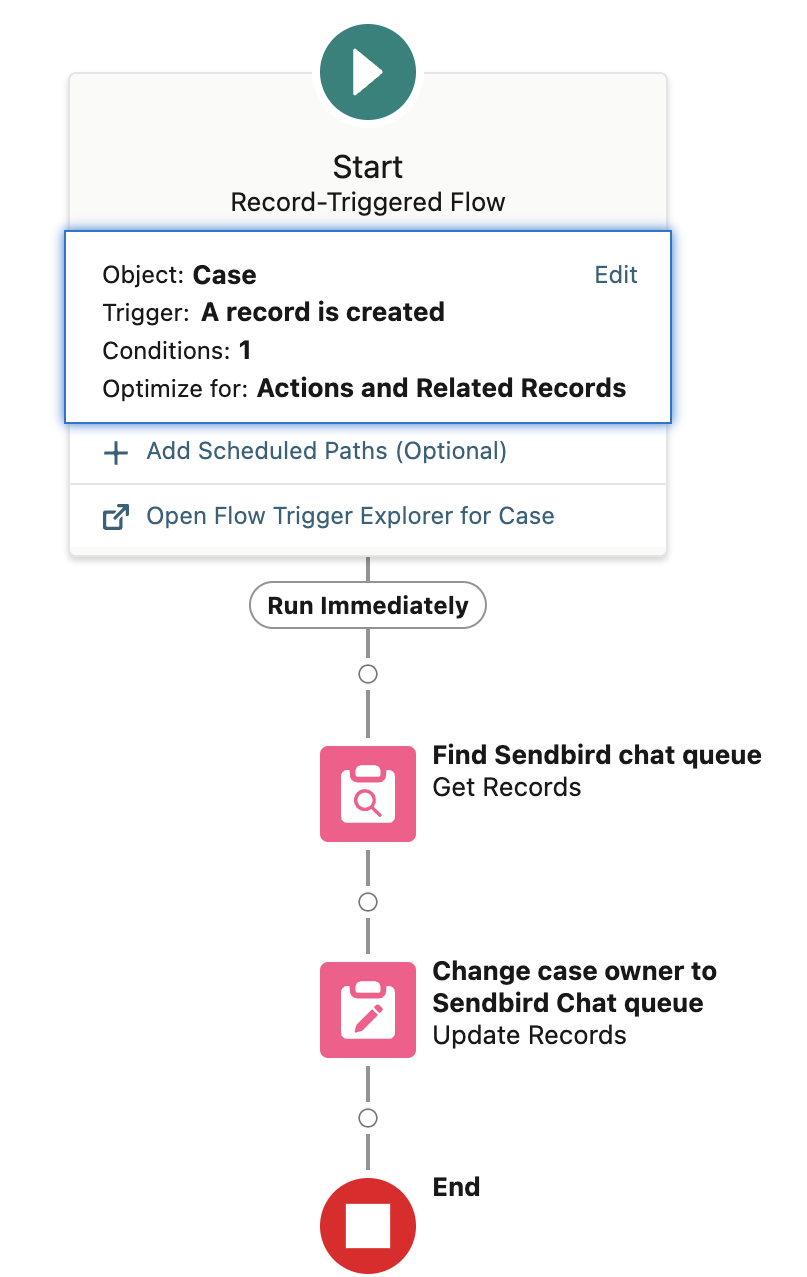
3. The case assignment rule is not working and the cases aren’t getting assigned to the Sendbird Chat queue.
This can happen as the assignment rule isn’t applied automatically when the cases are created. It can be handled in one of the following ways:
Specifying the assignment rule ID when the case is created programmatically.
Creating a process automation flow that assigns cases containing the Sendbird channel URL to Sendbird chat queue.
Set up an integrated customer support tool to maximize agent productivity and customer satisfaction with the Salesforce Connector
Congratulations! You can now take customer support to the next level with a state-of-the-art customer support tool. You now know how to integrate Sendbird Chat with the Salesforce Connector to maximize agent productivity and boost customer satisfaction. In this tutorial, we looked at the high-level architecture of the Salesforce Connector implementation, and learned how to install the Salesforce Connector package in the Salesforce instance. We also looked at required configurations to get the chat UI up and running in the Service Cloud. We highly recommend using our demo app to test the chat UI in the Service Console.
Now you need to implement Sendbird Chat in the client apps as described in the high-level architecture to enable customers to chat with agents. Please take a look at our chat tutorials on the dev portal to understand how to do this for iOS, Android, and the web! If you need help, please visit the Sendbird Community, where you can start or contribute to discussions about all things Sendbird! If you’d rather speak to us, please contact us! Our experts are happy to help.
Happy Salesforce integration building! 💻


